1⁄35Building Formations M5A1 Stuart
Suspension
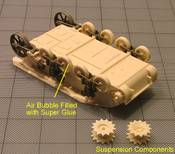
You will have to slightly drill out holes on the Lower Hull to locate the AFV Club Bogies. The holes need not penetrate through the hull sides, however. Twist a 2mm drill bit between your fingers to open up these holes for better control. Build up the AFV Club Bogies per the Instruction Sheet. These parts are easy to cleanup and nicely detailed. Assembly proceeds quickly.Select the type of Road Wheels for your M5A1 Stuart at this point. Early and Standard Production examples used the open spoke wheels provided in the AFV Club kit – and you can assemble the Bogies as instructed. Later Production M5A1 Stuarts were equipped with the dished Road Wheels. Between what’s given in the AFV Club and Formations Models kits, the modeler has a wide range of M5A1 Stuart examples to render – from Stateside US use, to the Pacific, to the ETO.
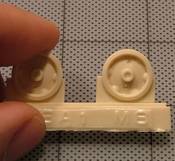
Cleaning up the resin Formations Models Road Wheels went uneventful, save for a couple of air bubbles underneath the pour gate once removed. Super glue and accelerator filled these satisfactorily. The Formations Models Road Wheels do require drilling out with a 1/16-inch drill bit to slip over the AFV Club Bogie axles. Let the Bogie assemblies dry overnight before attaching them to the Formations Models Lower Hull.
The AFV Club Idler Wheels and Arms are mated to the Formations nicely detailed Idler Bracket – the plastic portions left to set overnight along with the Bogies before adding them to the resin parts. As with the Bogie Trucks, the Idlers combine Formations Models and AFV Club parts into a nice unit. The Idler Wheels are the all-steel types, not having the rubber tire of the late M5A1 Stuarts.
AFV Club's T-16 track runs will fit this conversion, with a modicum of stretching. These are soft poly-vinyl and are up to the task. You also have the option of using Academy's M3 Stuart model kit tracks. I decided to fit AFV Club's T-36E6 (Number 35020) steel cleat track links to my example.
The smaller Hull Fittings come from the AFV Club model kit. These are finely detailed and scale thinness. The Turret is all AFV Club, and rounds out the model project. It has interior details and turned aluminum gun barrel – even with the fluted end turned in place. This is the end of the Formations Models conversion, the base miniature now ready to take in any direction the modeler decides.
Adding More Details - Interior
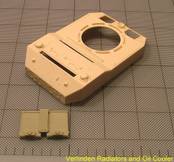
The Formations Models Hull is cast so smooth and clean it cries out for the addition of an Interior. Below are only a few suggestions on how to go about this with what’s commercially available at the time of this writing.Verlinden Productions (Number 1660) offers an Engine Compartment for the old Tamiya M5A1 Stuart model kit. VP provides extra details in the Oil Cooler (Part Number 5) and the two Radiators (Parts Number 6) and the most visible Part Number 4 – Deck. The Radiators and Oil Cooler aren’t designed to actually fit inside the Tamiya kit and are a bit of a waste unless you’re modeling a diorama. If you have the set available, you can use these four parts to add a little visual interest behind the Engine Deck Screens of this conversion kit. These are the only components you’d be able to see if you peered through the Deck Screens at best. All you need to do is blank off the area with styrene sheet and fashion simple mounts to hold the Verlinden parts in place. The Verlinden parts cleanup swiftly, and the detail addition only takes a few minutes to engineer and install.
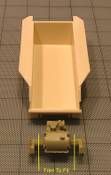
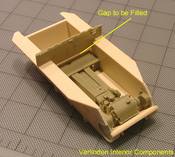
The two Interior Sets offered by Verlinden Productions (Number 1841 M5 Recon/Command Interior/Exterior and Number 1562 M5A1 Stuart Interior for Tamiya) calls for a little more modeling effort than the Engine Set does – but enhances the basic Formations Models conversion. The interesting-looking Verlinden Transmission casting goes virtually unseen in the final product, but the effect is for depth. It calls for trimming to fit inside the Formations Models Lower Hull. To preserve the bolt and Drive Plates on either side of the casting, you’d have to slice through the Drive Shafts and reattach them.
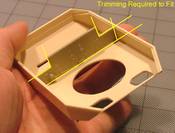
The Gear Shaft Cover is easy to cleanup and slip into place after the Transmission casting is set. The Rear Wall Bottom casting requires trimming on each end to fit inside the Formations Models Lower Hull like the Transmission casting. The Rear Wall requires a little trimming on the portions trapped between the sidewalls of the Formations Models Lower Hull pan and removal of the notches cast into the upper edge. Note, the Verlinden parts were cast to work with the Tamiya Lower Hull Pan – which is too shallow. You will have a gap between the Rear Wall Bottom and Top to close.
With these basic additions from the Verlinden sets, you can go to town in adding your own details to flesh out the interior of the miniature.


