

1⁄72Coming in out of the Cold
22
Comments
Part Four: The Snow Will Fly with Precision Ice and Snow
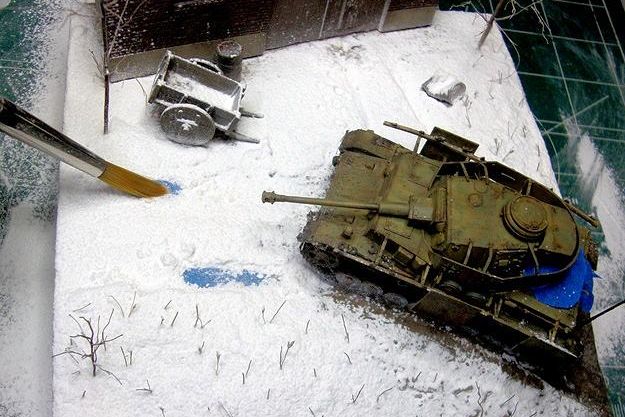
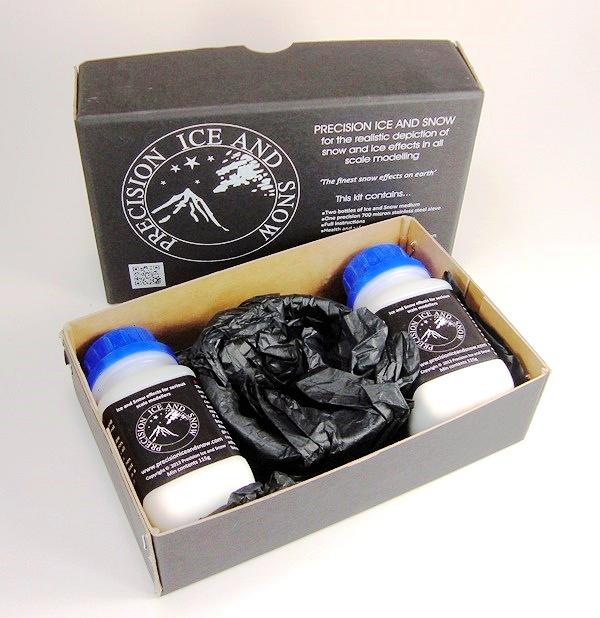
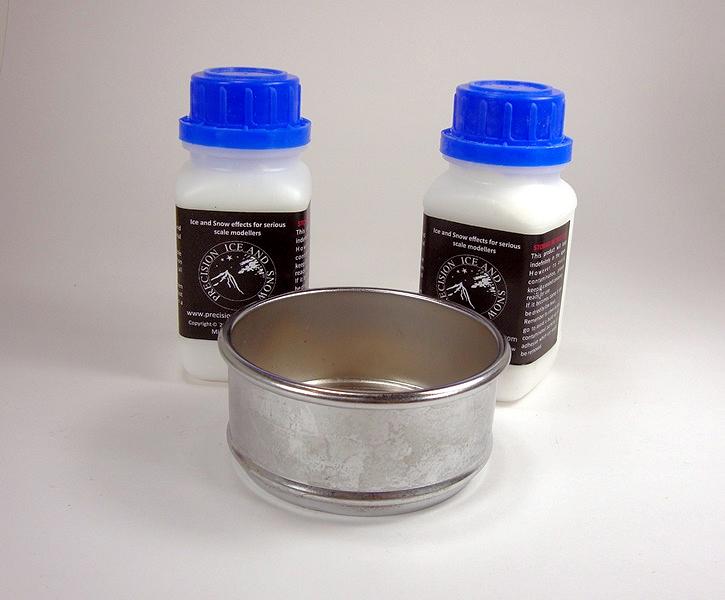
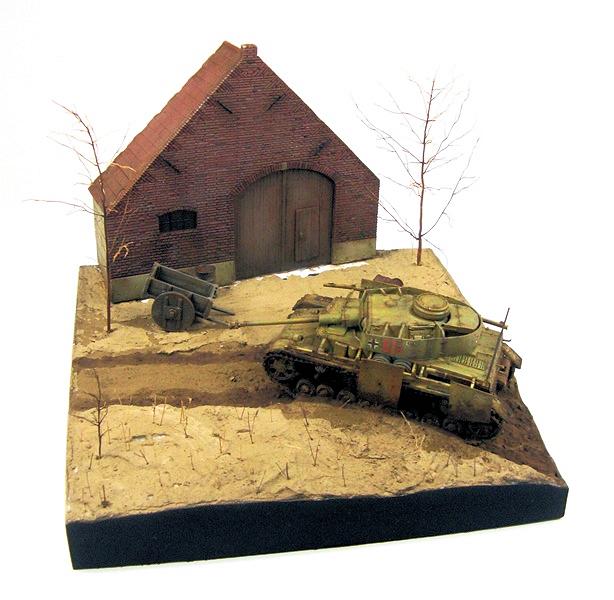
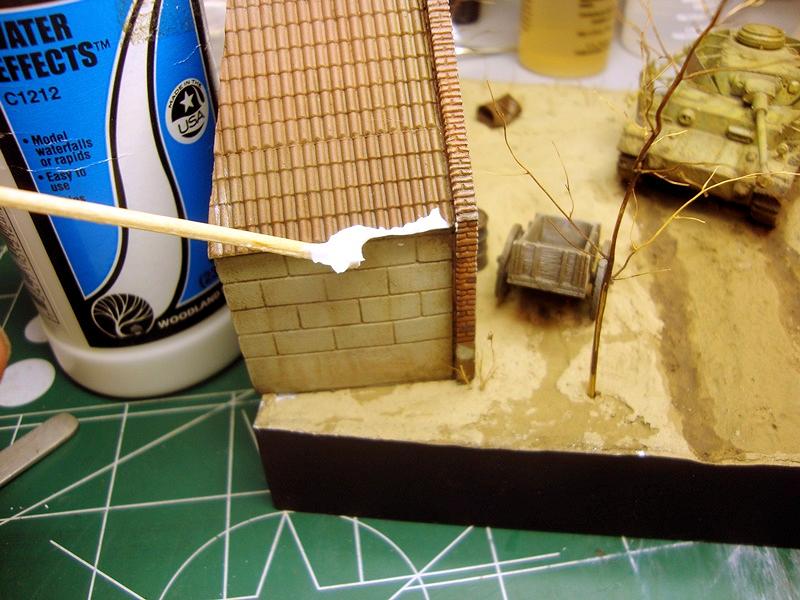
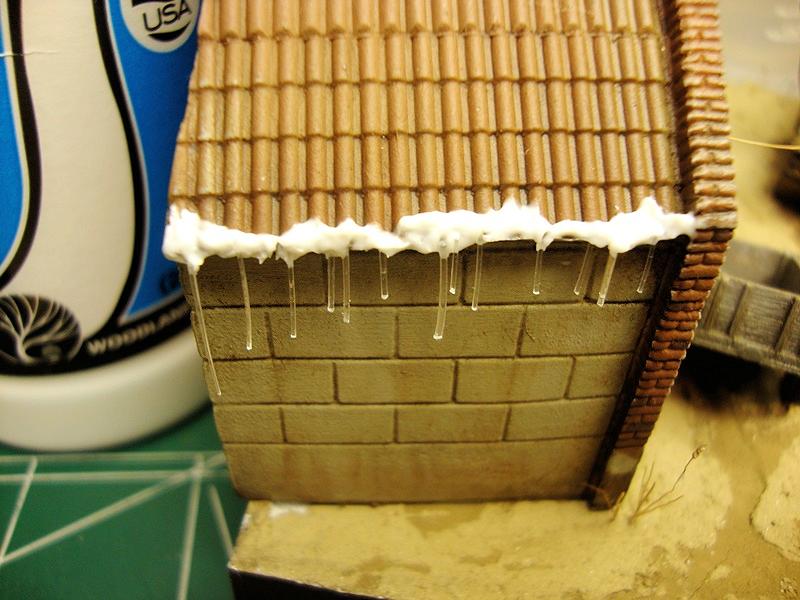
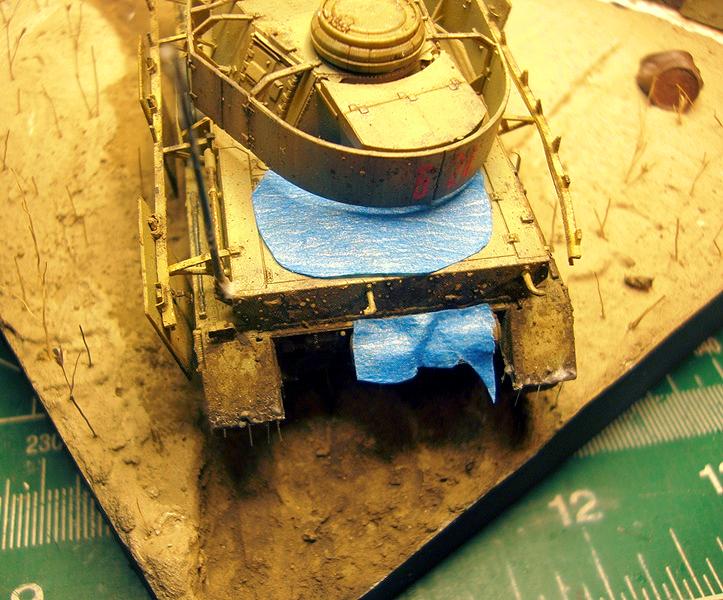
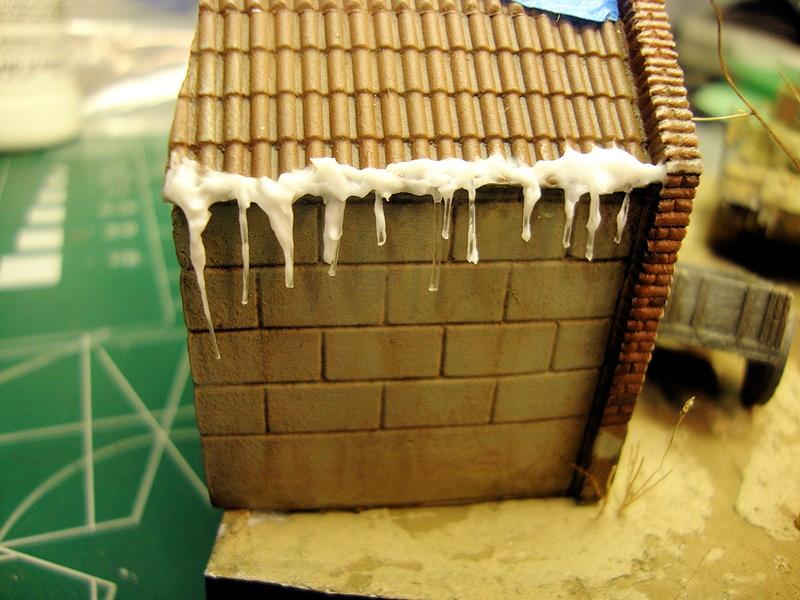
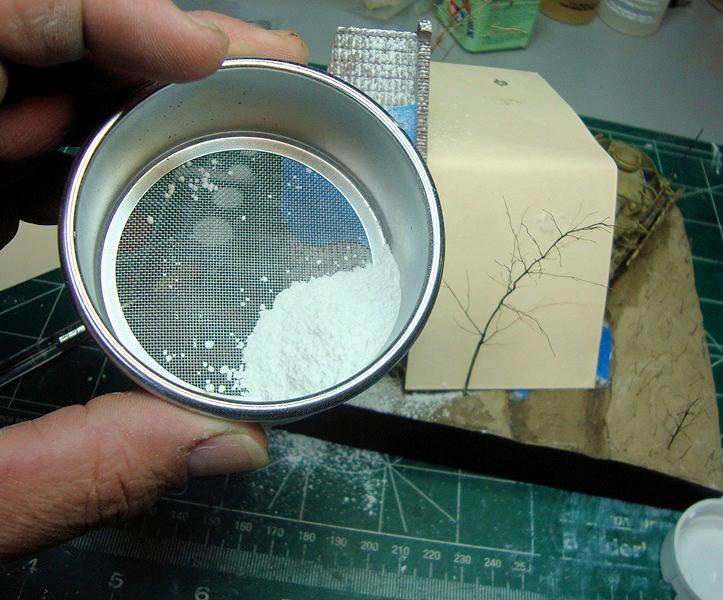
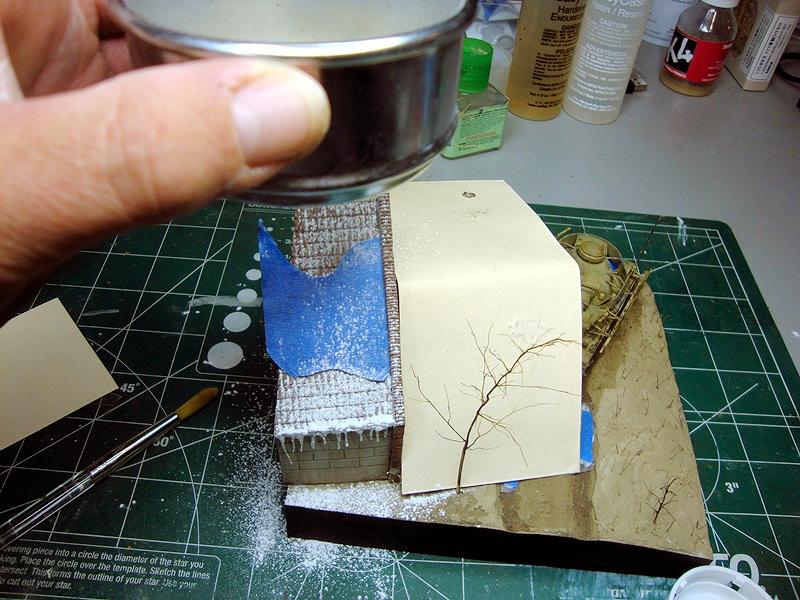
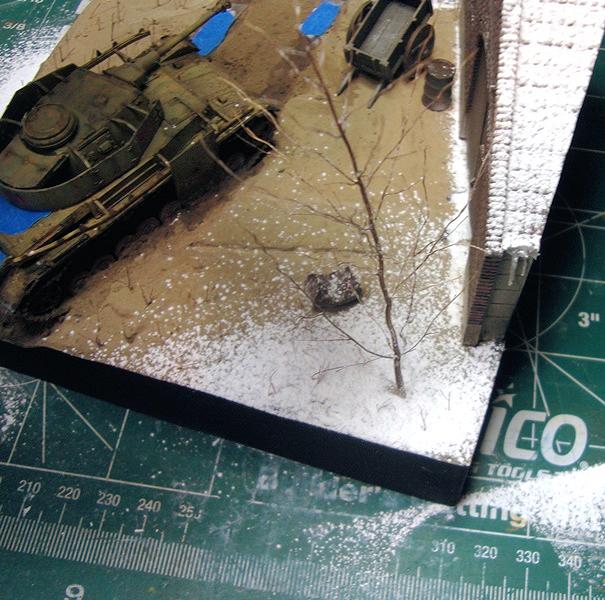
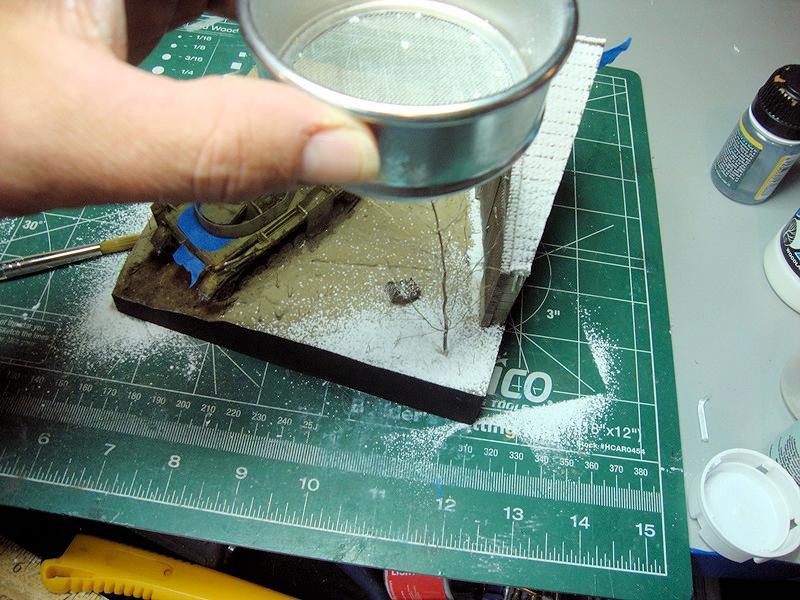
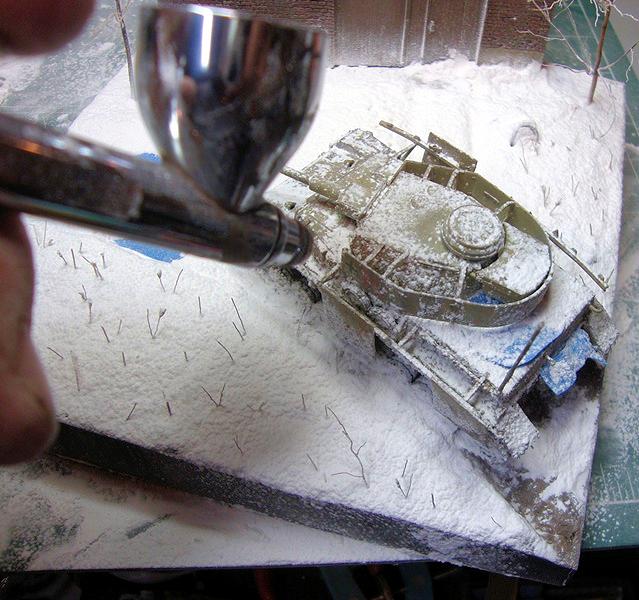
Moving into the final stages of the build, all the pieces have been attached to the base. Now came the moment of truth. I was fortunate enough to take on having a look at a new product to the market that allows modelers a better approach to adding snow effect to their displays. The new product is called Precision Ice and Snow. Precision Ice and Snow is sold in kit form comprising two 115 gram containers of the Ice and Snow, one 700 micron stainless steel sieve for dispensing the product and a two page detailed instructions sheet. This package retails for just over $25.00 US (£16.00). The Precision Ice and Snow is packaged in a sturdy cardboard box with packing paper to secure both bottles and the sieve while in transport. Upon receiving the package the excitement was high to give this new product a whirl; this was not to say that I was not a bit nervous as well. I had just spent time building and painting a model, stable and base only to begin to cover things with a wintery mix; nothing ventured, nothing gained just popped into my head so it was time to have some fun!! There are two ways to adhere the Ice and Snow to surfaces on your scene; hair spray (lacquer) and permanent adhesives such as clear photo mounts and spray adhesives. Each form of adhesive will give you different results depending on how you apply the adhesive and the thickness of the adhesive. It is not advisable to apply the Ice and Snow effect on a wet adhesive surface, rather the surface where the Ice and Snow is to be placed needs to be tacky in order to hold the product in place. Directionality is a key function in the application as well. Spraying the adhesive at an angle perpendicular to the surface and then tilting the model so as to apply the Precision Ice and Snow with the sieve in the same angle, will allow a build-up of the Ice and Snow only on one side of the surface that you are working with. This will give the suggestion of wind-blown snow from one direction. This is fantastic, as snow does not just fall straight down; the application choices are almost endless. Being a complete novice to the use of the Precision Ice and Snow process I chose not to attempt to get too fancy at first. I was feeling this was a scene where the tankers took advantage of the nearby stable to seek some warm shelter from the storm. With this thought, snow will have to be applied just about everywhere on the surface but of course you just cant dump snow effects and call it a scene. Using the suggestions from the instructions I planned to build up the snow effects in layers. I chose to use my airbrush as the tool for applying the hairspray to the surfaces. Starting on the roof I applied a thin layer of hairspray, and before any drying of the hairspray I grabbed the sieve and, lightly tapping the side, the snow began to fall. The snow mix is extremely fine and will make a mess if you are not prepared. The dust from the Ice and Snow will be seen right away once you begin to work. Although it is suggested you wear a dust mask during the application, the Precision Ice and Snow is completely non-toxic and while the dust can act as an irritant as a particulate, it is not biologically harmful. After getting a feel for applying the Ice and Snow the process becomes easier and easier. I wanted to limit snow on the tank itself as if the tank had recently rolled up to the barn. I made attempts to keep the product from attaching to the tank by use of small cards cut from Manila folders during the hairspray application. If the Ice and Snow fell onto the tank before I wanted it to this was easily removed with a light blast from my airbrush or with a couple of swipes from a soft bristled brush. Trying to mimic how snow would collect in the early stages of a storm, I wanted it built up in some areas, as well as some dusting and some drifting. This was easy to accomplish by going over the heavier areas, spaying the hairspray adhesive in-between each coat of the snow effects. For faster and more localized build-up, placement of the material with a small tool such as a coffee stirrer or hobby knife works well. I was amazed at how realistic the snow appeared even in this 1/72 scale. In addition I was pleased at how quickly the process went. When I found areas where there was too much or not enough, a simple brush stroke was all it usually took to move the snow around. Once the base was more or less where I wanted it, I turned my attention over to the Pz.IV. As mentioned earlier, I did not want to have a large build-up on the tank. I did want to show deposits as if they rolled through some snow to get where they were as well as some directionality to show the windy wintry scene. This was achieved by spraying the hairspray adhesive on an angle from the rear of the tank and then tilting the vignette on an angle to the bench and using the sieve to apply a couple of quick dashes of Ice and Snow. Then, with the airbrush turned way down, I gave a couple of light blasts in the same direction as the adhesive and product went on, only about 20 degrees up angle. This allowed me to control where the snow appeared to be landing. Along with applying the Ice and Snow to the surfaces, I had previously added some tape over the engine deck of the tank. My thought was to leave this area void of snow but make it appear to be wet from melting snow. This would put a time frame on when the tank arrived in the scene. This worked really well I think. After applying the snow effects, the tape was removed and the area was clean from snow. Using an effects product, more or less a thinned out clear coat applied in several applications, to give the appearance of wet surfaces, an effort was made to make wet the areas where snow would be melted by the heat of the engine, including the muffler and rear plate. The rear plate had already been covered with Ice and Snow. In taking a chance, with an almost dry brush, I tapped the tip a few time along the edge just above the muffler, allowing the wet effects to emanate outward and up as the heat was escaping from the joint in the rear plate. After a few touchups and fixing of some loose snowy areas I called this one done. I have to say applying the Precision Ice and Snow was a lot of fun and the results were pleasing to see. I would like to play around a bit more with the product after reading through the instructions provided, as well as the methods on their webpage which include the use of the Ice and Snow mixed with silicone, epoxy and/or resin to create some amazing ice effects.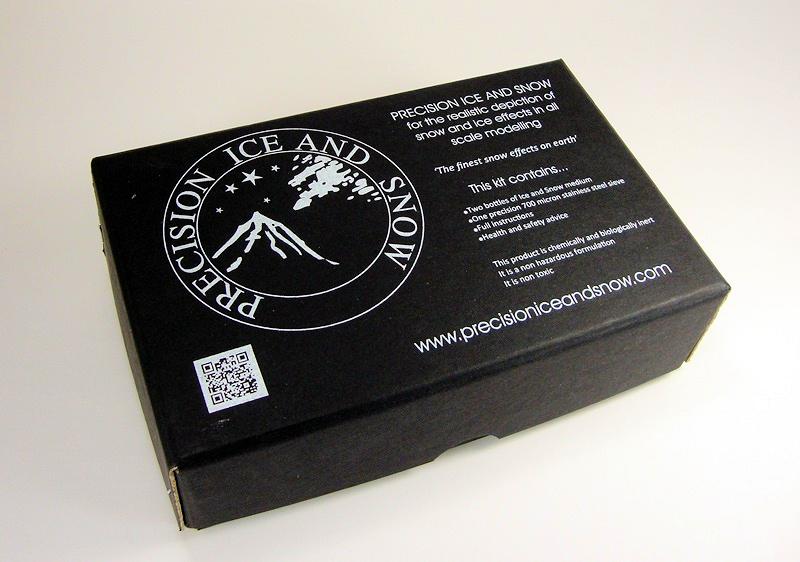


About the Author


FROM: MASSACHUSETTS, UNITED STATES
I am building what I like, when I like and how I like it; having fun doing it. I have been building and finishing models on and off my whole life but the past ten years things really exploded. Just about anything goes when it comes to hitting the bench, but wrecked armor, rusted hulks, ships or ...
Comments


Great diorama, some of the most realistic snow effects I've ever seen, 1/72 too superb job!
OCT 28, 2013 - 11:58 PM

Hello Roman!! Thank you very much my friend!!
Hi Dave...thank a bunch, most appreciated!!
OCT 29, 2013 - 04:17 AM

Hi Todd,
Excellent work, the build up of the snow on the vehicle looks terrific, a really interesting read and a super little dio.
Nice work Sir.
Al
OCT 29, 2013 - 08:28 AM

Todd, pretty sweet Dude. A great build and review. Truly Grand And the correct scale too
OCT 29, 2013 - 08:34 AM
AL - Thank you Sir! The Ice and Snow is a really neat product. I think I am just touching the surface on what can be done. "Directional" applications, working with clear resin and silicone to create ice effects...I think I have some playing around to do!!
Jeff - Thanks buddy!! LOL...does it show that braille is not my forte'?? Big fun! The Panzer fell together! I am sure there will be more little builds in my future!!
OCT 29, 2013 - 09:16 AM
LOL...they do my friend! We are always most critical of our own work!!
OCT 30, 2013 - 09:30 AM


Copyright ©2021 by Todd Michalak. Images and/or videos also by copyright holder unless otherwise noted. The views and opinions expressed herein are solely the views and opinions of the authors and/or contributors to this Web site and do not necessarily represent the views and/or opinions of Armorama, KitMaker Network, or Silver Star Enterrpises. All rights reserved. Originally published on: 2013-10-31 23:11:36. Unique Reads: 24033

WEB HOSTING BY


Copyright ©2021 Armorama and Kitmaker Network, a subsidiary of Silver Star Enterprises
All Rights Reserved. Please read our Conditions of Use and Privacy Policy.
All Rights Reserved. Please read our Conditions of Use and Privacy Policy.