

1⁄72M1114 FRAG 5 w/GPK Turret
11
Comments
Construction part 2
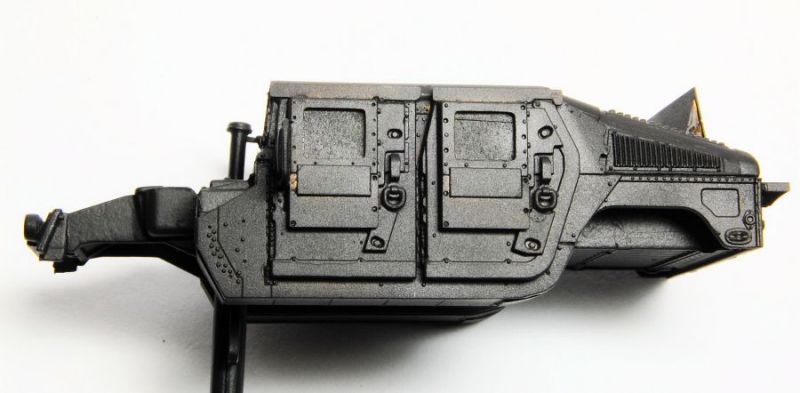
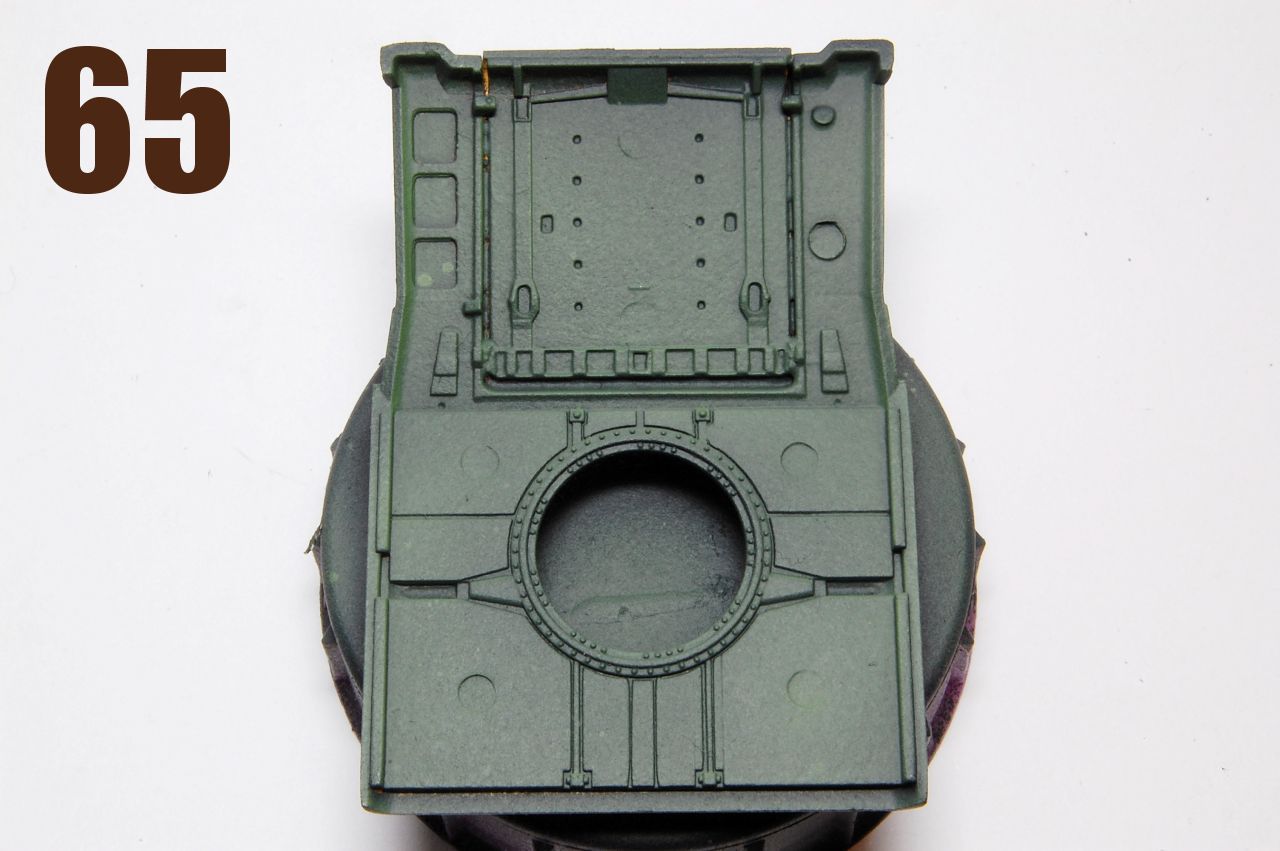
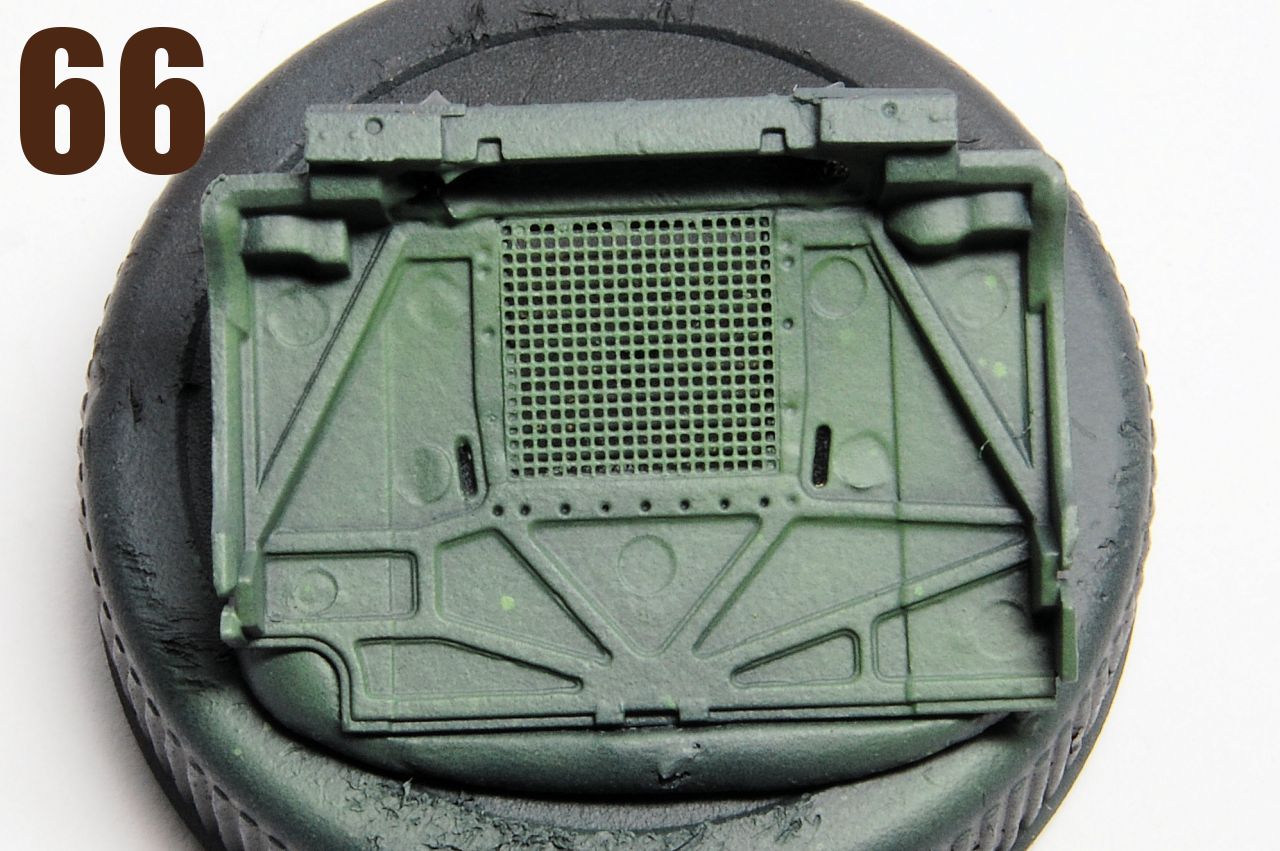
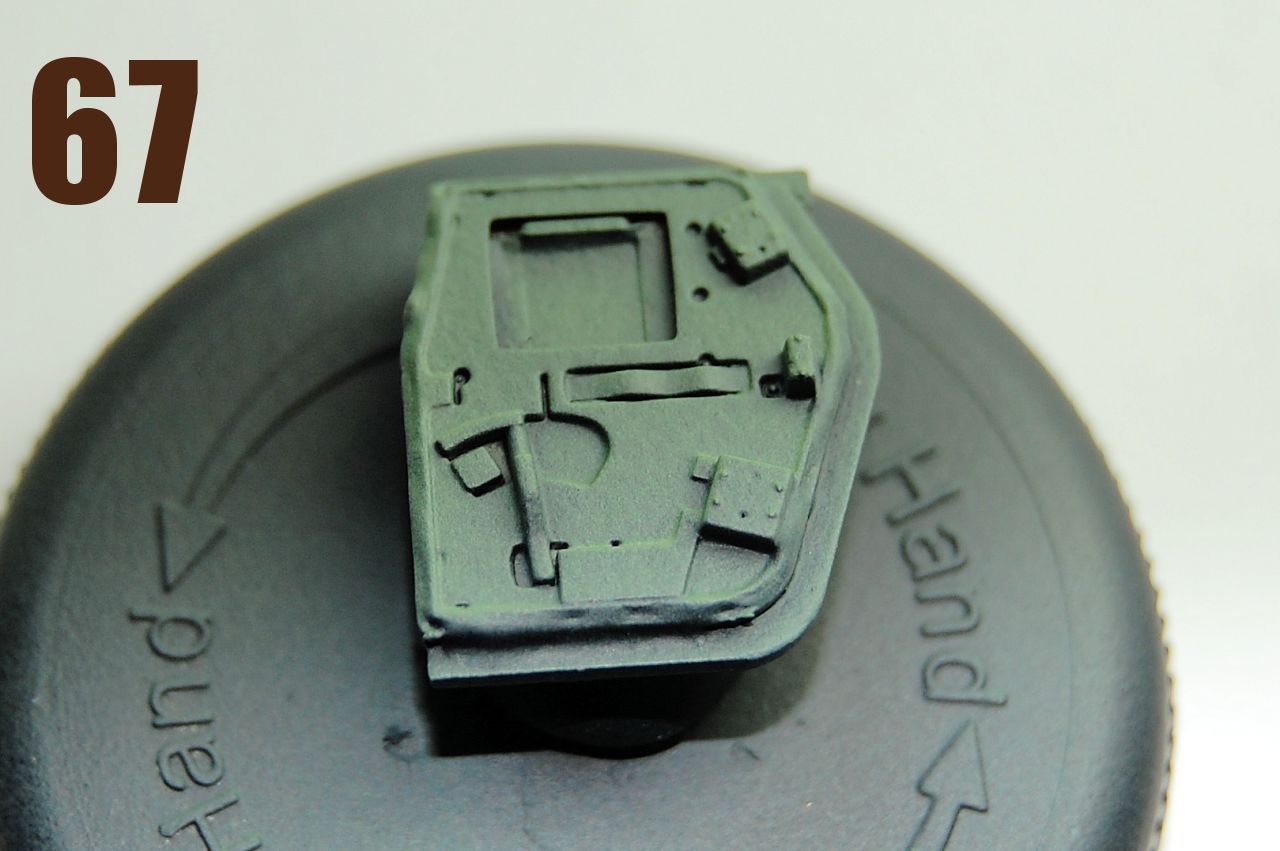
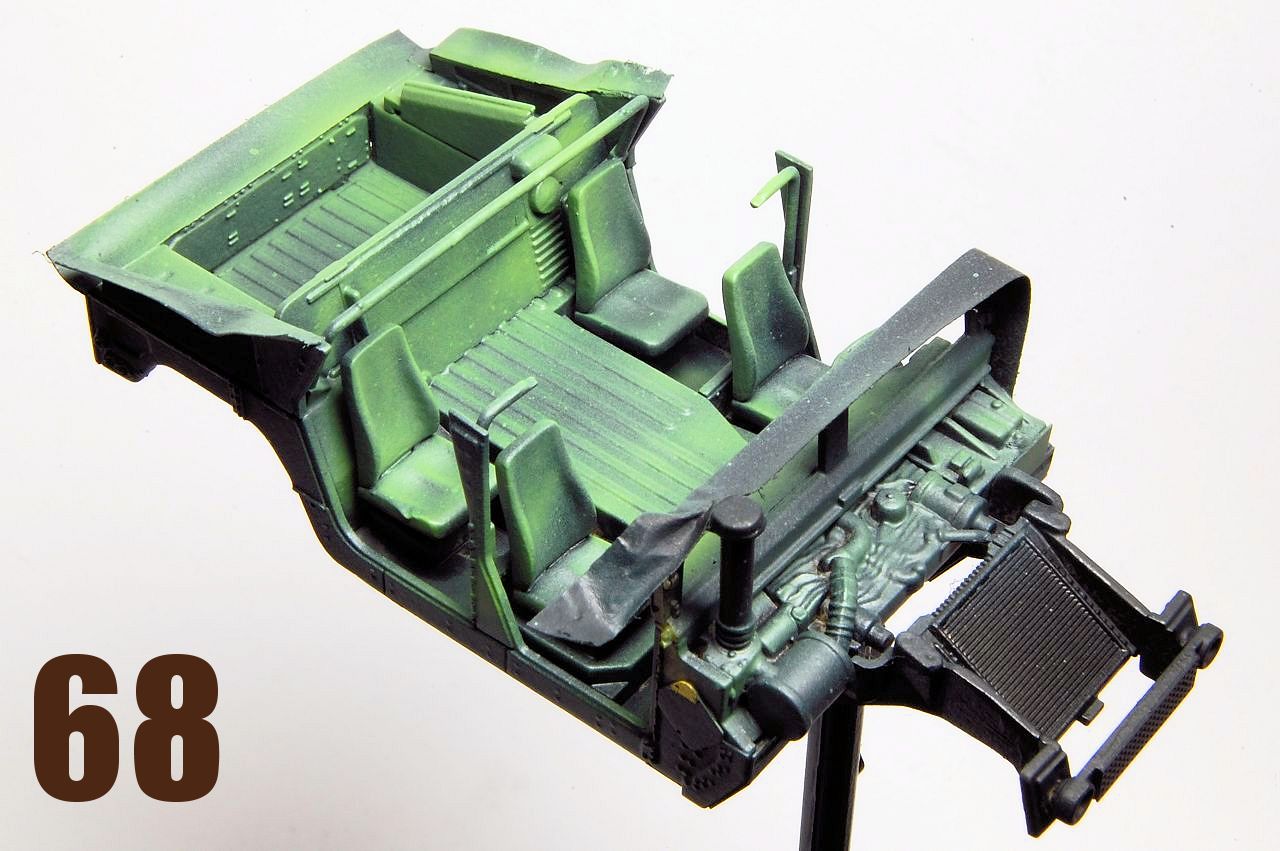
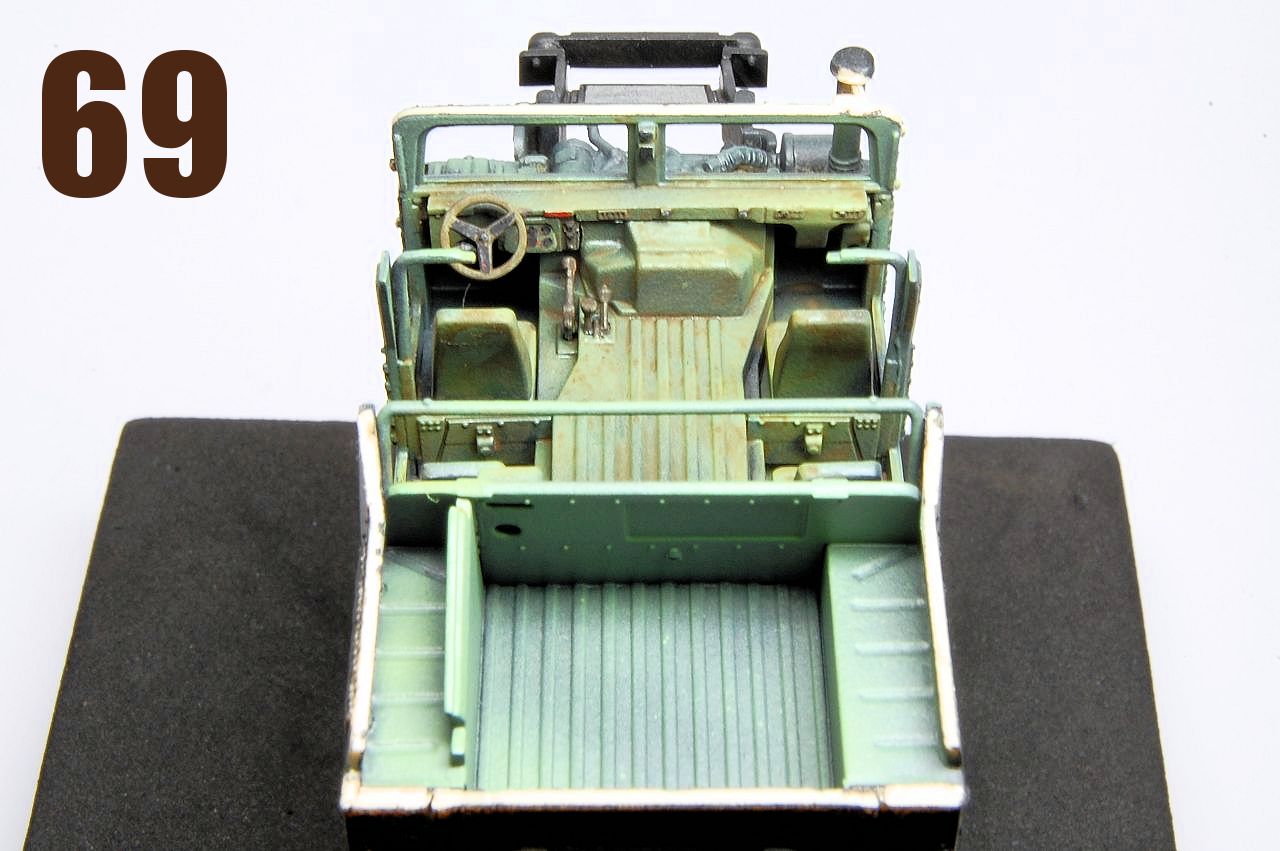
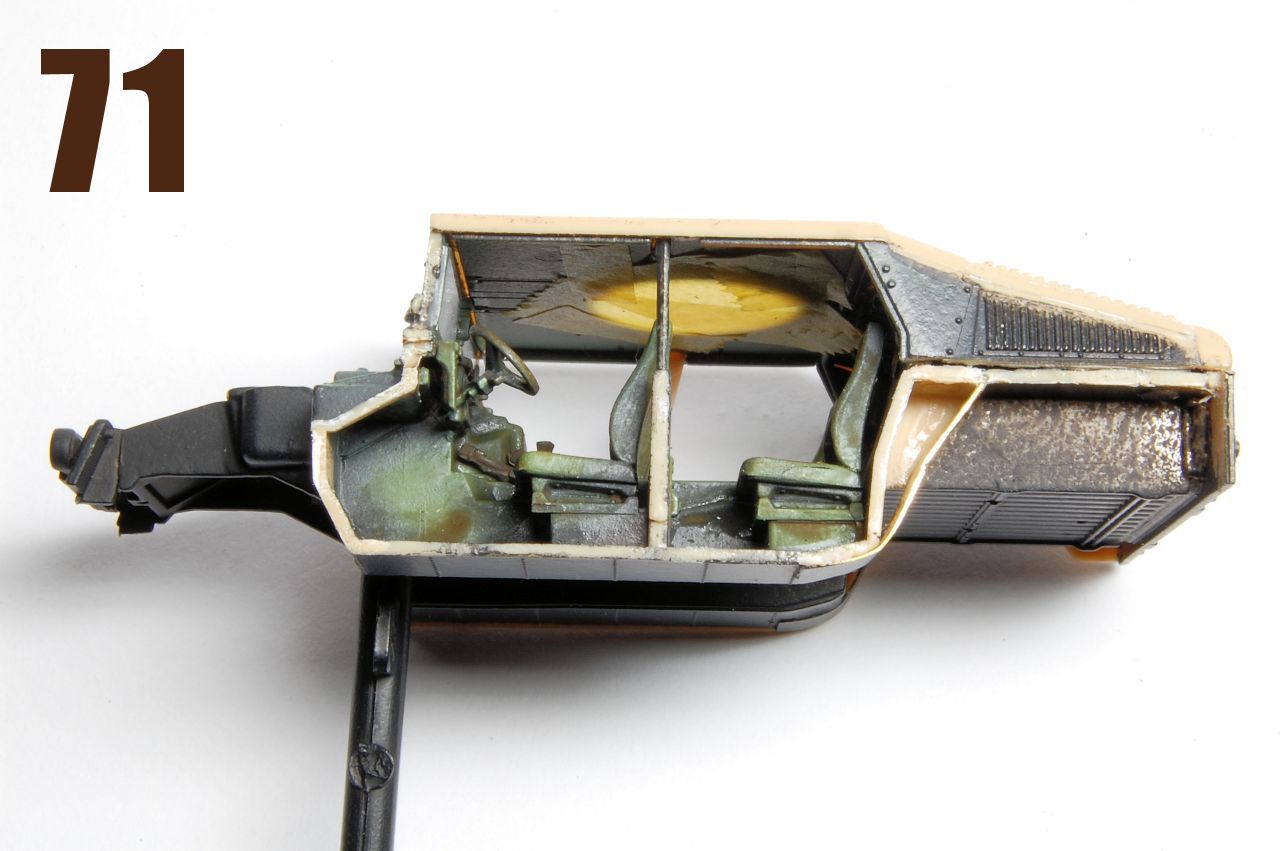
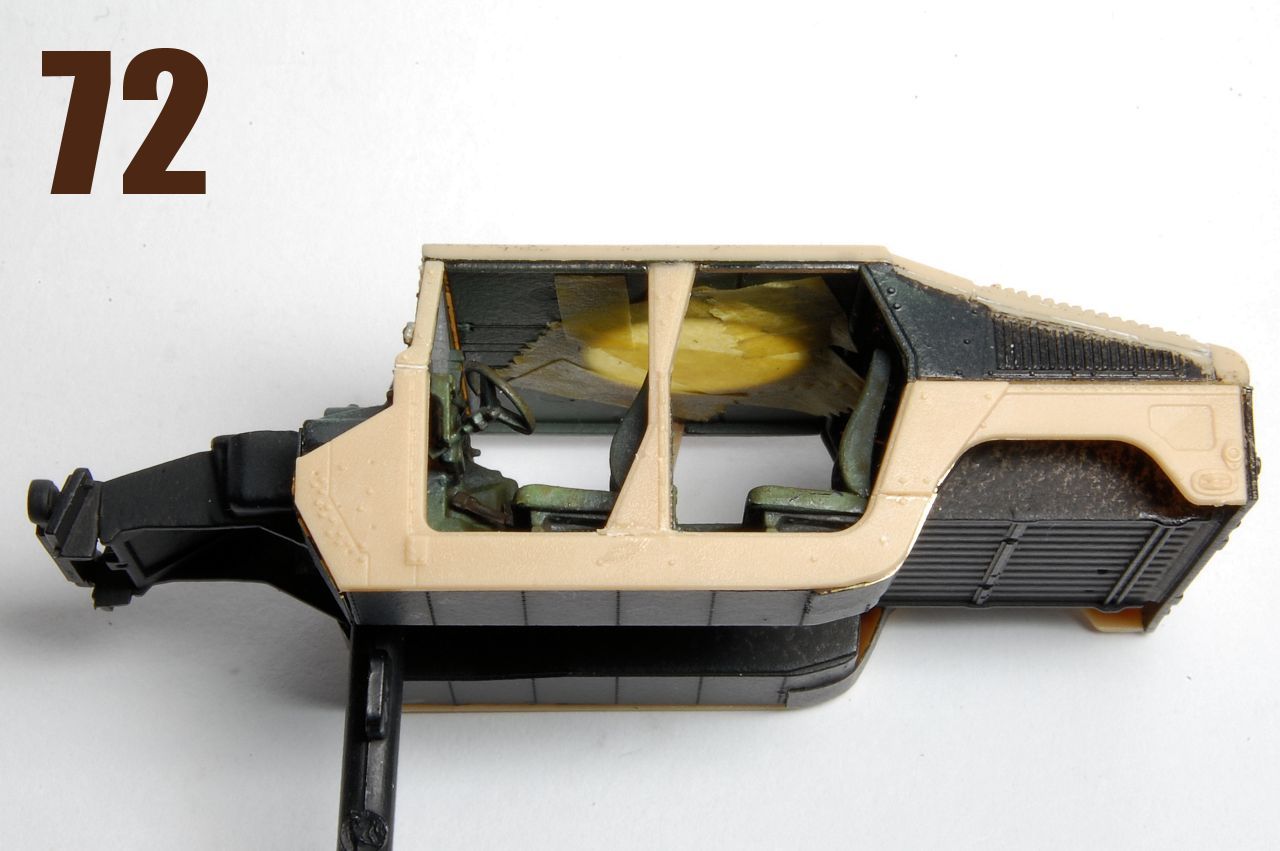
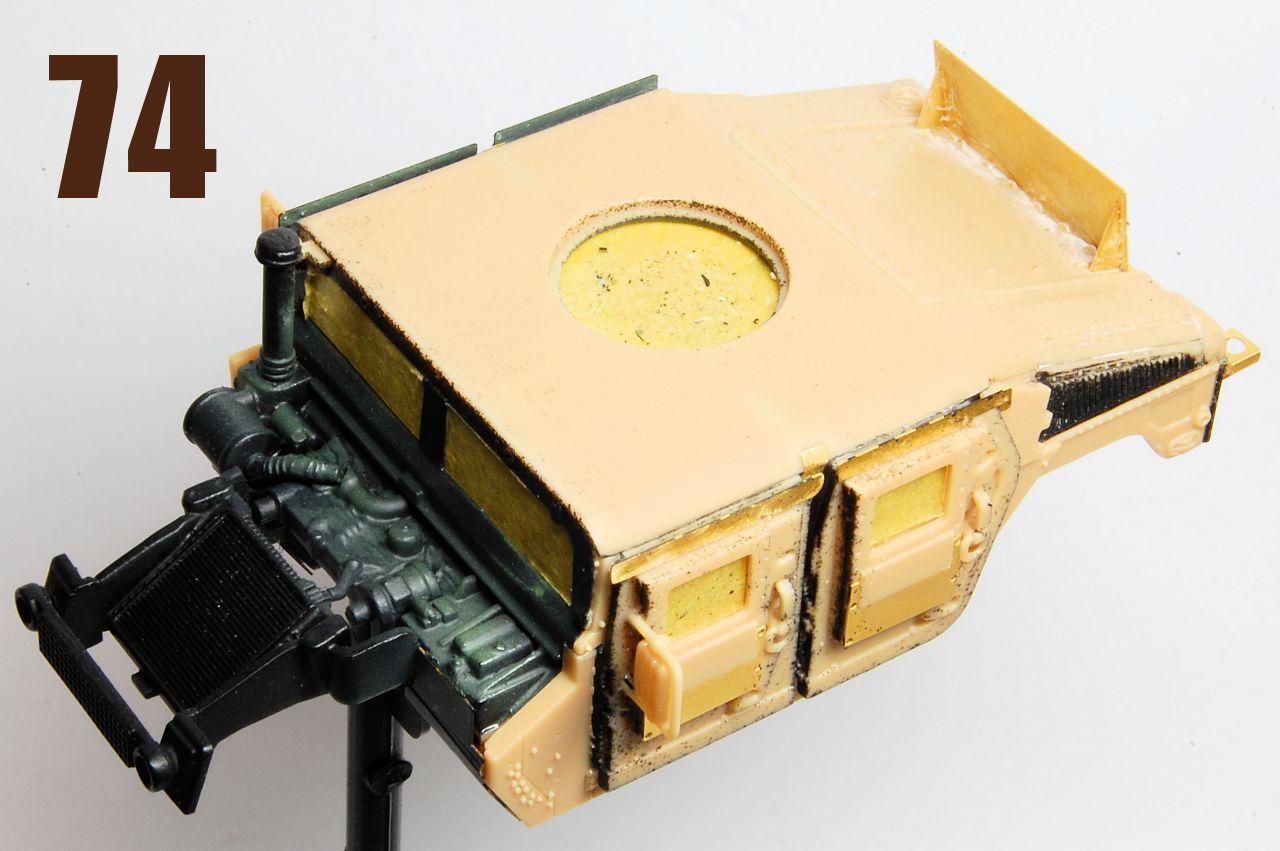
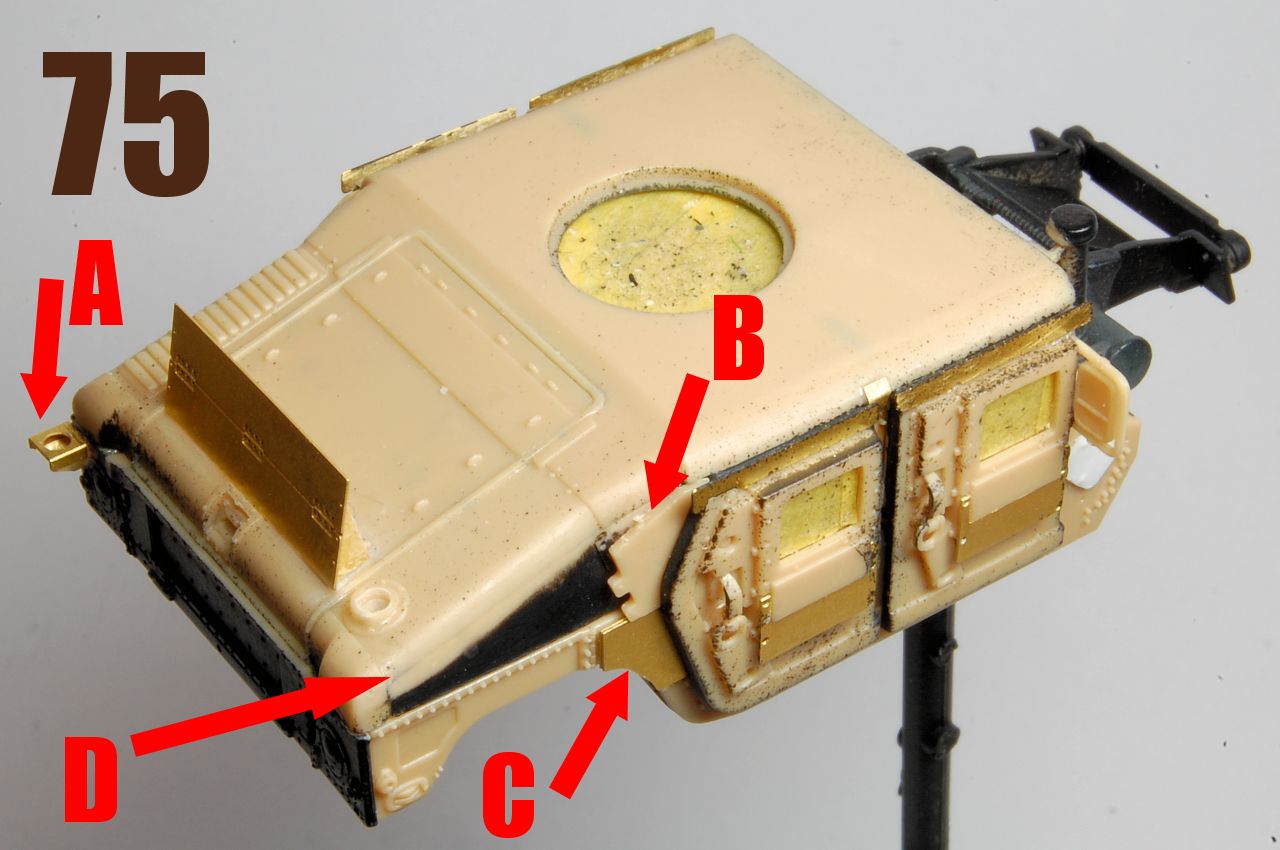
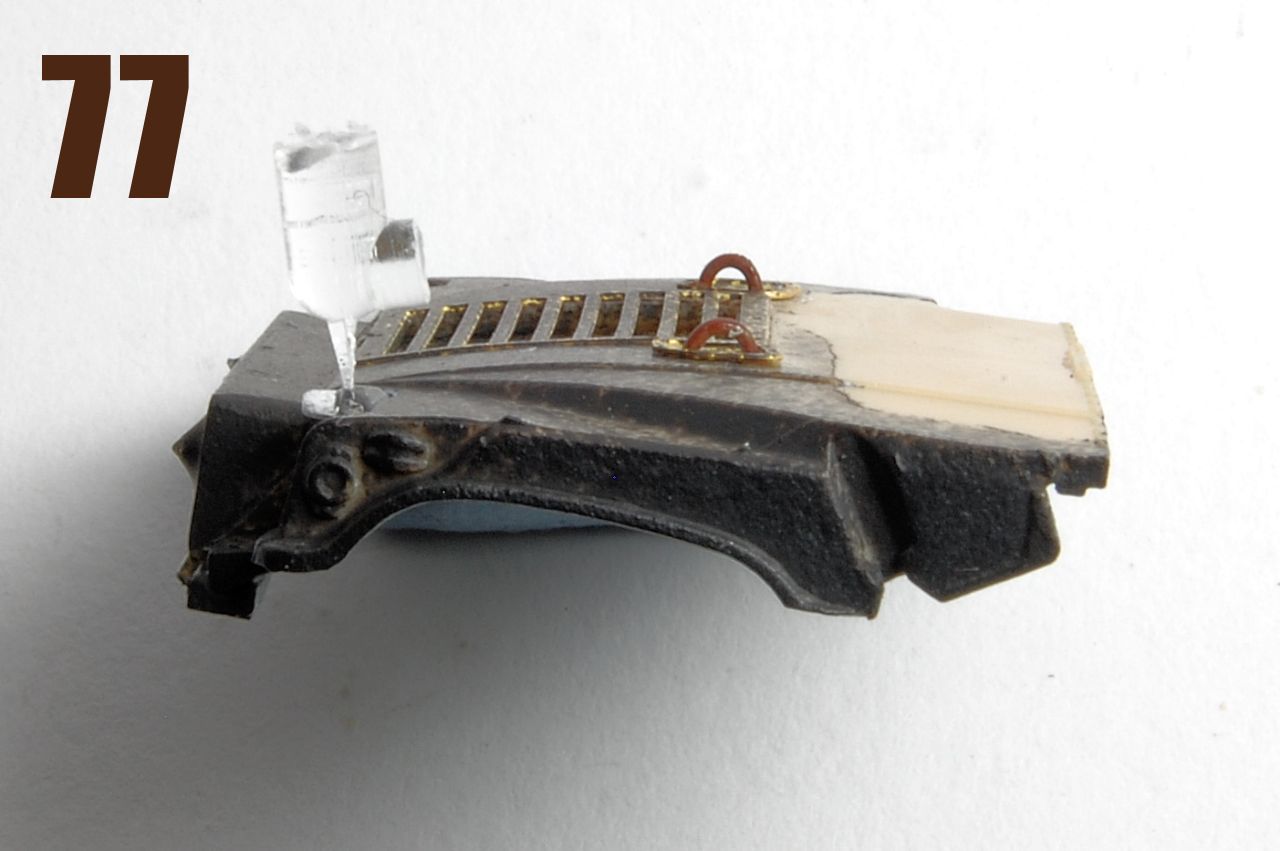
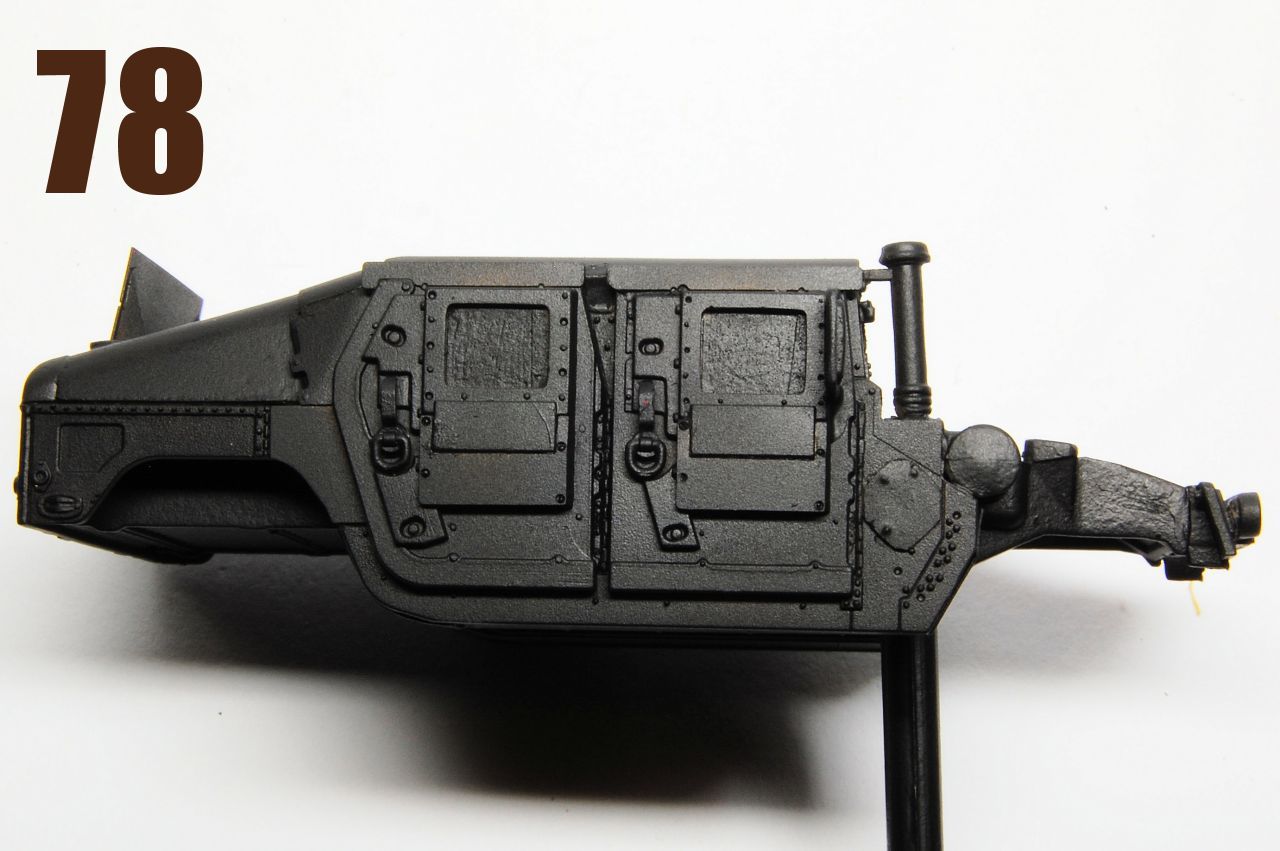
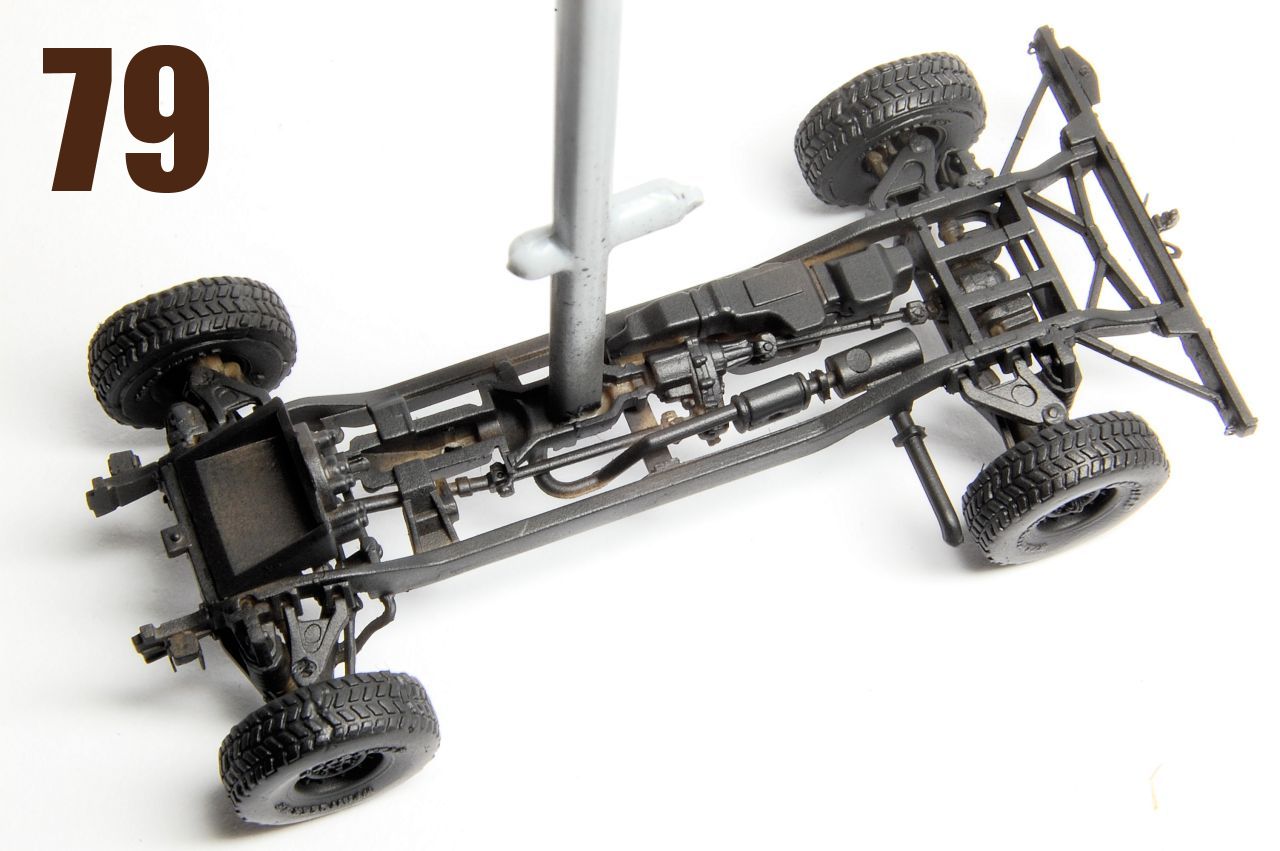
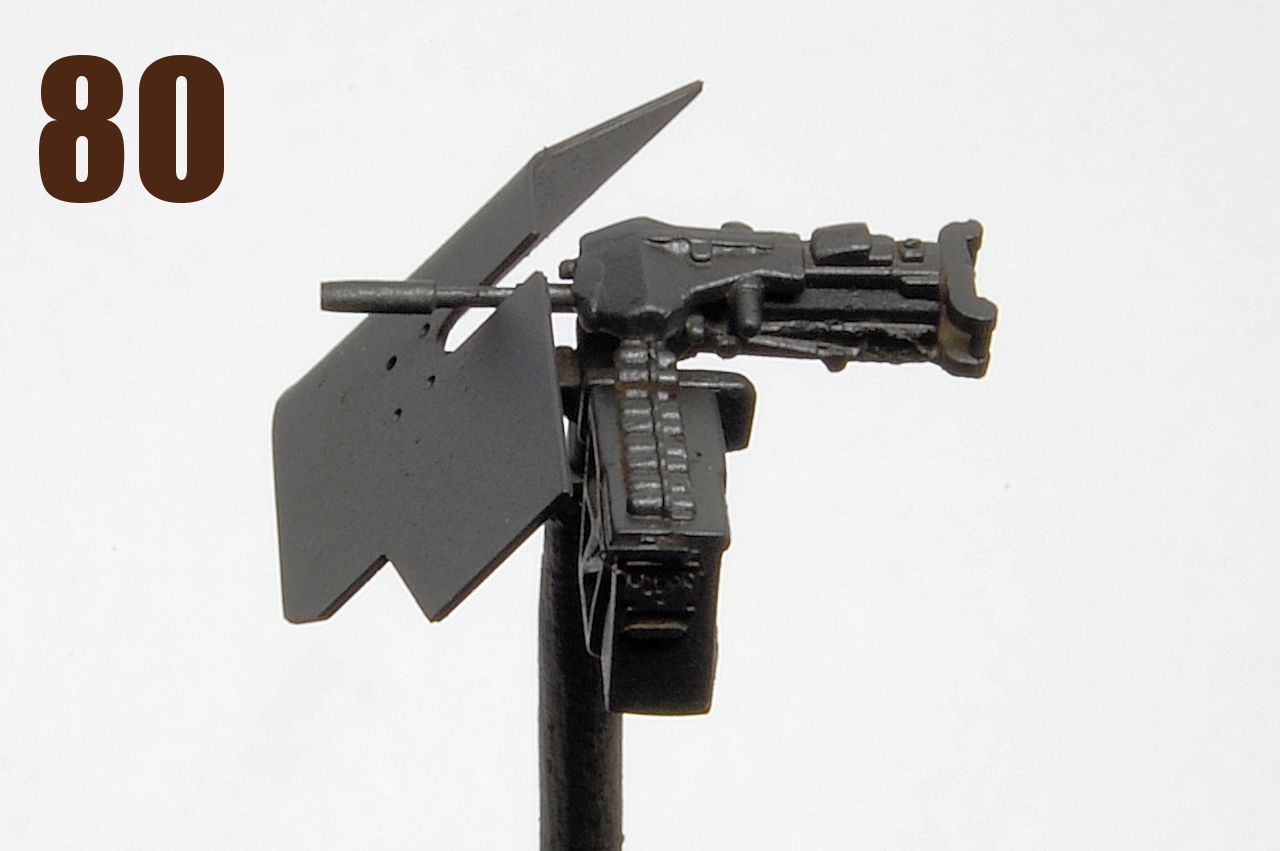
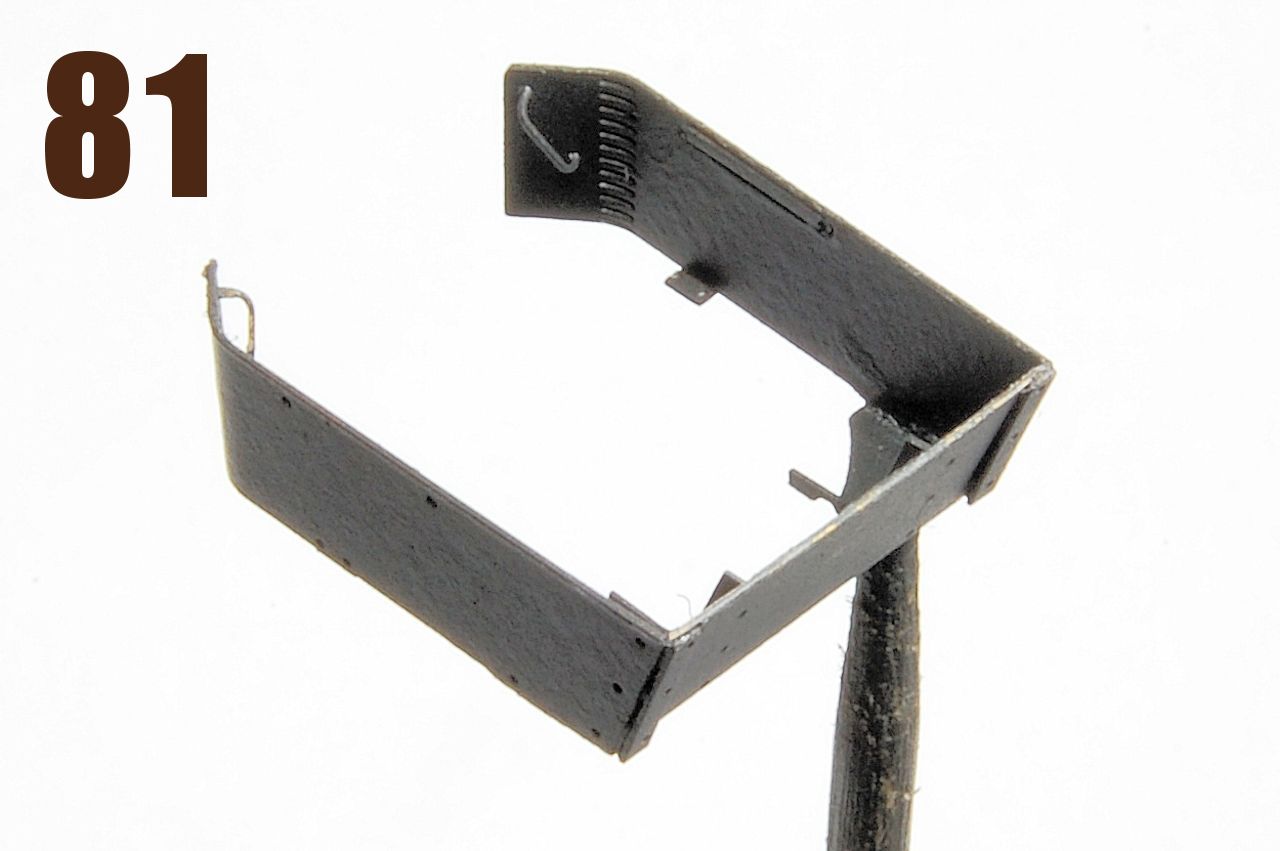
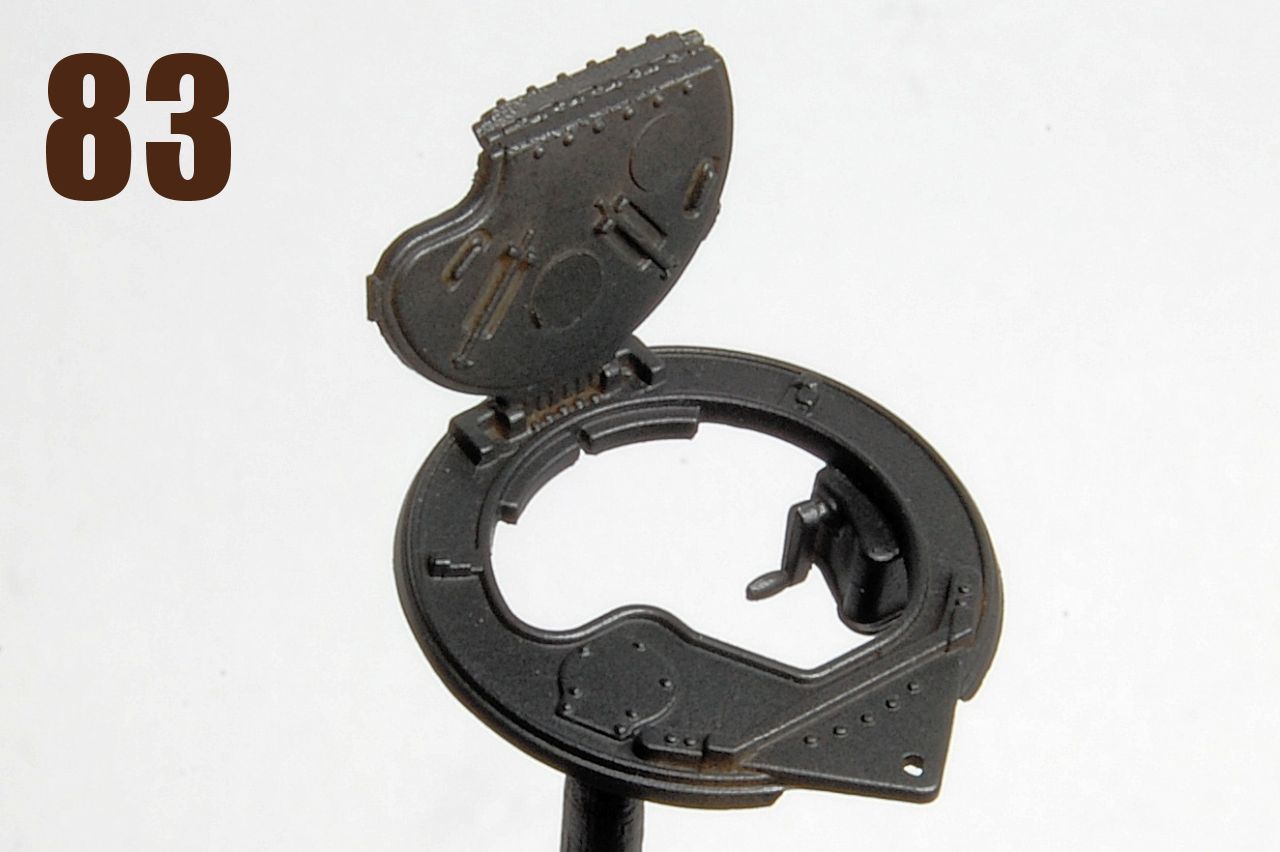
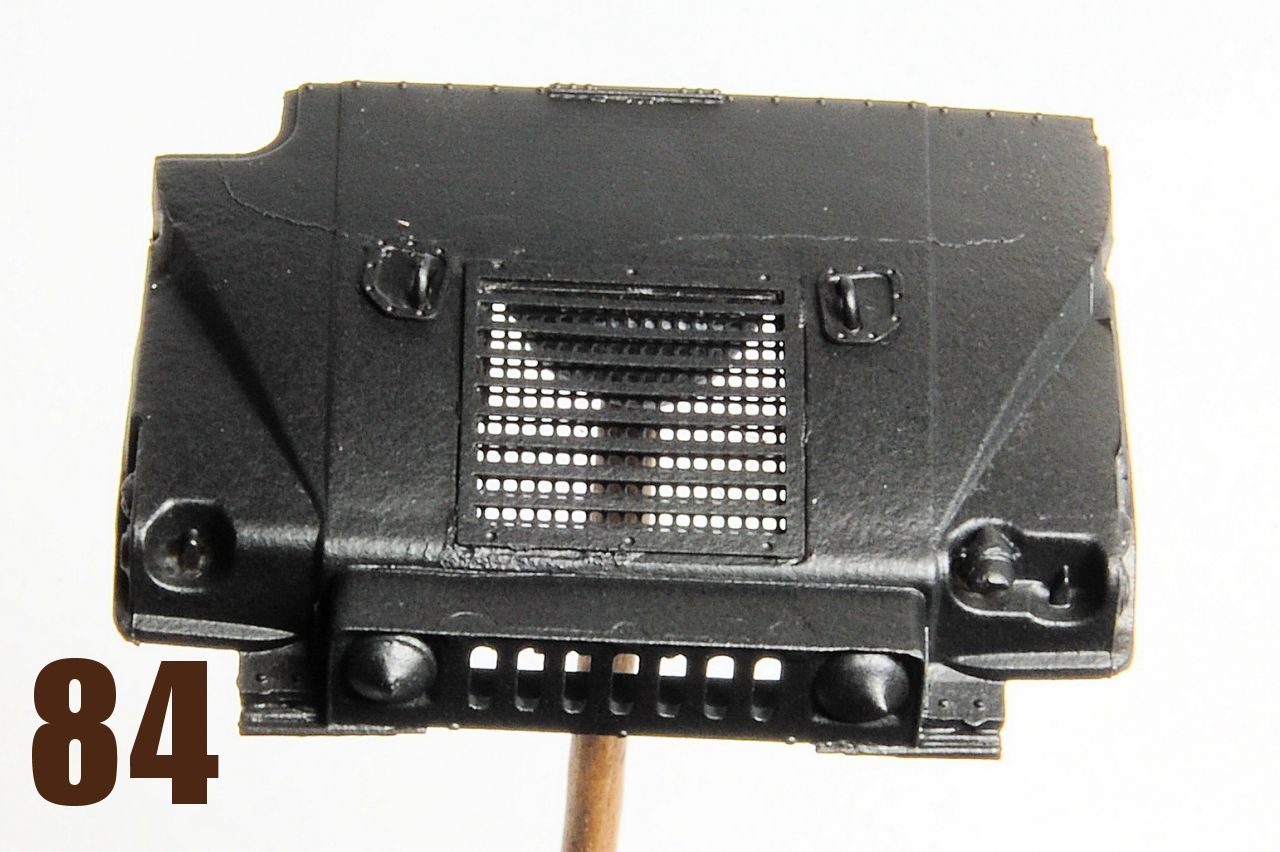
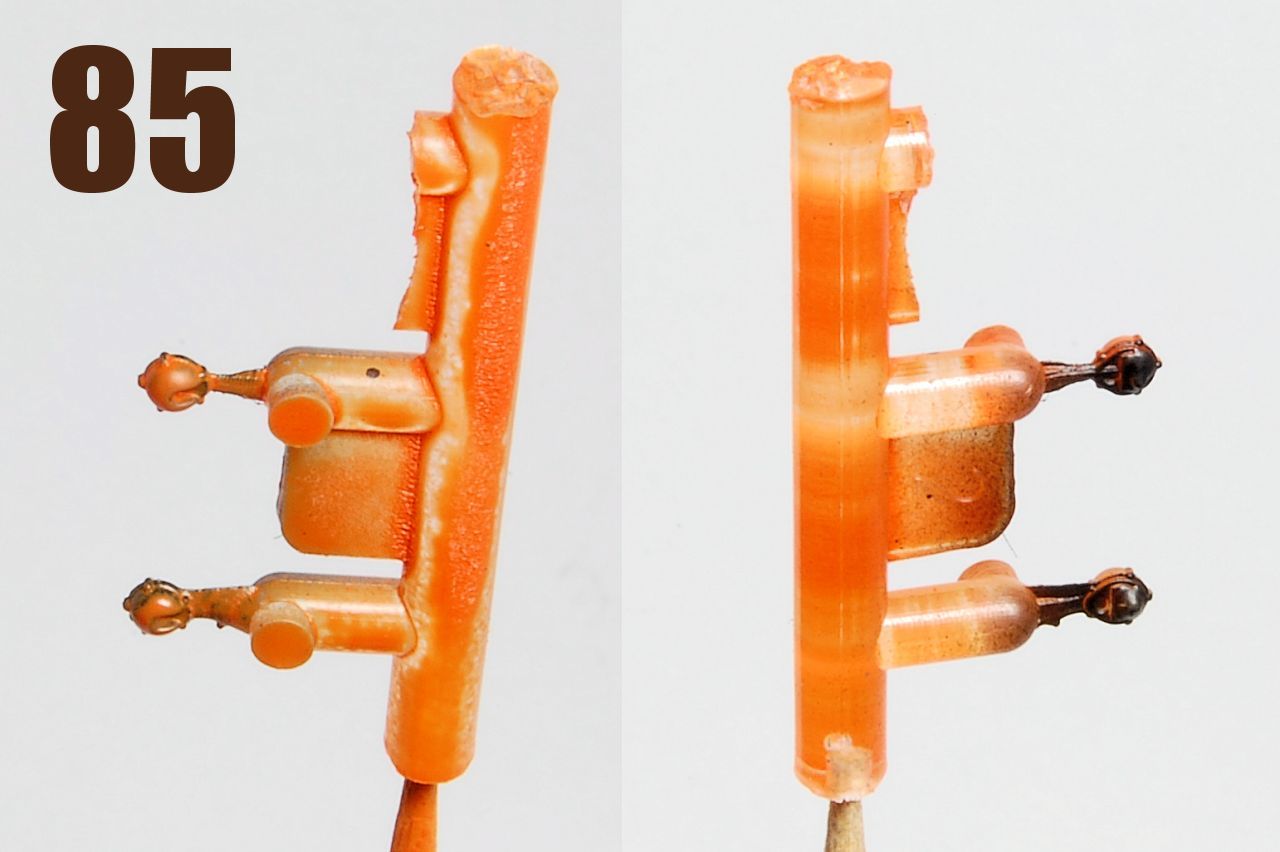
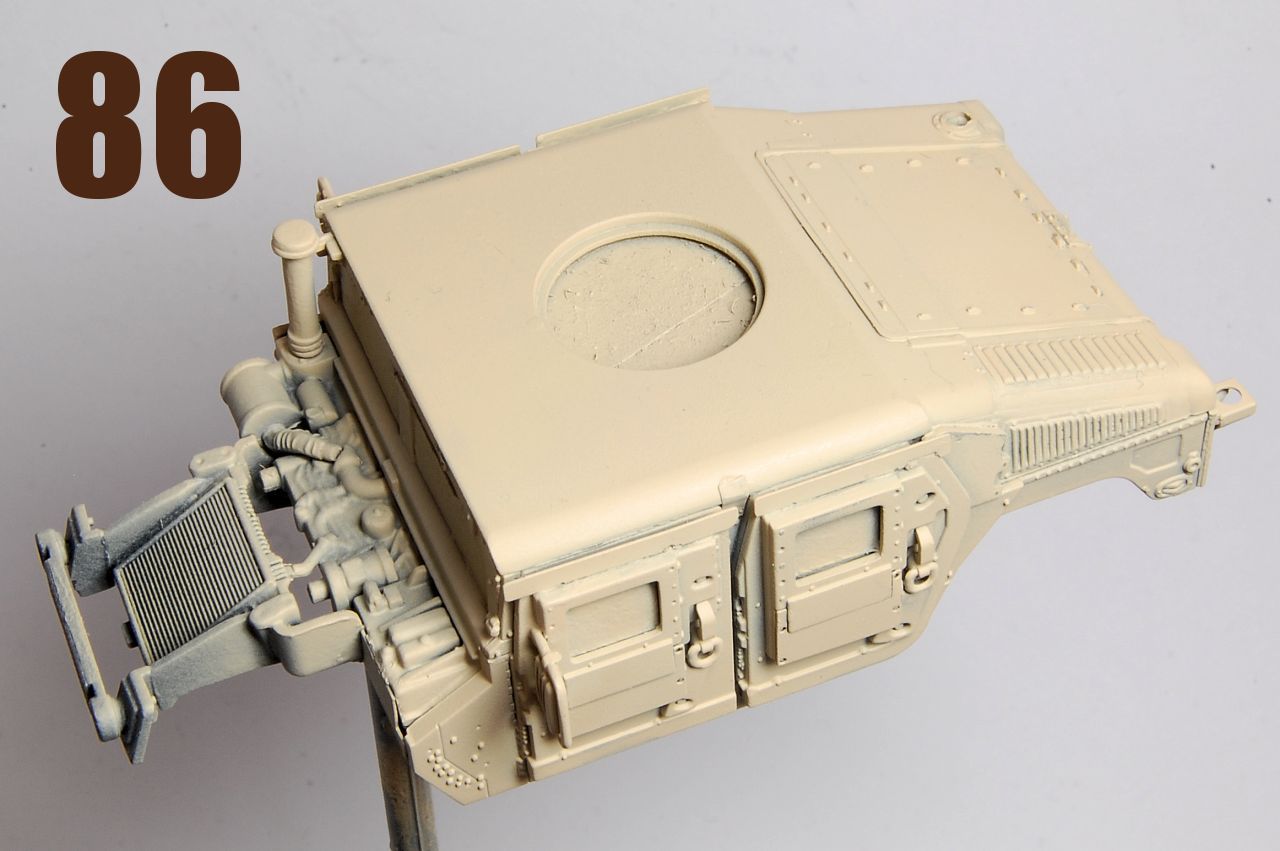
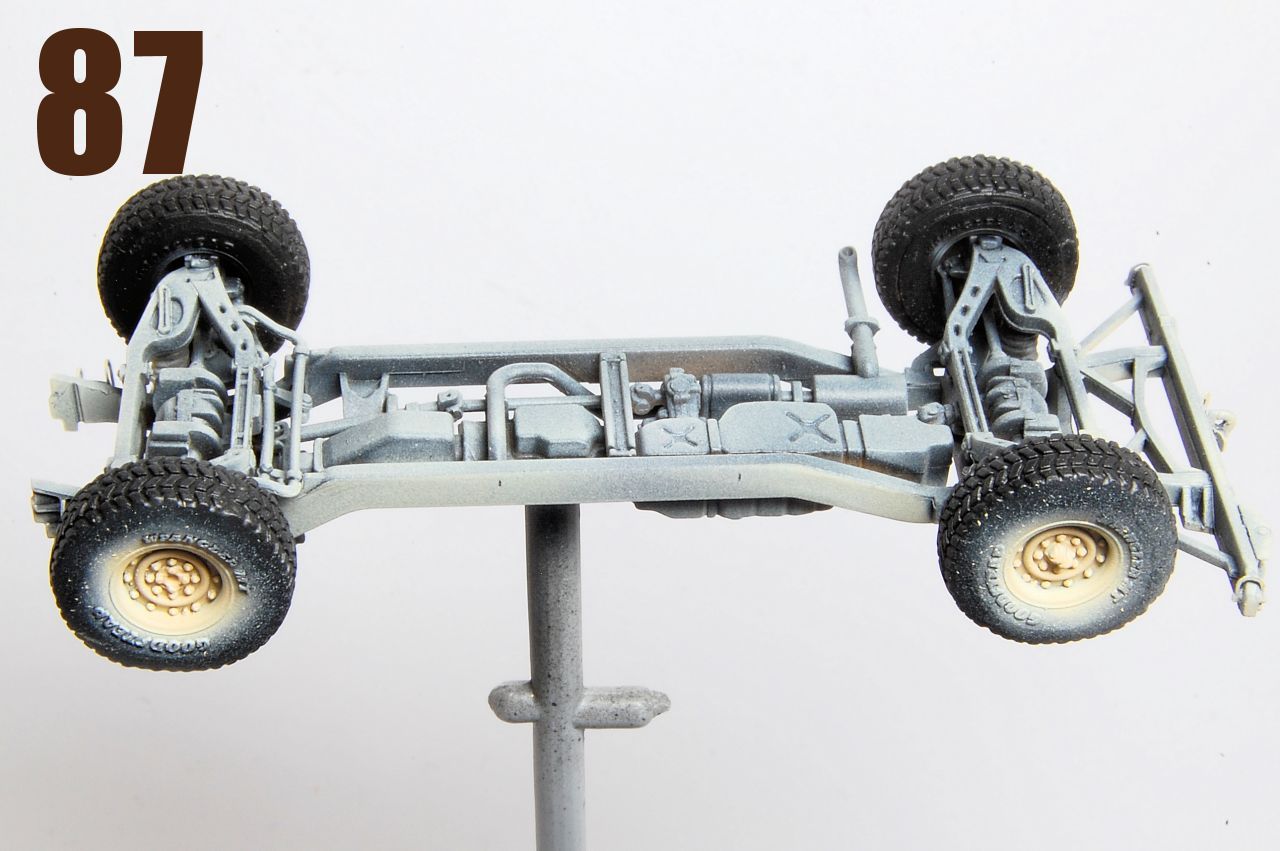
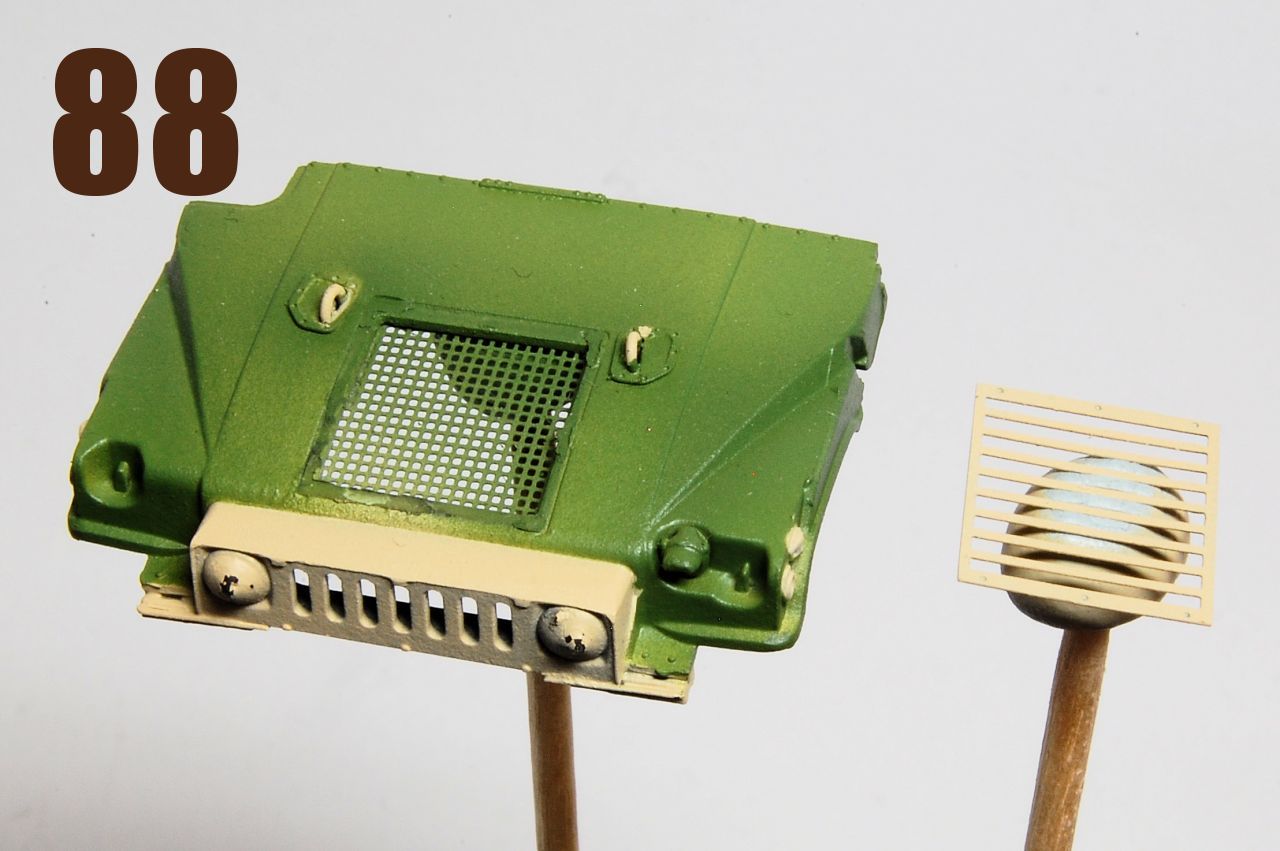
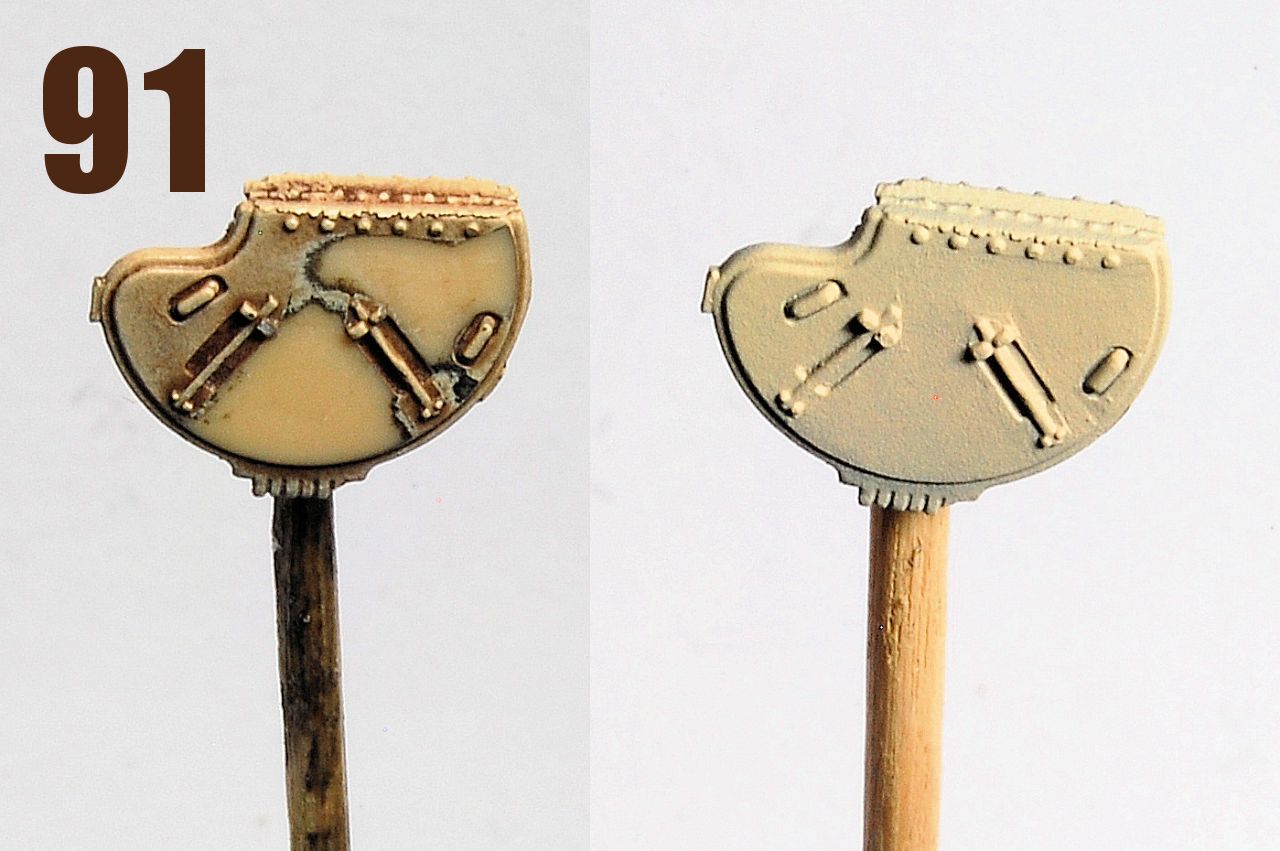
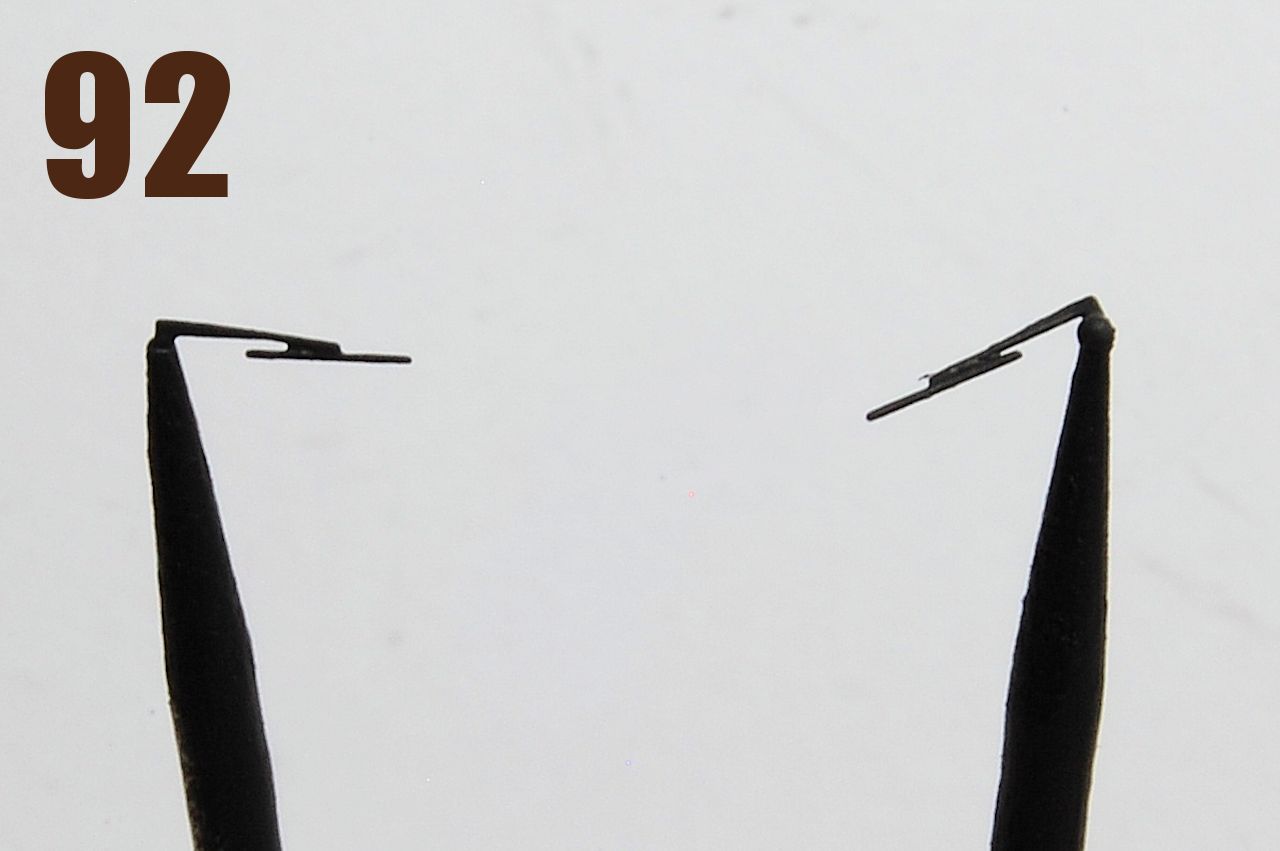
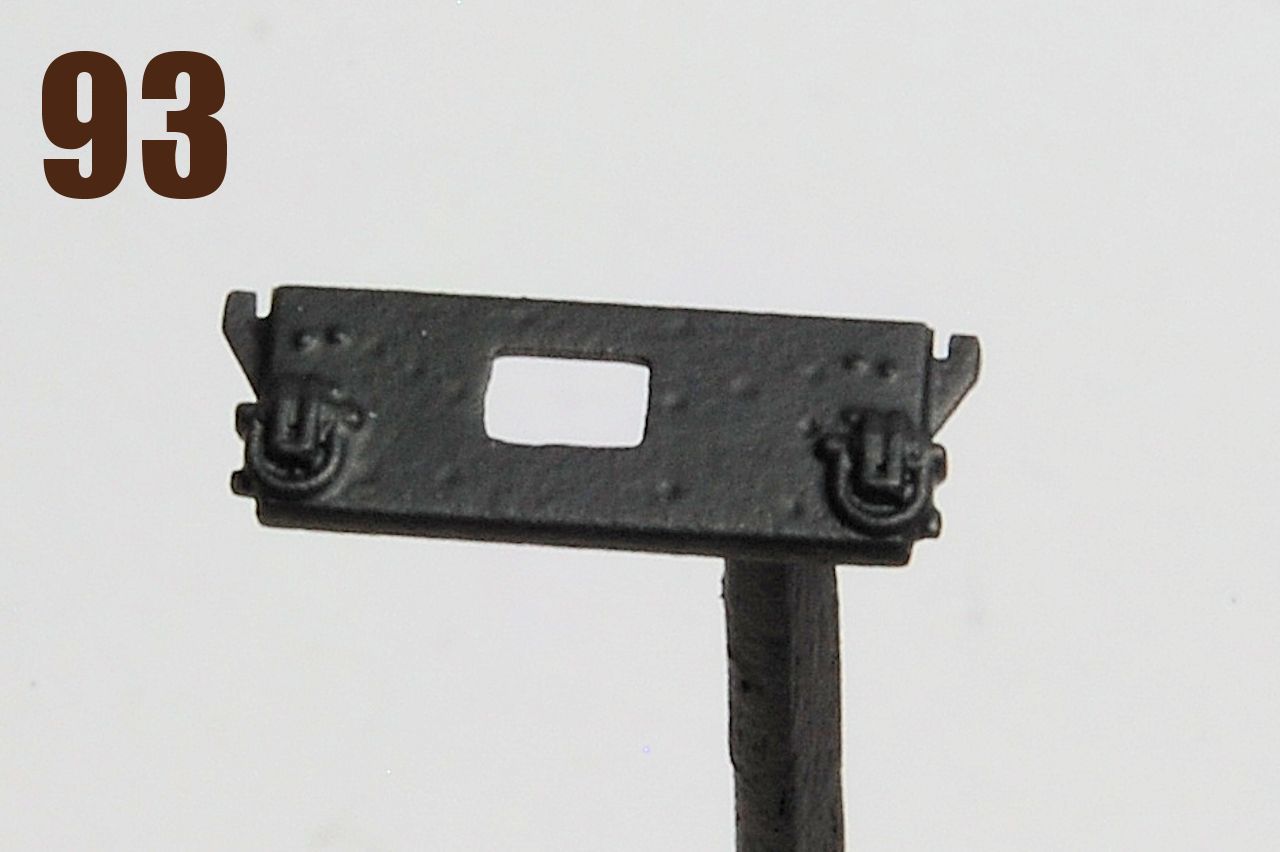
Time to paint the interior, so all the separate bits were mounted up (64), and the internals sprayed with something like NATO green, I think Mr Hobby Aqueous Hobby Color H422. The roof and rear door (65) feature ejector circles, those on the door in particular would need to be eliminated if posing it open; the same goes for the underside of the hood (66). Notice that all of those parts do at least include decent levels of detail despite the blemishes. No such marks appear on the doors however due to the two part construction; masking fluid was applied to the edges to make them easier to cement in place (67). The vehicle interior received some highlighting of a lighter green (68), Mr Hobby H312, on the basis that it might make some of it a bit more visible through the windows and roof hatch, instead of being just dark, followed by a little detail painting and some other weathering / shading (69, 70). With the interior painted, the turret ring was masked off with tape and the roof cemented on. Now the problem with the old side panels finally dawned on me, and after a few (ahem) oh dears, I managed to carefully prise them away from the rest of the bodywork (71). In (72) and (73) the new panels are in place. Apart from the external appearance of the new panels, a slight change has been made in that they now include the reinforced front windshield pillar, whereas in the first kit, this was only provided for by the windshield element itself. The doors are added (74, 75) as well as the mirrors, which is a risk, but I wanted them on before the main paint. As this is an OOB build, I left the mirrors as they came, but I think a big improvement would be to replace the brackets with wire to achieve a more scale appearance and also allow the mirrors to be angled in a little more. The vertical plate that mounts on top of the rear hatch was also attached; this plate looks simple, but turned out to be quite troublesome for me. The difficulty is that it has no definite means of attachment, other than using CA glue to bond the very thin edge on to the plastic surface, added to which it needs to sit between the rear hatch latch and the small pairs of studs that edge the hatch. If it was perfectly vertical, I think it would fit in place fine, but as it tilts forward slightly, it seemed to me that the edge didnt make perfect contact with the plastic, the line of studs being in the way. Then there is trying not to mess up the appearance with too much glue, but still getting it to remain attached properly. I don’t know how it attaches on the real thing, but either a bent over bracket, or perhaps a small pin extension on the PE components to locate into a hole drilled into the hatch, might be an improvement. Also visible in photo (75) is the rear left antenna bracket PE component (75A), the applique armour plate that fits just behind the rear passenger door (added after the door itself, 75B), and the double layered PE plate over the fuel filler cap recess (75C). Something that really needs attention is the elimination of the joins between the rear roof pillars and the rear side panels (75D). On the real thing this appears to be a single pressed piece of steel, so is a perfectly smooth curve, while here we have a join, and in fact particular attention is needed on the side with the a/c louvre, as the join is in the narrow gap between the roof and side ventilation slots. In photos (77, 78) is the top of the hood with the right inner lamp being added, there being two optional parts here, either clear or painted body colour, so Ive gone for body colour, hence it is added now, and thats the sprue tag still attached being used to position it until the cement is set. Also here the lifting rings have been added, using round wire instead of the flat hoops provided on the sheet, this being my only departure from an OOB build, but being both easier and looking better. The various subassemblies (78-84) were primed with Mr Surfacing Finisher 1500 mixed with cellulose thinners. This primer is excellent, the only downside being the toxic fumes, so vapour mask, gloves, goggles, garage door open even in sub-zero temperatures, are all necessary, and I still need to find some gloves that it doesnt react with. The lenses of the clear front side lights were masked with a dab of masking fluid, then sprayed orange on the insides, and primed on the outside (85). Now the main colour starts to go on (86), this being Mr Color 313, which although described as semi-gloss, is more like quarter-gloss, and was also thinned with cellulose thinners, with the same safety precautions followed. I think it is true to say that putting the toxicity to one side, this is the best paint mix Ive used through an airbrush, it just mists on very finely, with no drying or blocking on the tip, no grainy finish, no droplet formation, no spattering, just easy all the way. I didnt bother masking the tyres, roughly spraying the wheels in, the edges to be touched up later, while the chassis was given a very thin coat of the sand colour (87). The main headlamps were also covered with masking fluid, then the whole thing painted with sand; then I decided I liked the look of some M1114s that have this in the original green (no idea if this might be authentic with the FRAG5 doors) so the top grille was taken off, and the hood sprayed with a blend of the same two greens used for the interior (88). Having painted the turret hatch, two ejector marks that I had previously ignored became very obvious (90) so the hatch was removed, they were eliminated, and then repainted (91). The windshield wipers were mounted on cocktail sticks to be primed (92). The box top art and the painting guide show them as being painted the body colour, but I think in every photo Ive seen they appear to be black or some very dark colour, so the primer is how they stayed. More evidence of my disorderly build was forgetting about the lower front plate, and this was hurriedly primed with a Halfords spray can, a pity as you can see it has covered some of the detail (93).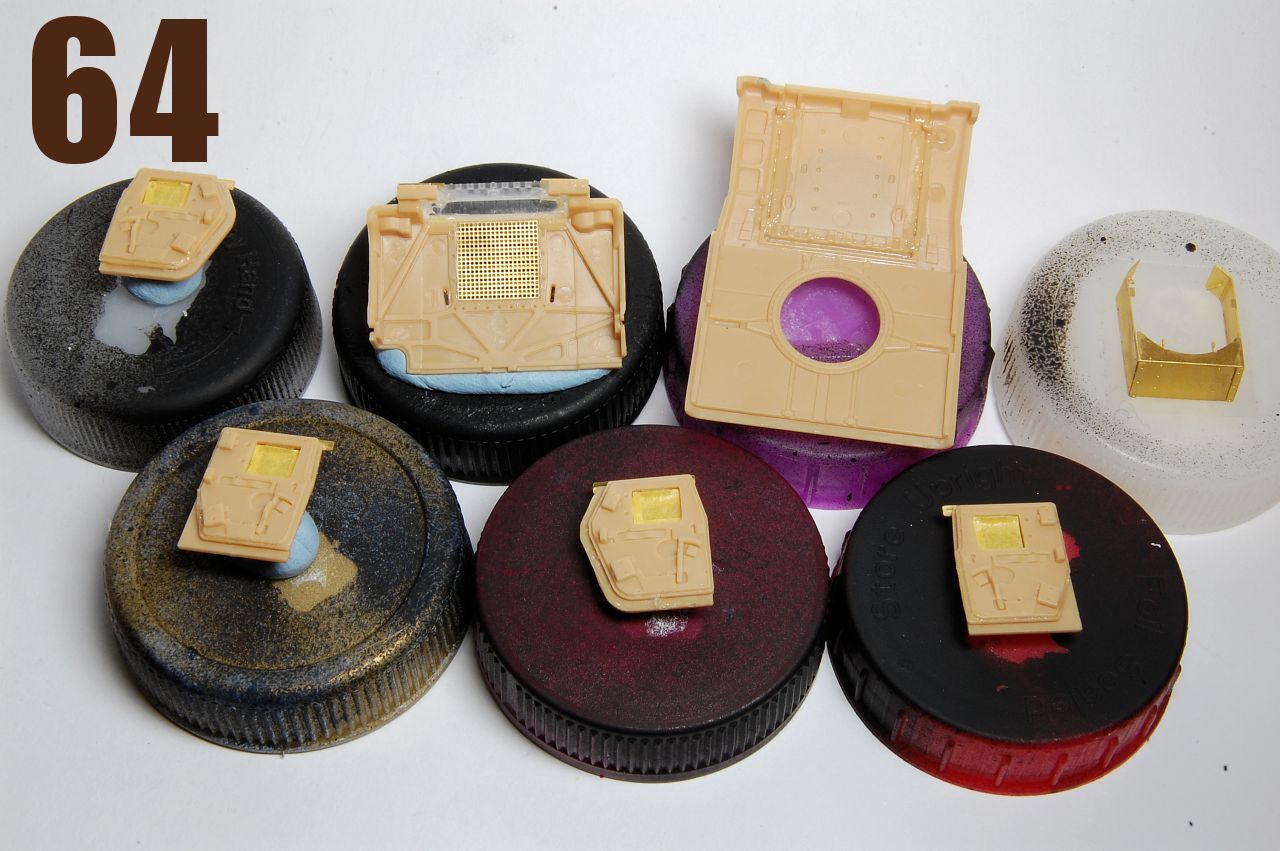


About the Author

FROM: ENGLAND - SOUTH EAST, UNITED KINGDOM
Earliest model memory is a Super Sabre my grandmother bought for me around 1972. Have always dabbled in painting and making things, and rediscovered doing that with plastic in 2008. Vowed then to complete the 30 year old stash, and have made some progress. Hobby goes hand in hand with BBC Radio 3...
Comments


The model looks great, thanks for the very thorough build review Matthew.
I like the braille scale Humvees from T-Molds, and with all the reviews I have found on-line, it seems the kits are mastered well. My only gripe is with the interior, which looks pretty basic, and the tires. I did notice an aftermarket set of resin tires which should help, but as far as I know there is no aftermarket update for the interior. I do wonder how much of the interior is visible on such a tiny model though...
Mario
MAR 25, 2018 - 02:53 AM

There should be an extendable platform for the gunner between the seats. And there should be a small shelf on the center dashboard holding a radio set and computer screen and keyboard.
MAR 25, 2018 - 04:25 AM

Yes, I agree about the interior details being basic, and my comment about decals being the only thing missing should have included these points (I had them in mind... then they slipped away again) I think the gunner step is the most obvious because it would be visible directly underneath the turret ring if the hatch is open. It would probably be quite easy to scratch as I think it is basically a box with a ridged top surface, like the floor, but it would have been good if it had been added to the additional sprue with the CREW antennae.
In answer to Mario's question about what is visible through the windows when all the doors are shut - not a lot, other what can be seen through the turret hatch, which is not much at all. It's a different story if you wanted to have any of the doors open. The interior door details are quite good, but as you correctly point out, the rest is quite simple. The comms / data gear that should be in the front would also have been a nice addition to the new sprue. The seats themselves are also a little basic. With all the doors shut however, it's not a big issue.
Regarding the wheels, for me they are only a problem from the point of view of buildability, but I think T-Model have pretty much acknowledged this, and even themselves posted a link to an aftermarket set of resin wheels by ScissorHandz, although I'm not sure of their availability outside of Asia.
MAR 25, 2018 - 06:40 PM
@Matthew; I'm struggling through my M1114 - If you had suggested "over-engineering" I would not disagree. I notice you did not use the concerntina-fold PE piece on the rear hood (bonnet). I found that piece impossible so I made one out of styrene strip- then discovered it is an optional part. On further M1114's I'll just discard it altogether. Don't particularly like the clear grill just for the sake of two molded-in headlight lenses. Would have preferred a solid-color grill with holes for separate clear lenses. Complicates painting with extra masking.
Still, I would take this one over Revell's any day.
MAR 26, 2018 - 04:13 AM
Perhaps an aftermarket company would tackle the lack of interior details. I tried to find more about Scissor Handz, but no luck... hopefully some of the international on-line vendors would pick up their line.
Anyway, back to the subject... I really like the Termin Molds model, it looks really good and your version did it justice. I don't usually do 1/72, but the Humvee is a very interesting subject for me and I might just take my chance with the braille scale. I wonder if the company is considering making more Humvee versions; GMV and other Special Ops versions comes to mind.
Mario
MAR 26, 2018 - 12:30 PM

Biggles, I felt that the PE enhancements, while they improve the look of the kit, do take it to another level of fiddliness, and as I recall from when building the first kit, there are a few other stressful moments, such as the steering wheel, which seemed more complicated than necessary, and certainly that is true of the wheels.
That concertina piece, the Combat Identification Panel - yes, in the text I said that the same thing happened to me, I have literally no idea how to use that piece, without a special former perhaps, but note that there is a plastic one on the accessories sprue, but it is framed, so I think it's to be hung on a door. Apparently these devices have a thermal signature that is different from the vehicle, I think the ridging is to keep them cool; it is supposed to make the vehicle recognisable to any pilots considering destroying them. Definitely optional, they seem to just tie or hang in place, I think they were used at the start of the Iraq war.
Also agree, clear headlamp unit makes it tricky to paint, as I pointed out, the instructions don't take account of the need to paint what is behind it, but then most kit instructions don't, I guess. I didn't get it masked 100% accurately, but found that a blob of masking fluid was a lot easier than trying to cut a circle of tape that small.
Hope this feature proves of some help however, and looking forward to seeing yours done. Don't forget those joins on the rear side to upper panel.
Mario, I think T-Model is planning even more variants, going by the fact that on the new sprue K there is a so far unused turret ring (8), and rear tail plate (3), and then you have already seen the CROWS II device they have designed, I wonder if that will go with the turret, and I am guessing there may also be an OGPK variant.
Thanks for the comps, Alex, Dave and Peter, it is appreciated.
MAR 26, 2018 - 07:06 PM

Your right on saying there is different configurations of the 1114. From what Ive seen is that it is crew dependent and they decided what they wanted to add to there own 1114. Not one was exactly the same. One had either the duke and the worlock or one had both or didnt have either and had the bullet directional indicator.
APR 28, 2018 - 03:25 AM
Copyright ©2021 by Matthew Lenton. Images and/or videos also by copyright holder unless otherwise noted. The views and opinions expressed herein are solely the views and opinions of the authors and/or contributors to this Web site and do not necessarily represent the views and/or opinions of Armorama, KitMaker Network, or Silver Star Enterrpises. All rights reserved. Originally published on: 2018-03-25 09:53:30. Unique Reads: 25647

WEB HOSTING BY


Copyright ©2021 Armorama and Kitmaker Network, a subsidiary of Silver Star Enterprises
All Rights Reserved. Please read our Conditions of Use and Privacy Policy.
All Rights Reserved. Please read our Conditions of Use and Privacy Policy.