

Constructive Feedback
For in-progress or completed build photos. Give and get contructive feedback!
For in-progress or completed build photos. Give and get contructive feedback!
Hosted by Darren Baker, Dave O'Meara
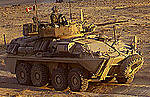
ASLAV III Type 1

shopkin4

Joined: March 29, 2009
KitMaker: 1,135 posts
Armorama: 1,030 posts
Posted: Friday, June 18, 2010 - 07:35 AM UTC
I as I'm sure others, will be patiently waiting

WayneB

Joined: July 22, 2008
KitMaker: 141 posts
Armorama: 130 posts
Posted: Friday, June 18, 2010 - 01:14 PM UTC
Glad to see you back ray. I had been wondering about this one.
Its a stunning build
W
Its a stunning build
W

bison126

Joined: June 10, 2004
KitMaker: 5,329 posts
Armorama: 5,204 posts
Posted: Friday, June 18, 2010 - 08:01 PM UTC
Nice to read you're back in town. I'll stay tuned for sure !
Olivier
Olivier

RomeoKilo
Joined: December 03, 2007
KitMaker: 160 posts
Armorama: 155 posts
Posted: Friday, June 18, 2010 - 11:23 PM UTC
Well got some stuff done today. Attached the storage bin to the side, and attached the PE continues tie downs.

Drilled the holes and attached the PE front light brackets and also attached the drivers periscopes and hatch. The drivers hatch spins freely on a thick peice of copper wire so it can be positioned open or closed.

Most of the day was spent on the rear doors. Just some minor sanding to get them to sit flush when closed and they will be done.

Every door and hatch except the engine deck has workable hinges.
The rear door handles work exactly like the real thing, swing them down (gently...) and they lock the door closed.


The hinges are not finished in this photo. Ive trialed it with thin wire so ive got a bit of play and its easy to remove the hatches and doors for painting. Once the slightly thicker copper wire is inserted in them they should be a lot firmer and the hatches should sit a lot better.

Close up of the hinges.

And one more photo just because i can

Another thing i managed to do today was break every single tiny drill bit i own.

Drilled the holes and attached the PE front light brackets and also attached the drivers periscopes and hatch. The drivers hatch spins freely on a thick peice of copper wire so it can be positioned open or closed.
Most of the day was spent on the rear doors. Just some minor sanding to get them to sit flush when closed and they will be done.
Every door and hatch except the engine deck has workable hinges.
The rear door handles work exactly like the real thing, swing them down (gently...) and they lock the door closed.
The hinges are not finished in this photo. Ive trialed it with thin wire so ive got a bit of play and its easy to remove the hatches and doors for painting. Once the slightly thicker copper wire is inserted in them they should be a lot firmer and the hatches should sit a lot better.
Close up of the hinges.
And one more photo just because i can
Another thing i managed to do today was break every single tiny drill bit i own.
WayneB
Joined: July 22, 2008
KitMaker: 141 posts
Armorama: 130 posts
Posted: Saturday, June 19, 2010 - 04:15 AM UTC
great stuff ray
RomeoKilo
Joined: December 03, 2007
KitMaker: 160 posts
Armorama: 155 posts
Posted: Thursday, July 01, 2010 - 01:10 AM UTC
Nonslip coating done.
Hatches Closed

Hatches Open

Hatches Closed
Hatches Open
Horace
Joined: March 23, 2010
KitMaker: 8 posts
Armorama: 6 posts
Posted: Thursday, July 01, 2010 - 09:37 AM UTC
Great job
Very interesting !
Very interesting !
RomeoKilo
Joined: December 03, 2007
KitMaker: 160 posts
Armorama: 155 posts
Posted: Wednesday, July 07, 2010 - 01:47 AM UTC
Ready for paint.


vonHengest
Joined: June 29, 2010
KitMaker: 5,854 posts
Armorama: 4,817 posts

Posted: Wednesday, July 07, 2010 - 02:40 PM UTC
Wow, this is looking super sharp! I'm getting ideas for things that I don't even have the skill or knowledge to pursue, keep up the good work!
recceboy

Joined: July 20, 2006
KitMaker: 706 posts
Armorama: 665 posts

Posted: Wednesday, July 07, 2010 - 03:02 PM UTC
Ray
You have nailed the little details, from a guy who helped with the product test for the Canuck Coyote back in 1996/97, well done.
Cheers
Anthony
You have nailed the little details, from a guy who helped with the product test for the Canuck Coyote back in 1996/97, well done.
Cheers
Anthony
RomeoKilo
Joined: December 03, 2007
KitMaker: 160 posts
Armorama: 155 posts
Posted: Wednesday, July 07, 2010 - 10:46 PM UTC
Thanks for the kind words lads. Much appreciated.
Primer done.


Primer done.
Boggie
Joined: December 08, 2005
KitMaker: 1,370 posts
Armorama: 1,331 posts

Posted: Thursday, July 08, 2010 - 12:33 AM UTC
Ray
Outstanding!
Bill
Outstanding!
Bill


Bowman18

Joined: July 19, 2008
KitMaker: 317 posts
Armorama: 286 posts

Posted: Monday, July 12, 2010 - 11:38 PM UTC
just seeing the interior on these things makes me want to try one.
Very nice model you have going there, cant wait to see some paint get layed down on that beast of a kit.
Very nice model you have going there, cant wait to see some paint get layed down on that beast of a kit.
grimmo
Joined: January 17, 2006
KitMaker: 752 posts
Armorama: 569 posts
Posted: Tuesday, July 13, 2010 - 01:39 AM UTC
Looking fantastic! Can't wait to see this painted up!
Btw, whats the bar hanging off the rear of the hull?
Btw, whats the bar hanging off the rear of the hull?

jasmils
Joined: December 23, 2003
KitMaker: 1,016 posts
Armorama: 745 posts

Posted: Tuesday, July 13, 2010 - 01:51 AM UTC
G'day Matt,
The bar holds this bit to the top of the hull.
Cheers Jason
The bar holds this bit to the top of the hull.
Cheers Jason
shopkin4
Joined: March 29, 2009
KitMaker: 1,135 posts
Armorama: 1,030 posts
Posted: Tuesday, July 13, 2010 - 05:17 AM UTC
ARGHHHH So excited for this! 
grimmo
Joined: January 17, 2006
KitMaker: 752 posts
Armorama: 569 posts
Posted: Tuesday, July 13, 2010 - 11:44 PM UTC
Cheers Jason!
Boggie
Joined: December 08, 2005
KitMaker: 1,370 posts
Armorama: 1,331 posts
Posted: Tuesday, July 13, 2010 - 11:58 PM UTC
Jason
This looks fantastic. The proportions look right on, you have managed to raise the bar again.
Bill
This looks fantastic. The proportions look right on, you have managed to raise the bar again.
Bill

soliver
Joined: September 12, 2009
KitMaker: 39 posts
Armorama: 38 posts
Posted: Wednesday, July 14, 2010 - 12:13 AM UTC
This is amazing work, I hope you have somewhere to show it off. Really good stuff.
RomeoKilo
Joined: December 03, 2007
KitMaker: 160 posts
Armorama: 155 posts
Posted: Wednesday, July 14, 2010 - 05:05 PM UTC
Jason- Bar armour is looking awesome mate. This car is definately getting a set once its available. Are you going to include the different rear door panel for veh's fitted with the spare tire carrier?
As usual, once i think its ready for paint i find things i need to add. I scratched door locking mechanisms on the rear hatches and the drivers hatch. I added the small mounts on each hatch were the earthing staps are fixed. Also, i lengthened the centre bar armour support as it seemed to short. I still need to scratch the lugs where it mounts to the vent fan cover- ill post up a pic once thats done so you all know what im on about. Also, i think the headlights were pointing too low so i fixed that. And i added some scratched bar armour mounts on the lower part of the hull, as the car im modeling had these left on.

I also noticed some PE tie downs i had missed

Also added a door lock mechinism to the scratched rear bar armour support. This is where the rear panel that covers the spare tire locks in.

I also added more hull mounts on the bottom corner of each rear door. After looking through some of my photos, i remembered that these were welded on at the same time the rear periscopes were removed and covered over before the cars went to Iraq for AMTG in 2005. They are where the rear door hinges attach for the bar armor door panels. Ive noticed that not all Phase 3 ASLAV have these- only if they were deployed to Iraq at some stage and had bar barmor fitted.

The spare tire carrier is only hinged temporarily so it can be removed come painting time at the moment- the hinges dont actually look like that!
Cheers
As usual, once i think its ready for paint i find things i need to add. I scratched door locking mechanisms on the rear hatches and the drivers hatch. I added the small mounts on each hatch were the earthing staps are fixed. Also, i lengthened the centre bar armour support as it seemed to short. I still need to scratch the lugs where it mounts to the vent fan cover- ill post up a pic once thats done so you all know what im on about. Also, i think the headlights were pointing too low so i fixed that. And i added some scratched bar armour mounts on the lower part of the hull, as the car im modeling had these left on.
I also noticed some PE tie downs i had missed
Also added a door lock mechinism to the scratched rear bar armour support. This is where the rear panel that covers the spare tire locks in.
I also added more hull mounts on the bottom corner of each rear door. After looking through some of my photos, i remembered that these were welded on at the same time the rear periscopes were removed and covered over before the cars went to Iraq for AMTG in 2005. They are where the rear door hinges attach for the bar armor door panels. Ive noticed that not all Phase 3 ASLAV have these- only if they were deployed to Iraq at some stage and had bar barmor fitted.
The spare tire carrier is only hinged temporarily so it can be removed come painting time at the moment- the hinges dont actually look like that!
Cheers
grimmo
Joined: January 17, 2006
KitMaker: 752 posts
Armorama: 569 posts
Posted: Wednesday, July 14, 2010 - 11:59 PM UTC
Quoted Text
Jason
This looks fantastic. The proportions look right on, you have managed to raise the bar again.
Bill
Intended pun?

Boggie
Joined: December 08, 2005
KitMaker: 1,370 posts
Armorama: 1,331 posts
Posted: Thursday, July 15, 2010 - 12:24 AM UTC
Matt
RomeoKilo
Joined: December 03, 2007
KitMaker: 160 posts
Armorama: 155 posts
Posted: Tuesday, August 10, 2010 - 10:10 PM UTC
Base tan coat.

And the Green. Very rough, lots to tidy up but ill worry about that after the black is done.


And the Green. Very rough, lots to tidy up but ill worry about that after the black is done.
 |

WEB HOSTING BY


Copyright ©2021 Armorama and Kitmaker Network, a subsidiary of Silver Star Enterprises
All Rights Reserved. Please read our Conditions of Use and Privacy Policy.
All Rights Reserved. Please read our Conditions of Use and Privacy Policy.