My Dio - "Look What I Found"
North Carolina, United States
Joined: February 22, 2002
KitMaker: 11,718 posts
Armorama: 7,138 posts
Posted: Friday, June 20, 2008 - 11:17 AM UTC
I looked for my old thread and couldn't find it so I'm starting a new one.
Here's an update on my diorama with a title something like the subject line.
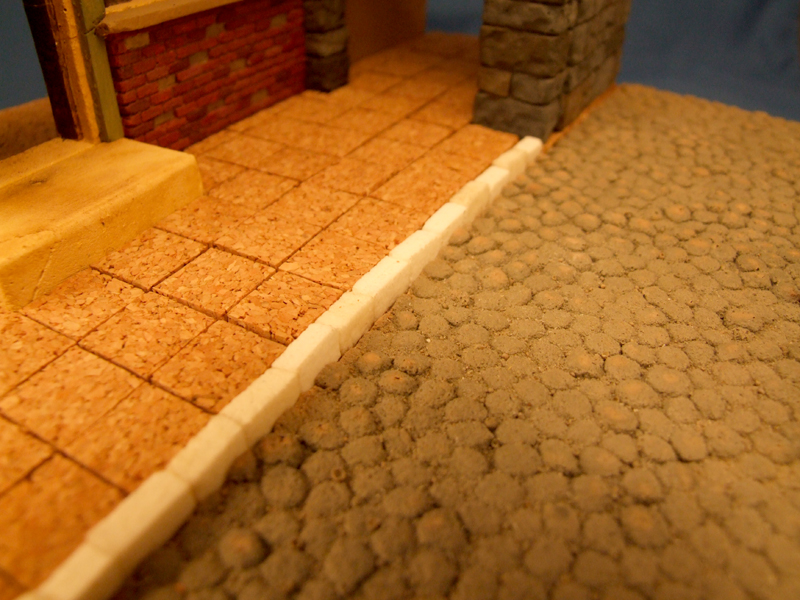
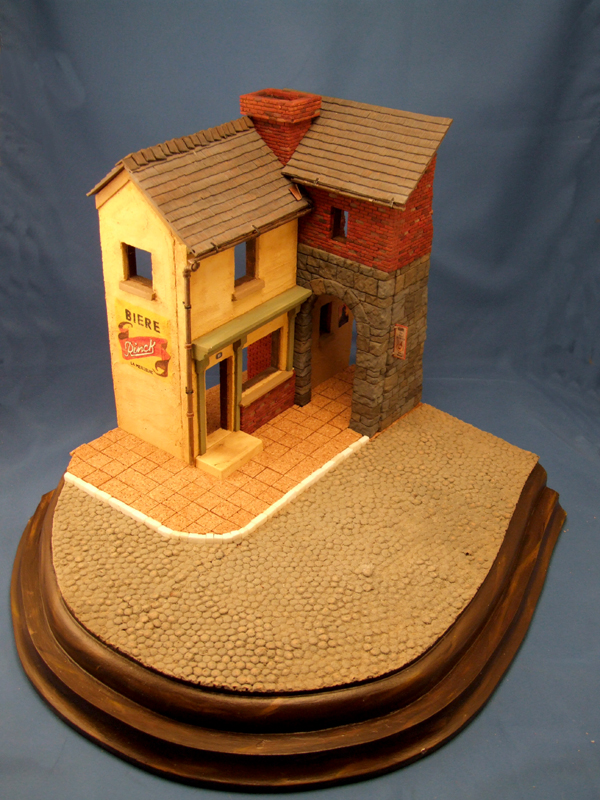
This is a CD building, scratch base, Kancali cobbles, poured resin cub stones, and cork sidewalks.
Colorado, United States
Joined: December 25, 2004
KitMaker: 3,770 posts
Armorama: 2,263 posts
Posted: Friday, June 20, 2008 - 12:52 PM UTC
That my friend, is sharp!
I really do like the Kancali sheets. The "poured resin cub stones"??" Are they individual stones or a run? The cork sidewalk stones...what are their 1/1 dimensions? They really do look the part. Base shape is kool...and the work on the buildings is really nice! Wish the hell I could pull that off!
Lookin' forward to seeing what you put on it!
Mike

North Carolina, United States
Joined: June 26, 2007
KitMaker: 2,116 posts
Armorama: 1,080 posts
Posted: Friday, June 20, 2008 - 02:00 PM UTC
Very Well Done....Mike said it all...Great Job on this.

milvehfan
Queensland, Australia
Joined: April 15, 2006
KitMaker: 915 posts
Armorama: 797 posts
Posted: Friday, June 20, 2008 - 07:48 PM UTC
Great effort on the dio Scott.
Looks excellent .
Look forward to seeing more .
Cheers
Rhone, France
Joined: November 04, 2005
KitMaker: 1,845 posts
Armorama: 777 posts
Posted: Friday, June 20, 2008 - 08:00 PM UTC
Great sense of space and perspective so far, now try to occupy the space in an handsome way!
JB
"too much colour distracts the viewer"
Jacques Tati
Luxembourg
Joined: January 19, 2004
KitMaker: 2,406 posts
Armorama: 2,224 posts
Posted: Friday, June 20, 2008 - 08:21 PM UTC
Hi Scott,
This is really looking good here. It's a nice mix of materials and i ma looking forward to see how the merge once painted.
What are the stones around the tunnel made of? You may have enumareted them but in this case i did not understand.
Cheers
Claude
North Carolina, United States
Joined: February 22, 2002
KitMaker: 11,718 posts
Armorama: 7,138 posts
Posted: Saturday, June 21, 2008 - 12:17 AM UTC
Thanks everyone.
Here are some answers for you.
The cork sidewalk blocks are 14x14mm.
The resin curb blocks are all indi blocks. They all stated out the same size but I custom cut almost all of them. The ones at the bend are cut in 1/2 and custom fit.
The tunnel piece is all plaster and is part of the CD kit. The entire building as you see it now is one kit. The detailed gutters and signage are my additions. The roof pieces are resin kit parts. At the joint where the right side tunnel wall meets the cobbles I am planning a small course of 'trim stones' similar to the curb stones.
I am planning on a base color of gray cobbles and gray sidewalk but with tons of layers of color varying from gray through tan/yellow to white(ish)
North Carolina, United States
Joined: January 20, 2005
KitMaker: 916 posts
Armorama: 758 posts
Posted: Saturday, June 21, 2008 - 04:06 AM UTC
Very nice - coming along well.
What w/ you fill joints in sidewalk with? drywall mud or something like that?
Old Chinese Proverb:
The journey of a thousand miles begins with the first step
Old Modelers Proverb:
The building of a thousand kits begins with the first sprue
Tennessee, United States
Joined: March 20, 2005
KitMaker: 420 posts
Armorama: 307 posts
Posted: Monday, June 23, 2008 - 02:26 PM UTC
Oh yeah...I remember seeing this one...
Looks great. I really like the dark stone work of the arch and the Biere sign on the side of the building is top notch. Is it possible to give a quick how to on that? Is it a commercially available product or did you come up with a technique?
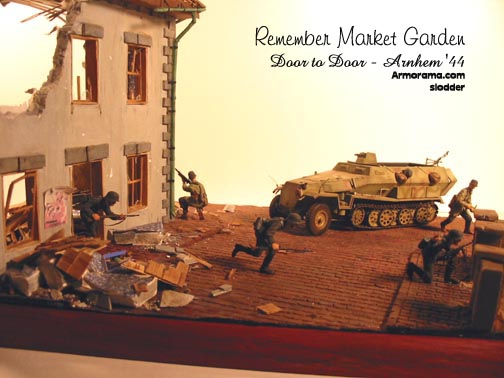
BTW, what ever happened to your Arnhem dio? Didn't you have one going that took place under the bridge? Had a shot-up 251 in it, something like that.
Bill.
Alabama, United States
Joined: September 26, 2002
KitMaker: 1,318 posts
Armorama: 837 posts
Posted: Tuesday, June 24, 2008 - 03:31 AM UTC
Looks great. I really like the appearance of the bricks. This is turning into a showstopper.
Patrick
North Carolina, United States
Joined: February 22, 2002
KitMaker: 11,718 posts
Armorama: 7,138 posts
Posted: Tuesday, June 24, 2008 - 03:54 AM UTC
Thanks again.
Bill, I did a quick SBS on the beer sign in my last thread. I'll have to search more for it and repost. It's all scratch.
I think there's another diorama floating around with a 251. I did one about three years ago in Arnham with a 251, but no bridge.
North Carolina, United States
Joined: February 22, 2002
KitMaker: 11,718 posts
Armorama: 7,138 posts
Posted: Tuesday, June 24, 2008 - 10:28 AM UTC
After a bunch of searching I found my last thread
Previous Thread The SBS on the sign is to print out a copy to scale, shrink or expand on a xerox till you get it right. Make one copy per shape. Cut out individual shapes from each piece working your way in. Mask off each shape and paint by hand.
I used watered down acrylic hobby paint to get a more transparant appearance. I worked my way from the lighter colors to darker colors. Then I lightly sanded it to weather it just that much more. See page two of the thread.
Victoria, Australia
Joined: July 28, 2004
KitMaker: 10,889 posts
Armorama: 3,245 posts
Posted: Wednesday, June 25, 2008 - 01:04 AM UTC
Hey Scott,
Great see you back at this one, buddy

Rudi
Beware the populist demagogues at the head of private armies
Tennessee, United States
Joined: March 20, 2005
KitMaker: 420 posts
Armorama: 307 posts
Posted: Wednesday, June 25, 2008 - 02:23 PM UTC
Scott
Thanks for digging up the old thread and for the further explanation on the sign painting method. I appreciate it.
Bill
Manitoba, Canada
Joined: August 13, 2006
KitMaker: 1,021 posts
Armorama: 805 posts
Posted: Wednesday, June 25, 2008 - 09:04 PM UTC
I'm glad you're still plugging away with this one. I'll be watching.
-Matt
It seemed she viewed guys on the same level as potatoes.
-Kyon
Virginia, United States
Joined: February 05, 2002
KitMaker: 6,149 posts
Armorama: 4,573 posts
Posted: Thursday, June 26, 2008 - 08:23 AM UTC
Scott-- great job. Keep it up
DJ
DJ Judge
COL (R), USA
"Tanker Boots do not a Tanker Make."
England - East Midlands, United Kingdom
Joined: December 16, 2005
KitMaker: 2,864 posts
Armorama: 303 posts
Posted: Thursday, June 26, 2008 - 10:16 AM UTC
real nice layout to this one Scott,looking forward to seeing more.
Steve
CLICK ON BANNER TO VISIT MY BLOG ---->
Indiana, United States
Joined: June 06, 2008
KitMaker: 344 posts
Armorama: 251 posts
Posted: Thursday, June 26, 2008 - 01:09 PM UTC
Great Job, Looks good for a ambush scene to me. You could really do alot with that scene.
thxs,
John

North Carolina, United States
Joined: February 22, 2002
KitMaker: 11,718 posts
Armorama: 7,138 posts
Posted: Monday, July 07, 2008 - 01:54 PM UTC
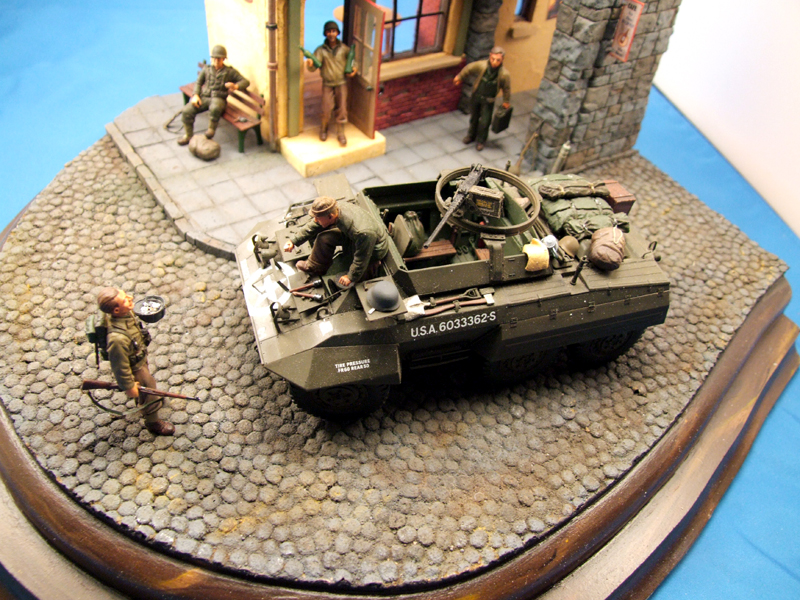
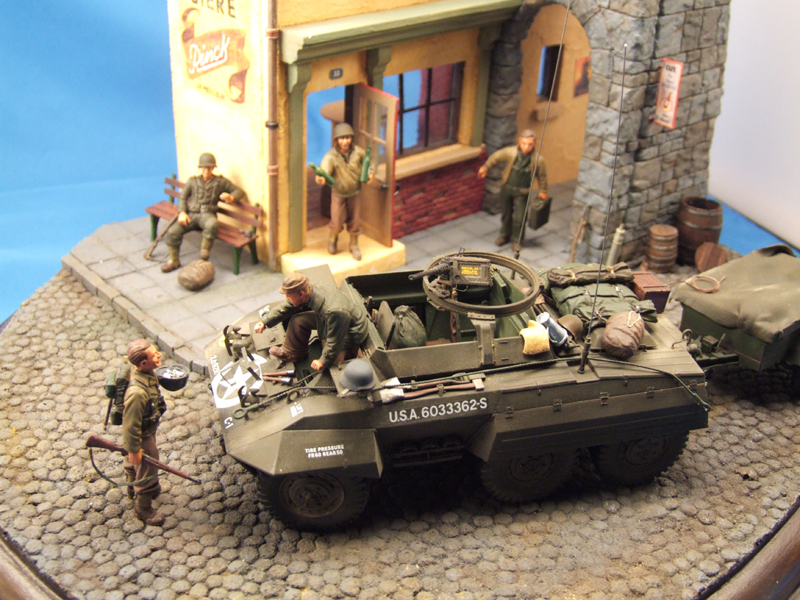
The last 10% takes 90% of the work......
So I'm down to the last 2%....... thoughts comments. It's nice to shoot pictures near the end because you get a totally different perspective.
I've got some details left to do, rope on the stowage, a few odds and end here and there, a bit of pastel work.
California, United States
Joined: June 30, 2008
KitMaker: 2,408 posts
Armorama: 2,394 posts
Posted: Monday, July 07, 2008 - 04:59 PM UTC
I'm reading this thread and all of a sudden the finished pic comes up. Very cool all around stuff. I like the seeing the supplies getting piled up on that M8. A handsome little dio. Congrats, Greg

Rhone, France
Joined: November 04, 2005
KitMaker: 1,845 posts
Armorama: 777 posts
Posted: Monday, July 07, 2008 - 08:03 PM UTC
well I really like the gfact that your diorama base is cut in a bit fo the same way as your buildings, there's an unfinished story feeling about it
Otherwise, looks neat, but well, all the stuff look like they are just put on the base, and the streets are yet too clean, a bit of extra mess shouldn't do any harm
"too much colour distracts the viewer"
Jacques Tati
North Carolina, United States
Joined: February 22, 2002
KitMaker: 11,718 posts
Armorama: 7,138 posts
Posted: Monday, July 07, 2008 - 10:47 PM UTC
Thanks guys.
jba, I agree that the road is too open and empty. I do want a 'clean' scene though, no battle rubble or anything like that. To the same empty point, I've got two barrels I'm working on for the right side. I'm 1/2 tempted to build a jeep for the left side? Maybe a cart, or something on the sidewalk. So, in the middle 1940's there weren't a lot of cars parked on the street, and horses wouldn't be out of a stable, maybe another soldier or two?
Illinois, United States
Joined: May 11, 2008
KitMaker: 767 posts
Armorama: 672 posts
Posted: Tuesday, July 08, 2008 - 04:35 PM UTC
Maybe add a few propaganda posters (maybe some on the ground) , a broken pot of flowers, a small table and a couple of chairs, some broken bottles/glasses, and a white sheet hanging out of one of the windows.
North Carolina, United States
Joined: February 22, 2002
KitMaker: 11,718 posts
Armorama: 7,138 posts
Posted: Monday, July 28, 2008 - 11:31 PM UTC
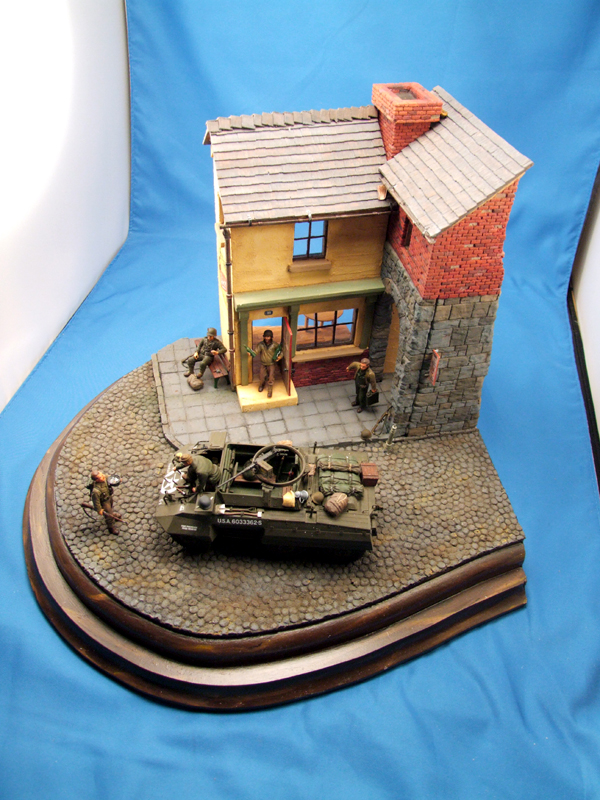
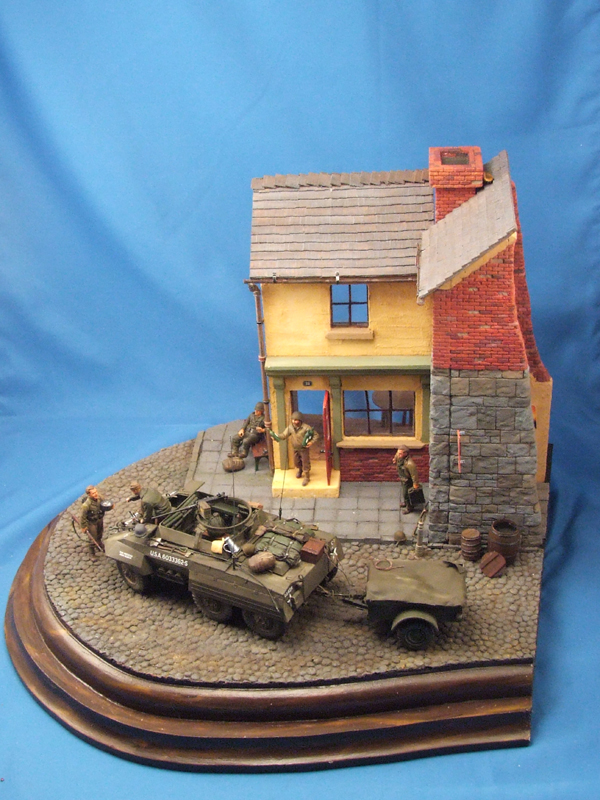
Well here it is - finally done.
The trailer is totally scratch built. I upscaled a 1/48th scale kit from Bandi and applied a bit of gizmology to it.
These are just quick test shots. My son used my camera and all the settings are different so I've got to reset the white balance, adjust depth of field....
More photos later.

#036
England - West Midlands, United Kingdom
Joined: December 01, 2001
KitMaker: 1,998 posts
Armorama: 1,236 posts
Posted: Monday, July 28, 2008 - 11:47 PM UTC
Him Scott
the finished diorama certainly looks good, the addition of the trailer helps fill the original dead space you had.
It's nice to see a "clean" diorama for a change rather than going down the usual blown up street look
cheers
keith
A VETERAN - Whether active duty or retired is someone who, at one point in their life, wrote a blank check made payable to "Great Britain", for an amount of "up to and including my life". That is HONOUR, and there are way too many people who forget this


