Now I have received my kit (from ebay).
I planned to build a diorama which shows a snowy scene, comparable to the very impressive 1/72 ACE-kit boxart of this gun.
(For me) ... a lonely piece, without personnel and ammunition.
greetings...
Soeren
ACE-models very impressive boxart of their 1/72 scale kit.
Armor/AFV
For discussions on tanks, artillery, jeeps, etc.
Hosted by Darren Baker, Mario Matijasic
Trumpeter 10cm s.K. 18 cannon
Gorizont
Sachsen, Germany
Joined: November 28, 2007
KitMaker: 1,462 posts
Armorama: 1,289 posts
Joined: November 28, 2007
KitMaker: 1,462 posts
Armorama: 1,289 posts
Posted: Wednesday, December 03, 2008 - 09:25 AM UTC
Gorizont
Sachsen, Germany
Joined: November 28, 2007
KitMaker: 1,462 posts
Armorama: 1,289 posts
Joined: November 28, 2007
KitMaker: 1,462 posts
Armorama: 1,289 posts
Posted: Thursday, December 04, 2008 - 09:49 AM UTC
Some in-progress pictures will follow as soon as possible. Also this is my first dio. ;-)
greetings
Soeren
greetings
Soeren
Posted: Thursday, December 04, 2008 - 10:25 AM UTC
I look forward to what you come up with.
Gorizont
Sachsen, Germany
Joined: November 28, 2007
KitMaker: 1,462 posts
Armorama: 1,289 posts
Joined: November 28, 2007
KitMaker: 1,462 posts
Armorama: 1,289 posts
Posted: Thursday, December 11, 2008 - 09:27 AM UTC
Now Iīve begun to build the gun.
I started with "glueing" (?) the parts of the wheels. I took one wheel for the limber and one main-wheel. The other two will follow later.
I read in another Build-blog of Robert Blokker, that he at first glued the wheel-parts together and then attached the rubber-parts. I also made it like this. I didnīt glued the rubber-rims.
The other part which I built, was one of the spades. Also I changed the working-surface, from a darker paper to a lighter one. The darker is better for finding small parts, but I get very dark fingers... and parts too. ;-) But after painting, this should not be visible.
I will upload the photos later.
Thats all for now.
Soeren
Posted: Thursday, December 11, 2008 - 11:07 AM UTC
Soeren some pictures would help the people here form an opinion on your work, you will not get a lot of feedback on your efforts from words alone. If you need help with any aspect of placing pictures in your post please shout.
Posted: Thursday, December 11, 2008 - 08:22 PM UTC
Soeren, sounds interesting.
I am looking forward to see pictures of your build.
Gorizont
Sachsen, Germany
Joined: November 28, 2007
KitMaker: 1,462 posts
Armorama: 1,289 posts
Joined: November 28, 2007
KitMaker: 1,462 posts
Armorama: 1,289 posts
Posted: Thursday, December 11, 2008 - 08:36 PM UTC
Hi Darren, youīre right. Photos are very useful to show progress... and errors too. ;-)
I built the parts until late evening and I didnīt had an idea, how to include the pics into the forum. (it was too late) ;-)
Now I have added 4 pics. Two for the 2 different wheels, and 2 for the shovel. They also can be found in my gallery.
I cleaned the shovel after some time from glue-rests.
I built the parts until late evening and I didnīt had an idea, how to include the pics into the forum. (it was too late) ;-)
Now I have added 4 pics. Two for the 2 different wheels, and 2 for the shovel. They also can be found in my gallery.
I cleaned the shovel after some time from glue-rests.
Gorizont
Sachsen, Germany
Joined: November 28, 2007
KitMaker: 1,462 posts
Armorama: 1,289 posts
Joined: November 28, 2007
KitMaker: 1,462 posts
Armorama: 1,289 posts
Posted: Friday, December 12, 2008 - 08:48 AM UTC
One more update.
Today I built the other limber-wheel and spade/shovel.
I made an "error" with the first spade, which has some inaccuracies. But perhaps I can fill it later with "dirt". Also the new one looks much cleaner. ;-)
Soeren
Today I built the other limber-wheel and spade/shovel.
I made an "error" with the first spade, which has some inaccuracies. But perhaps I can fill it later with "dirt". Also the new one looks much cleaner. ;-)
Soeren
Gorizont
Sachsen, Germany
Joined: November 28, 2007
KitMaker: 1,462 posts
Armorama: 1,289 posts
Joined: November 28, 2007
KitMaker: 1,462 posts
Armorama: 1,289 posts
Posted: Sunday, December 14, 2008 - 03:59 AM UTC
two lattices (for the shovels), which are attached to the limber when travelling; 2 parts for the limber itself and the incompleted breech
all 4 wheels
dryfitting the (incomplete) limber-parts
Soeren
all 4 wheels
dryfitting the (incomplete) limber-parts
Soeren
Gorizont
Sachsen, Germany
Joined: November 28, 2007
KitMaker: 1,462 posts
Armorama: 1,289 posts
Joined: November 28, 2007
KitMaker: 1,462 posts
Armorama: 1,289 posts
Posted: Monday, December 15, 2008 - 09:16 AM UTC
the barrel with its large grooves
the breechblock itself needs some correction, additions were made and more parts are complete...
the breechblock after "correction"; the 2 half-parts look better after rework
the nearly completed limber
the breechblock itself needs some correction, additions were made and more parts are complete...
the breechblock after "correction"; the 2 half-parts look better after rework
the nearly completed limber
Gorizont
Sachsen, Germany
Joined: November 28, 2007
KitMaker: 1,462 posts
Armorama: 1,289 posts
Joined: November 28, 2007
KitMaker: 1,462 posts
Armorama: 1,289 posts
Posted: Wednesday, December 17, 2008 - 08:58 AM UTC
the breech after one more sanding-session
test-fitting the gun-barrel
the limber (wheels are not glued)
both hole-plates ready for mating with the limber
---
at first, I planned to build the gun in firing-position, but the kit is only for the towed version.
so I made some modifications on the limber and the "hole-plates", which get attached on the spades.
this was my first try, to make changes on a model kit ever! ;-)
but the problem is, how to get this parts later together.
---
one reworked part and the material, which I used for
the other reworked part
filled with plastic from parts of the sprues and cut later
building the towing device for the limber - part 1
building the towing device for the limber - part 2
building the towing device for the limber - part 3
test-build of the limber (wheels are not glued)
Posted: Wednesday, December 17, 2008 - 07:41 PM UTC
Looks like you are getting there bud.
Gorizont
Sachsen, Germany
Joined: November 28, 2007
KitMaker: 1,462 posts
Armorama: 1,289 posts
Joined: November 28, 2007
KitMaker: 1,462 posts
Armorama: 1,289 posts
Posted: Saturday, December 20, 2008 - 07:44 AM UTC
a new part...
some very small parts are to combine...
the parts are to wide; I shortened both sides
(difference between shortened and original can be seen) that should help a bit
some very small parts are to combine...
the parts are to wide; I shortened both sides
(difference between shortened and original can be seen) that should help a bit
Gorizont
Sachsen, Germany
Joined: November 28, 2007
KitMaker: 1,462 posts
Armorama: 1,289 posts
Joined: November 28, 2007
KitMaker: 1,462 posts
Armorama: 1,289 posts
Posted: Sunday, December 21, 2008 - 09:00 AM UTC
Unfortunely I made an mistake with the incompleted "wheel part" - I filed them...
Now I will see, how to fix the problem and I have to use superglue for adding the main-wheels.
Gorizont
Sachsen, Germany
Joined: November 28, 2007
KitMaker: 1,462 posts
Armorama: 1,289 posts
Joined: November 28, 2007
KitMaker: 1,462 posts
Armorama: 1,289 posts
Posted: Monday, December 22, 2008 - 10:39 AM UTC
some smaller parts (hydraulic-fluid storage?)
a handbrake for the gun
added to the "chassis"
holder for the gun cradle (with lower parts for the height-mechanism)
upper parts for the height-mechanism-cylinders
brass parts are not glued yet
a handbrake for the gun
added to the "chassis"
holder for the gun cradle (with lower parts for the height-mechanism)
upper parts for the height-mechanism-cylinders
brass parts are not glued yet
Gorizont
Sachsen, Germany
Joined: November 28, 2007
KitMaker: 1,462 posts
Armorama: 1,289 posts
Joined: November 28, 2007
KitMaker: 1,462 posts
Armorama: 1,289 posts
Posted: Wednesday, December 24, 2008 - 04:01 AM UTC
the next step
some parts were glued...
... and added later to the gun
one "missing" part was added (center, between the lower parts of the "hydraulic-tubes")
the new part looks better after refining, but not perfect; also the brass-tube needs some cleaning
some glue was removed...
some parts were glued...
... and added later to the gun
one "missing" part was added (center, between the lower parts of the "hydraulic-tubes")
the new part looks better after refining, but not perfect; also the brass-tube needs some cleaning
some glue was removed...
Gorizont
Sachsen, Germany
Joined: November 28, 2007
KitMaker: 1,462 posts
Armorama: 1,289 posts
Joined: November 28, 2007
KitMaker: 1,462 posts
Armorama: 1,289 posts
Posted: Monday, December 29, 2008 - 11:11 AM UTC
In the last days Iīve built more parts.
the optical system...
... and attached to the "gun"
some of the many parts to add to the trail-arms...
first parts are completed
one side...
the other side
both trail-arms...
and finally... all completed parts so far...
the optical system...
... and attached to the "gun"
some of the many parts to add to the trail-arms...
first parts are completed
one side...
the other side
both trail-arms...
and finally... all completed parts so far...
Gorizont
Sachsen, Germany
Joined: November 28, 2007
KitMaker: 1,462 posts
Armorama: 1,289 posts
Joined: November 28, 2007
KitMaker: 1,462 posts
Armorama: 1,289 posts
Posted: Sunday, January 04, 2009 - 04:51 AM UTC
A small update today.
I glued the wheels to its axles and after a dryingphase of more than 12 hours I made some photos of the gun.
The trailarms are not glued onto the carriage, also the gun-cradle with the barrel part is not glued yet.
testbuild - firing mode
testbuild - travelling mode
note: the holder-part which connects the trailarms to the limber, doesnt fit. but I will build my model in firing mode.
Gorizont
Sachsen, Germany
Joined: November 28, 2007
KitMaker: 1,462 posts
Armorama: 1,289 posts
Joined: November 28, 2007
KitMaker: 1,462 posts
Armorama: 1,289 posts
Posted: Wednesday, January 07, 2009 - 07:38 AM UTC
next update:
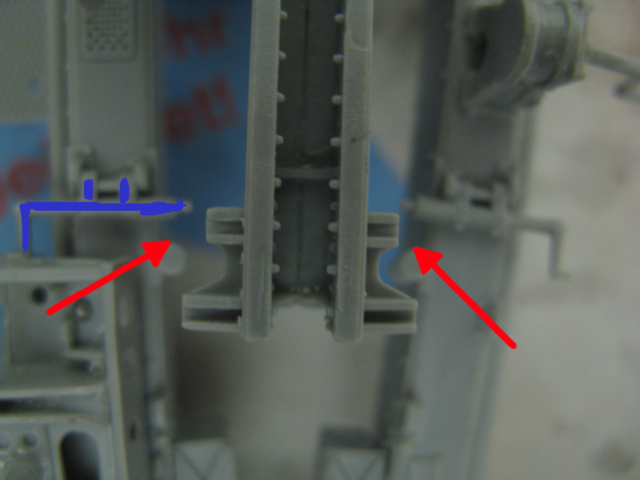
holders (blue-marked) and attachment-points (red) for the gun-cradle; also when the barrel is elevated a bit, they would not fit
result: instable barrel while in travelling-position
above the breech-block was a small rod, which I removed for a "cleaner" fit of the barrel to the gun-cradle
big and small (Ace-models s.K.18 - tested for my first try for the diorama one year ago)
idea for the dio - overview, using an DIN-A4-sized picture-frame
(trail-spades are not glued, also one of them is not completed)
idea for the dio - looks like the Ace-models-boxart ;-)
Gorizont
Sachsen, Germany
Joined: November 28, 2007
KitMaker: 1,462 posts
Armorama: 1,289 posts
Joined: November 28, 2007
KitMaker: 1,462 posts
Armorama: 1,289 posts
Posted: Monday, January 12, 2009 - 08:43 AM UTC
the gun is completed now, but one of the wheels broke away and was glued again.
also I did not attach the "transmission-part" for elevating the barrel. my plan, removing the rubber-rims while painting, is not possible; but for the limber I will try this.
for the diorama, I think about some "terraforming". I dont have the idea, which materials I should use. real earth-dirt would be the best, but the problem could be the small animals inside. ;-)
Posted: Monday, January 12, 2009 - 10:14 AM UTC
Soeren as you have done most of the needed work already why not send in a build feature to us here at Armorama when you get finished, after all we don't get that many field gun builds. great work so far.
wbill76
Texas, United States
Joined: May 02, 2006
KitMaker: 5,425 posts
Armorama: 4,659 posts
Joined: May 02, 2006
KitMaker: 5,425 posts
Armorama: 4,659 posts
Posted: Monday, January 12, 2009 - 11:11 AM UTC
Been following along with this one for a while Soeren, nice to see it get this far along...looking forward to see it placed in the dio.
Gorizont
Sachsen, Germany
Joined: November 28, 2007
KitMaker: 1,462 posts
Armorama: 1,289 posts
Joined: November 28, 2007
KitMaker: 1,462 posts
Armorama: 1,289 posts
Posted: Sunday, January 18, 2009 - 09:28 PM UTC
After the update on the Nasa-forum (russian-space), the next update here. ;-)
I reworked the trail-spades by removing the lower parts.
As a result, itīs easier to show, that they are "digged" deeper into the ground.
I had to be careful, the spades can break! I broke away small parts from the first one.
With the other, I tried an other technique.
I made 2 cuts at the two vertical holders (the things with the holes), and 2 cuts on the sides of the spades.
After that, itīs easy to bend (and break) the un-wanted part. One "session" with the sanding-tool/ filer later, they have a cleaner look.
Also I added the connection-rod for elevating the barrel, but I cut it into two pieces.
(can be seen on the lower picture, next to the wheel on the left side)
Darren, itīs a fine idea, with the kit-build-feature! I will try this later. ;-)
For the dio, my idea was using fine sand (mixed with wood-glue) as a base and the (white/grey) content from cat-toilets, for small stones. ;-)
Later, all gets a dark-brown color and a covering with snow.
Soeren
I reworked the trail-spades by removing the lower parts.
As a result, itīs easier to show, that they are "digged" deeper into the ground.
I had to be careful, the spades can break! I broke away small parts from the first one.
With the other, I tried an other technique.
I made 2 cuts at the two vertical holders (the things with the holes), and 2 cuts on the sides of the spades.
After that, itīs easy to bend (and break) the un-wanted part. One "session" with the sanding-tool/ filer later, they have a cleaner look.
Also I added the connection-rod for elevating the barrel, but I cut it into two pieces.
(can be seen on the lower picture, next to the wheel on the left side)
Darren, itīs a fine idea, with the kit-build-feature! I will try this later. ;-)
For the dio, my idea was using fine sand (mixed with wood-glue) as a base and the (white/grey) content from cat-toilets, for small stones. ;-)
Later, all gets a dark-brown color and a covering with snow.
Soeren
Gorizont
Sachsen, Germany
Joined: November 28, 2007
KitMaker: 1,462 posts
Armorama: 1,289 posts
Joined: November 28, 2007
KitMaker: 1,462 posts
Armorama: 1,289 posts
Posted: Saturday, January 24, 2009 - 09:16 AM UTC
Good evening to all.
Here is the next update.
Some time ago, I bought a grass-mat, which I tested. ;-)
I used my shaver and an older blade to make some tests with the mat. The result should be a ground, partly free of grass and get covered with earth/dirt later.
Iīm not sure with the result or the base itself. Because this is my first diorama and try for it, I had some problems to find "good" material and a ground, which I could use for.
I would use the partly shaved grass-mat, because itīs very strong.
Also I found some fine stuff from the model-tramway-part, which I could use. A mixed darker earth would be the best at first.
The damaged blades of the shaver. Do not strike, please! ;-)
I also made an "artwork" of the unfinished set, using some photos and the gun.
I will delete some pictures in my gallery, because I donīt have enough store-space.
Soeren
Gorizont
Sachsen, Germany
Joined: November 28, 2007
KitMaker: 1,462 posts
Armorama: 1,289 posts
Joined: November 28, 2007
KitMaker: 1,462 posts
Armorama: 1,289 posts
Posted: Sunday, February 01, 2009 - 09:01 AM UTC
The next update, after deleting some pictures from my gallery.
I bought 2 small bags of gravel (for model-trains) and glued it using wood glue.
the materials...
Later I will buy fine sand, for smoothing the "rough" surface and I try to remove some parts.
Test of the gun on its place.
I bought 2 small bags of gravel (for model-trains) and glued it using wood glue.
the materials...
Later I will buy fine sand, for smoothing the "rough" surface and I try to remove some parts.
Test of the gun on its place.