Hosted by Darren Baker
USMC M1A1 w/ TAGS & TWMP WIP
AngryDog

Joined: March 27, 2004
KitMaker: 1,114 posts
Armorama: 900 posts

Posted: Thursday, January 20, 2011 - 01:51 AM UTC
Jay, can you be a bit more specific, what info do you need?
hliu24

Joined: November 19, 2010
KitMaker: 798 posts
Armorama: 797 posts

Posted: Thursday, January 20, 2011 - 07:51 PM UTC
Hi, Nick
Pre shading and air brush Processing, weathering is too early for me
And I looked at most of your works here, besides the insane scratch build capability, you also have incredible painting skill too. I am trying to learn from all the masters here
Regards
Jay
Pre shading and air brush Processing, weathering is too early for me

And I looked at most of your works here, besides the insane scratch build capability, you also have incredible painting skill too. I am trying to learn from all the masters here
Regards
Jay
jhoog59

Joined: November 13, 2005
KitMaker: 189 posts
Armorama: 32 posts

Posted: Thursday, January 20, 2011 - 11:00 PM UTC
Your scratchbuilding and detailing skills are amazing.
Jim
Jim
ti

Joined: May 08, 2002
KitMaker: 2,264 posts
Armorama: 1,763 posts

Posted: Thursday, January 20, 2011 - 11:30 PM UTC
Amazing scratch building abilities. I'm loving your work here. Truly inspirational.
yufkey70

Joined: July 16, 2005
KitMaker: 264 posts
Armorama: 263 posts

Posted: Friday, January 21, 2011 - 04:23 AM UTC
Great detail in the painting 

bill_c

Joined: January 09, 2008
KitMaker: 10,553 posts
Armorama: 8,109 posts

Posted: Friday, January 21, 2011 - 05:37 AM UTC
Excellent! 

AngryDog

Joined: March 27, 2004
KitMaker: 1,114 posts
Armorama: 900 posts

Posted: Saturday, January 22, 2011 - 12:01 AM UTC
Thank You Guys!
Jay,
IMHO.....About my painting skills..
I don't t do preshading anymore. Postshading is a bit harder at first, cause you have to be careful you don't overdo it. Simply said, follow a rule of thumb of "building up layers" of paint for ALL paint work. This means thinning down your paints a little more than normal. Here you have to master one of two methods - Either your finger control of your airbrush for paint & air release Or the gradual thinning down ratio of paint & thinner. Once you get the hang of one of them, the process is a breeze.
As for my weathering, I don't really follow a die-hard sequence, besides the basic rules of which paint/oils over or under which. I tend to jump back and fort and skip some steps and repeat others. Depending on the intensity and sizes of the decals, sometimes I apply them after the post-shade. The process all depends on whether I've achieved the "look" I want in each process. And /or I want more or less contrast.
From the very begining of the first color coat application...contrast is a key to me, so I take note of the mixing of how dark or light the color variations to be applied in every step.
A note on Primer, apply it like paint, in thin layers, particularly on the fine details. I use Humbrol enamel, but making a thorough transition to Vallejo and Life color acrylics.
Here goes :
~Primer
~Main color/ colors.
~Gloss coat/Decals/Gloss coat/
~Touch up for decal areas (to blend the artwork to the tank)
~Main color+darker shade/shades mix - post shading for undertones for later weathering applications, recessed areas, joints and details.
This is the initiate of the weathering process and is very important. The larger, less featureless areas is where you'll shade along the edges, add large streaks, blotches,etc. These will be the undermost color tone especially for single color paint work. Jumping forward, this will act as a base and really compliment the oil paint applications, mainly the "dots" oil method.
OR
~ Main color+lighter shade/shades mix.
As a touch up if you overdid the postshading for light or sand-colored armor.
As a color fade/blend/variation for darker colored armor, such as WWII, Israeli and camoflage modern AFVs, this is an important step, where besides the lighter color mix layers to be applied, you'll want to spray some very light coats of the appropreiate "sand" color as the enviroment the AFV is to be depicted in. This will also be a good blending as a base color tone for pigments later.
(Perhaps my "postshading" method in both processes are similar to "color modulation" techique by popular paint and pigment produces.)
~Painting of detail parts.
~Pin washes and smudges with various Oils for particular areas like recessed lines,areas, welds, joints, details..And on top of "undertoned" areas.
~Chipping, wear and tear and then touch ups and corrections,etc.
~Oil "dot system" color tones
~Washes and smudges of entire tank for dirt,grim,stains,etc (here's when I follow photos of the real tanks)
~Chipping,wear and tear,touch ups etc.for more or less contrast to the previous work.
~ Flat coat
~Pigments
Regarding piments, for heavily water & sand weathered AFVs such as the Marines AAV.. You can literally paint the sand streaks : use a thin brush and apply Vallejo's gloss medium(thinned down with water) as the sand streaks, then use another brush to dab the sand pigment on the areas. Once you finish what you can, brush off the excess pigments with a lrager brush, then use a cotton swab dibbed in a little Magic Clean to define the streak.
.. How many streaks you can finish at a time depends on how fast you apply the pigment before the gloss dries.
like this.......
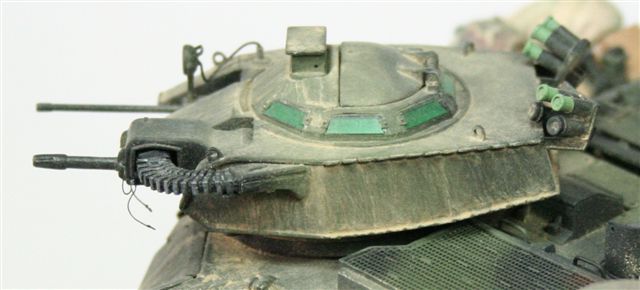
Hope this helps?
Jay,
IMHO.....About my painting skills..
I don't t do preshading anymore. Postshading is a bit harder at first, cause you have to be careful you don't overdo it. Simply said, follow a rule of thumb of "building up layers" of paint for ALL paint work. This means thinning down your paints a little more than normal. Here you have to master one of two methods - Either your finger control of your airbrush for paint & air release Or the gradual thinning down ratio of paint & thinner. Once you get the hang of one of them, the process is a breeze.
As for my weathering, I don't really follow a die-hard sequence, besides the basic rules of which paint/oils over or under which. I tend to jump back and fort and skip some steps and repeat others. Depending on the intensity and sizes of the decals, sometimes I apply them after the post-shade. The process all depends on whether I've achieved the "look" I want in each process. And /or I want more or less contrast.
From the very begining of the first color coat application...contrast is a key to me, so I take note of the mixing of how dark or light the color variations to be applied in every step.
A note on Primer, apply it like paint, in thin layers, particularly on the fine details. I use Humbrol enamel, but making a thorough transition to Vallejo and Life color acrylics.
Here goes :
~Primer
~Main color/ colors.
~Gloss coat/Decals/Gloss coat/
~Touch up for decal areas (to blend the artwork to the tank)
~Main color+darker shade/shades mix - post shading for undertones for later weathering applications, recessed areas, joints and details.
This is the initiate of the weathering process and is very important. The larger, less featureless areas is where you'll shade along the edges, add large streaks, blotches,etc. These will be the undermost color tone especially for single color paint work. Jumping forward, this will act as a base and really compliment the oil paint applications, mainly the "dots" oil method.
OR
~ Main color+lighter shade/shades mix.
As a touch up if you overdid the postshading for light or sand-colored armor.
As a color fade/blend/variation for darker colored armor, such as WWII, Israeli and camoflage modern AFVs, this is an important step, where besides the lighter color mix layers to be applied, you'll want to spray some very light coats of the appropreiate "sand" color as the enviroment the AFV is to be depicted in. This will also be a good blending as a base color tone for pigments later.
(Perhaps my "postshading" method in both processes are similar to "color modulation" techique by popular paint and pigment produces.)
~Painting of detail parts.
~Pin washes and smudges with various Oils for particular areas like recessed lines,areas, welds, joints, details..And on top of "undertoned" areas.
~Chipping, wear and tear and then touch ups and corrections,etc.
~Oil "dot system" color tones
~Washes and smudges of entire tank for dirt,grim,stains,etc (here's when I follow photos of the real tanks)
~Chipping,wear and tear,touch ups etc.for more or less contrast to the previous work.
~ Flat coat
~Pigments
Regarding piments, for heavily water & sand weathered AFVs such as the Marines AAV.. You can literally paint the sand streaks : use a thin brush and apply Vallejo's gloss medium(thinned down with water) as the sand streaks, then use another brush to dab the sand pigment on the areas. Once you finish what you can, brush off the excess pigments with a lrager brush, then use a cotton swab dibbed in a little Magic Clean to define the streak.
.. How many streaks you can finish at a time depends on how fast you apply the pigment before the gloss dries.
like this.......

Hope this helps?

bison126

Joined: June 10, 2004
KitMaker: 5,329 posts
Armorama: 5,204 posts

Posted: Saturday, January 22, 2011 - 05:30 AM UTC
Hi Nick,
I haven't looked at your build for quite a while and the result is simply amazing. The details are really great on the mine plow but the small bits you added here and there give a lot to the final look
The markings are cool, I like the Deutsches Afrika Korps look a like palm tree on the smoke grenade stowage box.
Olivier
hliu24

Joined: November 19, 2010
KitMaker: 798 posts
Armorama: 797 posts

Posted: Sunday, January 23, 2011 - 04:37 AM UTC
Thank you for sharing, Master
My neighbor will hate me when I start practicing my airbrush outside
Regards
Jay
My neighbor will hate me when I start practicing my airbrush outside

Regards
Jay
AngryDog

Joined: March 27, 2004
KitMaker: 1,114 posts
Armorama: 900 posts

Posted: Monday, January 24, 2011 - 11:28 PM UTC
Thanks Guys!
Olivier, the USMC palm tree were painstaking just like the rest of them. I spent hours on end searching images, fusing them and going down to individual pixels to get them right. Luckily my client provided me with hi-res images for the other markings. Working on a 1000 resolution image is a great start..so I had to do my very best!
I'm looking forward to finally getting the rest of the decals done in the future and having them printed professionally, then I'll really be able to appreciate the work I put into them.
I'll post the updated photos soon..
Olivier, the USMC palm tree were painstaking just like the rest of them. I spent hours on end searching images, fusing them and going down to individual pixels to get them right. Luckily my client provided me with hi-res images for the other markings. Working on a 1000 resolution image is a great start..so I had to do my very best!
I'm looking forward to finally getting the rest of the decals done in the future and having them printed professionally, then I'll really be able to appreciate the work I put into them.

I'll post the updated photos soon..
AngryDog

Joined: March 27, 2004
KitMaker: 1,114 posts
Armorama: 900 posts

Posted: Saturday, August 13, 2011 - 06:40 AM UTC
Already complete and will post the pics in process...
Metalgear


The 300


Metalgear


The 300


Anirudharun

Joined: February 16, 2008
KitMaker: 597 posts
Armorama: 530 posts

Posted: Saturday, August 13, 2011 - 06:46 AM UTC
Really great work Nick! The helmets and packs look excellent. Can't wait to see more!
Just out of curiousity why did you replace the straps on the blackdog items?
Keep it up
Anirudh
Just out of curiousity why did you replace the straps on the blackdog items?
Keep it up
Anirudh
BLACKWATER

Joined: August 05, 2010
KitMaker: 449 posts
Armorama: 441 posts

Posted: Saturday, August 13, 2011 - 06:50 AM UTC
Wow there is nothing more shocking than this it! Thanks to share. 


AngryDog

Joined: March 27, 2004
KitMaker: 1,114 posts
Armorama: 900 posts

Posted: Saturday, August 13, 2011 - 06:51 AM UTC
Thanks Anirudh & Blackwater, I'm watching your work too and they ROCK!!!
The straps were all too thick and the velcro strips had the wrong number of intervals.
If you noticed I angled the MOLLE packs..too a lot of work to get them how I wanted...but they sit realistically in the BRE after.
The straps were all too thick and the velcro strips had the wrong number of intervals.
If you noticed I angled the MOLLE packs..too a lot of work to get them how I wanted...but they sit realistically in the BRE after.
PH-Designs

Joined: June 21, 2011
KitMaker: 87 posts
Armorama: 83 posts

Posted: Saturday, August 13, 2011 - 07:00 AM UTC
Nick
What material did you use for the strapping on everything?
It all looks very good and very time consuming but worth the effort.
Very nice.
Pete
What material did you use for the strapping on everything?
It all looks very good and very time consuming but worth the effort.
Very nice.
Pete
Anirudharun

Joined: February 16, 2008
KitMaker: 597 posts
Armorama: 530 posts

Posted: Saturday, August 13, 2011 - 07:02 AM UTC
Thats impressive attention to detail! I sympathise regarding the way the packs sit, its a real shame when good models are spoiled by ill-fitting stowage!
What thickness of styrene are you using for the straps etc?
Anirudh
What thickness of styrene are you using for the straps etc?
Anirudh
AngryDog

Joined: March 27, 2004
KitMaker: 1,114 posts
Armorama: 900 posts

Posted: Saturday, August 13, 2011 - 07:15 AM UTC
for such work I cut out styrene sheet 0.3 for shoulder straps and 0.13 for velcro,etc. Both Evergreen. I'll not do it againthough...working on making my on MOLLES in various positions n have em cast. If i ever find the time to complete them!
I'll have the Daypacks pics posted soon,those I scratched.
I'll have the Daypacks pics posted soon,those I scratched.
DutchRick

Joined: June 09, 2011
KitMaker: 42 posts
Armorama: 42 posts

Posted: Saturday, August 13, 2011 - 08:34 AM UTC
Very very impressive, I read through the tread and it's very helpfull to get a 'howto' from this beautifull build, your eye for detail is second to none, this is masterclass.
Cheers Rick
Cheers Rick
AngryDog

Joined: March 27, 2004
KitMaker: 1,114 posts
Armorama: 900 posts

Posted: Wednesday, December 18, 2013 - 03:38 AM UTC
I completely forgot to update my blog!!!
Here's a few..
All markings were custom made!
The 300..


And a fictitious tank..MetalGear..


Here's a few..
All markings were custom made!
The 300..
And a fictitious tank..MetalGear..
bill_c

Joined: January 09, 2008
KitMaker: 10,553 posts
Armorama: 8,109 posts

Posted: Wednesday, December 18, 2013 - 03:58 AM UTC
Superb! Outstanding! A show winner for sure. 


chnoone

Joined: January 01, 2009
KitMaker: 1,036 posts
Armorama: 1,033 posts

Posted: Wednesday, December 18, 2013 - 08:59 AM UTC
They do look very nice !
Great job !
Cheers
Christopher
Great job !
Cheers
Christopher

Posted: Wednesday, December 18, 2013 - 09:16 AM UTC
Those are some really great looking tanks, I like how you dropped the suspension on The 300. Great job. 


 |


