Hosted by Darren Baker
2 Uparmored Humvees & SF Dumvee WIP
MARPAT

Joined: April 14, 2007
KitMaker: 206 posts
Armorama: 39 posts

Posted: Friday, October 23, 2009 - 04:33 PM UTC
Wow.... stunning build, All the scratch built parts, truly a master. Thanks for the little lesson on how to make cones, I might have to give it a shot! Thanks!
seb43

Joined: August 30, 2005
KitMaker: 2,315 posts
Armorama: 2,158 posts

Posted: Saturday, October 24, 2009 - 04:52 AM UTC
The cooler is so great Nick
Any progress pics ??
Cheers
Seb
Any progress pics ??
Cheers
Seb
AngryDog

Joined: March 27, 2004
KitMaker: 1,114 posts
Armorama: 900 posts

Posted: Saturday, October 24, 2009 - 05:36 AM UTC
"Master"??? Wow thanks guys 
Seb, thanks. Sorry no progress pics for the cooler. But if time permits I'll make another one that's similar for tutorial pruposes.
I've still to make some other small bits like smoke grenades, touches, manuals,etc.
On my Abrams, you can see the smoke grenade to the right of the 50cal, also note the black book at centre.. Got some real thin sheet styrene, so instead of books, I'm going to do those files/ manuals? I seen in some Humvee pics..

MARPAT

Joined: April 14, 2007
KitMaker: 206 posts
Armorama: 39 posts

Posted: Saturday, October 24, 2009 - 03:32 PM UTC
wow, I like the addition of the manuals, it adds to the model.

shopkin4

Joined: March 29, 2009
KitMaker: 1,135 posts
Armorama: 1,030 posts

Posted: Saturday, October 24, 2009 - 03:45 PM UTC
Nick,
This build has bitten me with the scratch building bug. However I have never scratch built anything. Do you think you could possibly send me a list of the styrene that you have been using as it's perfect for 1/35 scale. I have a rough idea of what I may been but this would help alot.
This build has bitten me with the scratch building bug. However I have never scratch built anything. Do you think you could possibly send me a list of the styrene that you have been using as it's perfect for 1/35 scale. I have a rough idea of what I may been but this would help alot.
AngryDog

Joined: March 27, 2004
KitMaker: 1,114 posts
Armorama: 900 posts

Posted: Saturday, October 24, 2009 - 06:08 PM UTC
Thanks Guys,
Sean...and anyone interested,
For all my scratch building I use Evergreen or Midwest sheets, both of which I obtain locally.
http://www.evergreenscalemodels.com/Sheets.htm
I usually get 2 or more packs per size..all the way up to 060" thickness.
Take a look at what you want to scratch build, use a ruler and match as best to what's available.. You'll get the hang of it after awhile.
Don't throw away what you cut off.. they always come in handy.
Follow the basic rule : MEASURE TWICE, CUT ONCE.
You may also want to check out Plastruct..they made the thinnest round and hexagon rods. I got them via "myatomic" from ebay. Evergreen carries rods and others as well...check them out.
For the cones I used the 2nd thinnest sheet available from Evergreen. (Think Midwest has them too)
.010" / 0,25mm / Item 9010
For the Base you can use
.015" / 0,38mm / Item 9015
Or
.020" / 0,50mm / item9020
Use .015, if you are very neat with work.. I'm messy and file alot for glue joints so I used .020.. since after filing down the thickness will decrease.
Thus a note on scratch building..sometimes you have to go up a size since filing and sandpapering work is required. As well as filing to get rounded edges (such as the cooler box)
Also note that using liquid cement as I do, and gluing with my principle of "fusing" means that the plastic softens and thus sometimes the "size" will decrease.
Always give ample time for the glue joints to cure.
Other times you go up or down a size..to get the visuals closer to the real thing. You also have to note on your painting skills and type of paint etc....since adding primer and paint will increase the thickness and change the overall visual representation, which sometimes you want and other times you don't. This is very true for tiny parts..like chains, wiring, and photoetch...
..learn and adjust as you go along..
Thinnest sheet (to my knowledge) is by Evergreen
.005" / 0,13mm / Item 9009
Requires a touch of glue, I use Tamiya extra thin cement (green bottle), touch the glue on the part to be attached, not on the 0.13mm sheet... You can touch up the joints later. The sheet is so thin that a little more glue than required will melt the sheet...! But on a plus point this creates texture if you're representing cloth or rusted/ corroded metals, welds, etc.
Still..this sheet is Godsend! And excellent to replicate fine details such as ducktape, manuals, books, weapon,helmet and packs' straps...
The "canvas" and it's wrinkles was done by just using a metal ruler to press lines across the sheet..giving an impression as though the canvas was actually folded.
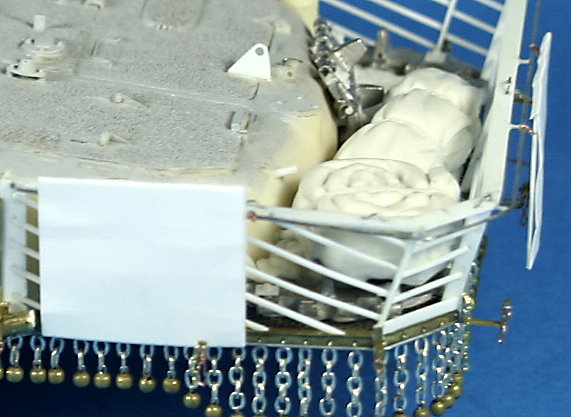

If you use the sheets' easy "melting" point to your advantage then you can create easy weld textures by pressing down with the other end of a blade,etc.
Also note that those rectangle strips on the AAV's vents were thus attached and positioned by liquid cement. Later, just a tiny drop of super glue made sure they stayed in place.
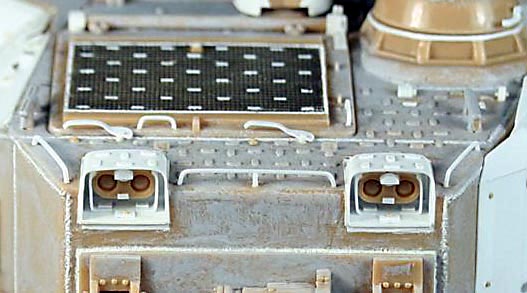
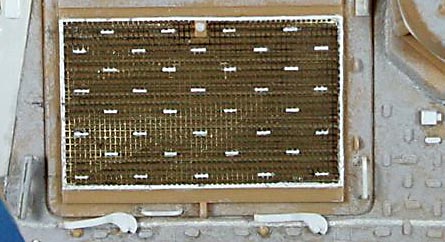
If you're really careful, neat and patient..you can take a step further and use it to make details which would usually only be possible by photoetch such as the tiny rectangles on the MCD for an Abrams tank.
Also note the weld lines

Hope this helps...
Sean...and anyone interested,
For all my scratch building I use Evergreen or Midwest sheets, both of which I obtain locally.
http://www.evergreenscalemodels.com/Sheets.htm
I usually get 2 or more packs per size..all the way up to 060" thickness.
Take a look at what you want to scratch build, use a ruler and match as best to what's available.. You'll get the hang of it after awhile.
Don't throw away what you cut off.. they always come in handy.
Follow the basic rule : MEASURE TWICE, CUT ONCE.
You may also want to check out Plastruct..they made the thinnest round and hexagon rods. I got them via "myatomic" from ebay. Evergreen carries rods and others as well...check them out.
For the cones I used the 2nd thinnest sheet available from Evergreen. (Think Midwest has them too)
.010" / 0,25mm / Item 9010
For the Base you can use
.015" / 0,38mm / Item 9015
Or
.020" / 0,50mm / item9020
Use .015, if you are very neat with work.. I'm messy and file alot for glue joints so I used .020.. since after filing down the thickness will decrease.
Thus a note on scratch building..sometimes you have to go up a size since filing and sandpapering work is required. As well as filing to get rounded edges (such as the cooler box)
Also note that using liquid cement as I do, and gluing with my principle of "fusing" means that the plastic softens and thus sometimes the "size" will decrease.
Always give ample time for the glue joints to cure.
Other times you go up or down a size..to get the visuals closer to the real thing. You also have to note on your painting skills and type of paint etc....since adding primer and paint will increase the thickness and change the overall visual representation, which sometimes you want and other times you don't. This is very true for tiny parts..like chains, wiring, and photoetch...
..learn and adjust as you go along..
Thinnest sheet (to my knowledge) is by Evergreen
.005" / 0,13mm / Item 9009
Requires a touch of glue, I use Tamiya extra thin cement (green bottle), touch the glue on the part to be attached, not on the 0.13mm sheet... You can touch up the joints later. The sheet is so thin that a little more glue than required will melt the sheet...! But on a plus point this creates texture if you're representing cloth or rusted/ corroded metals, welds, etc.
Still..this sheet is Godsend! And excellent to replicate fine details such as ducktape, manuals, books, weapon,helmet and packs' straps...
The "canvas" and it's wrinkles was done by just using a metal ruler to press lines across the sheet..giving an impression as though the canvas was actually folded.


If you use the sheets' easy "melting" point to your advantage then you can create easy weld textures by pressing down with the other end of a blade,etc.
Also note that those rectangle strips on the AAV's vents were thus attached and positioned by liquid cement. Later, just a tiny drop of super glue made sure they stayed in place.


If you're really careful, neat and patient..you can take a step further and use it to make details which would usually only be possible by photoetch such as the tiny rectangles on the MCD for an Abrams tank.
Also note the weld lines

Hope this helps...
grimmo

Joined: January 17, 2006
KitMaker: 752 posts
Armorama: 569 posts

Posted: Saturday, October 24, 2009 - 10:17 PM UTC
Nick. love your work! love the sratch built cones! going to try making them!
AngryDog

Joined: March 27, 2004
KitMaker: 1,114 posts
Armorama: 900 posts

Posted: Monday, October 26, 2009 - 02:26 AM UTC
Thanks Matt.
Yup give those Cones a try and let me know how they turn out.
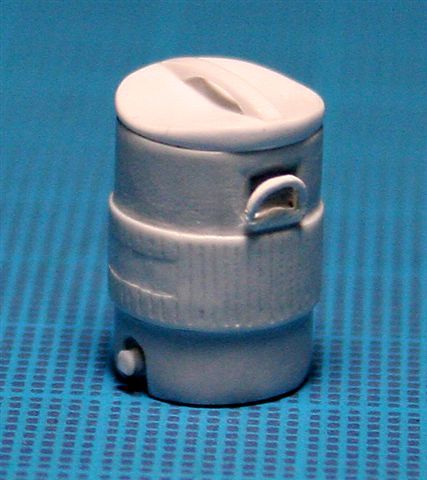
Here's an Igloo cooler for my Abrams WIP, I still need to clean up a bit and file down the sides of the cooler's lid. Not my best work but as close as I can get it so far.
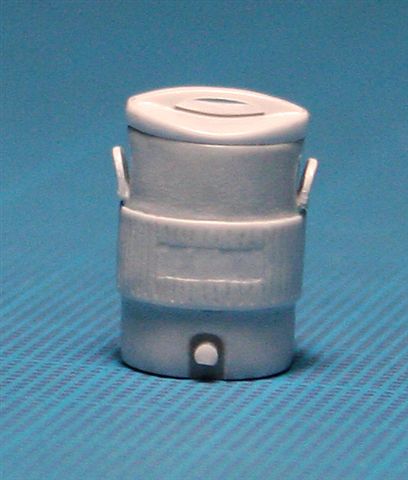
Yup give those Cones a try and let me know how they turn out.
Here's an Igloo cooler for my Abrams WIP, I still need to clean up a bit and file down the sides of the cooler's lid. Not my best work but as close as I can get it so far.



Captin_Caveman_III

Joined: October 20, 2008
KitMaker: 1,069 posts
Armorama: 1,062 posts

Posted: Tuesday, October 27, 2009 - 02:46 PM UTC
Here's some new resin and photo-etch kits by Legend Productions.
Humvee (GPK) "Gunner's Protection Kit": As seen on mini Humvee before the (O-GPK):"'Objective Gunner's Protection Kit"

Next the "IBIS Tek Bumper & Tow Bar set":

I have seen these part on Afghan units. The program was from National Geographic an I also saw these mounted on the sides of the roof of some of the Humvee's on patrol.
The AT4 & LAW set: The bigger of the two(2) is what I'm talking about.

I must say these are some awesome builds with lot's of detail.
Humvee (GPK) "Gunner's Protection Kit": As seen on mini Humvee before the (O-GPK):"'Objective Gunner's Protection Kit"

Next the "IBIS Tek Bumper & Tow Bar set":

I have seen these part on Afghan units. The program was from National Geographic an I also saw these mounted on the sides of the roof of some of the Humvee's on patrol.
The AT4 & LAW set: The bigger of the two(2) is what I'm talking about.

I must say these are some awesome builds with lot's of detail.

AngryDog

Joined: March 27, 2004
KitMaker: 1,114 posts
Armorama: 900 posts

Posted: Friday, October 30, 2009 - 03:28 AM UTC
Legend has some very nice sets...and they will surely make the batch of next humvees for me next year....
I'll be using those Academy A4s for now. But Legends' set will surely come handy. Too bad straps don't come with them.
I've almost done all the interior detailing..Once I complete scratch building the firing console for the smoke dischargers I'll post pics..
I'll be using those Academy A4s for now. But Legends' set will surely come handy. Too bad straps don't come with them.
I've almost done all the interior detailing..Once I complete scratch building the firing console for the smoke dischargers I'll post pics..
AngryDog

Joined: March 27, 2004
KitMaker: 1,114 posts
Armorama: 900 posts

Posted: Monday, May 10, 2010 - 02:29 AM UTC
Laid down the primer and base coat/camo colors... Now in detail painting and weathering process..
As you can see I free hand airbrushed the camo pattern..and touched up a bit with brush..made the individual colors somewhat "modulation-style" as well since I want the finish in different shades...It'll be all toned down a lot with the weathering process.
Also, the "sand" color for the armored doors,CIP, etc are the same I use for my M1s.
What's a good color (Vallejo) for the seats?


Bunch of stuff! My Stryker assesories too!
You can see the Blast-models'Half Doors painted Black..

As you can see I free hand airbrushed the camo pattern..and touched up a bit with brush..made the individual colors somewhat "modulation-style" as well since I want the finish in different shades...It'll be all toned down a lot with the weathering process.
Also, the "sand" color for the armored doors,CIP, etc are the same I use for my M1s.
What's a good color (Vallejo) for the seats?


Bunch of stuff! My Stryker assesories too!
You can see the Blast-models'Half Doors painted Black..

AngryDog

Joined: March 27, 2004
KitMaker: 1,114 posts
Armorama: 900 posts

Posted: Tuesday, June 08, 2010 - 05:41 AM UTC
What colors are these...???


AngryDog

Joined: March 27, 2004
KitMaker: 1,114 posts
Armorama: 900 posts

Posted: Thursday, June 10, 2010 - 07:08 AM UTC
A-N-Y-B-O-D-Y.. 


AngryDog

Joined: March 27, 2004
KitMaker: 1,114 posts
Armorama: 900 posts

Posted: Friday, September 17, 2010 - 08:03 AM UTC
Completed these some time back...I'll post the SF version much later on.. meanwhile looking forward to your comments. 


HazZaRd

Joined: May 25, 2006
KitMaker: 291 posts
Armorama: 288 posts

Posted: Friday, September 17, 2010 - 08:34 AM UTC
ahh always looking forward to see some more of your work
great job you did there, nice details and an awsome weathering
looking forward to your SF version

great job you did there, nice details and an awsome weathering
looking forward to your SF version

jwest21

Joined: October 16, 2006
KitMaker: 3,374 posts
Armorama: 3,126 posts

Posted: Friday, September 17, 2010 - 08:51 AM UTC
Another sweet build! I love the weathering job
35th-scale

Joined: November 21, 2007
KitMaker: 3,212 posts
Armorama: 2,807 posts

Posted: Friday, September 17, 2010 - 11:53 AM UTC
Sweet! Two fantastic builds.
Can we get a blow-up of the playboy centrefold?
Can we get a blow-up of the playboy centrefold?

panzerIV

Joined: January 02, 2007
KitMaker: 781 posts
Armorama: 676 posts

Posted: Friday, September 17, 2010 - 01:34 PM UTC
these looks great 
what scale are these??
i look forward to seeing your sf version
its going to be as good as these two youve done up

what scale are these??
i look forward to seeing your sf version

its going to be as good as these two youve done up

Citizinsane
Joined: July 27, 2006
KitMaker: 463 posts
Armorama: 450 posts
KitMaker: 463 posts
Armorama: 450 posts

Posted: Saturday, September 18, 2010 - 12:17 AM UTC
Hey Nick,
this is nice! this is definitely one of the best three tone camo's I've ever seen!
great job on the weathering as well (btw, may I ask how you painted those scratches/splashes on the left and right rear sides?)
oh yeah, what's going on with your abrams'? looking forward to seeing more of your work.
Cheers, Max

Anirudharun

Joined: February 16, 2008
KitMaker: 597 posts
Armorama: 530 posts

Posted: Saturday, September 18, 2010 - 03:19 AM UTC
Wow Nick, these are excellent! Definitely worth the wait since your last update.
Also I want your opinion on the interior sets: Pro art vs Legends? I used the Legends one earlier but how does you the pro art one compare?
I second what Max said about your Abrams'. Can't wait to see them!
Also I want your opinion on the interior sets: Pro art vs Legends? I used the Legends one earlier but how does you the pro art one compare?
I second what Max said about your Abrams'. Can't wait to see them!
AngryDog

Joined: March 27, 2004
KitMaker: 1,114 posts
Armorama: 900 posts

Posted: Saturday, September 18, 2010 - 03:26 AM UTC
Thanks Guys!
This one?

"Rear" sides? Errr more specifically?
Abrams are nearing completion, just squaring up the decals.
I will post some close of these Humvees once I have more time
Quoted Text
Can we get a blow-up of the playboy centrefold?
This one?

Quoted Text
(btw, may I ask how you painted those scratches/splashes on the left and right rear sides?)
oh yeah, what's going on with your abrams'?
"Rear" sides? Errr more specifically?
Abrams are nearing completion, just squaring up the decals.
I will post some close of these Humvees once I have more time

Citizinsane
Joined: July 27, 2006
KitMaker: 463 posts
Armorama: 450 posts
KitMaker: 463 posts
Armorama: 450 posts

Posted: Saturday, September 18, 2010 - 04:00 AM UTC

hey Nick,
this is what I was referring to:
anyway, I think you 'accidentally' answered that question over in your stryker thread, you applied a similar effect as on stryker's gun shield, I just wouldn't have thought you've painted every scratch individually
 .
.oh, and sorry for reusing your pic...
Cheers, Max

bison126

Joined: June 10, 2004
KitMaker: 5,329 posts
Armorama: 5,204 posts

Posted: Saturday, September 18, 2010 - 04:50 AM UTC
Really nice couple of Humvees Nick. The paint job is excellent as is your dedication to details !
Congratulations
Olivier
Congratulations
Olivier
AngryDog

Joined: March 27, 2004
KitMaker: 1,114 posts
Armorama: 900 posts

Posted: Saturday, September 18, 2010 - 05:58 AM UTC
Thanks Guys,
Anirudh, the Pro art set I have is of the SF Humvee and is Basic. But I read their new individual version has a lot of details and photoetch parts as well. You can check out details at their site. The Legend Interior set I have is part of their M1151 kit. I suspect Pro art set will have items more than Legend's, however I can't be sure.
The interior of my 2 Humvees partially scratched built and I sure left some stuff out, like seatbelts,etc.
Max, yes I painted the the grey color scratches as well as some dust streak details individually with a brush. Would have done a better and more creative job if I got the proper pencils... Anyone can recommend which type???

 |


