Hi everybody,
Just thought I would hurry up and check in as we are getting along in time. I have learned so much from this campaign, and have enjoyed sharing projects with everyone. I am proud of my dio so far, but I have a hard time finishing projects. I guess the best thing to do is make a list of things to be done and get going. Also, I need some help on a few items so I will get to that as well at the bottom.
First, I gotta say that the builds are getting good. really good. Like I said, I have REALLY enjoyed everyone's work. I seem to jump into projects easily so it has been a great learning experience for me to take my time and make the attempt to concentrate on finishing one project.
a couple comments:
Joris- thanks for the info on Lithuania. I didn't know Jan. 13 was such an important date, but good cheer to you and your compatriots.
Ron- the railcar looks great. I have an idea for a similar project, albiet massive in scale that is going to depict a German rail depot in Tunisia, possible Oran that has been bombed and the Allies are advancing. I have two Dragon Railcars, a Marder that I just started will sit on the first railcar, a supply truck that is going to be out of commission will be parked in front, and then I have have the Dragon El Alamein Sherman with the newish Miniart British Tankers that I am nowhere even close to starting- all planned for this project. I will look and see if I have any pics and if not get some soon, but I do like your scene a lot as I have been in your exact place about how to do the loading dock. Just make is simple right? The point is to load equipment as fast as possible, but I would be SERIOUSLY interested in any references anyone might have on hand on this subject.
Tom- also wanted to say great work. Looking forward to seeing your progress.
Hope everyone is making good progress. At some point I am going to have to abandon all other projects.
This is what I have. I am posting from Flickr now, so if anyone wants to take a look at more of my pics, you can here.
my photostream:
http://www.flickr.com/photos/billycash/and pics for this campaign:
http://www.flickr.com/photos/billycash/sets/72157623176037576/I appreciate any comments and feedback, and as usual, thanks for looking.
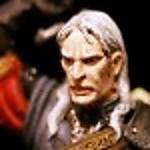
This is my main dude as I have shown you before, and I am quite proud of the progress I have made with him even if I am not finished with him yet obviously. At least I have learned a lot and it was fun to play around with making a few modifications, as this is definitely not OOB. Also my last comment to our fearless leader regarding the lines on the hands of his figs made me reexamine this guy and I found a few lines to sand away as well. Also I removed an ammo pack that I thought was German. The downfall is that he is still dressed for Normandy. UGH!!! NOT the ARDENNES where the action is depicted. The photo is pretty poor actually, but we will see more of him later.

Next up are a few shots of my latest series that I think are great additions for the set. I probably had these in mind originally- they just took a long time to arrive. Dragon's 101st U.S. in Bastogne. Ironically, they seem to look like the Band of Brothers's Captain Winters. I need to convert a couple of these to medics for this scene. Geez- I wished I had an overturned ambulance to play with here but these figures have been really fun so far. You can see my progression as I ALWAYS paint and have extra so I do a lot of underpainting. These days I am using the extra paint for my dirt in the dio.

The other two- one thing I have been doing is gluing the rifle in place to the hand while leaving the arm unattached to the shoulder, but for every set I seem to have one figure that I try to do differently- without the gun for example. So I think I will have the last figure doing some bandaging to an injured MP in the shed.

The while group; check out the crooked rifle barrel. It just broke off five minutes ago. Glue it back, or think of something different? It is never too late for these things. You can also see some of the puttying I did late last night. Just regular old Testors in the grey tube variety.

My progress shots of the dio itself are really dark today. I veered from my lighting rig in order to try to capture some natural night- but silly me it is quite stormy today in Portland so these are not exactly a success. However, the last two do have some cool lighting effects. I tried to get all the little pieces together to start to fill the space, while keeping the figures to a minimum for this scene.
Somewhere in the Ardennes, near Bastogne
So far I have 11 US soldiers and 4 to 6 Germans that are suitable and usable for this campaign, but they will not all fit on the set. I should do a Time-elapsed set to show a. the initial explosion when the shell lands in front of the jeep and the Americans taking refuge in the house b. US troops take steps to defend the house. c. Germans attack and are pushed back leaving their own casualties as prisoners. d. US troops depart/pull back with their own dead and wounded as possible. e. Germans overun with Panzers. That would be a cool movie!!! But for this scene we are situated somewhere between b and d for right now.

The jeep from above. Also notice the gutters! I just finished them recently. The rest of the lamp post (i.e. the top part- the lamp itself) is forthcoming. And, there is a little box in the back seat! People always want to know what I do late at night at my desk.

Lighting is poor- way to dark. But conveys a mood, and the parts up against the building are contrasted well.

For this shot the lighting is still way to dark. Sorry- I will go back to my lighting rig after this and/or wait for sunnier days, but I do like the way the light falls on the two figures. Very up close and personal. I like this scene a lot.

FINALLY, I need help to know what to do to finish this.
This is what I know I can do> a. finish the ground. texture the floor, etc. b. finish painting figures obviously and when I am done with everything glue them into place. c. keep moving parts around to work on composition issues. More pictures with different arrangements will follow. d. more weathering as needed but DEFINITALLY open to suggestions here. e. adding more puddles with Vallejo Still Water as seen in the lower left corner of some of the earlier shots (not seen here). f. mounting up and finishing.
This is what I DO NOT know what to do with and need the most help with:
a. the roof and roofing material is a serious concern. I like the open look, but can't just leave it like that. The pieces that came with the set look perfectly useless from what I can see. I think that the best option is to spend a Sunday scratch building the main pieces and doing some tile work to match, but still try to leave parts open. HMMM. I have seen a couple good examples in the DIOS area- I need to find the links but I know some of you have seen some of those examples because I have read your comments. I am thinking of the gentleman who built some rafters and such, and then actually burned them.
b. The Jeep. I can think of a handful of final touches but I could really use input.
a. add soot- a lot of soot. for some reason I have a block agaist this step. should I spray black very carefully, or use a weathering brush- something like Tamiya Soot which I do have? I don't have any MIG or Vallejo pigments yet.
b. the broken windshield. I think I got this covered.
c. how do I deal with the hood? Should I try to bend it up?
d. what would the headlights look like? burned out and sooty?
e. anything I am missing? maybe a couple dead bodies buried in the mud? Not sure I even know how to get started on that even if it was deemed appropriate. Whose work was it that had that great burned out Panzer I think with a quite decomposed- looking body buried in the mud? For some reason I don' think it was this campaign, but it might have been one of you guys.
Ok, thanks for your help. If you can think of anything else let me know.
Billy


 .
. ) is also looking good. Why wont you use it as the entry diorama?


