Virginia, United States
Joined: February 05, 2002
KitMaker: 6,149 posts
Armorama: 4,573 posts
Posted: Tuesday, January 27, 2009 - 06:09 AM UTC
Keith-- great work on a very tough model to build correctly. To my fellow modellers, I believe EEAK stands for Enhanced Applique Armor Kit...although, one wonders why they placed two EEs in the abbreviation

Good job
DJ
DJ Judge
COL (R), USA
"Tanker Boots do not a Tanker Make."
Virginia, United States
Joined: July 17, 2006
KitMaker: 1,558 posts
Armorama: 1,159 posts
Posted: Tuesday, January 27, 2009 - 11:38 AM UTC
Quoted Text
Hi
the marines during the invasion in 2003 used the AAVP7a1 with EEAK, with the mounts only and with out any fittings, all versions. the one presently being shown in this topic is ok for TF TARAWA at An Nassiriya
http://www.clubhyper.com/reference/taskforcetarawach_1.htm
http://picasaweb.google.com/nobbie333/War01#
ive put together a file on the battle like i did with 3ID. all for personal use, any body wants it just drop your email and i will send.
also read 'marines in the garden of eden' by richard lowrie. much better than ambush alley. you can put the pics in my file in order with the books narrative.
mark
Mark--that is one of the best photo references I have seen on the Web so far on a single battle. Great work putting it together.
Illinois, United States
Joined: February 10, 2004
KitMaker: 2,058 posts
Armorama: 791 posts
Posted: Tuesday, January 27, 2009 - 05:14 PM UTC
Keith, you rock! Thank you very much.
Judging by your pictures, I think I came close. It looks like I could add a couple more bits.


Tough to see because I haven't painted it yet, but, pretty darn close for working with one drawing I had.
Who needs kit parts? I don't need no kit parts!

Cuhail

Campaigns:
Stop, Look and Listen -ENDS 1-31-10
ACUTR Again-STARTS 08-18-09
What if? -STARTS 06-01-09
On the bench:
1/35 Scratchbuilt Rail Tank

#036
England - West Midlands, United Kingdom
Joined: December 01, 2001
KitMaker: 1,998 posts
Armorama: 1,236 posts
Posted: Saturday, January 31, 2009 - 10:08 AM UTC
Thanks for all the positive comments guys
here are a couple of new pictures
the interior painted awaiting weathering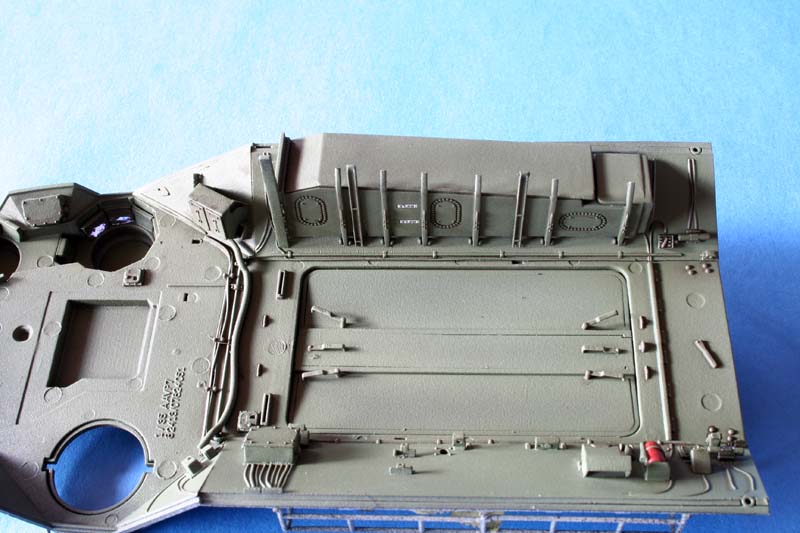
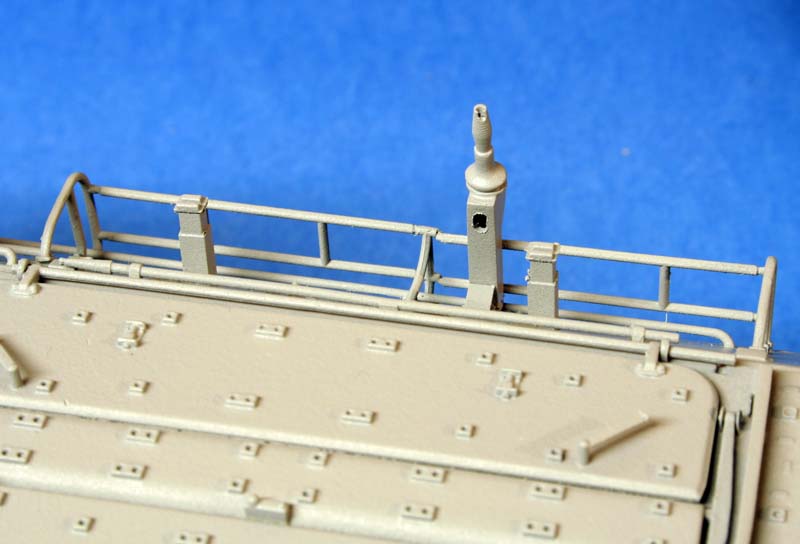
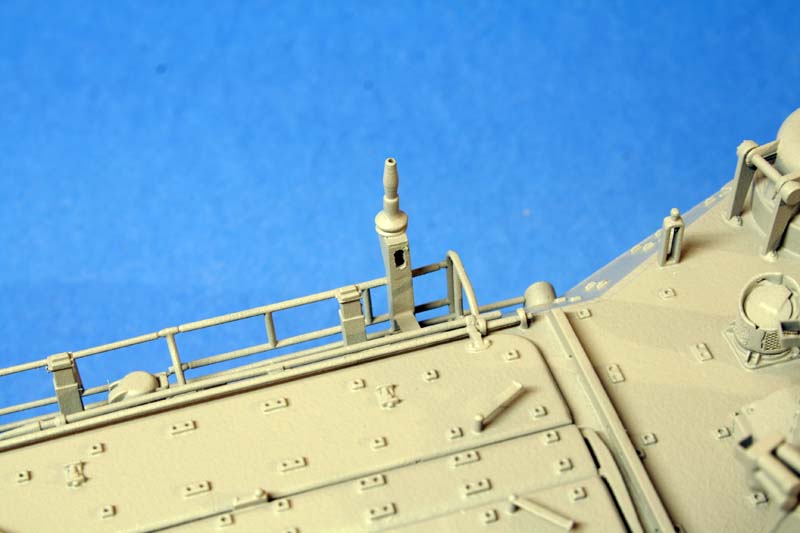
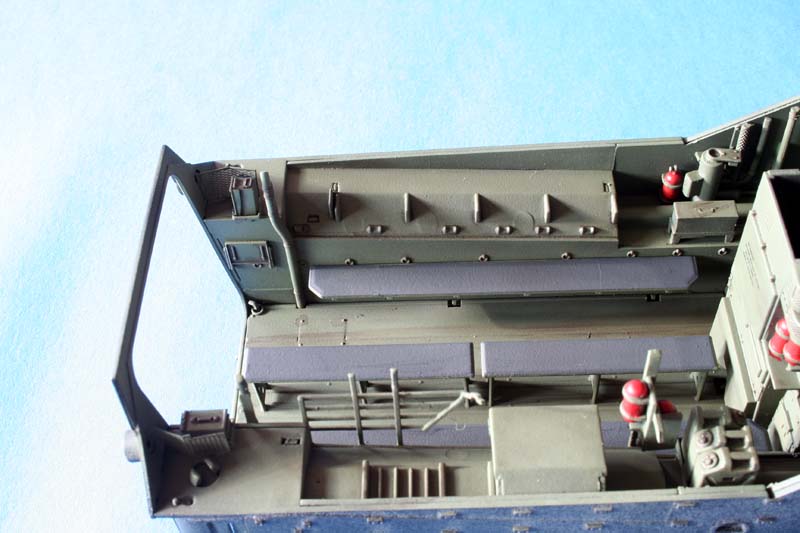 The exterior behind the rear of the front hatch showing the additional hatch stop not show on the instructions and the additional aerial mount
 other views of the scratch built additional aerial masts
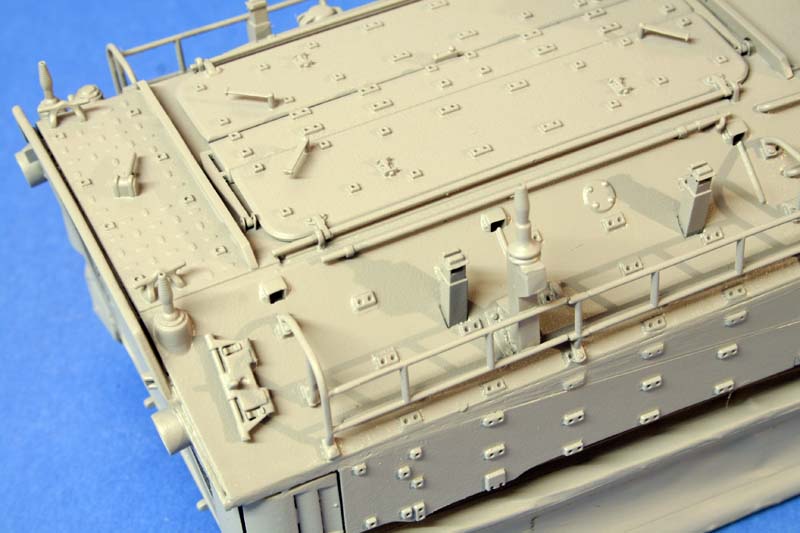
again thanks for looking
cheers
Keith
A VETERAN - Whether active duty or retired is someone who, at one point in their life, wrote a blank check made payable to "Great Britain", for an amount of "up to and including my life". That is HONOUR, and there are way too many people who forget this
Illinois, United States
Joined: February 10, 2004
KitMaker: 2,058 posts
Armorama: 791 posts
Posted: Saturday, January 31, 2009 - 03:40 PM UTC
WOW, look at those ejector marks on the inside hull roof! Not that anyone will see them there, of course. Was there a lot of pin marks in other places you did have to take care of?
Cuhail
Campaigns:
Stop, Look and Listen -ENDS 1-31-10
ACUTR Again-STARTS 08-18-09
What if? -STARTS 06-01-09
On the bench:
1/35 Scratchbuilt Rail Tank
#036
England - West Midlands, United Kingdom
Joined: December 01, 2001
KitMaker: 1,998 posts
Armorama: 1,236 posts
Posted: Saturday, January 31, 2009 - 09:58 PM UTC
Quoted Text
WOW, look at those ejector marks on the inside hull roof! Not that anyone will see them there, of course. Was there a lot of pin marks in other places you did have to take care of?
Cuhail
Hi
Surprisingly there are quite a few injector marks, luckily most are hidden, which is good and those that can be seen are really small and easy to fill.
I take it you are now scratch building the Hull after all the work you did on the turret
a nice bit of scratch building that
cheers
keith
A VETERAN - Whether active duty or retired is someone who, at one point in their life, wrote a blank check made payable to "Great Britain", for an amount of "up to and including my life". That is HONOUR, and there are way too many people who forget this
Wisconsin, United States
Joined: January 03, 2005
KitMaker: 279 posts
Armorama: 262 posts
Posted: Saturday, January 31, 2009 - 11:30 PM UTC
This looks like a nice kit. I still have an additional Hobby Fan interior sitting in stash but need a Tamiya kit for it. Figures I would have that thing now that a new kit is available with the same components. I would assume it would be an easier build than the resin. My first buld of the Hobby Fan kit was a long drawn out affair, but it looked great when completed.
Keep up the good work, I'm looking forward to seeing more photos.
England - West Midlands, United Kingdom
Joined: June 23, 2008
KitMaker: 2,329 posts
Armorama: 2,110 posts
Posted: Sunday, February 01, 2009 - 02:03 AM UTC
The interior looks great i cant to see it weathered. Are you going to add any personal touches into the interior like posters equipement?

Art isn't just pritty pictures. It's an expression of human rage.
Florida, United States
Joined: June 03, 2003
KitMaker: 1,095 posts
Armorama: 743 posts
Posted: Sunday, February 01, 2009 - 10:53 AM UTC
Great looking build keith! Those mounts look like they came with the kit, great job!
a few notes... the toolbox should be red (on the left side, along the sponson, foward of the fuel tank). Also right behind the tool box is the troop heater, that is a blackish brown.
Now, if you are going to add the extra antenna mounts, you will have to mount the SINCGARS...which go on a rack right foward of the tool box, where you now have a single seat...the single seat (basicly a cushion on the sponson) was only thier with the PRC radio instalation....yeah, i know...more details to deal with! Sorry!

Email me if you want some better explaination...
looking good!!
Andy
Fideli Certa Merces -- "to the faithful there is certain reward"
Rhone, France
Joined: December 02, 2002
KitMaker: 12,719 posts
Armorama: 12,507 posts
Posted: Sunday, February 01, 2009 - 06:31 PM UTC
Quoted Text
Now, if you are going to add the extra antenna mounts, you will have to mount the SINCGARS...which go on a rack right foward of the tool box, where you now have a single seat...the single seat (basicly a cushion on the sponson) was only thier with the PRC radio instalation
Here they are

HTH
Frenchy
"Find the Bastards, then Pile On"
Col. George W.Patton III 's standing order for the troopers of the 11th Armoured Cavalry Regiment
#036
England - West Midlands, United Kingdom
Joined: December 01, 2001
KitMaker: 1,998 posts
Armorama: 1,236 posts
Posted: Sunday, February 01, 2009 - 08:12 PM UTC
thanks Guys
But a little to late now as I have sealed the beast up and painted the out side
but a valuable piece of information for the next one I build. Although now you can't see most of the interior.
These are the second set of mounts I tried as the first set I tried to hard to copy the pictures and they just didn't quite work, but I am happy with the results.
cheers
keith
A VETERAN - Whether active duty or retired is someone who, at one point in their life, wrote a blank check made payable to "Great Britain", for an amount of "up to and including my life". That is HONOUR, and there are way too many people who forget this
Florida, United States
Joined: June 03, 2003
KitMaker: 1,095 posts
Armorama: 743 posts
Posted: Monday, February 02, 2009 - 01:32 AM UTC
Did the both of you notice that it looks like HobbyBoss also didnt include the AN/VVS-2 night vision device shelf, nor the additional ammo box rack that is directly foward of it?
I wonder if they used a Korean AAVP as thier "prototype" and the korean Tracks dont have these features?
I hope they include them in the RAM/RS version, or we will be in for some scratchbuilding...or a prime moment for some resin upgrades (maybe i should start working on some masters?!)
Quoted Text
Here they are
HTH
Frenchy
Fideli Certa Merces -- "to the faithful there is certain reward"
Rhone, France
Joined: December 02, 2002
KitMaker: 12,719 posts
Armorama: 12,507 posts
Posted: Monday, February 02, 2009 - 02:06 AM UTC
I'm still longing for my favorite asian online store to have this kit in stock to order it

....so I can't compare it yet to the hundreds of reference pics I have gathered (including some from you Andy
)
Frenchy
"Find the Bastards, then Pile On"
Col. George W.Patton III 's standing order for the troopers of the 11th Armoured Cavalry Regiment
England - West Midlands, United Kingdom
Joined: April 24, 2007
KitMaker: 6 posts
Armorama: 4 posts
Posted: Monday, February 02, 2009 - 06:23 AM UTC
Hi Frenchy,
If your still looking for one of these kits, my friend here in the Unite Kingdom, has got the kit in stock.
If your interested, please pm me

Thanks
Gary
England - West Midlands, United Kingdom
Joined: September 12, 2007
KitMaker: 1,548 posts
Armorama: 1,407 posts
Posted: Monday, February 02, 2009 - 06:36 AM UTC
Rhone, France
Joined: December 02, 2002
KitMaker: 12,719 posts
Armorama: 12,507 posts
Posted: Monday, February 02, 2009 - 06:54 AM UTC
Quoted Text
Hi Frenchy,
If your still looking for one of these kits, my friend here in the Unite Kingdom, has got the kit in stock.
If your interested, please pm me
Thanks
Gary
Thanks for the offer Gary, but I'll think I'm resigned to my fate
and anyway I'm not really in a hurry as I've got a huge pile of unbuilt kits I could tackle to pass time if need be !
Frenchy
"Find the Bastards, then Pile On"
Col. George W.Patton III 's standing order for the troopers of the 11th Armoured Cavalry Regiment
Illinois, United States
Joined: February 10, 2004
KitMaker: 2,058 posts
Armorama: 791 posts
Posted: Monday, February 02, 2009 - 11:50 AM UTC
Quoted Text
I take it you are now scratch building the Hull after all the work you did on the turret
a nice bit of scratch building that
cheers
keith
Thanks Keith. No, it's not going on an AAVP-7 at all. It's going on a secret project vehicle I will unveil in the ACUTR campaign. I'll give you a hint, though, look in the "Scratchbuilding" Forum and look for my two recent build-logs. I've been throwing hints left and right!
Thanks for the info and the kudos. They both go a long way.
Cuhail
Campaigns:
Stop, Look and Listen -ENDS 1-31-10
ACUTR Again-STARTS 08-18-09
What if? -STARTS 06-01-09
On the bench:
1/35 Scratchbuilt Rail Tank
#036
England - West Midlands, United Kingdom
Joined: December 01, 2001
KitMaker: 1,998 posts
Armorama: 1,236 posts
Posted: Wednesday, February 04, 2009 - 08:43 AM UTC
the start of the painting process, before the weathering. the rear door has yet to be weathered

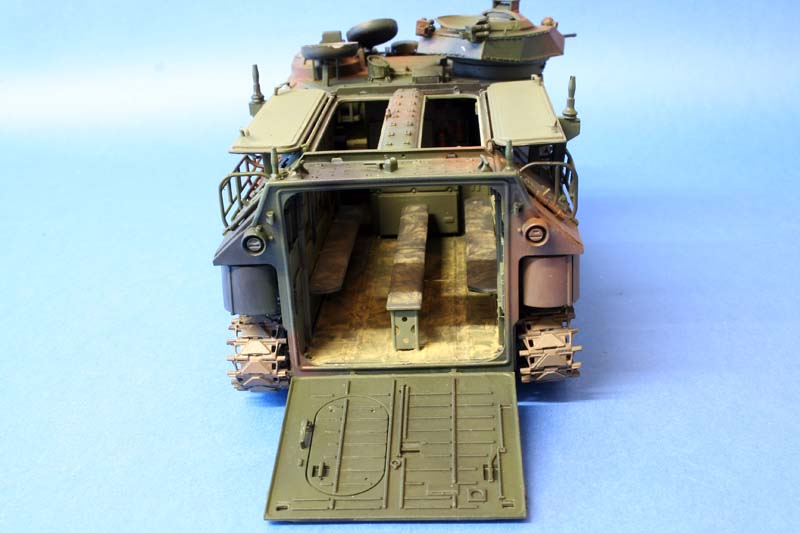
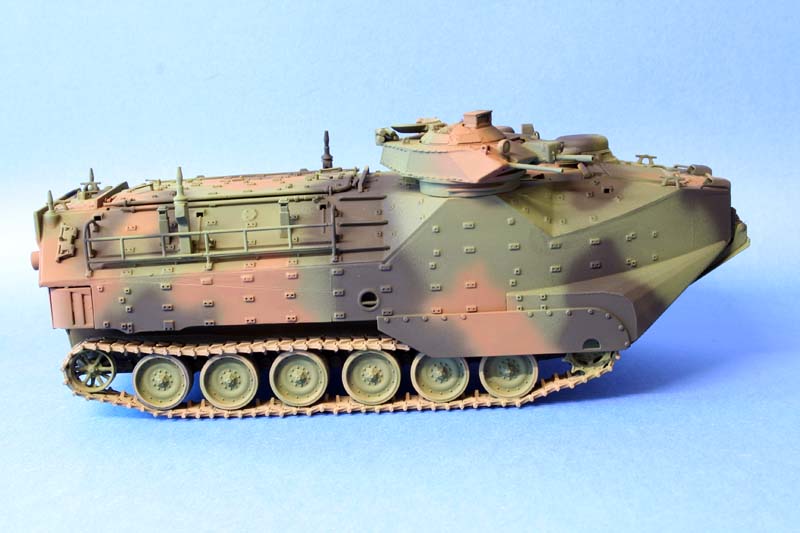
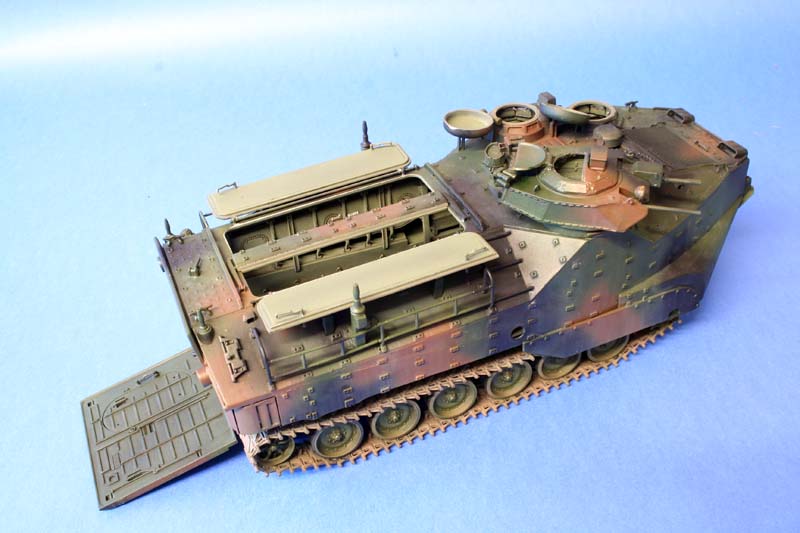
I just have to finish the weathering and add the storage and crew
cheers
Keith
A VETERAN - Whether active duty or retired is someone who, at one point in their life, wrote a blank check made payable to "Great Britain", for an amount of "up to and including my life". That is HONOUR, and there are way too many people who forget this
Paris, France
Joined: August 30, 2005
KitMaker: 2,315 posts
Armorama: 2,158 posts
Posted: Wednesday, February 04, 2009 - 09:25 AM UTC
Keith
Can you open the small door on the rear hatch ???
BTW look really good to me
A must have certainly
cheers
Seb
#036
England - West Midlands, United Kingdom
Joined: December 01, 2001
KitMaker: 1,998 posts
Armorama: 1,236 posts
Posted: Wednesday, February 04, 2009 - 09:27 AM UTC
Quoted Text
Keith
Can you open the small door on the rear hatch ???
BTW look really good to me
A must have certainly
cheers
Seb
yes you can the small oval hatch is a separate item, so you have the option, but it really depends on how you wish to show the interior of.
cheers
Keith
A VETERAN - Whether active duty or retired is someone who, at one point in their life, wrote a blank check made payable to "Great Britain", for an amount of "up to and including my life". That is HONOUR, and there are way too many people who forget this
England - West Midlands, United Kingdom
Joined: June 23, 2008
KitMaker: 2,329 posts
Armorama: 2,110 posts
Posted: Wednesday, February 04, 2009 - 10:04 AM UTC
Kieth superb weathering! on the interior

i really like how you represented the camoflauge looks superb
can you tell me how you did the weathering?
Art isn't just pritty pictures. It's an expression of human rage.
England - West Midlands, United Kingdom
Joined: September 12, 2007
KitMaker: 1,548 posts
Armorama: 1,407 posts
Posted: Wednesday, February 04, 2009 - 10:19 AM UTC
Really nice work Keith! Superb painting and weathering!
Martyn
Florida, United States
Joined: May 16, 2002
KitMaker: 17,694 posts
Armorama: 13,742 posts
Posted: Wednesday, February 04, 2009 - 04:44 PM UTC
Looks awsome Keith. Great job so far. I can't wait for the Recovery version to come out.
Field Artillery --- The KING of BATTLE!!!
"People sleep peaceably in their beds at night only because rough men stand ready to do violence on their behalf." -- George Orwell
Showcase
#041
Kobenhavn, Denmark
Joined: July 20, 2006
KitMaker: 10,069 posts
Armorama: 4,677 posts
Posted: Friday, February 20, 2009 - 01:58 AM UTC
Great job so far, Keith. I am planning to make this kit for the Gator Navy campaign at shipwrights part of this site.
The references in this tread is great. Thanks to all for posting

Campaign'oholic - 252+ campaigns completed
Florida, United States
Joined: June 03, 2003
KitMaker: 1,095 posts
Armorama: 743 posts
Posted: Tuesday, February 24, 2009 - 02:20 AM UTC
Keith,
Looking good man! I have GOT to get me one of these!
only comment I have is that the cammo should be a little tighter on the edges...see pics. Its almost so tight it could look "hard edge" from a distance (but its not, just has a tight sprayed edge.
Of course, what you have will look fine after a good coat of dust, some packs and bags, and all that..
Andy


Fideli Certa Merces -- "to the faithful there is certain reward"