


Campaigns
Where Armorama group builds can be discussed, organized, and updates posted.
Where Armorama group builds can be discussed, organized, and updates posted.
Hosted by Darren Baker, Richard S.
Get the Job Done Again
Red4

Joined: April 01, 2002
KitMaker: 4,287 posts
Armorama: 1,867 posts

Posted: Saturday, March 14, 2009 - 02:46 AM UTC
Thanks for the update Kimmo. How about an updated pic too. Thanks for posting your progress. "Q"
casualmodeler

Joined: February 04, 2009
KitMaker: 702 posts
Armorama: 665 posts

Posted: Saturday, March 14, 2009 - 05:28 AM UTC
Quoted Text
Thanks for the update Kimmo. How about an updated pic too. Thanks for posting your progress. "Q"
Sorry for no updated pic but tank is under dust cover at the moment. I´ll send pics later.


CrazyEd

Joined: February 25, 2009
KitMaker: 88 posts
Armorama: 57 posts

Posted: Saturday, March 14, 2009 - 10:55 AM UTC
Hi Red4, just signed in today. I'm going to finish a Tamiya M3 Lee that's been collecting dust for a long time ! The plan is that it's going to end up as a German "beutepanzer". The US send these steel babes to Mother Russia (the Lend-Lease program) and they (well some of them) ended up being used by the Germans. Funny how things can turn out right ? Sorry, I got no pictures of it right now, first got to blow off the dust ...  Greetings 2 all
  Ed.
Ed.
Greetings 2 all Ed.Dangeroo

#023

Joined: March 13, 2009
KitMaker: 2,058 posts
Armorama: 1,656 posts

Posted: Sunday, March 15, 2009 - 09:22 AM UTC
Hi all!
Just signed up (to the campaign and Armorama...). This looks like a good campaign to start for a newby... Have a few unfinished projects, but this one I have had sitting around for years. Must have built that M24 about 10 years ago...
It's supposed to be in Korea in February 1951.

Just signed up (to the campaign and Armorama...). This looks like a good campaign to start for a newby... Have a few unfinished projects, but this one I have had sitting around for years. Must have built that M24 about 10 years ago...
It's supposed to be in Korea in February 1951.
Red4
Joined: April 01, 2002
KitMaker: 4,287 posts
Armorama: 1,867 posts
Posted: Monday, March 16, 2009 - 01:56 AM UTC
Stefan,
Welcome to the site and to the campaign. You called it right, as this is a great campaign to get your feet wet. Any subject, any era, just get the model or project finished. Looks like its going to be a good looking diorama when your done. Thanks for sharing your work. "Q"
Welcome to the site and to the campaign. You called it right, as this is a great campaign to get your feet wet. Any subject, any era, just get the model or project finished. Looks like its going to be a good looking diorama when your done. Thanks for sharing your work. "Q"

Sudzonic

Joined: December 07, 2007
KitMaker: 2,096 posts
Armorama: 1,983 posts

Posted: Wednesday, March 18, 2009 - 02:02 AM UTC
Got this one done and raedy for paint.


Sudzonic
Joined: December 07, 2007
KitMaker: 2,096 posts
Armorama: 1,983 posts
Posted: Wednesday, March 18, 2009 - 04:03 AM UTC
Got some work done on this one aswell.


PlaneOldMe

Joined: September 26, 2005
KitMaker: 31 posts
Armorama: 24 posts

Posted: Wednesday, March 18, 2009 - 08:33 AM UTC
Hi Everyone,
Got a few days to do a little more work on my "Elefant", Put filters, washes and chipping on and also tried some mud. Applying mud was some thing i wanted to do, but never thought i would get it to work. Anyway, here are my latest photos.
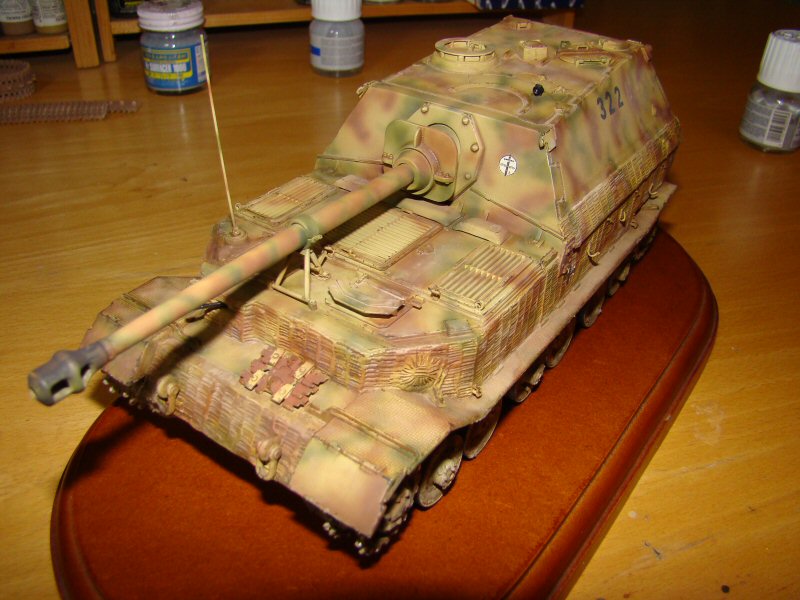
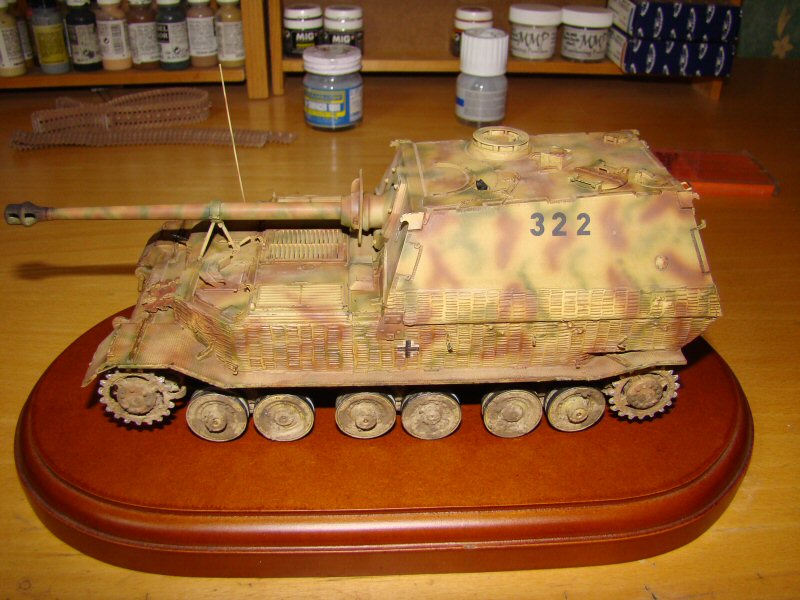
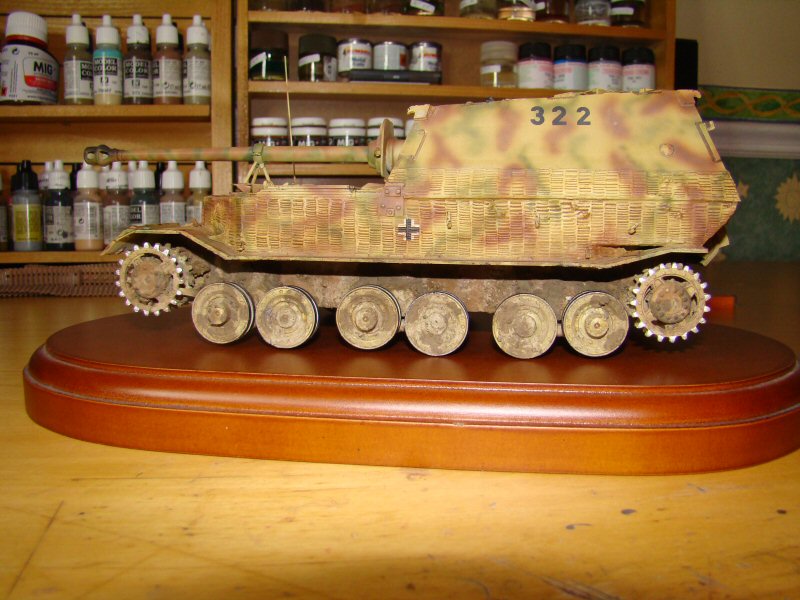
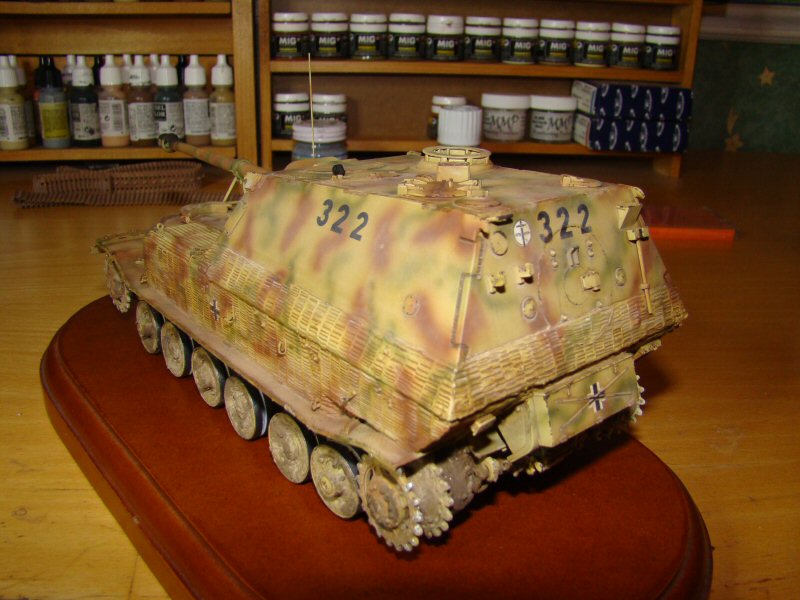
Anyway, i was reasonably happy with the mud, until i tries to fit the tracks, I built up the mud a little too high above the axles, with the result that the tracks catch and dont sit flat. So the job for tomorrow is to Deremel off some off the mud so that the tracks fit.
All the best, Dean
Got a few days to do a little more work on my "Elefant", Put filters, washes and chipping on and also tried some mud. Applying mud was some thing i wanted to do, but never thought i would get it to work. Anyway, here are my latest photos.
Anyway, i was reasonably happy with the mud, until i tries to fit the tracks, I built up the mud a little too high above the axles, with the result that the tracks catch and dont sit flat. So the job for tomorrow is to Deremel off some off the mud so that the tracks fit.
All the best, Dean
Damraska
Joined: October 06, 2006
KitMaker: 580 posts
Armorama: 499 posts
Posted: Wednesday, March 18, 2009 - 12:55 PM UTC
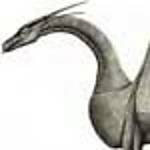
After much consideration I decided to make a partially built Italeri M47 Patton my (first?) effort for this campaign.

In the box I found a mostly completed kit with major components assembled and almost all parts cleaned up. Bolt head detail was added to the suspension, cast texture added to required components, unwanted details sanded off, and periscope openings bored out. Unfortunately, the first task on the agenda was the same one that brought the project to a screeching halt in the first place--the tracks.
I replaced the kit tracks with T84E1s by AFV Club. 688 parts, 344 ejector pin marks, and one weekend later the horrible task was done. I broke the first dozen links, threw all the parts in the trash, pulled all the parts out of the trash, broke a couple more links, and finally figured it out. Each run consists of two assembled lengths meeting at the sprocket and idler.
Now I need to decided what vehicle to model and add appropriate parts from an Eduard photo-etch set. Anyone know a good source for ROK (c1980s) or Jordanian (c1967) markings?
-Doug
SGTJKJ
#041

Joined: July 20, 2006
KitMaker: 10,069 posts
Armorama: 4,677 posts

Posted: Wednesday, March 18, 2009 - 11:48 PM UTC
So many interesting builds in this tread.
James, I like ribbon #2 the best, but both look nice.
Great looking Elefant, Dean. It is turning out very nice with a great camouflage. How do you keep your work desk so clean????
James, I like ribbon #2 the best, but both look nice.
Great looking Elefant, Dean. It is turning out very nice with a great camouflage. How do you keep your work desk so clean????

Sudzonic
Joined: December 07, 2007
KitMaker: 2,096 posts
Armorama: 1,983 posts
Posted: Thursday, March 19, 2009 - 06:10 AM UTC
Hay all got some paint on the second challenger 2 today.


Both challys together.

Both challys together.

curseoftheundead
Joined: June 04, 2007
KitMaker: 40 posts
Armorama: 38 posts
Posted: Thursday, March 19, 2009 - 07:01 AM UTC
Greetings All:
Thought I'd jump in too....
I've got a couple of old partially completed kits from back in the day....way back in the day. Like from 80's, before life got in the way and I had to put down the model building for awhile.
I'm thinking of finishing up the old Tamiya Su-85 kit that's laid dormant for 20+ years, and if I have time then moving on to a Stug III, Elephant, or jagd tiger. Matching some of the old paint jobs should be quite a challenge.
Thanks for coming up with this campaign...it's inspiring...
Peter
SGTJKJ
#041
Joined: July 20, 2006
KitMaker: 10,069 posts
Armorama: 4,677 posts
Posted: Thursday, March 19, 2009 - 08:27 PM UTC
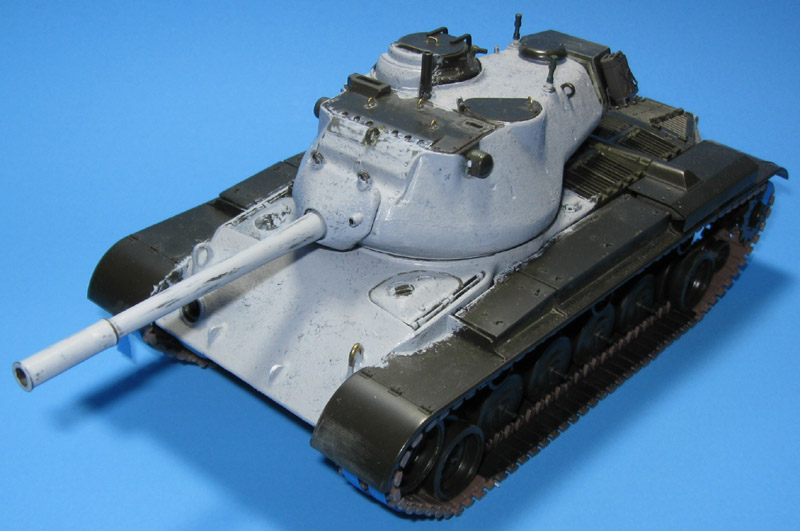
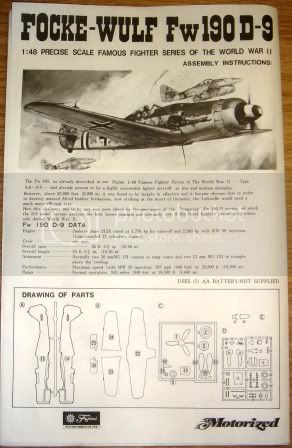
I had a look through my stash of semifinished kits last night and came up with an oldie from Fujimi. The 1/48 FW 190 Dora.
This kit is probably older than me - at least judging by the very 60ties-70ties pilot figure. The details are not up to todays standards, but I am sure it will be an enjoyable build none the less.
I have not decided on the scheme yet, but it will be something from the decal spares box as the decals for this kit are long gone.
More to follow....

This kit is probably older than me - at least judging by the very 60ties-70ties pilot figure.
The details are not up to todays standards, but I am sure it will be an enjoyable build none the less. I have not decided on the scheme yet, but it will be something from the decal spares box as the decals for this kit are long gone.
More to follow....

sgtreef
Joined: March 01, 2002
KitMaker: 6,043 posts
Armorama: 4,347 posts
Posted: Friday, March 20, 2009 - 11:28 PM UTC
I am in as to the rest of the Year.
Want to finish that Wingy Thing I started about a year and half ago
P 38 it is.
Pics latter in the weekend.
Want to finish that Wingy Thing I started about a year and half ago
P 38 it is.
Pics latter in the weekend.

acav

Joined: May 09, 2002
KitMaker: 517 posts
Armorama: 290 posts

Posted: Saturday, March 21, 2009 - 05:40 PM UTC
Quoted Text
Hi All,
Bout time I ponied up and posted some work here - what better way than to finish my Trumpeter KV-1 Ekranahmi?
Oh, and the Trumpeter E10.
And I've got a Tamiya King Tiger that won't finish itself.
I'm in.
So in.
acav
Update - getting close to finished on a Krupp Boxer I started earlier this year.


I've scratched the foot pedals ands a set of steering linkages as the basic kit has neither.
The mudguards are all thinned and profiled, the indicator arms are scratched from brass wire as the plastic kit ones broke, the width indicators are scratched as the kit ones are oversized, I made the seat cushions look more upholstered and lived in (I hope) and built the throttle/choke quadrant under the steering column from scrap and stock (have to rebuild the throttle and choke levers cos they broke too).
Added a jack and scratchbuilt horn to the outer firewall.
Paint is a matt black primer undercoat, with some sensible salt chipping under a coat of Tamiya rattlecan Panzer Grey.
Some final assembly and weathering to go, but this one's close to finished.
Even if it wasn't on the original list.
acav out...

yeahwiggie

Joined: March 24, 2006
KitMaker: 2,093 posts
Armorama: 1,359 posts

Posted: Saturday, March 21, 2009 - 08:29 PM UTC
Nice one, Acav.
I like the look of the seats, they look textured. How did you do that?
I like the look of the seats, they look textured. How did you do that?
acav
Joined: May 09, 2002
KitMaker: 517 posts
Armorama: 290 posts
Posted: Saturday, March 21, 2009 - 10:18 PM UTC
Quoted Text
Nice one, Acav.
I like the look of the seats, they look textured. How did you do that?
I glued strips of fine styrene round the edges of the moulded plastic seats and textured the surface with Mr Surfacer and a slurry of Tamiya putty and liquid glue ( = very smelly and toxic, ventilate well if doing this )
When I was happy with the shapes ( was going for a more random look than moulded seats, more like cushions that have been lived on for a while ) I put the units aside to dry and set.
Then it was a base coat of black primer, topped with light sand, both from rattlecans - let that dry for 24 hours between coats.
After that, I washed the surface of each seat with Tamiya Khaki Drab acrylic ( thinned down heaps ) and pressed the wet seat into a clean piece of calico over a wad of kitchen towels - this absorbed the excess moisture and imparted colour and 'texture'...
Hope that's clear enough - it a trial and error thing, I was just lucky it worked on the day...
acav
Red4
Joined: April 01, 2002
KitMaker: 4,287 posts
Armorama: 1,867 posts
Posted: Sunday, March 22, 2009 - 03:19 AM UTC
Nice work all. As for me, unfortunately my building has all but stopped. It is just temporary though. I've been working on getting my '65 Falcon Wagon restored and this has taken up all of my time. I work on it every chance I get... in the mornings before I leave for work at noon, and then sun-up to sun-down on the week ends. Hoping to have her back on the road really soon though. Thanks for continuing to post your updates and progress reports. Hopefully I'll have something to add/share soon. Thanks, "Q"
Sudzonic
Joined: December 07, 2007
KitMaker: 2,096 posts
Armorama: 1,983 posts
Posted: Tuesday, March 24, 2009 - 04:19 AM UTC
Hay all both challys are decal-ed up and ready for the matt coat and weathering.


alpha_tango

Joined: September 07, 2005
KitMaker: 5,609 posts
Armorama: 264 posts
Posted: Tuesday, March 24, 2009 - 06:25 AM UTC
Hi all
I just enlisted ... I have more projects started than I like to admit and I would be happy if i could finish at least one of them. I failed miserably in the first GTJD campaign but I try again.
This time I choose a project that is likely to get finished, and I can proove it is a loong term project:
Eduard Fw 190 A-8
all the best
Steffen

Sudzonic
Joined: December 07, 2007
KitMaker: 2,096 posts
Armorama: 1,983 posts
Posted: Wednesday, March 25, 2009 - 04:50 AM UTC
Update time.
Both challys pritty much ready for weathering.


Both challys pritty much ready for weathering.

Nito74

Joined: March 04, 2008
KitMaker: 5,386 posts
Armorama: 4,727 posts
Posted: Wednesday, March 25, 2009 - 06:06 AM UTC
Great Challys Scott !!
Red4
Joined: April 01, 2002
KitMaker: 4,287 posts
Armorama: 1,867 posts
Posted: Wednesday, March 25, 2009 - 08:07 AM UTC
Nice job on the Challengers Scott. Ok, a little off topic, but it is an unfinished project just the same, just on a larger scale is all. Just to prove I am making headway on something, here is a couple of pics on my 1:1 model I am working on. 1965 Ford Falcon 4 Door wagon with all of 21,000-ish miles on her. Wimbeldon White with Red Sierra Vinyl interior. I've rebuilt the engine, and cleaned and painted it and the engine compartment. Now it is just a matter of setting the engine back in the mounts and bolting everything back up. Its slow going but I am making headway. Hoping to have it at least road worthy soon, so I can get back to the plastic. Thanks, "Q"
This is how she looked before I started...not bad for a 44 year old car that has been sittng under the sun for over 35+ years. The tires still held air when I picked her up some 4+ years ago

This is what I started with in the engine compartment....ugh


And this is what she looks like currently after about 3 weeks of work. There is still a lot to do yet, but 110% better than when I started.


The transmission before-- Again, yuck...

and after rebuilding/painting

Thanks, "Q" 
This is how she looked before I started...not bad for a 44 year old car that has been sittng under the sun for over 35+ years. The tires still held air when I picked her up some 4+ years ago
This is what I started with in the engine compartment....ugh
And this is what she looks like currently after about 3 weeks of work. There is still a lot to do yet, but 110% better than when I started.
The transmission before-- Again, yuck...
and after rebuilding/painting
Thanks, "Q"
Nito74
Joined: March 04, 2008
KitMaker: 5,386 posts
Armorama: 4,727 posts
Posted: Wednesday, March 25, 2009 - 02:59 PM UTC
Great work Matt, I understand how you kept the plastic away for a few weeks !
Keep us posted on that Job !!
Keep us posted on that Job !!
curseoftheundead
Joined: June 04, 2007
KitMaker: 40 posts
Armorama: 38 posts
Posted: Thursday, March 26, 2009 - 03:15 AM UTC
Here's a few I need to finish off...the Jagpanzer IV, KV-1, and Tiger II are recent.
The others are from 20 years ago, before life got too complicated to include modelling.
Hope I did the picture correctly....
 [/url][/img]
The others are from 20 years ago, before life got too complicated to include modelling.
Hope I did the picture correctly....
[/url][/img]  |

WEB HOSTING BY


Copyright ©2021 Armorama and Kitmaker Network, a subsidiary of Silver Star Enterprises
All Rights Reserved. Please read our Conditions of Use and Privacy Policy.
All Rights Reserved. Please read our Conditions of Use and Privacy Policy.