Hosted by Darren Baker
Die Bundeswehr 'Hitting the 'G' Spot !!!
okdoky
Scotland, United Kingdom
Joined: April 30, 2007
KitMaker: 1,597 posts
Armorama: 806 posts
Joined: April 30, 2007
KitMaker: 1,597 posts
Armorama: 806 posts
Posted: Sunday, March 15, 2009 - 08:05 AM UTC
okdoky
Scotland, United Kingdom
Joined: April 30, 2007
KitMaker: 1,597 posts
Armorama: 806 posts
Joined: April 30, 2007
KitMaker: 1,597 posts
Armorama: 806 posts
Posted: Sunday, March 22, 2009 - 12:00 PM UTC
A wee update on tonights work
Short wheel base hard top
Long wheel base hard top
Longer wheel base
All three
Made a start on the interior of the box body
Am going by this layout as best I can
Nige
Short wheel base hard top
Long wheel base hard top
Longer wheel base
All three
Made a start on the interior of the box body
Am going by this layout as best I can
Nige
okdoky
Scotland, United Kingdom
Joined: April 30, 2007
KitMaker: 1,597 posts
Armorama: 806 posts
Joined: April 30, 2007
KitMaker: 1,597 posts
Armorama: 806 posts
Posted: Saturday, March 28, 2009 - 11:11 PM UTC
Got some work on the San Wolf done
Nige
Nige
okdoky
Scotland, United Kingdom
Joined: April 30, 2007
KitMaker: 1,597 posts
Armorama: 806 posts
Joined: April 30, 2007
KitMaker: 1,597 posts
Armorama: 806 posts
Posted: Monday, March 30, 2009 - 08:23 PM UTC
Construction of the gurny cradles.
Dry fit and temporary support
Nige
Dry fit and temporary support
Nige
okdoky
Scotland, United Kingdom
Joined: April 30, 2007
KitMaker: 1,597 posts
Armorama: 806 posts
Joined: April 30, 2007
KitMaker: 1,597 posts
Armorama: 806 posts
Posted: Wednesday, April 01, 2009 - 11:41 AM UTC
Wasn't happy with the wire I used with paper (the type used in twist lock freezer bag wire) as the paper did not sit right.
Van body cradle with twist lock wire (Now since removed)
Decided to start again for the box body gurny cradles and will re-do the van body cradle later.
I drew the line shape of the hinged rods on paper then chopped thin plastic strip for the largest sections
Then overlayed the uncut strip on top of the pre cut sections one by one to cut the smaller, centre sections judged by eye using the drawn line as a cutting guide
I was surprised how much better and easier it proved to be doing it this way and the rods also sat on the central control rod for glueing without any ham fisted fiddling.
Am much happier with the look
What do you folks think?
Nige
okdoky
Scotland, United Kingdom
Joined: April 30, 2007
KitMaker: 1,597 posts
Armorama: 806 posts
Joined: April 30, 2007
KitMaker: 1,597 posts
Armorama: 806 posts
Posted: Wednesday, April 15, 2009 - 10:50 AM UTC
Latest update on progress. Even took the models on holiday with me and did some work at the caravan.
Primer applied
All three together
Short with a coat of Tamiya Dark Green 30 spray. Keeping this G waggon in this colour as a little contrast to the others which will be in Halfords leaf green.
All three together showing contrast between the Tamiya and Halfords greens
Van body
Box body
This was my work bench last week,,,,,,,,,,,,,,,,, modelling al-fresco !!!
Even had a limited airshow while I worked. Shame it was the Easter Hols and there were no Tornados flying.
RAF Lossiemouth Air Sea Rescue always on the go flying over Scotland and the North Sea. The caravan site is right next to the air base
rost:
Nige
okdoky
Scotland, United Kingdom
Joined: April 30, 2007
KitMaker: 1,597 posts
Armorama: 806 posts
Joined: April 30, 2007
KitMaker: 1,597 posts
Armorama: 806 posts
Posted: Thursday, April 16, 2009 - 04:26 AM UTC
Have to figure out how to make a reasonable representation of these storage boxes and other add-ons for the interior.
Will be making mine on guesswork as there are no other clear pics of the interior for the newer style box I am building. Most of the pics I have been provided by everyone on the sites show slightly older configurations but I will use these pics as a basis.
Nige
Will be making mine on guesswork as there are no other clear pics of the interior for the newer style box I am building. Most of the pics I have been provided by everyone on the sites show slightly older configurations but I will use these pics as a basis.
Nige
Jupiterblitz
Joined: December 30, 2007
KitMaker: 885 posts
Armorama: 796 posts
KitMaker: 885 posts
Armorama: 796 posts
Posted: Thursday, April 16, 2009 - 05:19 AM UTC
Hello Nige,
have you thought about vacu-forming with clear plastic sheets?
Will become difficult to elaborate all the details by this method in this scale, but I do not know any other way to replicate those clear part boxes...
have you thought about vacu-forming with clear plastic sheets?
Will become difficult to elaborate all the details by this method in this scale, but I do not know any other way to replicate those clear part boxes...
okdoky
Scotland, United Kingdom
Joined: April 30, 2007
KitMaker: 1,597 posts
Armorama: 806 posts
Joined: April 30, 2007
KitMaker: 1,597 posts
Armorama: 806 posts
Posted: Saturday, April 18, 2009 - 05:07 PM UTC
Hi Marco
Still thinking about the boxes but I did a wee bit of work on the doors and bumpers this weekend instead.
Van body
Short wheelbase
Chopped the rear bumpers up to accept the nato standard towing pintle supports and drilled openings for rear fog and reversing lights. Also drilled out the front bumper to form a towing hitch and recess.
Original parts and alterred together
Front bumpers
Van body has slightly different rear bumpers compared to the short as there are tie down/lifting rings that have to be added to the chassis in between the rear wheels but in front of the bumpers.
The fire service G waggons have horizontally split doors and the rally G waggon vertically split doors that come formed as part of the full body shell part. There is also the board and number plate lights moulded into the doors that are already factory cut with only tiny joints left that are easily carved to free the doors from the body shell.
Van body needs a single, side hung rear door with no glass and supporting a spare wheel. I took all the detail off the horizontally split door and added a new door handle and recess.
Van body bumpers and door with spare wheel (no hinges yet)
Short wheelbase gets the vertical split doors with the number plate board carefully cut off and saved for adding back on later and the hole filled in.
Hope you like
Nige
okdoky
Scotland, United Kingdom
Joined: April 30, 2007
KitMaker: 1,597 posts
Armorama: 806 posts
Joined: April 30, 2007
KitMaker: 1,597 posts
Armorama: 806 posts
Posted: Sunday, April 19, 2009 - 11:10 AM UTC
Some work done on the interior of the San Wolf.
If you have some basic dimensions in mm's of the gurny that came with the VW ambulance I would appreciate if you might pass these on Michael as it looks very like the one that would sit on the flat platform to the left.
I think I will do mine with a red matrass for a bit of contrast with the green and white.
Hope you like
Nige
okdoky
Scotland, United Kingdom
Joined: April 30, 2007
KitMaker: 1,597 posts
Armorama: 806 posts
Joined: April 30, 2007
KitMaker: 1,597 posts
Armorama: 806 posts
Posted: Tuesday, April 21, 2009 - 10:44 AM UTC
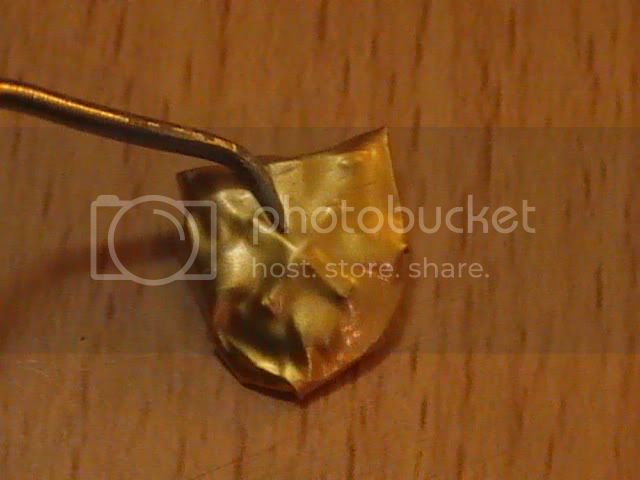
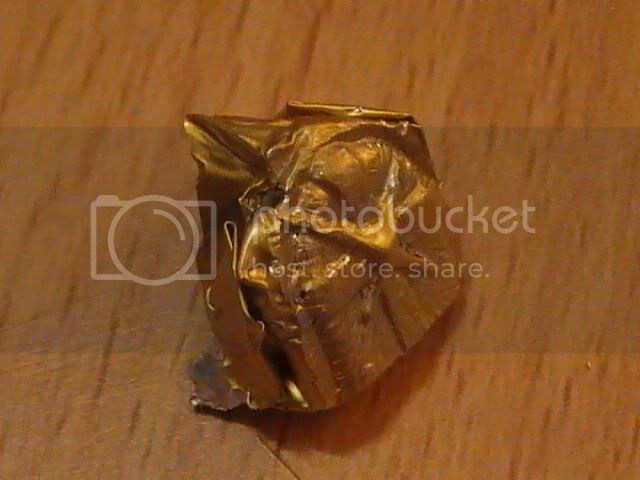
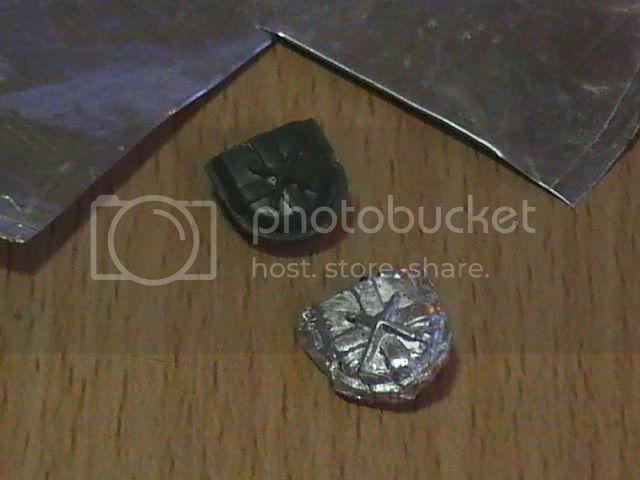
Had a go at making extra convoy marker board and light fittings for the group of vehicles.
I used the Ian Sadler method of burnishing copies of the Revell 1/24 military Unimog marker board.
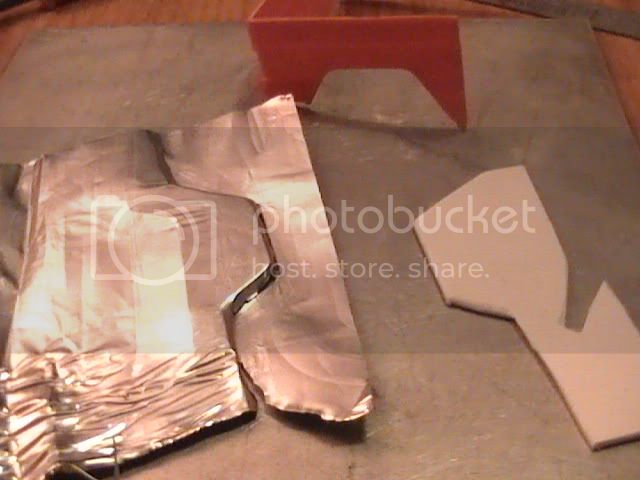
First I wrapped the original plastic piece tightly in aluminium foil taken from a carton of hot chocolate powder.
Using a dental tooth pick to burnish the foil down over and into the fine detail
The detail comes up a treat
Care needs to be taken unwrapping the original piece to preserve the detail
I used a pair of nail clippers to clip away the excess foil around the edges then picked out the original plastic using the tooth pick again to lever it outof the foil
Here is the results
A blob of super glue in the inprint will hopefully help to preserve the detail and make it less likely to be bent.
A very cheap, easy and quick method of making extra parts of ready available kit parts.
Thanks Ian for giving me the idea last Perth show. Looking forward to getting more hints and tips from you this year.
All the best
Nige
okdoky
Scotland, United Kingdom
Joined: April 30, 2007
KitMaker: 1,597 posts
Armorama: 806 posts
Joined: April 30, 2007
KitMaker: 1,597 posts
Armorama: 806 posts
Posted: Wednesday, April 22, 2009 - 11:37 AM UTC
After me saying how good the steering componants were at the start of the build I was seriously pee'd off by the poor fit of the wheel hubs to the spindle they are supposed to slide onto.
In simple terms the spindle is too thin for the holes in the rear of the wheel hubs so they need to be packed out to fit.
I am thinking of finding some aluminium tube of the right thickness to either build up the spindles to the right thickness or to fit inside the wheel hub.
Either way we need to find a way to pack the hubs so they sit neater.
Have to watch that the tube thickness we use is not too thin and still allows wobble or is too thick to allow the wheels to fit on.
Looks like I will have these at Perth as in progress models only. Never mind I can be doing things to them while I am sitting at the table.
Nige
okdoky
Scotland, United Kingdom
Joined: April 30, 2007
KitMaker: 1,597 posts
Armorama: 806 posts
Joined: April 30, 2007
KitMaker: 1,597 posts
Armorama: 806 posts
Posted: Tuesday, May 26, 2009 - 01:33 PM UTC
Wee snippet of work done to form the tie down and air transport shackles on the sides and rear of the chassis members for the van bodied ambulance.
Got a small section to add over the wire to make the cover plate that holds the side shackles
Nige
Got a small section to add over the wire to make the cover plate that holds the side shackles
Nige
bobman331
Massachusetts, United States
Joined: April 13, 2009
KitMaker: 177 posts
Armorama: 142 posts
Joined: April 13, 2009
KitMaker: 177 posts
Armorama: 142 posts
Posted: Tuesday, May 26, 2009 - 05:27 PM UTC
wow, u should add a leo to go along with ur trucks!
Jupiterblitz
Joined: December 30, 2007
KitMaker: 885 posts
Armorama: 796 posts
KitMaker: 885 posts
Armorama: 796 posts
Posted: Wednesday, May 27, 2009 - 05:52 AM UTC
Really nice details you have added on Nige.
And as you are that hungry in improving these details...good luck with broadering the mud flaps at the wheel cases...
okdoky
Scotland, United Kingdom
Joined: April 30, 2007
KitMaker: 1,597 posts
Armorama: 806 posts
Joined: April 30, 2007
KitMaker: 1,597 posts
Armorama: 806 posts
Posted: Wednesday, May 27, 2009 - 07:58 AM UTC
Quoted Text
Really nice details you have added on Nige.
And as you are that hungry in improving these details...good luck with broadering the mud flaps at the wheel cases...
Thanks Marco
I was hoping to get away without them ,,,,,,,,,,,,,,,,,,,,,, but now I will have to!!!!!!!!!!!!
I was thinking of making masters on a flat piece of plastic and glue shaped pieces to make up a male pattern for front and rear extensions. One nearside set and one offside set.
If I factor in the thickness of foil I can hopefully burnish tin foil over the male masters to make enough sets. I could get away with leaving the short wheel base as it is but would like to have the other two with the extensions.
Thanks as always for the encouragement Marco.
Nige
tjkelly
Maryland, United States
Joined: May 04, 2007
KitMaker: 1,132 posts
Armorama: 1,123 posts
Joined: May 04, 2007
KitMaker: 1,132 posts
Armorama: 1,123 posts
Posted: Wednesday, May 27, 2009 - 08:29 AM UTC
Fantastic progress Nige! Been a while since I've taken a look at it, you're coming right along! Keep at it mate!
Cheers -
Tim
Cheers -
Tim
okdoky
Scotland, United Kingdom
Joined: April 30, 2007
KitMaker: 1,597 posts
Armorama: 806 posts
Joined: April 30, 2007
KitMaker: 1,597 posts
Armorama: 806 posts
Posted: Wednesday, May 27, 2009 - 12:06 PM UTC
Quoted Text
Really nice details you have added on Nige.
And as you are that hungry in improving these details...good luck with broadering the mud flaps at the wheel cases...
OK MARCO
I rose to the challenge tonight as I thought I had better try to get something done and you gave me the push I needed to give it a go!!!!!!
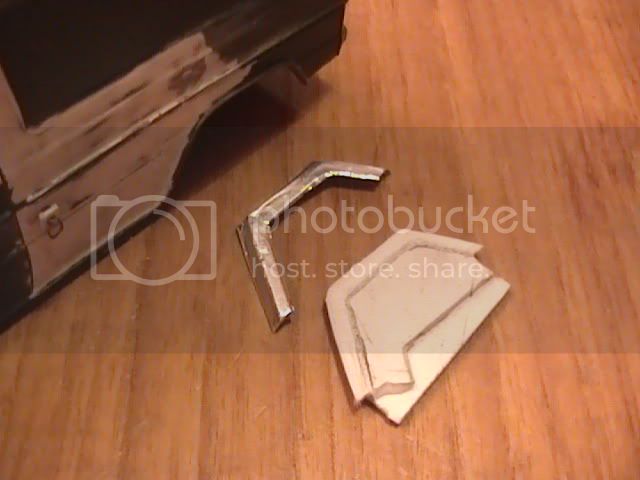
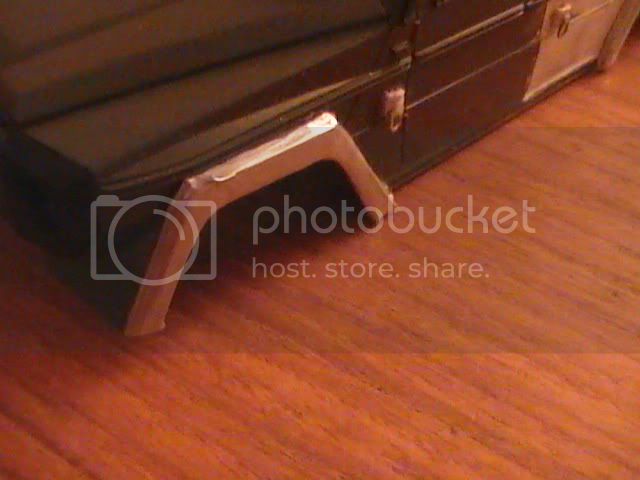
So I will let you guys be the judge of my first attempt. Use of more Aluminium foil again and burnishing "A La Sandy" Ian Sadler style to press the pattern from sections of plastic cut and sanded to shape.
A bit of tweeking on the master still to do and then there is front and opposits of each to make masters of.
I have decided to also narrow the outside lip / vertical lip a bit more as comparing with the real photos they project out but are not as wide a lip as I appear to have formed here as far as I can see it.
What do you guys think
Do you think I should continue with this route or any other suggestions?
Thanks for the support all
Nige
Jupiterblitz
Joined: December 30, 2007
KitMaker: 885 posts
Armorama: 796 posts
KitMaker: 885 posts
Armorama: 796 posts
Posted: Wednesday, May 27, 2009 - 01:09 PM UTC
Nige,
meanwhile I've been getting the feeling that you are hooked on challenges like that.
Successful performance...and fast too.
An easier method were vacuum forming which would also provide solutions for other sections like the clear boxes of the interior.
meanwhile I've been getting the feeling that you are hooked on challenges like that.
Successful performance...and fast too.
An easier method were vacuum forming which would also provide solutions for other sections like the clear boxes of the interior.
okdoky
Scotland, United Kingdom
Joined: April 30, 2007
KitMaker: 1,597 posts
Armorama: 806 posts
Joined: April 30, 2007
KitMaker: 1,597 posts
Armorama: 806 posts
Posted: Wednesday, May 27, 2009 - 01:39 PM UTC
Hi Marco
I would love to try doing the vac-form using my machine in the shed but these bits are so small that it would be such a waste of A3 sized sheet of plastic to form them on this.
My friend at the model club is supposed to be trying to make a reducer frame that will let me use A4 sized sheets of plastic which make life a lot easier for items of this size. The one I can buy from the makers of the Vac-former would cost me over 100 pounds including p&p.
I suppose I could try to make a small, simple former to push press after heating on the vac-former heat lamp. I don't know how successfull that might be.
Nige
Jupiterblitz
Joined: December 30, 2007
KitMaker: 885 posts
Armorama: 796 posts
KitMaker: 885 posts
Armorama: 796 posts
Posted: Wednesday, May 27, 2009 - 02:43 PM UTC
...What the heck...?...How does this machine fit into your caravan you live in?
I had no clue that you have got such a large piece.
Well, I have thought of a small table version..but in your case...
"I suppose I could try to make a small, simple former to push press after heating on the vac-former heat lamp. I don't know how successfull that might be."
Good luck with this attempt Nige.
okdoky
Scotland, United Kingdom
Joined: April 30, 2007
KitMaker: 1,597 posts
Armorama: 806 posts
Joined: April 30, 2007
KitMaker: 1,597 posts
Armorama: 806 posts
Posted: Wednesday, May 27, 2009 - 03:42 PM UTC
Hi Marco
I have a 5m by 4m shed in my back garden all layed out for my modelling and it is full of great bits of kit.
Only problem is it is also full of house junk that we moved out of the house to build the extension I have been working on for a year now. Still loads of building items to do to get house back in order. So have not actually worked in my shed for the past year now. Only just getting around to clearing out the junk to find bits I need.
Another update with the rear door area. I added the auxiliary power connections that probably allow battery power to tents or awnings for temporary aid posts set up in forward locations.
I also remembered to fill in the fuel tank filling point. Will have to re-scribe one on the side of the bodywork.
I don't know what the four dots either side of the door are (possibly fixings through to something on the rear interior) but one has fallen off while working.
Also added the front face to the shackle fixings
Now I gotta go to bed. Got to go to work in 5 Hours time.
Don't you just hate that there are not enough hours in a day.
Nige
okdoky
Scotland, United Kingdom
Joined: April 30, 2007
KitMaker: 1,597 posts
Armorama: 806 posts
Joined: April 30, 2007
KitMaker: 1,597 posts
Armorama: 806 posts
Posted: Sunday, May 31, 2009 - 01:17 PM UTC
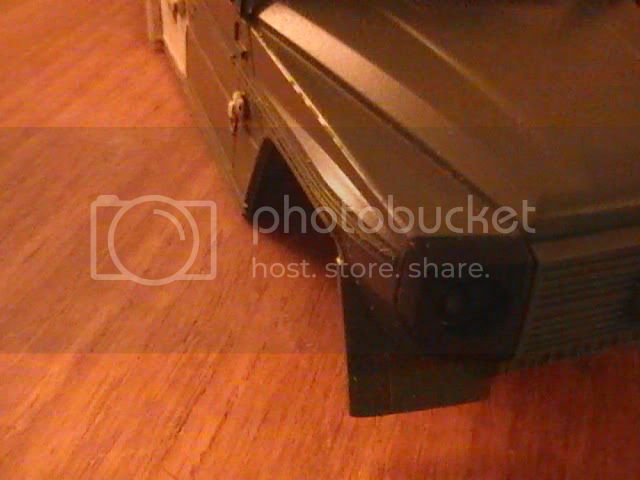
More work on the wheel arches and I thought the front wheel would be the hardest but it seems to have worked well with the first attempt.
See what you guys think.
Before
and after
Just got the one front arch to do now so I am done for the night. Work tomorrow.
Nige
See what you guys think.
Before
and after
Just got the one front arch to do now so I am done for the night. Work tomorrow.
Nige
okdoky
Scotland, United Kingdom
Joined: April 30, 2007
KitMaker: 1,597 posts
Armorama: 806 posts
Joined: April 30, 2007
KitMaker: 1,597 posts
Armorama: 806 posts
Posted: Thursday, June 04, 2009 - 01:03 AM UTC
Hi folks
Thanks for the kind comments! I am enjoying the build when I get the time to do stuff. Having made the plastic masters to form the foil extensions to the mud guards it made it easy to run off all the pieces I needed in quick succession. I am reasonably chuffed with how easy the pieces fitted to the plastic.
I fitted the two front pieces to the cab of the box body version in no time at all. I need to fill a few minor gaps, smooth the surfaces, prime them and repaint.
Will have to look over the photos to check what other areas need worked on first before I add more paint though. There are the blue beacons and any protectors. Roof racks can be done as separate items hopefully and added after.
The short wheelbase would probably be the easiest to finish off as there is not very much to add that the kit does not provide.
Was attempting to scan and adapt the decals for the Bundeswehr VW's bus conversions and from the 1/24 Unimog kits I have in the stash to alter number plates and give me additional stuff to addorn the models.
Having bother uploading the file to e-mail to my work to use their printers to put on decal sheet. Must have made the file size so damned big with the alterations I did on photo shop 6.
Have got so much to learn on how to use the programme!!!!!!!!!!! Any hints from folks on here would be appreciated.
Will do some update pics soon.
Nige
Jupiterblitz
Joined: December 30, 2007
KitMaker: 885 posts
Armorama: 796 posts
KitMaker: 885 posts
Armorama: 796 posts
Posted: Thursday, June 04, 2009 - 06:24 AM UTC
Hello Nige,
a look at the amount of views signifies that your blog is rather popular.
Obviously the folks consume silently your thread with all the technicques shown what is not very encouraging to go on with build blogs at all.
Now for the markings: Have you thought about to use stencils?
Not very easy to handle but have got advantages and the result is worth the efforts.