


Campaigns
Where Armorama group builds can be discussed, organized, and updates posted.
Where Armorama group builds can be discussed, organized, and updates posted.
Hosted by Darren Baker, Richard S.
Mighty 88

integraguy95

Joined: October 02, 2008
KitMaker: 308 posts
Armorama: 304 posts
Posted: Saturday, March 28, 2009 - 02:51 PM UTC
Welcome aboard James! Looking forward to seeing your builds progress, especially that Elephant, don't see too many of those done. Good luck!

jaypee

Joined: February 07, 2008
KitMaker: 1,699 posts
Armorama: 168 posts

Posted: Sunday, March 29, 2009 - 02:58 AM UTC
i just don't get it justin. why is it in german markings? why would you ruin a perfectly good tiger with an inferior chassis.
now in us markings it makes sense put a big gun on a sherman ah well just him call him herman the german sherman, keep on having fun with it
now in us markings it makes sense put a big gun on a sherman
ah well just him call him herman the german sherman, keep on having fun with it

tjkelly
Joined: May 04, 2007
KitMaker: 1,132 posts
Armorama: 1,123 posts
Posted: Sunday, March 29, 2009 - 05:53 AM UTC
Hi all -
Have been working on the AFV Flak 18, here are some pics before painting.


Am planning on a yellow scheme with maybe some brown camo lines.
Comments/criticism welcome! Thanks.
Cheers -
Tim
Have been working on the AFV Flak 18, here are some pics before painting.
Am planning on a yellow scheme with maybe some brown camo lines.
Comments/criticism welcome! Thanks.
Cheers -
Tim
integraguy95
Joined: October 02, 2008
KitMaker: 308 posts
Armorama: 304 posts
Posted: Sunday, March 29, 2009 - 03:14 PM UTC
jeez Tim, that is an amazing build! that should look pretty good all done up, you going to put it in a dio?
jaypee
Joined: February 07, 2008
KitMaker: 1,699 posts
Armorama: 168 posts
Posted: Monday, March 30, 2009 - 02:18 AM UTC
Really is a smashing rendition of the 88. Could you post some shots with the stabilisers down
so that I can copy some of the larger details for my airfix 88.
Thanks
JP
so that I can copy some of the larger details for my airfix 88.
Thanks
JP
mimeda
Joined: August 10, 2008
KitMaker: 204 posts
Armorama: 191 posts

Posted: Monday, March 30, 2009 - 10:37 AM UTC
WOW!!!! Very interesting projects so far, that Flak 18 is looking really good....
I was on vacations so didn't worked much on my King Tiger Porsche. Anyhow, today i made some progress explained on each following picture:
Looking at the engine exhausts, as they come, they could potentially give a decent result, but I decided to use my Dremel to make some drilling, then a almost "hair thin" drill bit with a pin vise was used to make a hole through both ends and a piece of wire attached with cynoacrilate.


Next step consisted of attaching the grills. Had to make some trimming and bending here and there cause I made a mistake and ordered the grills from Part for a Dragon King Tiger. I think the result was acceptable though.


Soldering wire was added to the Notek lamp.

Instead of closing both driver & gunner hatches, a spare Verlinden hand and a piece of an old Tamiya figure arm were used to simulate a semi opened hatch, just to make things less usual...


Finally for today, using again the same tiny drill bit an pin vise the sight on one of the cupola windows was added. Also, some styrene was used to scratch some visors or however they are called....you guys get the idea....


Well this is all for today, any comments, questions and suggestions are welcomed.
Mirko
I was on vacations so didn't worked much on my King Tiger Porsche. Anyhow, today i made some progress explained on each following picture:
Looking at the engine exhausts, as they come, they could potentially give a decent result, but I decided to use my Dremel to make some drilling, then a almost "hair thin" drill bit with a pin vise was used to make a hole through both ends and a piece of wire attached with cynoacrilate.
Next step consisted of attaching the grills. Had to make some trimming and bending here and there cause I made a mistake and ordered the grills from Part for a Dragon King Tiger. I think the result was acceptable though.
Soldering wire was added to the Notek lamp.
Instead of closing both driver & gunner hatches, a spare Verlinden hand and a piece of an old Tamiya figure arm were used to simulate a semi opened hatch, just to make things less usual...
Finally for today, using again the same tiny drill bit an pin vise the sight on one of the cupola windows was added. Also, some styrene was used to scratch some visors or however they are called....you guys get the idea....
Well this is all for today, any comments, questions and suggestions are welcomed.
Mirko
integraguy95
Joined: October 02, 2008
KitMaker: 308 posts
Armorama: 304 posts
Posted: Monday, March 30, 2009 - 07:01 PM UTC
Mirko, that level of accuraccy is outstanding! Do you have some sort of OCD?  That is outstanding work, I never would have thought about those exhausts or cupola sights. nice job!
P.S I love that half-open hatch idea, very original!
That is outstanding work, I never would have thought about those exhausts or cupola sights. nice job!P.S I love that half-open hatch idea, very original!
tjkelly
Joined: May 04, 2007
KitMaker: 1,132 posts
Armorama: 1,123 posts
Posted: Thursday, April 02, 2009 - 01:22 AM UTC
Thanks Justin, appreciate it. Am thinking of placing it on a small base with a couple of figures, we'll see how things go with the finish.
John - would love to be able to put the stabilizers down, but unfortunately have glued them in the up position. This one's going to be a challenge to paint, hindsight I should have left them off, maybe my impatience won't screw it up too bad!
Thanks for the compliment Mirko, keep at your's, you've done some amazing builds, always a pleasure looking at your work.
More to come all, looking to get some paint on her in a few weeks.
Thanks again! Keep at it!
Cheers -
Tim

kevinb120
Joined: May 09, 2006
KitMaker: 1,349 posts
Armorama: 1,267 posts
Posted: Monday, April 06, 2009 - 02:13 PM UTC
Well I've been idle for a while but this gives me a reason to build that Cyber Hobby Ferdinand 150100. I'm in!

Tojo72
Joined: June 06, 2006
KitMaker: 4,691 posts
Armorama: 3,509 posts
Posted: Tuesday, April 07, 2009 - 06:55 AM UTC
Some nice stuff appearing already........Mirko+Tim......moving along nicely,very detailed.Won't get mine started for some time yet.
SGTJKJ

#041

Joined: July 20, 2006
KitMaker: 10,069 posts
Armorama: 4,677 posts

Posted: Thursday, April 09, 2009 - 09:58 PM UTC
Really nice details you are adding, Mirko. It is going to look great. I am taking a little more out of the box approach, but will also lack some of the nice finer details from you build, Mirko.
The only AM part I am adding is a turned Aluminium barrel. I think this really adds a really visible detail. Especially for the mighty long barreled 88 mm of the King Tiger.
The way Tamiya has solved the engine screens for the curved covers are really good. Very thin double sided tape is provided along with a template. This makes it possible to add the fine mesh to the screens with a strong yet almost invisible bond.
Below are some shots of how my King Tiger is progressing. More to follow.....

mimeda
Joined: August 10, 2008
KitMaker: 204 posts
Armorama: 191 posts
Posted: Friday, April 10, 2009 - 04:34 PM UTC
Hello everybody. After getting some info here on the forums about the main gun sights I noticed that I am missing one in the cupola, bad luck,will do the appropriate scratch in the KT Henschel which is coming next..........
Here some pics of the pre shading and the scratched gun sight.....


Here some pics of the pre shading and the scratched gun sight.....
mimeda
Joined: August 10, 2008
KitMaker: 204 posts
Armorama: 191 posts
Posted: Saturday, April 11, 2009 - 11:17 AM UTC
Painting has started....  .... the base color is XF-60 from Tamiya, the green XF-61 also from Tamiya.....(acrylics)....I applied the base color with a Paasche VL, the green with a Paasche VJR, freehand......


After seeing this combination of colors I am not quite sure if I want to add the third color the XF-64 as I really like this 2 colors together....mmmmm......will see...will go biking to clear my mind..hahaha
Keep working on those projects guys...
Mirko
.... the base color is XF-60 from Tamiya, the green XF-61 also from Tamiya.....(acrylics)....I applied the base color with a Paasche VL, the green with a Paasche VJR, freehand......After seeing this combination of colors I am not quite sure if I want to add the third color the XF-64 as I really like this 2 colors together....mmmmm......will see...will go biking to clear my mind..hahaha
Keep working on those projects guys...
Mirko
integraguy95
Joined: October 02, 2008
KitMaker: 308 posts
Armorama: 304 posts
Posted: Saturday, April 11, 2009 - 12:19 PM UTC
Mirko,
That Porsche turret KT is looking great. I like that pre-shading, it adds alot to the basecoat and that camoflage is top notch. Keep up the great work!
That Porsche turret KT is looking great. I like that pre-shading, it adds alot to the basecoat and that camoflage is top notch. Keep up the great work!
mimeda
Joined: August 10, 2008
KitMaker: 204 posts
Armorama: 191 posts
Posted: Wednesday, April 15, 2009 - 12:59 AM UTC
Hello again.......Jusin & Jesper thaks for your comments.........
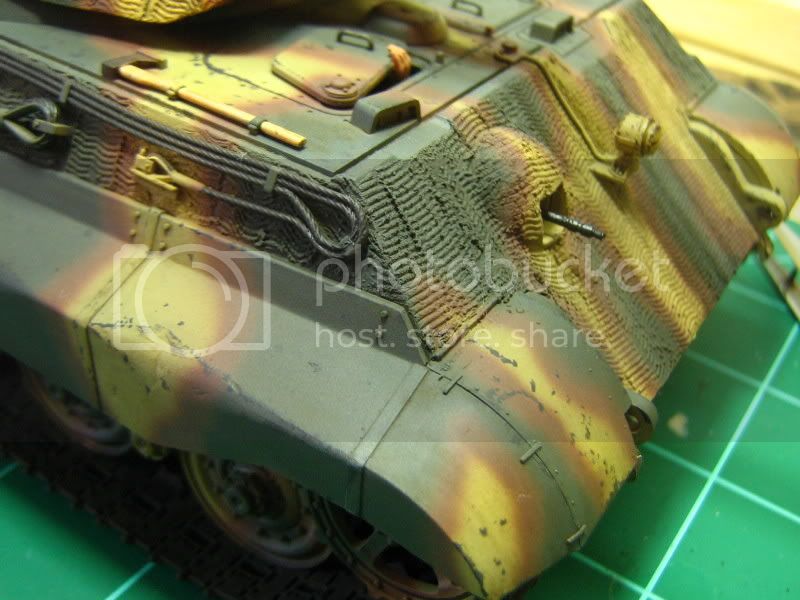
Here some pics of the KTP with the third camouflage color added. Also some chipping applied with a 3/0 brush and a mixture of flat brown and flat black from Tamiya.
Decals were applied with Micro Sol decal fixer to help attaching in the zimmerit crevices.
Next step will be a semi gloss lacquer coat......but it will have to waite until tomorrow cause I am on call today.....


Mirko
Here some pics of the KTP with the third camouflage color added. Also some chipping applied with a 3/0 brush and a mixture of flat brown and flat black from Tamiya.
Decals were applied with Micro Sol decal fixer to help attaching in the zimmerit crevices.
Next step will be a semi gloss lacquer coat......but it will have to waite until tomorrow cause I am on call today.....
Mirko
integraguy95
Joined: October 02, 2008
KitMaker: 308 posts
Armorama: 304 posts
Posted: Monday, April 20, 2009 - 12:47 PM UTC
Mirko,
That looks absolutely outstanding!! Thats a great paintjob, the camo looks great and so does that chipping.
That looks absolutely outstanding!! Thats a great paintjob, the camo looks great and so does that chipping.
mimeda
Joined: August 10, 2008
KitMaker: 204 posts
Armorama: 191 posts
Posted: Tuesday, April 21, 2009 - 06:18 AM UTC
Hi, thanks for the comment. I applied a raw umber oil wash yesterday to all the kit so just letting it dry before some final details. I am planning to bring this kit next weekend to a local Model Expo in Cedar Rapids, IA. I have never been there before...so that makes a good excuse...hahaha.
Anyhow, I started the figure that came with the kit to so hopefully will be posting some pictures soon.....
Keep the good work....
Mirko
Anyhow, I started the figure that came with the kit to so hopefully will be posting some pictures soon.....
Keep the good work....
Mirko

Nito74

Joined: March 04, 2008
KitMaker: 5,386 posts
Armorama: 4,727 posts
Posted: Tuesday, April 21, 2009 - 02:54 PM UTC
Terrific job Mirko !
What colours did you use for the chipping ?
What colours did you use for the chipping ?
mimeda
Joined: August 10, 2008
KitMaker: 204 posts
Armorama: 191 posts
Posted: Tuesday, April 21, 2009 - 03:49 PM UTC
Hello John, thanks for the comments. I used Tamiya's acrylics for the chipping. Basically a mixture of Flat Brown and Flat Black, probably 3 to 1. Then I applied it with a 3/0 round brush here and there.....
Mirko
Mirko

mj
Joined: March 16, 2002
KitMaker: 1,331 posts
Armorama: 569 posts
Posted: Tuesday, April 21, 2009 - 06:28 PM UTC
Mirko, awesome job, man. I'm really glad you went with the third color - the camo looks perfect to me now. Great tip on the chipping. You make it sound easy, and it looks great.
Cheers,
Mike
Cheers,
Mike
mj
Joined: March 16, 2002
KitMaker: 1,331 posts
Armorama: 569 posts
Posted: Wednesday, April 22, 2009 - 05:27 AM UTC
Well, here is my entry, just finished - but maybe not. It is the Tamiya kit, OOB. It is a great, simple build, and while quick, provided a lot of enjoyment. I've placed it in a D.A.K. type setting. I have always wanted to attempt weathering my models, but have been afraid of ruining the finish. But, I keep looking at that huge shield in this gun, and keep thinking it would be a great opportunity to try some weathering techniques, - so - this model may look a little different when my Mig Oils arrive, and I get to test them out. But for now, it's done, and my campaign is complete.


And, I also discovered the best way to hide bad modeling - enter, the Camo net

Cheers,
Mike
And, I also discovered the best way to hide bad modeling - enter, the Camo net
Cheers,
Mike
mimeda
Joined: August 10, 2008
KitMaker: 204 posts
Armorama: 191 posts
Posted: Wednesday, April 22, 2009 - 09:14 AM UTC
Great job Mike and thanks for the comments. Once you weather one kit it will become almost a standard for your builds....you will see things a little bit different. Remember...always keep trying new things, that's the fun of this hobby!!!!!!!!!!!
As far as my KTp, as I mentioned before, I applied a very subtle raw umber wash with the following results. Notice that some final detailing of the tooling and towing cables has also started.


Afer letting this set for 24-48 hours a steel+ra umber dry brush was applied here and there, particularly on the tracks....


Here some results although not finished yet.....just to have a gross idea of the effect..


Mirko
As far as my KTp, as I mentioned before, I applied a very subtle raw umber wash with the following results. Notice that some final detailing of the tooling and towing cables has also started.
Afer letting this set for 24-48 hours a steel+ra umber dry brush was applied here and there, particularly on the tracks....
Here some results although not finished yet.....just to have a gross idea of the effect..
Mirko
SGTJKJ
#041
Joined: July 20, 2006
KitMaker: 10,069 posts
Armorama: 4,677 posts
Posted: Monday, April 27, 2009 - 06:16 AM UTC
Great job on the King Tiger, Mirko. I hope mine will get to the same level as yours. Looking forward to see more as your build progresses.
I have added the Voyager screens to my King Tiger and it is now ready for paint. I am going for a 501st SS heavy panzer battalion King Tiger destroyed in Hungary in 1945. It has a very interesting scheme that remains me of some of the Hetzer schemes from last part of the war.
More to follow as the build continues....
integraguy95
Joined: October 02, 2008
KitMaker: 308 posts
Armorama: 304 posts
Posted: Monday, April 27, 2009 - 11:54 PM UTC
Mike,
Great job on the Flak, suppose it could use a little weathering but i really like that camoflage netting!
Mirko,
Thats a stunning King Tiger! I like the color for the jack, I've been trying to nail down a good color for the jack since i've started armor models and I'd say thats an excellent color to use.
Jesper,
Can't wait to see how your K.T comes out.
just a few months in and already some great work being turned out!
P.S I've got my Sherman mit Tiger Turm 80% done, we have had a string of beautiful days here and its hard to stay inside.
Nito74
Joined: March 04, 2008
KitMaker: 5,386 posts
Armorama: 4,727 posts
Posted: Tuesday, April 28, 2009 - 05:50 AM UTC
Great King Tigers ! Congrats to Mirko & Jesper !!
 |

WEB HOSTING BY


Copyright ©2021 Armorama and Kitmaker Network, a subsidiary of Silver Star Enterprises
All Rights Reserved. Please read our Conditions of Use and Privacy Policy.
All Rights Reserved. Please read our Conditions of Use and Privacy Policy.