I have started a diorama in a groupsbuild on another forum.
The subject of this GB is D-day.
I have chosen to build myself an Opel Blitz, with spare parts from previous build Opel's and the remains of these old models, all the missing parts will be scratchbuild .
I'm allready in a further stage building this model....
I'm still looking for further info or pics off this vehicle, so if there's anyone who can help...
But enough talk , here some pics :
This is what I had to start with:
This was the first work done on the chassis:
Going further with the cabin:
These two put together for a dryfit:
Some detail added in the interior:
The steering wheel was, as poited out to me on the other forum, out of scale, so a new one was scratched:
Hope you enjoyed so far
Grtz,
Beyond
Hosted by Darren Baker
Opel Blitz, kofferaufbau, funkwagen 1/72
Beyond
West-Vlaaderen, Belgium
Joined: October 17, 2008
KitMaker: 240 posts
Armorama: 112 posts
Joined: October 17, 2008
KitMaker: 240 posts
Armorama: 112 posts
Posted: Monday, March 09, 2009 - 06:11 AM UTC
Beyond
West-Vlaaderen, Belgium
Joined: October 17, 2008
KitMaker: 240 posts
Armorama: 112 posts
Joined: October 17, 2008
KitMaker: 240 posts
Armorama: 112 posts
Posted: Monday, March 09, 2009 - 06:34 AM UTC
After these works, it was time to go further wit the load-/kofferaufbau section.
Some real wood (for lightning cigars) was glued on the floor:
And some boxes where made for the sides of the chassis:
Wich I did'nt like, so I removed them and made some new ones:
Next came the kofferaufbau itself, starting with some plasticcard and a paper(? )cutting machine:
And this where I stand at this moment:
So,like this is the way it looks today....
I'm a slow builder, so please give me some time to proceed, and to come again with a further update....
But in the meantime, don't hesitate to give me some feedback, comments, tips, etc...
Grtz,
Beyond
Frenchy
Rhone, France
Joined: December 02, 2002
KitMaker: 12,719 posts
Armorama: 12,507 posts
Joined: December 02, 2002
KitMaker: 12,719 posts
Armorama: 12,507 posts
Posted: Monday, March 09, 2009 - 06:55 AM UTC
Do you plan to put some stuff inside ? If so (and if it's not too late ) maybe you could draw some inspiration from Verlinden's 1/35th scale set, even if the shelter is different :
HTH
Frenchy
HTH
Frenchy
Beyond
West-Vlaaderen, Belgium
Joined: October 17, 2008
KitMaker: 240 posts
Armorama: 112 posts
Joined: October 17, 2008
KitMaker: 240 posts
Armorama: 112 posts
Posted: Monday, March 09, 2009 - 07:04 AM UTC
Hi Frenchy,
Yes, I do have plans to put some stuff in the interior
And it's not too late, what you see is only a dryfit....
Thanx for the info, this will be usefull, I have some info for the interior, but one can never have to much info
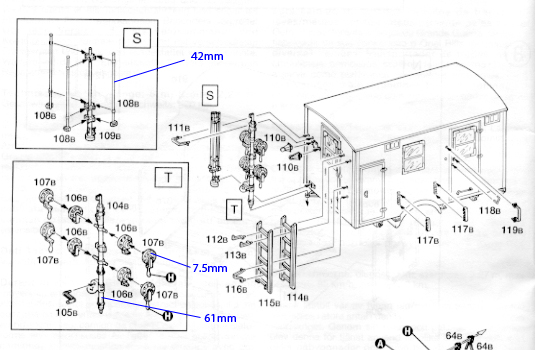
What I am still looking for is some info/pics of the mounted antenna... seems hard to find
Grtzz,
Beyond
trajan98
South Dakota, United States
Joined: November 26, 2008
KitMaker: 36 posts
Armorama: 34 posts
Joined: November 26, 2008
KitMaker: 36 posts
Armorama: 34 posts
Posted: Monday, March 09, 2009 - 01:52 PM UTC
Very impressive scratchbuilding, that is one that I have not attempted to do yet.
Patcher
Australia
Joined: March 21, 2008
KitMaker: 5 posts
Armorama: 4 posts
Joined: March 21, 2008
KitMaker: 5 posts
Armorama: 4 posts
Posted: Tuesday, March 10, 2009 - 02:07 PM UTC
Quoted Text
What I am still looking for is some info/pics of the mounted antenna... seems hard to find :-
Hi Beyond,
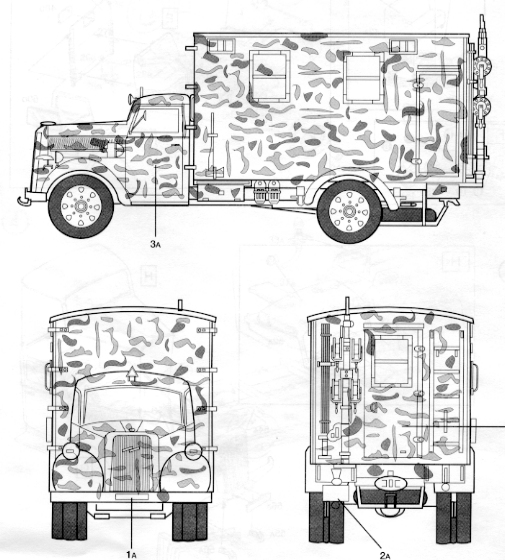
Yes, pictures of this vehicle are hard to find. I have made some scans of the instructions for the Italeri 1/35 radio truck. (I hope this works - it's the first time I have attempted to post pictures .)
The dimensions I have added are taken from the part on the sprue.
Hope this helps
Patrick
Beyond
West-Vlaaderen, Belgium
Joined: October 17, 2008
KitMaker: 240 posts
Armorama: 112 posts
Joined: October 17, 2008
KitMaker: 240 posts
Armorama: 112 posts
Posted: Wednesday, March 11, 2009 - 12:08 AM UTC
Hi Patcher,
Thanx for the scans, these will be of great help.
I was looking for these for a while.....
Grtz,
Beyond
Thanx for the scans, these will be of great help.
I was looking for these for a while.....
Grtz,
Beyond
Beyond
West-Vlaaderen, Belgium
Joined: October 17, 2008
KitMaker: 240 posts
Armorama: 112 posts
Joined: October 17, 2008
KitMaker: 240 posts
Armorama: 112 posts
Posted: Wednesday, March 11, 2009 - 09:39 AM UTC
Found some time today to work on the interior of the kofferaufbau.
Not much to say about it, let the pics speak for themselves
This is only the beginning, much to do still
Give me some input, comments, tips,...
Grtz,
Beyond
Not much to say about it, let the pics speak for themselves
This is only the beginning, much to do still
Give me some input, comments, tips,...
Grtz,
Beyond
Beyond
West-Vlaaderen, Belgium
Joined: October 17, 2008
KitMaker: 240 posts
Armorama: 112 posts
Joined: October 17, 2008
KitMaker: 240 posts
Armorama: 112 posts
Posted: Friday, March 13, 2009 - 10:52 PM UTC
Some little progress on the inside of the cabin.
Give me your honest opinions, don't hold in
The sleeves are too long, I know, my wife pointed that out to me , but it's already fixed
Also the chassis has recieved some paint again
Thanx for looking and reacting
Grtzzz,
Beyond
Give me your honest opinions, don't hold in
The sleeves are too long, I know, my wife pointed that out to me , but it's already fixed
Also the chassis has recieved some paint again
Thanx for looking and reacting
Grtzzz,
Beyond
Beyond
West-Vlaaderen, Belgium
Joined: October 17, 2008
KitMaker: 240 posts
Armorama: 112 posts
Joined: October 17, 2008
KitMaker: 240 posts
Armorama: 112 posts
Posted: Sunday, March 15, 2009 - 12:11 PM UTC
Some little work has been done.
The cabin has been glued together, some putty was used to fill the gaps and some sanding was done...
Also the chassis has been treated with some pigments
Feel free to give some feedback ............., before it's too late .....
Grtzz,
Beyond
The cabin has been glued together, some putty was used to fill the gaps and some sanding was done...
Also the chassis has been treated with some pigments
Feel free to give some feedback ............., before it's too late .....
Grtzz,
Beyond
lespauljames
England - South West, United Kingdom
Joined: January 06, 2007
KitMaker: 3,661 posts
Armorama: 2,764 posts
Joined: January 06, 2007
KitMaker: 3,661 posts
Armorama: 2,764 posts
Posted: Sunday, March 15, 2009 - 12:34 PM UTC
looking nice:D
areo gonna pint the tires, thy look a tad shiny to me,
the jacket is a great touch!
good luck with the latter stages!!
areo gonna pint the tires, thy look a tad shiny to me,
the jacket is a great touch!
good luck with the latter stages!!
Beyond
West-Vlaaderen, Belgium
Joined: October 17, 2008
KitMaker: 240 posts
Armorama: 112 posts
Joined: October 17, 2008
KitMaker: 240 posts
Armorama: 112 posts
Posted: Sunday, March 15, 2009 - 07:25 PM UTC
Hello lespauljames,
Yes the tires do look a bit shiny, don't they
But don't worry, at the end the whole vehicle will recieve some flatt varnish, including the tires...
I might even try to make 'm less black... more blue-greyish.
Thanx for your reply, apreciate it
Grtz,
Beyond
Yes the tires do look a bit shiny, don't they
But don't worry, at the end the whole vehicle will recieve some flatt varnish, including the tires...
I might even try to make 'm less black... more blue-greyish.
Thanx for your reply, apreciate it
Grtz,
Beyond
tjkelly
Maryland, United States
Joined: May 04, 2007
KitMaker: 1,132 posts
Armorama: 1,123 posts
Joined: May 04, 2007
KitMaker: 1,132 posts
Armorama: 1,123 posts
Posted: Sunday, March 15, 2009 - 08:23 PM UTC
Impressive work you've done there. Definitely nice to see it come together, from a pile of odds and ends to an identifiable vehicle, even more so in 1/72nd scale! Great scratchbuilding, looking forward to seeing this progress, as you've done a lot to date!
Keep it up, thanks for sharing. Cheers!
Beyond
West-Vlaaderen, Belgium
Joined: October 17, 2008
KitMaker: 240 posts
Armorama: 112 posts
Joined: October 17, 2008
KitMaker: 240 posts
Armorama: 112 posts
Posted: Tuesday, March 17, 2009 - 05:35 AM UTC
Here some pics of the latest works...
Tell me what you guys think of it
Some paint for the interior:
Some interior stuff:
All together now :
So, that's it guys...
Give me hints, tips, comments,......
Grtzzz,
Beyond
Tell me what you guys think of it
Some paint for the interior:
Some interior stuff:
All together now :
So, that's it guys...
Give me hints, tips, comments,......
Grtzzz,
Beyond
lespauljames
England - South West, United Kingdom
Joined: January 06, 2007
KitMaker: 3,661 posts
Armorama: 2,764 posts
Joined: January 06, 2007
KitMaker: 3,661 posts
Armorama: 2,764 posts
Posted: Tuesday, March 17, 2009 - 06:49 AM UTC
wow , realy nice work:D te interioris great
Beyond
West-Vlaaderen, Belgium
Joined: October 17, 2008
KitMaker: 240 posts
Armorama: 112 posts
Joined: October 17, 2008
KitMaker: 240 posts
Armorama: 112 posts
Posted: Wednesday, March 18, 2009 - 05:34 AM UTC
Today some small bitts and pieces made and/or prepared for painting.
Won't bother you with lot's of comment, that's up to you guys
Here are the pics:
The first pieces on there place:
And here some pics of the total, mostly the same pics, just from a slightly different angle :
Now let's hope the gods have mercy when I'll start to paint them .
Grtz,
Beyond
Won't bother you with lot's of comment, that's up to you guys
Here are the pics:
The first pieces on there place:
And here some pics of the total, mostly the same pics, just from a slightly different angle :
Now let's hope the gods have mercy when I'll start to paint them .
Grtz,
Beyond
lespauljames
England - South West, United Kingdom
Joined: January 06, 2007
KitMaker: 3,661 posts
Armorama: 2,764 posts
Joined: January 06, 2007
KitMaker: 3,661 posts
Armorama: 2,764 posts
Posted: Wednesday, March 18, 2009 - 06:04 AM UTC
interior is lookingbrilliant. !!!
Beyond
West-Vlaaderen, Belgium
Joined: October 17, 2008
KitMaker: 240 posts
Armorama: 112 posts
Joined: October 17, 2008
KitMaker: 240 posts
Armorama: 112 posts
Posted: Thursday, March 19, 2009 - 08:08 AM UTC
Today I have painted the items I've made yesterday.
The lockers in the back are only dryfitted, so they can be a bit
And I still have to paint some matt varnish on it....
Give me your honest opinions, please......... (and some tips to enhance it ?)
Grtz,
Beyond
The lockers in the back are only dryfitted, so they can be a bit
And I still have to paint some matt varnish on it....
Give me your honest opinions, please......... (and some tips to enhance it ?)
Grtz,
Beyond
orange_3D
British Columbia, Canada
Joined: July 28, 2005
KitMaker: 602 posts
Armorama: 469 posts
Joined: July 28, 2005
KitMaker: 602 posts
Armorama: 469 posts
Posted: Monday, March 23, 2009 - 07:37 PM UTC
Looking good, its tough to cram so much detail in on this scale.
were the radios built from scratch?
Beyond
West-Vlaaderen, Belgium
Joined: October 17, 2008
KitMaker: 240 posts
Armorama: 112 posts
Joined: October 17, 2008
KitMaker: 240 posts
Armorama: 112 posts
Posted: Friday, March 27, 2009 - 06:48 AM UTC
Hi, Orange_3d,
Thanx for your reaction
Sorry for the late reply, I have been on a holliday .....
The radio's where only for a part scratchbuild, as can be seen on this picture.
The green radio parts have been cut from a soldier, the white part has been scratched, using plasticcard, iron wire and copper wire.
The copper wire has been used to form the round parts and the iron wire was cutt in small pieces, wich where placed in small holes I have drilled, so there would be some buttons....
Hope to have been of any help?
Greetings,
Beyond
Beyond
West-Vlaaderen, Belgium
Joined: October 17, 2008
KitMaker: 240 posts
Armorama: 112 posts
Joined: October 17, 2008
KitMaker: 240 posts
Armorama: 112 posts
Posted: Friday, March 27, 2009 - 10:26 AM UTC
Beyond
West-Vlaaderen, Belgium
Joined: October 17, 2008
KitMaker: 240 posts
Armorama: 112 posts
Joined: October 17, 2008
KitMaker: 240 posts
Armorama: 112 posts
Posted: Friday, March 27, 2009 - 11:01 AM UTC
Beyond
West-Vlaaderen, Belgium
Joined: October 17, 2008
KitMaker: 240 posts
Armorama: 112 posts
Joined: October 17, 2008
KitMaker: 240 posts
Armorama: 112 posts
Posted: Friday, April 03, 2009 - 02:29 PM UTC
I have started with the antenna....
These where the ingredients:
Here is what I made and how it looks today..., (not finished yet ):
source: WWP Opel blitz in detail
Does anyone know what the cabels were used for?
Are they actually part of the antenna (electricity?) ?
Or was it to stabilize the antenna, against wind etc...?
Thanx for watching
Grtz,
Beyond
weathering_one
Ontario, Canada
Joined: April 04, 2009
KitMaker: 458 posts
Armorama: 456 posts
Joined: April 04, 2009
KitMaker: 458 posts
Armorama: 456 posts
Posted: Saturday, April 04, 2009 - 07:33 AM UTC
Talk about attention to minute detail! This build and others in this forum are almost breathtaking. Very nice work there Beyond.
AJ
AJ
Patcher
Australia
Joined: March 21, 2008
KitMaker: 5 posts
Armorama: 4 posts
Joined: March 21, 2008
KitMaker: 5 posts
Armorama: 4 posts
Posted: Saturday, April 04, 2009 - 03:09 PM UTC
Hi Beyond,
Your antenna looks excellent.
As always, references are pretty hard to find, but I am quite sure that the cables connect the antenna to the radio. I think that the antenna is robust enough not to need stabilising wires.
I look forward to seeing the completed build.
HTH
Patrick
Your antenna looks excellent.
Quoted Text
Does anyone know what the cabels were used for?
Are they actually part of the antenna (electricity?) ?
Or was it to stabilize the antenna, against wind etc...?
As always, references are pretty hard to find, but I am quite sure that the cables connect the antenna to the radio. I think that the antenna is robust enough not to need stabilising wires.
I look forward to seeing the completed build.
HTH
Patrick