

AFV Painting & Weathering
Answers to questions about the right paint scheme or tips for the right effect.
Answers to questions about the right paint scheme or tips for the right effect.
Hosted by Darren Baker, Matthew Toms
Finishing and Weathering Sequence

SSGToms

Joined: April 02, 2005
KitMaker: 3,608 posts
Armorama: 3,092 posts

Posted: Wednesday, August 31, 2011 - 12:15 PM UTC
Gene, you have everything exactly right and have answered your own questions. The pin wash is done with a dark color and a small pointed brush, touching rivets, bolts, and other small highlights so that the wash collects in a ring around the base of the detail.


gzukowski
Joined: February 09, 2011
KitMaker: 4 posts
Armorama: 3 posts
Posted: Sunday, September 04, 2011 - 07:56 AM UTC
This thing's lookin' pretty good! I'm excited...I'm gonna take a few pics and post when it's done. I'm using your process with a few modifications...I learned a lot on this project. Thanks again!
SSGToms
Joined: April 02, 2005
KitMaker: 3,608 posts
Armorama: 3,092 posts
Posted: Sunday, September 04, 2011 - 08:37 AM UTC
You're welcome Gene, and you just get better from here!

stansmith

Joined: July 18, 2010
KitMaker: 611 posts
Armorama: 584 posts

Posted: Friday, September 16, 2011 - 10:46 PM UTC
can someone help me outhere, i want to do an overall general wash to one of my model, but have no idea what ratio of paint to thinner it should be or what colour i should use?
thanks stan
thanks stan

SSGToms
Joined: April 02, 2005
KitMaker: 3,608 posts
Armorama: 3,092 posts
Posted: Monday, September 19, 2011 - 07:46 AM UTC
Stan,
The answer is in this thread, and it really would help you a lot to read through the whole 5 pages.
But the answer is: 90% thinner 10% paint. In practice, I fill a 30ml medicine cup with Mineral Spirits, then take a toothpick and cut off a pea sized ball of Winsor & Newton Winton oil color #35, Raw Umber.
Mix well so all the paint is dissolved and stir often to keep the paint suspended while you apply the wash.
stansmith
Joined: July 18, 2010
KitMaker: 611 posts
Armorama: 584 posts
Posted: Thursday, September 22, 2011 - 10:20 AM UTC
thanks a lot for the help matt, really apreciate it

didgeboy
Joined: September 21, 2010
KitMaker: 1,846 posts
Armorama: 1,509 posts

Posted: Thursday, September 22, 2011 - 11:03 AM UTC
Matt;
I have a quick questions as I will be starting the weathering process on two kits soon. When applying the future, do you airbrush it? If so what are the precautions I need to take so that it does not get "milky" like I have heard from some people on here, same with the matt coat. Cheers.
I have a quick questions as I will be starting the weathering process on two kits soon. When applying the future, do you airbrush it? If so what are the precautions I need to take so that it does not get "milky" like I have heard from some people on here, same with the matt coat. Cheers.
SSGToms
Joined: April 02, 2005
KitMaker: 3,608 posts
Armorama: 3,092 posts
Posted: Monday, September 26, 2011 - 02:45 PM UTC
Damon,
Shoot the Future and the clear flat with an airbrush, unthinned. Apply light, misting coats, slowly building a solid clear coat. Do not lay it on heavy or let it pool in corners. Go slow - it's hard to see your coverage with a clear. Shoot in the lowest humidity possible.
If for some reason you get any frosting in the flat coat, shoot that area with a light coat of Future and it will clear. Wait to dry and re-shoot the clear flat.

imatanker
Joined: February 11, 2011
KitMaker: 1,654 posts
Armorama: 1,565 posts
Posted: Thursday, November 24, 2011 - 12:08 AM UTC
Matt,I saw aways back in this thread that you make your own matte coat with 3 parts Future to 2 parts Tamiya flat base.Based on exhaustive research  I know that this ratio will be too thick to spray in my AB.What can I thin it with
  Windex,X-20-A?Happy Thanksgiving,Jeff
I know that this ratio will be too thick to spray in my AB.What can I thin it with Windex,X-20-A?Happy Thanksgiving,Jeff
SSGToms
Joined: April 02, 2005
KitMaker: 3,608 posts
Armorama: 3,092 posts
Posted: Saturday, November 26, 2011 - 06:45 PM UTC
Hi Jeff,
Future is very thin stuff, and I shoot my flat coat mixture without thinning. I use my Iwata Revolution CR for this, it has a .5 nozzle.
If you want to thin it, use windshield washer fluid or Tamiya X-20A. Don't worry about the blue color of the windshield washer fluid, it wont show in the finish.
Don't use Windex for thinning, only for cleaning. Windex actually eats the pigment and carrier, destroying the paint.
imatanker
Joined: February 11, 2011
KitMaker: 1,654 posts
Armorama: 1,565 posts
Posted: Sunday, November 27, 2011 - 12:21 AM UTC
Quoted Text
Matt,that may explain the problem.I'm using a Paasche Talon with a .38 fluid tip.It works really well,but I'm finding that I have to thin everything I spray at least 1/1.Just picked up some liquitex varnish,I'm still working with it,but seem to be making good headway.What pressure are you spraying at?I'm at about 14-18 psi.Thanks,JeffHi Jeff,
Future is very thin stuff, and I shoot my flat coat mixture without thinning. I use my Iwata Revolution CR for this, it has a .5 nozzle.
If you want to thin it, use windshield washer fluid or Tamiya X-20A. Don't worry about the blue color of the windshield washer fluid, it wont show in the finish.
Don't use Windex for thinning, only for cleaning. Windex actually eats the pigment and carrier, destroying the paint.
SSGToms
Joined: April 02, 2005
KitMaker: 3,608 posts
Armorama: 3,092 posts
Posted: Sunday, November 27, 2011 - 11:26 AM UTC
Same here - 10 - 15 PSI for an overall coat.
nexusys

Joined: January 01, 2012
KitMaker: 5 posts
Armorama: 2 posts
Posted: Saturday, December 31, 2011 - 08:45 PM UTC
Quoted Text
Yes, Vallejo matte is very good from what people report. It's fine to put it over all the oil washes, etc. but if you put it over pigments it will darken the pigment and you will loose all the dusty dirty effect. It's best to do pigments last and leave them exposed.
Hi Matt, im new here, looking at your suggestion above, is that mean that there's no coat to protect the white-ish weathering on the model? I'm in the middle of completing my weathering finish on M1A2 tank. I'm using Tamiya Weathering Master NATO paint M1A2 to have the desert dust look on it. I then sprayed Tamiya Flat Clear (TS-80) on it, resulting the weather finish to disappear. I guess it reacts towards the wet spray paint. So i have to re-do it again. This time i decided to join in here and find out what's the solution for this type of problem?
Ref photo
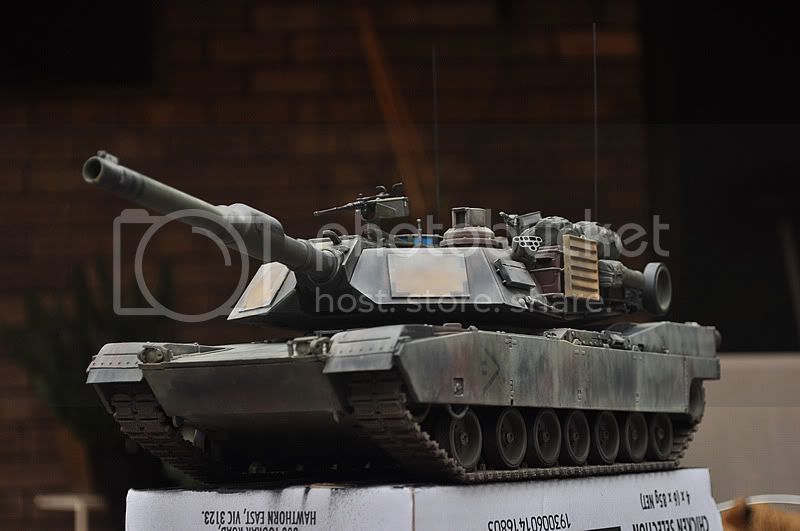

Thanks in advance.

SSGToms
Joined: April 02, 2005
KitMaker: 3,608 posts
Armorama: 3,092 posts
Posted: Sunday, January 01, 2012 - 09:34 PM UTC
Hi Min,
Welcome to Armorama! Yes, if you use pigments, pastels, or any kind of weathering powder, you have to leave it exposed to retain the dusty look. The best thing to do is mount the model on a base so you don't get fingerprints on it.
If you apply a clear carrier to a pigment - you get paint. And you lose the effect.
nexusys
Joined: January 01, 2012
KitMaker: 5 posts
Armorama: 2 posts
Posted: Monday, January 02, 2012 - 11:12 PM UTC
(deep Breath... Siggghhhhh)
Thanks Tom, your feedback at least clear up my mind thinking about this... Appreciate it..... is there any other way instead of usign the Weathering Powder?
Thanks Tom, your feedback at least clear up my mind thinking about this... Appreciate it..... is there any other way instead of usign the Weathering Powder?
SSGToms
Joined: April 02, 2005
KitMaker: 3,608 posts
Armorama: 3,092 posts
Posted: Tuesday, January 03, 2012 - 06:16 PM UTC
You can apply dusty layers by misting the model with your airbrush, using Tamiya buff and deck tan.
Battleship_Al
Joined: October 25, 2009
KitMaker: 133 posts
Armorama: 97 posts

Posted: Tuesday, January 31, 2012 - 06:33 AM UTC
This has been a great thread. OK, I have a question.
I am building a Tiger I with zimerit. I have painted the camo and did my Future then decals then second coat of Future. I would like to fade the camo a bit because it's pretty dark and needs to be blended. Should I do an overall wash first and then dust it with a lighter camo color followed by the pin wash? Is there any special technique for dealing with the zimerit?
Thanks in advance for any help.

ironwork

Joined: January 12, 2012
KitMaker: 216 posts
Armorama: 194 posts
Posted: Friday, February 03, 2012 - 04:18 AM UTC
Hi to everyone, relly nice topic
... and should you have a water-weathering process, able to reduce number of passages ?
Working directly on flat paints ?
Paint flat with any paint you like
Decals or dry transfers with Crystal Lock Method
Acrylic clear flat just over decals
Filters
Chipping and scuffing
Dirt with Structured Powders and/or Dust Filters
Oil, grease, sooth, staining
Beppe
Quoted Text
1) Acrylic camo paint
2) Acrylic clear gloss
3) Decals or dry transfers
4) Acrylic clear gloss
5) Overall oil washes
6) Acrylic clear flat
7) Oil panel washes (filters)
8) Oil pin washes
9) Oil drybrushing
10) Oil staining (dot method)
11) Chipping and scuffing
12) Pigments
13) Mount to base so nobody touches the pigments
... and should you have a water-weathering process, able to reduce number of passages ?
Working directly on flat paints ?
Paint flat with any paint you like
Decals or dry transfers with Crystal Lock Method
Acrylic clear flat just over decals
Filters
Chipping and scuffing
Dirt with Structured Powders and/or Dust Filters
Oil, grease, sooth, staining
Beppe
SSGToms
Joined: April 02, 2005
KitMaker: 3,608 posts
Armorama: 3,092 posts
Posted: Sunday, February 05, 2012 - 08:28 PM UTC
Albert,
Yes, do an overall wash, then you can airbrush lightened camo colors to brighten the appearance and fade the paint. It should look much more tied together and less stark then. You can also drybrush the zimmeritt with lightened camo colors to make the raised edges pop, giving the zimmeritt visual interest and depth.
Yes, do an overall wash, then you can airbrush lightened camo colors to brighten the appearance and fade the paint. It should look much more tied together and less stark then. You can also drybrush the zimmeritt with lightened camo colors to make the raised edges pop, giving the zimmeritt visual interest and depth.
SSGToms
Joined: April 02, 2005
KitMaker: 3,608 posts
Armorama: 3,092 posts
Posted: Sunday, February 05, 2012 - 08:34 PM UTC
Giuseppe,
When I made this list I included all the weathering treatments currently being used so that no one would wonder when they should be done. It certainly does not mean you have to do all of them, you may omit as many as you like. You are encouraged to do what works for you and develop your own style. If you have a faster easier process, by all means use it.
When I made this list I included all the weathering treatments currently being used so that no one would wonder when they should be done. It certainly does not mean you have to do all of them, you may omit as many as you like. You are encouraged to do what works for you and develop your own style. If you have a faster easier process, by all means use it.
Battleship_Al
Joined: October 25, 2009
KitMaker: 133 posts
Armorama: 97 posts
Posted: Tuesday, February 07, 2012 - 06:28 AM UTC
Quoted Text
Albert,
Yes, do an overall wash, then you can airbrush lightened camo colors to brighten the appearance and fade the paint. It should look much more tied together and less stark then. You can also drybrush the zimmeritt with lightened camo colors to make the raised edges pop, giving the zimmeritt visual interest and depth.
Matt,
Thanks for your help. I was very unhappy with the way the Tiger was looking so I ended up stripping the paint and will start new with lighter colors. This time I will do some pre-shading too. I have never done that before. I will also lighten and thin the camo colors so they are a little more translucent and faded looking from the start.
Can you recommend a wash color to use with a dark yellow base and a green and brown camo? I think a nice medium brown artist oil wash would bring out detail and the zimermmit pattern without making it too dark.
Again, thanks for your kind help.
SSGToms
Joined: April 02, 2005
KitMaker: 3,608 posts
Armorama: 3,092 posts
Posted: Tuesday, February 07, 2012 - 08:02 AM UTC
Al,
You're welcome. I would suggest Burnt Umber for the wash.
You're welcome. I would suggest Burnt Umber for the wash.
ShaunDoe

Joined: March 13, 2012
KitMaker: 7 posts
Armorama: 6 posts

Posted: Thursday, March 15, 2012 - 04:35 PM UTC
Posted this in the Tank Treads thread but not sure if anyone is checking that any more plus this also sort of applies to this topic... so here goes: I have only been working on models for a year now so my expertise is limited. I am working on some M1A2 treads and have laid down a base coat of flat black which I will then over spray with a mixture of metallic grey/flat black mix as was suggested in the other thread. Then I wanted to do a wash with rust (Model Master). I was wondering if I need to do a seal with future before applying a wash? Would the thinner in the wash take off my base coats? My main worry is that by adding a layer of future first I may be making the rubber (Tamiya) treads too rigid to fit to the wheels later. Never used future or a wash before hence my trepidation and lack of know how. Any help is appreciated. Thank you in advance
SSGToms
Joined: April 02, 2005
KitMaker: 3,608 posts
Armorama: 3,092 posts
Posted: Friday, March 16, 2012 - 02:23 PM UTC
Chris,
What type of paints are you using for these stages? If the black, metallic grey/black, and rust are all enamel or all acrylic, the wash may dissolve your base coat.
The idea is to paint with acrylics and wash/weather with oils and enamels so that the paints don't react with each other. The Future clear coat prevents the wash from staining and darkening the paint of the base coat, which you really wouldn't care about with tracks. Also, Future dries highly glossy, which you don't want on tracks.
Also, if you paint the tracks with acrylic base colors, I highly recommend AK Interactive Track Wash, Track Rust Pigment, and Dark Steel Pigment. They are fantastic products and the results are amazing.
ShaunDoe
Joined: March 13, 2012
KitMaker: 7 posts
Armorama: 6 posts
Posted: Sunday, March 18, 2012 - 01:59 PM UTC
Sorry I completely forgot to mention, the base coat paints (metallic grey, flat black) are all tamiya paints while the rust wash would be model master paints. I knew that the future would be glossy and that I would have to use a dull coat later which was something I was worried about. I thought it would start to make my tracks thick and rigid. Thanks for the advice thus far
 |

WEB HOSTING BY


Copyright ©2021 Armorama and Kitmaker Network, a subsidiary of Silver Star Enterprises
All Rights Reserved. Please read our Conditions of Use and Privacy Policy.
All Rights Reserved. Please read our Conditions of Use and Privacy Policy.