

AFV Painting & Weathering
Answers to questions about the right paint scheme or tips for the right effect.
Answers to questions about the right paint scheme or tips for the right effect.
Hosted by Darren Baker, Matthew Toms
Finishing and Weathering Sequence

messynachos

Joined: November 14, 2012
KitMaker: 142 posts
Armorama: 113 posts
Posted: Monday, December 03, 2012 - 12:43 PM UTC
ok i did a black wash all over it, started to look pretty cool, then i tied the same for pin wash and wow its working (except for tide marks??) but then when it dried it didnt look like i had put any pin washes on it? was i not useing thick enough paint? too thinned out for pin wash? what other colours should i do the panel wash? the black wash gave it a dirty look and it aint to bad but still feels like im missing something? help? thank you.

didgeboy

Joined: September 21, 2010
KitMaker: 1,846 posts
Armorama: 1,509 posts

Posted: Monday, December 03, 2012 - 12:50 PM UTC
Terry;
A pin wash is not just putting on spot washes, but rather adding tiny dots of oil paints and then blending them with thinner across an area. Search pin washes here and I am sure you will find some good tutorials. Cheers.
A pin wash is not just putting on spot washes, but rather adding tiny dots of oil paints and then blending them with thinner across an area. Search pin washes here and I am sure you will find some good tutorials. Cheers.
messynachos
Joined: November 14, 2012
KitMaker: 142 posts
Armorama: 113 posts
Posted: Monday, December 03, 2012 - 12:50 PM UTC
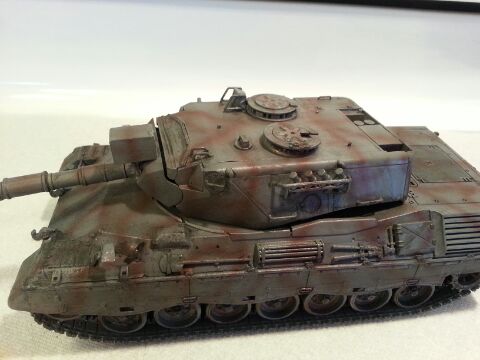 this is with the first black thinned out wash,,
messynachos
Joined: November 14, 2012
KitMaker: 142 posts
Armorama: 113 posts
Posted: Monday, December 03, 2012 - 12:53 PM UTC
ahhh ok i get it now, the spots guys put all over then blend in with a bit of thinner. so what colors would you recommend? and the spot wash is all just part of the same wash?? sorry for asking dumb questions/
messynachos
Joined: November 14, 2012
KitMaker: 142 posts
Armorama: 113 posts
Posted: Monday, December 03, 2012 - 12:54 PM UTC

didgeboy
Joined: September 21, 2010
KitMaker: 1,846 posts
Armorama: 1,509 posts
Posted: Monday, December 03, 2012 - 02:37 PM UTC
You want to mix your colors mostly primary, lights and darks. For adding shadows greens, blues and even greys. For highlights or sun faded panels, whites, yellow, etc. try this out and see what works best for you. A good reference might be the afv painting guide vol 2 from Andrea press. This should give you a great idea of how to. Cheers.
messynachos
Joined: November 14, 2012
KitMaker: 142 posts
Armorama: 113 posts
Posted: Monday, December 03, 2012 - 05:44 PM UTC
right on thank you very very much for your help and Patience. 
didgeboy
Joined: September 21, 2010
KitMaker: 1,846 posts
Armorama: 1,509 posts
Posted: Wednesday, December 05, 2012 - 04:38 AM UTC
Terry,
Just trying to payback what I can from all of the help I have received. Cheers
Just trying to payback what I can from all of the help I have received. Cheers
robw_uk

Joined: June 22, 2010
KitMaker: 1,224 posts
Armorama: 1,207 posts

Posted: Friday, January 11, 2013 - 10:44 AM UTC
Can I get a little "wash" clarification... should it only be done on horizontal surfaces? Concerned if I do it on verticals then it will just flow off....
Chees
Chees
didgeboy
Joined: September 21, 2010
KitMaker: 1,846 posts
Armorama: 1,509 posts
Posted: Friday, January 11, 2013 - 10:58 AM UTC
Imagine how dirt and grime builds up on your car in the winter and summer months. Road dirt gets licked up and settles any place it can. Water from the roads and rains take it to new places and allow it to flow into crevices and other areas. If you went out now and drove around for half an hour then took several pictures of your vehicle you will see what I mean. The dirt and grime just finds its way into so many places that you cannot imagine.
A good wash should be done over everything. Horizontal and vertical surfaces and left for a few minutes. This will allow things to flow and start to dry a bit. Any thing you think is excess, can be easily wiped away with a tissue, clean brush or if it has dried too much or you don't like the look, then a clean brushed dipped in clean mineral spirits.
I find that I like to do several passes to get just the right look with many different colors and shades. HTH.
robw_uk
Joined: June 22, 2010
KitMaker: 1,224 posts
Armorama: 1,207 posts
Posted: Friday, January 11, 2013 - 11:03 AM UTC
Quoted Text
Imagine how dirt and grime builds up on your car in the winter and summer months. Road dirt gets licked up and settles any place it can. Water from the roads and rains take it to new places and allow it to flow into crevices and other areas. If you went out now and drove around for half an hour then took several pictures of your vehicle you will see what I mean. The dirt and grime just finds its way into so many places that you cannot imagine.
A good wash should be done over everything. Horizontal and vertical surfaces and left for a few minutes. This will allow things to flow and start to dry a bit. Any thing you think is excess, can be easily wiped away with a tissue, clean brush or if it has dried too much or you don't like the look, then a clean brushed dipped in clean mineral spirits.
I find that I like to do several passes to get just the right look with many different colors and shades. HTH.
Cheers.... did look at my car earlier and noticed it needed cleaning.... and how the grime goes...
didgeboy
Joined: September 21, 2010
KitMaker: 1,846 posts
Armorama: 1,509 posts
Posted: Friday, January 11, 2013 - 11:17 AM UTC
Nice. 
robw_uk
Joined: June 22, 2010
KitMaker: 1,224 posts
Armorama: 1,207 posts
Posted: Friday, January 11, 2013 - 09:52 PM UTC
Quoted Text
Can I get a little "wash" clarification... should it only be done on horizontal surfaces? Concerned if I do it on verticals then it will just flow off....
Chees
ok - first wash went on (burnt umber + a bit of black.. however think it is more filter consistency than wash (read "split-pea" as "pea" so think it a little weak). Guess it is just a question of more layers of wash (good for me as usually go heavy handed and would've coated it in brown gloop ;-)... anyway even after 1 coat I am beginning to see a small amount of shading....
robw_uk
Joined: June 22, 2010
KitMaker: 1,224 posts
Armorama: 1,207 posts
Posted: Wednesday, January 30, 2013 - 01:03 AM UTC
I am at the wash stage - so mixed my oils with white spirit (water soluble oils but found it mixes better with WS). Now I "think" I am making them 90:10 (thinner:paint) but when I apply to the model I end up with:

a horrible dusty mess (well to my eyes it is a horrible dusty mess)... Can you think where I am going wrong. Looking at it i am thinking
1) not thinning the paint enough
2) applying too much wash
3) a bit of both
if anyone has any photos of one of their kits before/after a wash showing how it ends up looking, or could offer some advice, it would be very much appreciated....
Joel_W
Joined: December 04, 2010
KitMaker: 11,666 posts
Armorama: 1,143 posts
Posted: Wednesday, January 30, 2013 - 04:04 AM UTC
From your pictures, that' how a wash dries especially if you apply too much. It' puddles up in seams and corners, and generally dries unevenly on flat surfaces. Less will still tend to puddle up in corners, recesses, etc, but that's what you want. Using a Q tip dampened with the thinning agent you used, will help to clean up the areas you don't like.
Joel
Joel

robw_uk
Joined: June 22, 2010
KitMaker: 1,224 posts
Armorama: 1,207 posts
Posted: Wednesday, January 30, 2013 - 05:17 AM UTC
Quoted Text
From your pictures, that' how a wash dries especially if you apply too much. It' puddles up in seams and corners, and generally dries unevenly on flat surfaces. Less will still tend to puddle up in corners, recesses, etc, but that's what you want. Using a Q tip dampened with the thinning agent you used, will help to clean up the areas you don't like.
Joel
cheers Joel... will get on that - dont mind it on the floor but thought on the bench(?) a little OTT
massonbd
Joined: May 04, 2013
KitMaker: 4 posts
Armorama: 3 posts
Posted: Friday, May 03, 2013 - 04:33 PM UTC
Im painting a meng merkave 3d. Its already tamiya acrylic flat desert yellow. What type of clear coat should I use to prepare for washing? I know I must make it gloss but should it be enamel or acrylic? Also what type of thinner should i use to make washes and filters? And combined with witch paint?
didgeboy
Joined: September 21, 2010
KitMaker: 1,846 posts
Armorama: 1,509 posts
Posted: Friday, May 03, 2013 - 05:45 PM UTC
Brian;
I just was having a conversation with Mike Rinaldi, if you are on FB check out Rinaldi Studios-awesome stuff, who says that you do not have to add a clear coat for your washes. While the future gloass coat is great for decals both before application and after, Mike says that it is not necessary and he actually does not use varnish for his washes. His process involves less of the over all wash and more pin washes applies to specific areas. I have not yet tried this but it might be worth sending him a PM. If you choose to use the old tried and true then you just need some acrylic clear gloss, Future works well for this and is usually easy to source and is quite cheap. Cheers.
I just was having a conversation with Mike Rinaldi, if you are on FB check out Rinaldi Studios-awesome stuff, who says that you do not have to add a clear coat for your washes. While the future gloass coat is great for decals both before application and after, Mike says that it is not necessary and he actually does not use varnish for his washes. His process involves less of the over all wash and more pin washes applies to specific areas. I have not yet tried this but it might be worth sending him a PM. If you choose to use the old tried and true then you just need some acrylic clear gloss, Future works well for this and is usually easy to source and is quite cheap. Cheers.
massonbd
Joined: May 04, 2013
KitMaker: 4 posts
Armorama: 3 posts
Posted: Saturday, May 04, 2013 - 05:54 AM UTC
thank you for your help. Im gonna pm mike now and see if he has any info for me. Im just unsure of what base to use for my washes and I thought that washes work much better over a gloss finish. I have no personal experience with this however so your word is the best iv got at the moment.
Nerazzurri

Joined: May 16, 2012
KitMaker: 51 posts
Armorama: 34 posts
Posted: Thursday, July 11, 2013 - 09:13 PM UTC
Hi Folks. I have a problem after spraying Future on my Horch. It didn't spray very well, and also left the model kind of 'frosted'.
So my first question is how did this happen? I mixed 3 parts future to 2 parts Tamiya flat coat. Was this wrong? It did seem a bit thick. Is my 0.3mm nozzle not wide enough?
And secondly, how do I remedy the effect on my model? I've read of dipping in Windex but would that work with there being a flat coat in there too??
Thanks for any help folks; this really got me down when it happened.

Emeritus

Joined: March 30, 2004
KitMaker: 2,845 posts
Armorama: 808 posts

Posted: Thursday, July 11, 2013 - 10:35 PM UTC
I presume you mean Tamiya Flat Base? 3 parts Future to 2 parts Flat Base ratio has a lot of Flat Base - I'd say that's the culprit.
An article in Finescale Modeler had ratios to get people started. 1 part Flat Base to 3 parts future was to make a "dead flat" finish, but I've never managed to lay down a coat of that without it frosting. The next one was "flat," with a ratio of 1:10, then "satin" with 1:15.
I've gotten good results with a ratio of 1 part Flat Base to 5 parts Future. Makes a flat, but not quite "dead flat" coat. Actually, to me that looks more interesting and lively finish than a truly dead flat finish.
I don't think Flat Base has any binding agent in it; I'd try windex for removing the frosted coat. Not sure if there's a risk of it taking away the underlying coat too, though.
Nerazzurri
Joined: May 16, 2012
KitMaker: 51 posts
Armorama: 34 posts
Posted: Friday, July 12, 2013 - 12:44 AM UTC
Quoted Text
I presume you mean Tamiya Flat Base?
Yes.
Quoted Text
3 parts Future to 2 parts Flat Base ratio has a lot of Flat Base - I'd say that's the culprit.
That was my gut feeling, but that was the ratio Matt suggested in a previous post on this thread - so I thought can't be that, I must just have done something stupid LOL.
Quoted Text
An article in Finescale Modeler had ratios to get people started. 1 part Flat Base to 3 parts future was to make a "dead flat" finish, but I've never managed to lay down a coat of that without it frosting. The next one was "flat," with a ratio of 1:10, then "satin" with 1:15.
I've gotten good results with a ratio of 1 part Flat Base to 5 parts Future. Makes a flat, but not quite "dead flat" coat. Actually, to me that looks more interesting and lively finish than a truly dead flat finish.
I don't think Flat Base has any binding agent in it; I'd try windex for removing the frosted coat. Not sure if there's a risk of it taking away the underlying coat too, though.
OK mate, thanks very much for your help. I'll cross my fingers the frosting comes off and leaves the base colour then have another go with the Future.


SSGToms
Joined: April 02, 2005
KitMaker: 3,608 posts
Armorama: 3,092 posts
Posted: Friday, July 12, 2013 - 08:52 PM UTC
Gavin,
DON'T DIP YOUR MODEL IN WINDEX! It will remove the Future Flat Base coat, but it won't stop there. Windex actually destroys the pigment and carrier of alcohol based acrylics, so you will wind up with a fresh plastic model.
I've been using my 3 parts Future/2 parts flat base for years without any major problems. Any minor frosting problems I have had have been from: humidity (major culprit) shooting from too far away and getting pebbling, or accidentally pooling in a corner.
I would suggest following Eetu's advice - start with 3 parts Future and 1 part flat base. Shoot a junk model, and increase the flat base ratio until you get the flatness you want without the frosting. I airbrush in perfectly controlled conditions - air conditioned, air filtration, conntrolled humidity, so I get to eliminate all of those variables.

Nerazzurri
Joined: May 16, 2012
KitMaker: 51 posts
Armorama: 34 posts
Posted: Friday, July 12, 2013 - 09:18 PM UTC
Hey Matt.
I've no doubt it works for you - I probably got the ratio a bit wrong, enough to mess it up. Plus it's been unusually warm here recently, about 25C.
I didn't dip the model. I read somewhere you can shoot a few coats of pure Future and the frosting will disappear. I tried, I think, about 4 or 5 coats and it did improve it some.
But I eventually gave up and hand painted the worst affected area with the original base colour and I'll try again with a flat coat. It won't look very good but I'm just going to put it down to experience.
As you suggest, in the future I'll experiment until I find the right mix for me.
Thanks again mate.

sopmod89
Joined: July 01, 2013
KitMaker: 29 posts
Armorama: 24 posts
Posted: Wednesday, July 17, 2013 - 04:21 PM UTC
I am a complete noob to this level you guys are on , lemme tell you im still using testors paints brushes and the canned air "airbrush" if you can call it that... i did however buy some rustall that is amazing to me so im trying to comprehend as much info as i can.
 |

WEB HOSTING BY


Copyright ©2021 Armorama and Kitmaker Network, a subsidiary of Silver Star Enterprises
All Rights Reserved. Please read our Conditions of Use and Privacy Policy.
All Rights Reserved. Please read our Conditions of Use and Privacy Policy.