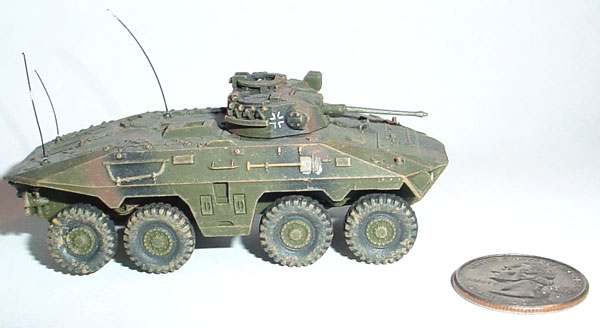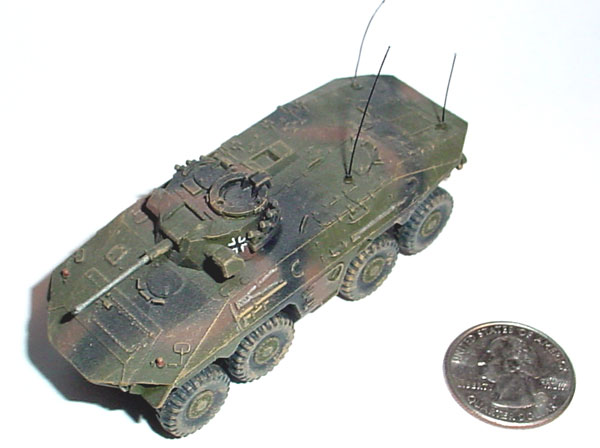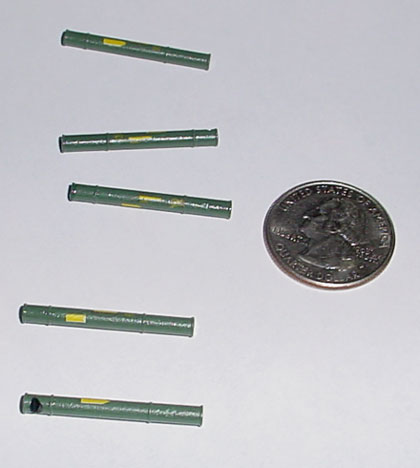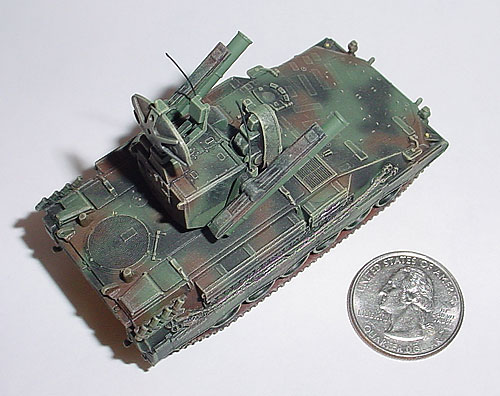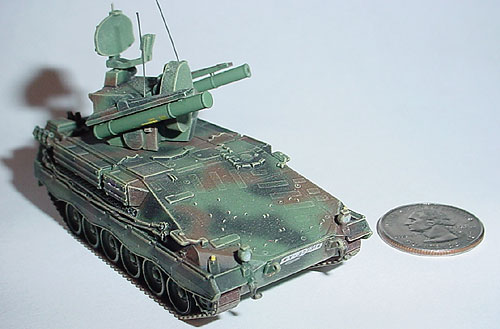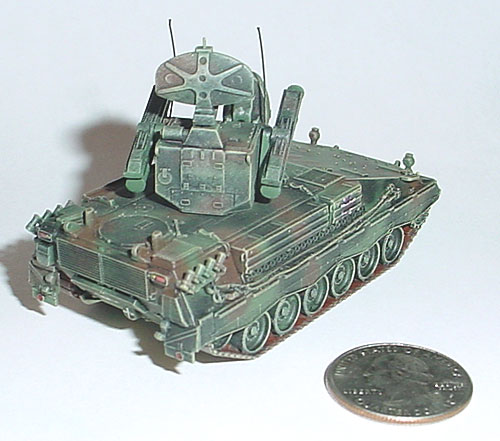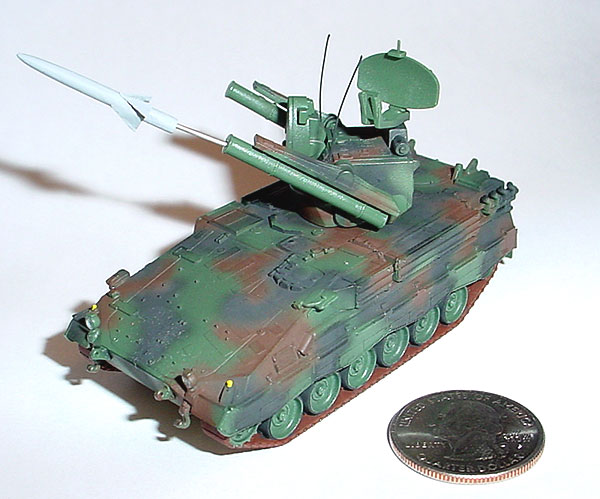
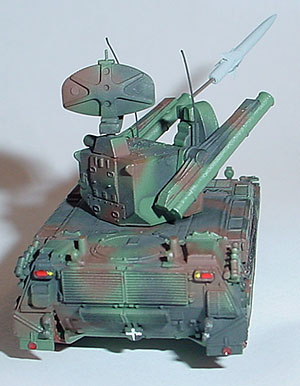
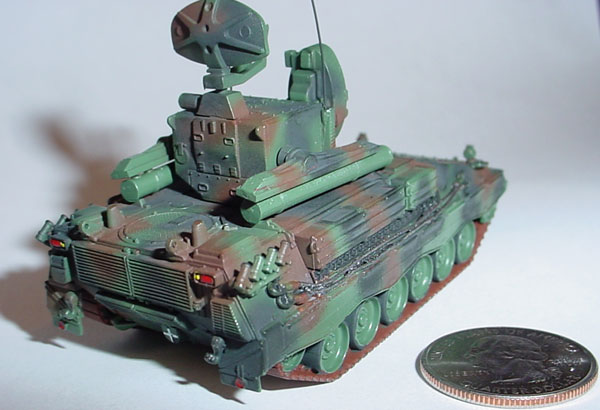
Painted the tracks, road wheel rubber, headlights, tail lights, reflectors, tow cables, and replaced antennas with monofiliment line.
Next comes gloss coat and decals.
Constructive Feedback
For in-progress or completed build photos. Give and get contructive feedback!
Hosted by Darren Baker, Dave O'Meara
HO Scale Roland
woltersk
Utah, United States
Joined: May 27, 2003
KitMaker: 1,026 posts
Armorama: 654 posts
Joined: May 27, 2003
KitMaker: 1,026 posts
Armorama: 654 posts
Posted: Monday, June 29, 2009 - 01:57 AM UTC
tread_geek
Ontario, Canada
Joined: March 23, 2008
KitMaker: 2,847 posts
Armorama: 2,667 posts
Joined: March 23, 2008
KitMaker: 2,847 posts
Armorama: 2,667 posts
Posted: Monday, June 29, 2009 - 03:22 AM UTC
Coming along nicely, Keith. The ability to paint the hull marker and tail lights on this tiny beast would drive many modellers batty. The nostalgia that this build produces is quite something. Not only am I recalling my own experiences with ROCO but also with an old company that went by the name of UPC. UPC kits were very similar to ROCO but generally had more parts and came in small boxes and were unassembled.
Cheers,
Jan
Cheers,
Jan
woltersk
Utah, United States
Joined: May 27, 2003
KitMaker: 1,026 posts
Armorama: 654 posts
Joined: May 27, 2003
KitMaker: 1,026 posts
Armorama: 654 posts
Posted: Monday, June 29, 2009 - 09:23 AM UTC
Quoted Text
Coming along nicely, Keith. The ability to paint the hull marker and tail lights on this tiny beast would drive many modellers batty. The nostalgia that this build produces is quite something. Not only am I recalling my own experiences with ROCO but also with an old company that went by the name of UPC. UPC kits were very similar to ROCO but generally had more parts and came in small boxes and were unassembled.
Cheers,
Jan
Thanks again Jan! At least there's one person following this build.
I have not heard of UPC. Not that I can remember, but I am getting old. I could not imagine having more parts in this scale. Whew!
Painting the lights was not so bad. I thought about painting the yellow stenciling on the missile tubes but decided to go with small decals instead. I dug some out of the stash which should work. They may not be the correct verbiage, but at this size who could tell?
More to come...
tread_geek
Ontario, Canada
Joined: March 23, 2008
KitMaker: 2,847 posts
Armorama: 2,667 posts
Joined: March 23, 2008
KitMaker: 2,847 posts
Armorama: 2,667 posts
Posted: Wednesday, July 01, 2009 - 05:39 AM UTC
Quoted Text
Thanks again Jan! At least there's one person following this build.
I have not heard of UPC. Not that I can remember, but I am getting old. I could not imagine having more parts in this scale. Whew!
Painting the lights was not so bad. I thought about painting the yellow stenciling on the missile tubes but decided to go with small decals instead. I dug some out of the stash which should work. They may not be the correct verbiage, but at this size who could tell?
More to come...
Keith, I'm basically a small scale nut and appreciate anything diminutive. At these scales markings can almost become unnoticeable. My SpPz 2 Luchs build had decals for tire pressure stencils and I needed a jewellers loop to tell which way was up.
Here's what I'm talking about. Picture was taken with a 4X macro filter.
People that have seen the real model have to have the tiny decal pointed out to them.
Cheers,
Jan
woltersk
Utah, United States
Joined: May 27, 2003
KitMaker: 1,026 posts
Armorama: 654 posts
Joined: May 27, 2003
KitMaker: 1,026 posts
Armorama: 654 posts
Posted: Thursday, July 02, 2009 - 01:28 PM UTC
Quoted Text
Keith, I'm basically a small scale nut and appreciate anything diminutive. At these scales markings can almost become unnoticeable. My SpPz 2 Luchs build had decals for tire pressure stencils and I needed a jewellers loop to tell which way was up.
Here's what I'm talking about. Picture was taken with a 4X macro filter.
People that have seen the real model have to have the tiny decal pointed out to them.
Cheers,
Jan
Wow! I just went and relooked at your pic portfolio. I would have bet your paycheck that your Luchs was 1/35th scale!
Those decals are a bit nuts. I thought I was bad. Please tell me it is 1/72 scale.
But seriously, it is a beautiful build. My hat is off sir! I can only hope my little Roland comes out half as nice.
Keith
tread_geek
Ontario, Canada
Joined: March 23, 2008
KitMaker: 2,847 posts
Armorama: 2,667 posts
Joined: March 23, 2008
KitMaker: 2,847 posts
Armorama: 2,667 posts
Posted: Friday, July 03, 2009 - 04:16 AM UTC
Quoted Text
Wow! I just went and relooked at your pic portfolio. I would have bet your paycheck that your Luchs was 1/35th scale!
Those decals are a bit nuts. I thought I was bad. Please tell me it is 1/72 scale.
But seriously, it is a beautiful build. My hat is off sir! I can only hope my little Roland comes out half as nice.
Thanks for the compliments, Keith. I only returned to the hobby a little over a year ago after a long hiatus and have only built Braille scale vehicles so far. If you go to the Braille Scale Forum you can see the Luchs build in progress. There is all the verification you'll need in that thread to prove that it is 1/72.
Cheers,
Jan
woltersk
Utah, United States
Joined: May 27, 2003
KitMaker: 1,026 posts
Armorama: 654 posts
Joined: May 27, 2003
KitMaker: 1,026 posts
Armorama: 654 posts
Posted: Monday, July 06, 2009 - 12:47 AM UTC
Jan,
Since its pretty much just you and me here I have no problem getting off topic, hijacking my own thread, or carrying on a conversation with you.
About 15 years ago I did a ROCO Fuchs. No tire pressure decals for this one.
Wadya think?
Since its pretty much just you and me here I have no problem getting off topic, hijacking my own thread, or carrying on a conversation with you.
About 15 years ago I did a ROCO Fuchs. No tire pressure decals for this one.
Wadya think?
tread_geek
Ontario, Canada
Joined: March 23, 2008
KitMaker: 2,847 posts
Armorama: 2,667 posts
Joined: March 23, 2008
KitMaker: 2,847 posts
Armorama: 2,667 posts
Posted: Monday, July 06, 2009 - 06:54 AM UTC
Keith, it's your thread so I guess you can do what you want with it. What you show there is a very early version of a Luchs, possibly the first version after the original prototype. And if you painted this 15 years ago then your skill level was considerably more advanced than mine was at the time. The camo for the the size is amazing. During the period you mention my airbrush skills could only be called disappointing. For Braille scale vehicles I used the airbrush for only the main base colour. Additional camouflage colours were done by hand with a brush. Here's a couple of embarrassing pictures of a 1/76 Fujimi Hetzer done around '91.
I pulled this little tyke out of storage with the idea of bringing it up to the standard of my current builds. Due to years of renovations of an older house most of my previous builds were kept in storage and a large number were mangled or otherwise damaged. You might call this Hetzer as going through a partial "Tank Overhaul." At this point I've reattached numerous pieces but I doubt I'll take it much further. My attempt at creating Zimmeritt back then was to smear the body with Testors putty and use a sharpenned toothpick to create the texture. Definitely over scale. It is however a good example of where I was and where I'm coming from.
Cheers,
Jan
woltersk
Utah, United States
Joined: May 27, 2003
KitMaker: 1,026 posts
Armorama: 654 posts
Joined: May 27, 2003
KitMaker: 1,026 posts
Armorama: 654 posts
Posted: Monday, July 06, 2009 - 11:28 PM UTC
Quoted Text
Keith, it's your thread so I guess you can do what you want with it. What you show there is a very early version of a Luchs, possibly the first version after the original prototype. And if you painted this 15 years ago then your skill level was considerably more advanced than mine was at the time. The camo for the the size is amazing. During the period you mention my airbrush skills could only be called disappointing. For Braille scale vehicles I used the airbrush for only the main base colour. Additional camouflage colours were done by hand with a brush. Here's a couple of embarrassing pictures of a 1/76 Fujimi Hetzer done around '91.
I pulled this little tyke out of storage with the idea of bringing it up to the standard of my current builds. Due to years of renovations of an older house most of my previous builds were kept in storage and a large number were mangled or otherwise damaged. You might call this Hetzer as going through a partial "Tank Overhaul." At this point I've reattached numerous pieces but I doubt I'll take it much further. My attempt at creating Zimmeritt back then was to smear the body with Testors putty and use a sharpenned toothpick to create the texture. Definitely over scale. It is however a good example of where I was and where I'm coming from.
Cheers,
Jan
Thanks again Jan,
I do like to airbrush. The Luchs was done with my old, trusty Badger 150. Albeit the camo pattern wasn't much more than stripes laid down in a haphazard fashion. The Roland was done with the new love of my life--an Iwata Eclipse. I was able to do a slightly better camo pattern, even if the feathering is a bit out of scale. I'm still getting used to the airbrush and learning what it can do.
Your Hetzer isn't that bad. Looks like a good, clean build. And 'It is better to have tried Zimmeritt and have it be out of scale, then to have never tried Zimmeritt at all!' When 'overhauling' your tanks do you ever repaint them?
tread_geek
Ontario, Canada
Joined: March 23, 2008
KitMaker: 2,847 posts
Armorama: 2,667 posts
Joined: March 23, 2008
KitMaker: 2,847 posts
Armorama: 2,667 posts
Posted: Tuesday, July 07, 2009 - 08:07 AM UTC
Quoted Text
Thanks again Jan,
I do like to airbrush. The Luchs was done with my old, trusty Badger 150. Albeit the camo pattern wasn't much more than stripes laid down in a haphazard fashion. The Roland was done with the new love of my life--an Iwata Eclipse. I was able to do a slightly better camo pattern, even if the feathering is a bit out of scale. I'm still getting used to the airbrush and learning what it can do.
I had and have a Paasche airbrush that my SWMBO got for me just before I built the Hetzer. The brush really wasn't suited for 1/72 vehicles (not fine enough lines. It was also a bear to clean. It did however work fine for aircraft. Here's an example.
The Mig is just another resurrected model. It required the reattachment of the landing gear, one tail fin, several pylons as well as assorted other damage repair.
Quoted Text
Your Hetzer isn't that bad. Looks like a good, clean build. And 'It is better to have tried Zimmeritt and have it be out of scale, then to have never tried Zimmeritt at all!' When 'overhauling' your tanks do you ever repaint them?
At the time the Hetzer was built there was no Internet, only model magazines. I got the Zimmeritt idea from an article in AFV News. At the time I thought it turned out pretty well when compared to some of the pictures.
My Luchs was painted with my new Iwata Eclipse CS (the same airbrush fairy that got me the Paasche got me the Iwata) . It's my first 1/72 camouflage attempt and like you, I am still learning it's ins and outs. At the present time the overhaul process is concentrating on repair and I haven't done much more than brush touch-ups on the repaired items. My logic is that once I have several vehicles repaired I can try a "group" or assembly line repainting. This will also give me time to experiment and learn about the new brush.
Cheers,
Jan
woltersk
Utah, United States
Joined: May 27, 2003
KitMaker: 1,026 posts
Armorama: 654 posts
Joined: May 27, 2003
KitMaker: 1,026 posts
Armorama: 654 posts
Posted: Wednesday, July 08, 2009 - 10:57 PM UTC
Quoted Text
I had and have a Paasche airbrush that my SWMBO got for me just before I built the Hetzer. The brush really wasn't suited for 1/72 vehicles (not fine enough lines. It was also a bear to clean. It did however work fine for aircraft. Here's an example.
The Mig is just another resurrected model. It required the reattachment of the landing gear, one tail fin, several pylons as well as assorted other damage repair.
At the time the Hetzer was built there was no Internet, only model magazines. I got the Zimmeritt idea from an article in AFV News. At the time I thought it turned out pretty well when compared to some of the pictures.
My Luchs was painted with my new Iwata Eclipse CS (the same airbrush fairy that got me the Paasche got me the Iwata) . It's my first 1/72 camouflage attempt and like you, I am still learning it's ins and outs. At the present time the overhaul process is concentrating on repair and I haven't done much more than brush touch-ups on the repaired items. My logic is that once I have several vehicles repaired I can try a "group" or assembly line repainting. This will also give me time to experiment and learn about the new brush.
Cheers,
Jan
Good looking MiG! Gotta love the -29. Here is one I did for a friend. I tried to depict a worn out Moldovan plane. It was done with the new airbrush too. Which also was a birthday present from my ol' lady. I think that is common among married model builders.
I've been thinking about repainting some of my older kits. Mainly the HO scale stuff. This Roland will be added to my Bundeswehr Order of Battle, circa 1992-ish (even though there is a Leo 2A6 thrown in). Most of the kits were done 15-20 years ago and they could all use a camo update.
I know some builders frown on rebuilding/repainting kits and believe it is better to buy a new one and then see how far your talents have come. But I have no problem resurrecting old kits. It saves $$ and precious room on the shelves!
tread_geek
Ontario, Canada
Joined: March 23, 2008
KitMaker: 2,847 posts
Armorama: 2,667 posts
Joined: March 23, 2008
KitMaker: 2,847 posts
Armorama: 2,667 posts
Posted: Thursday, July 09, 2009 - 06:42 AM UTC
Quoted Text
Good looking MiG! Gotta love the -29. Here is one I did for a friend. I tried to depict a worn out Moldovan plane. It was done with the new airbrush too. Which also was a birthday present from my ol' lady. I think that is common among married model builders.
Thanks for the kind words about my Mig. And ditto right back at you on your '29 build. If I do say so I am rather proud of how mine turned out as it's probably my best result as far as aircraft are concerned. As far as I'm concerned the '29 is amongst the first attractive Soviet era aircraft. Prior to that I say the Mig 27 wasn't bad looking either. That one is still in the "hanger" for overhaul.
Quoted Text
I've been thinking about repainting some of my older kits. Mainly the HO scale stuff. This Roland will be added to my Bundeswehr Order of Battle, circa 1992-ish (even though there is a Leo 2A6 thrown in). Most of the kits were done 15-20 years ago and they could all use a camo update.
I also have quite a collection of diverse ROCO kits about the same age as yours. Some of my favourites would have to be the artillery pieces with trails that split and spades that attach to them.
Quoted Text
I know some builders frown on rebuilding/repainting kits and believe it is better to buy a new one and then see how far your talents have come. But I have no problem resurrecting old kits. It saves $$ and precious room on the shelves!
Personally, I'll keep a few models from various periods to show how I've progressed over time. At some point I'd like to bring some of the older and rare pieces up to a more equitable standard. There's even a few from my scratch build 1/72 collection (3 or 4) that I'd like to overhaul.
Cheers,
Jan
woltersk
Utah, United States
Joined: May 27, 2003
KitMaker: 1,026 posts
Armorama: 654 posts
Joined: May 27, 2003
KitMaker: 1,026 posts
Armorama: 654 posts
Posted: Thursday, July 09, 2009 - 11:39 PM UTC
Quoted Text
Thanks for the kind words about my Mig. And ditto right back at you on your '29 build. If I do say so I am rather proud of how mine turned out as it's probably my best result as far as aircraft are concerned. As far as I'm concerned the '29 is amongst the first attractive Soviet era aircraft. Prior to that I say the Mig 27 wasn't bad looking either. That one is still in the "hanger" for overhaul.
Yeah, the -29 was the beginning of something new in the way of Russian design, but I have always loved the MiG-21 too. And the -25 wasn't too bad looking either. The Su-27 is nice, but is huge for a dogfighter!
Quoted Text
I also have quite a collection of diverse ROCO kits about the same age as yours. Some of my favorites would have to be the artillery pieces with trails that split and spades that attach to them.
I've got one with the working fold down spades. I'm surprised I haven't lost them after all these years and frequent moves.
Quoted Text
Personally, I'll keep a few models from various periods to show how I've progressed over time. At some point I'd like to bring some of the older and rare pieces up to a more equitable standard. There's even a few from my scratch build 1/72 collection (3 or 4) that I'd like to overhaul.
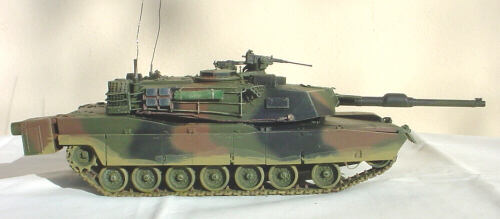
I've only completely redone a few. Most of the time I just use them for test beds for new techniques, especially weathering. Here is an old M1 that went through stages a dozen years apart:
You’ve scratch built? Entire kits? Which ones? That I’ve gotta see!
tread_geek
Ontario, Canada
Joined: March 23, 2008
KitMaker: 2,847 posts
Armorama: 2,667 posts
Joined: March 23, 2008
KitMaker: 2,847 posts
Armorama: 2,667 posts
Posted: Friday, July 10, 2009 - 08:07 AM UTC
Quoted Text
I've only completely redone a few. Most of the time I just use them for test beds for new techniques, especially weathering. Here is an old M1 that went through stages a dozen years apart:
I've got an old ESCI 1/72 M1 that doesn't look nowhere near that good. At some point it will definitely undergo a repainting and weathering.
Quoted Text
You’ve scratch built? Entire kits? Which ones? That I’ve gotta see!
Actually for a time (like almost 20 years ago) I was into the war-gaming side of things and there weren't really all that many kits out there. As they weren't available in kit form I built an M-113, Fv-432 Trojan a Japanese Ho Ki APC and started a number of other builds. Most of the completed was are packed and at present not easy to get at. I've taken pictures of some incomplete ones that were in a parts box.
Here's my attempt at a 1/76 Bren Carrier. I had an old Airfix version and used measurements from it. My original intention was to build a complete "section" of them (4) and I got as far as a mini assembly line. The first picture shows one that is nearly complete as well as some pieces from the others.
I'll have to dig the others out and put up a page on one of my Web sites for you to have a look at them. We'll have to consider if there might be a better forum for this "show me yours and I'll show you mine" type of discussion.
Cheers,
Jan
woltersk
Utah, United States
Joined: May 27, 2003
KitMaker: 1,026 posts
Armorama: 654 posts
Joined: May 27, 2003
KitMaker: 1,026 posts
Armorama: 654 posts
Posted: Friday, July 10, 2009 - 03:51 PM UTC
Quoted Text
I've got an old ESCI 1/72 M1 that doesn't look nowhere near that good. At some point it will definitely undergo a repainting and weathering.
Well Jan I cheated on this one--it's 1/35th scale.
Quoted Text
Actually for a time (like almost 20 years ago) I was into the war-gaming side of things and there weren't really all that many kits out there. As they weren't available in kit form I built an M-113, Fv-432 Trojan a Japanese Ho Ki APC and started a number of other builds. Most of the completed was are packed and at present not easy to get at. I've taken pictures of some incomplete ones that were in a parts box.
I got into HO scale due to wargaming ~27 years ago too. I had battalions (or divisions?) worth of Leos. We invented our own game and would use a large room as our battlefield. I should dig out those pics. Talk about geeky.
Quoted Text
Here's my attempt at a 1/76 Bren Carrier. I had an old Airfix version and used measurements from it. My original intention was to build a complete "section" of them (4) and I got as far as a mini assembly line. The first picture shows one that is nearly complete as well as some pieces from the others.
That is really cool. It looks like a store bought kit. Nice work.
Quoted Text
I'll have to dig the others out and put up a page on one of my Web sites for you to have a look at them. We'll have to consider if there might be a better forum for this "show me yours and I'll show you mine" type of discussion.
I have a website too. It needs updating also. So yeah, put your URLs here and I'll take a gander.
And like you said earlier--It's my thread and we can do what we want!
What? Is someone else gonna pop in and tell us "Hey now you two, you've gotten off topic!"
Have a good weekend and model on!
tread_geek
Ontario, Canada
Joined: March 23, 2008
KitMaker: 2,847 posts
Armorama: 2,667 posts
Joined: March 23, 2008
KitMaker: 2,847 posts
Armorama: 2,667 posts
Posted: Saturday, July 11, 2009 - 08:09 AM UTC
Slipping in a 1/35 impostor, you dirty rotten scoundrel! Okay, we can keep this thread going as long as we want and annoy all of those that don't approve. I've created a new site specifically for modelling. There isn't a lot there but at least it's a start. You can find it here. You might find it interesting to view the Spitfire page and my wife's first build.
I checked out your site and found it quite interesting. Happy to see that you got your daughter started early in the family hobby. Now it's back to working on my M119 howitzer. I took a break to write this as the coil springs on the cradle support arms are driving me batty. They have a seem along both sides that is proving to be a nightmare as most of my files are too thick. I'm going to try one of my SWMBO's finer nail files and see if that works any better. BTW, the Roland is coming along nicely. I decided to acknowledge in this thread so it doesn't look like we have a conspiracy going to hijack the Constructive Feedback forum.
Happy modelling,
Jan
I checked out your site and found it quite interesting. Happy to see that you got your daughter started early in the family hobby. Now it's back to working on my M119 howitzer. I took a break to write this as the coil springs on the cradle support arms are driving me batty. They have a seem along both sides that is proving to be a nightmare as most of my files are too thick. I'm going to try one of my SWMBO's finer nail files and see if that works any better. BTW, the Roland is coming along nicely. I decided to acknowledge in this thread so it doesn't look like we have a conspiracy going to hijack the Constructive Feedback forum.
Happy modelling,
Jan
woltersk
Utah, United States
Joined: May 27, 2003
KitMaker: 1,026 posts
Armorama: 654 posts
Joined: May 27, 2003
KitMaker: 1,026 posts
Armorama: 654 posts
Posted: Monday, July 13, 2009 - 02:57 PM UTC
Quoted Text
Slipping in a 1/35 impostor, you dirty rotten scoundrel! Okay, we can keep this thread going as long as we want and annoy all of those that don't approve. I've created a new site specifically for modelling. There isn't a lot there but at least it's a start. You can find it here. You might find it interesting to view the Spitfire page and my wife's first build.
Oops, sorry. That was a bit dastardly of me. I wish my small scale stuff turned out that good.
You got your wife building kits? Lucky! How'd she like it?
I looked around your site. I like the slide show idea. I may steal it, if I can figure out how you did it.
Quoted Text
I checked out your site and found it quite interesting. Happy to see that you got your daughter started early in the family hobby. Now it's back to working on my M119 howitzer. I took a break to write this as the coil springs on the cradle support arms are driving me batty. They have a seem along both sides that is proving to be a nightmare as most of my files are too thick. I'm going to try one of my SWMBO's finer nail files and see if that works any better. BTW, the Roland is coming along nicely. I decided to acknowledge in this thread so it doesn't look like we have a conspiracy going to hijack the Constructive Feedback forum.
Yea, she got into it early and out of it early too. She discovered boys. She's 21 now and her only interest in the hobby is following the progress of my builds.
That artillery piece of yours is way small. You don't have a needle file set? When you say "try one of the SWMBOs files" do you mean with or without her knowledge?
Thanks again. I decaled the missile tubes last night and should have those pics ready soon. Got a question for ya: should I give the kit a wash? I will definitely dry brush it, but the cracks and crevases seem dark and shadowy enough. Do you apply a wash to yours?
tread_geek
Ontario, Canada
Joined: March 23, 2008
KitMaker: 2,847 posts
Armorama: 2,667 posts
Joined: March 23, 2008
KitMaker: 2,847 posts
Armorama: 2,667 posts
Posted: Tuesday, July 14, 2009 - 06:50 AM UTC
Quoted Text
Oops, sorry. That was a bit dastardly of me. I wish my small scale stuff turned out that good.
You got your wife building kits? Lucky! How'd she like it?
IMO, small scale is just that, small. You must understand that I'm still relatively new to this "new" way of building and what to me are very new techniques and kits. Each of my builds take more than a handful of weeks or longer. I haven't built anything larger than 1/72 in eons and therefore have no idea what might be involved. At the same time I am trying to develop a way to use larger scale techniques on the more diminutive subjects.
While my wife enjoyed the build experience from a personal perspective it's the painting that she far more enjoyed. The kit is taking quite a while to be finished. Since it's now summer the avid gardener in her reigns supreme. There is still the decals to do and a couple of other parts before the Spitfire is finished. Hopefully I can get her to spare some time and get it done before the fall. BTW, she's also am avid photographer and an accomplished decorative painter. That last talent has been immeasurably helpful to me in my builds. Take a look here for some of her other work.
Quoted Text
I looked around your site. I like the slide show idea. I may steal it, if I can figure out how you did it.
The site is hosted on .Mac and the programme that creates it is iWeb. The slide show is an integrated part of the package. As it's JavaScript I'm sure that a free similar version of it might be lurking out there on the Web.
Quoted Text
Yea, she got into it early and out of it early too. She discovered boys. She's 21 now and her only interest in the hobby is following the progress of my builds.
Not surprising.
Quoted Text
That artillery piece of yours is way small. You don't have a needle file set? When you say "try one of the SWMBOs files" do you mean with or without her knowledge?
I have a few of what at the LHS are called "Jewellers files" but although they are the smallest they carry, they are still a bit too big and coarse for the job at hand. And I would never dream of borrowing anything personal from her without her knowledge. She's loaned me certain of her manicure tools in the past for various projects. The only stipulation is "if you wreck it you relplace it."
Quoted Text
Thanks again. I decaled the missile tubes last night and should have those pics ready soon. Got a question for ya: should I give the kit a wash? I will definitely dry brush it, but the cracks and crevases seem dark and shadowy enough. Do you apply a wash to yours?
Be interested to see more progress pictures. I recall someone doing a 1/76 M551 launching a Shillelagh missile from the gun tube with very good smoke and some flame. There was also a Bradley firing a TOW that was quite impressive. Wish I could recall the sites.
As to your build questions, I am still in the learning phase. If the cracks and crevases seem okay to you I might forego a further wash. I only apply washes after the gloss coat and decal phase to pick out things such as engine grills and those are usually predominantly thinner. I do use other lighter colours of washes to simulate dust and dirt and such. Some dry brushing also goes on at this stage. After the sealer gloss coat and flat coat I use a technique my wife developed for me. Here's an example of what can be achieved.
While the picture may not make it obvious, there is not only Tamiya Buff involved in the dusting but also XF-52 dark earth and several other artist acrylic colours from the Delta Ceramcoat range (Burnt Sienna, as well as various browns and ochre/beiges). The colours are diluted and applied with pieces of sponge from a decorative artist's stencil sponge.
The sponge on the right has been the donor for several weathering applications. You break off a piece of the sponge about 3/16 of an inch in size and use a reverse action tweezers to hold it and act as a handle. Depending on the intensity you desire you might blot the sponge on a paper towel before applying it to the model. BTW, a light touch/hand is a definite asset when using this technique.
Cheers,
Jan
woltersk
Utah, United States
Joined: May 27, 2003
KitMaker: 1,026 posts
Armorama: 654 posts
Joined: May 27, 2003
KitMaker: 1,026 posts
Armorama: 654 posts
Posted: Thursday, July 16, 2009 - 02:54 AM UTC
Hey Jan,
I decided to post an update here and not in a new thread since you're pretty much the only one commenting.
Decaled each missile tube with stenciling, some kind of yellow rectangle, and a 'this end forward' arrow. The tips of some of the arrows curled up and they look like another rectangle. Of course one of these had to be the tube which goes on the vehicle.
So your wife is already artistic. That explains a lot. My wife doesn't draw, crochet, macramé, or even scrapbook. Not even creative writing. We are truly opposites. I couldn't get her to do a model if I promised her a cruise.
I did apply a wash to the Roland. Drybrushing will be next, and then weathering. I'll have to try your sponge idea. It appears to work really well.
I will have to search for a way to do the rocket motor exhaust. I have tried the cotton/diluted white glue mix with mixed results. Maybe I can find some kind of gossamer material at the LHS.
tread_geek
Ontario, Canada
Joined: March 23, 2008
KitMaker: 2,847 posts
Armorama: 2,667 posts
Joined: March 23, 2008
KitMaker: 2,847 posts
Armorama: 2,667 posts
Posted: Thursday, July 16, 2009 - 07:54 AM UTC
I can appreciate on what's involved with placing those decals. IIRC the Roland tube in 1/87 scales out to a touch over and inch long and about less than a tenth of an inch wide. I have some Rapier missiles that I've scratched in 1/72 that have close enough the same dimensions. And they are small enough in that scale.
Cheers,
Jan
Cheers,
Jan
weathering_one
Ontario, Canada
Joined: April 04, 2009
KitMaker: 458 posts
Armorama: 456 posts
Joined: April 04, 2009
KitMaker: 458 posts
Armorama: 456 posts
Posted: Thursday, July 16, 2009 - 08:47 AM UTC
I've watched this thread on and off for a while now. I don't know if it's my place to say anything but I couldn't resist. The pictures and and hints are amazing. You guys have almost created a forum of your own.
woltersk
Utah, United States
Joined: May 27, 2003
KitMaker: 1,026 posts
Armorama: 654 posts
Joined: May 27, 2003
KitMaker: 1,026 posts
Armorama: 654 posts
Posted: Thursday, July 16, 2009 - 12:31 PM UTC
Quoted Text
I've watched this thread on and off for a while now. I don't know if it's my place to say anything but I couldn't resist. The pictures and and hints are amazing. You guys have almost created a forum of your own.
Hey Jan we/'ve gained another unto the fold! Welcome AJB. We could almost call ourselves a cult now.
But serious--thanks for the kind words. I've felt I've learned more from this site than what I've contributed.
I've finished the drybrushing. Pics will be posted tomorrow. And then she's almost done!
woltersk
Utah, United States
Joined: May 27, 2003
KitMaker: 1,026 posts
Armorama: 654 posts
Joined: May 27, 2003
KitMaker: 1,026 posts
Armorama: 654 posts
Posted: Thursday, July 16, 2009 - 11:16 PM UTC
Drybrushing.
tread_geek
Ontario, Canada
Joined: March 23, 2008
KitMaker: 2,847 posts
Armorama: 2,667 posts
Joined: March 23, 2008
KitMaker: 2,847 posts
Armorama: 2,667 posts
Posted: Friday, July 17, 2009 - 05:38 AM UTC
Really coming together there, Keith. One thing that really puzzles me is how the red-brown doesn't show up as prominent in pictures as it does when looking at the actual model. I'm basing this primarily on my Luchs but your build photos seem that they are also displaying a similar lack of prominence. I've been doing a bit of research and I think that the answer might be in the camera's white balance. I'll experiment and see what changing it does to some of my pictures.
AJ, welcome to our little "splinter group." I recall that you've commented in some of my build posts in the past. If Keith has no objections, why not post a picture or two in this thread. We all have to start somewhere!
Cheers,
Jan
AJ, welcome to our little "splinter group." I recall that you've commented in some of my build posts in the past. If Keith has no objections, why not post a picture or two in this thread. We all have to start somewhere!
Cheers,
Jan
woltersk
Utah, United States
Joined: May 27, 2003
KitMaker: 1,026 posts
Armorama: 654 posts
Joined: May 27, 2003
KitMaker: 1,026 posts
Armorama: 654 posts
Posted: Friday, July 17, 2009 - 05:52 AM UTC
Quoted Text
Really coming together there, Keith. One thing that really puzzles me is how the red-brown doesn't show up as prominent in pictures as it does when looking at the actual model. I'm basing this primarily on my Luchs but your build photos seem that they are also displaying a similar lack of prominence. I've been doing a bit of research and I think that the answer might be in the camera's white balance. I'll experiment and see what changing it does to some of my pictures.
I've always liked the drybrush look. I could stop the build here and be happy. But I'll press on.
I've noticed the brown phenomenon too. I just thought it was my eyes. I've got the white balance set for Indoor lightning and have played with incandescent and fluorescent settings. Maybe its the flash?
Quoted Text
AJ, welcome to our little "splinter group." I recall that you've commented in some of my build posts in the past. If Keith has no objections, why not post a picture or two in this thread. We all have to start somewhere!
Heck yeah AJ! I don’t mind one bit. The more the merrier. I hadn’t noticed that you are rather new. Welcome! I did notice a lack of pics in your photo album. Uploading is easy. Getting them into a thread can be a little more difficult. I think there are instructions on the site somewhere. If you need help we’d be glad to assist.