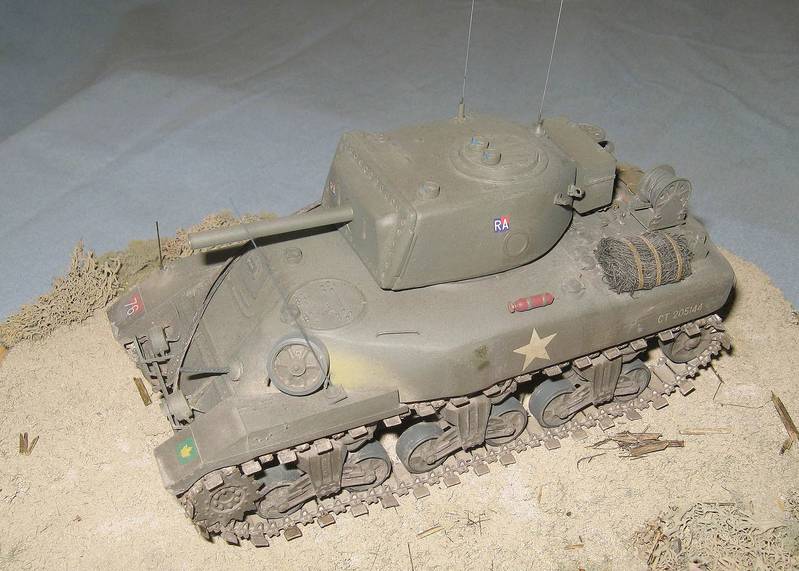
Campaigns
Where Armorama group builds can be discussed, organized, and updates posted.
Sherman Campaign
Copperalis
Visit this Community
United Kingdom
Joined: October 20, 2007
KitMaker: 52 posts
Armorama: 45 posts
Posted: Saturday, July 24, 2010 - 06:59 AM UTC

Quoted Text

Andrew; Really nice Firefly “Carole”, maybe you give everyone a run down on how you did canvas mantlet cover since it looks outstanding.


The mantlet cover comes from the Resicast set 35.2229 'Sherman M4A4 deep wading' and is designed to be used with their own 75mm barrel, which is included within the kit.


The back of the cover needs to be carefully cleaned and a litle taken off the bottom to get an exact fit. The cover was blended onto the turret using Humbrol filler.

The inside of the cover was drilled out to accept the larger and longer Tasca barrel. The flaired end of the barrel was also removed to a cylindrical shape to fit into the hole. To match the photos of Carole the cover was shaved off the end of the barrel, and was cleaned up with Humbrol filler.

I have also used the wading stack from this kit, and will show a photograph once the model has progressed. This week I have completed the suspension units, which took slightly longer due to the working inner sections being inserted upside down and this being realised after the bogies edges had been glued...

Eric: thanks for the tutorial on the welds - will have a look at this again when I work on the upper hull.
This post was removed.
Copperalis
Visit this Community
United Kingdom
Joined: October 20, 2007
KitMaker: 52 posts
Armorama: 45 posts
Posted: Saturday, July 24, 2010 - 08:06 AM UTC
Since editing time has expired on the post two replies above I cannot sort out the missing picture. It was supposed to show a copy of the Resicast instructions with the mantlet cover on a 75mm gun.

Moderators: please feel free to remove the post I added by mistake above.
This post was removed.
MichaelSatin
Staff MemberCampaigns Administrator
AEROSCALE
Visit this Community
Colorado, United States
Joined: January 19, 2008
KitMaker: 3,909 posts
Armorama: 510 posts
Posted: Saturday, July 24, 2010 - 08:25 AM UTC
Help, I'm being dragged off track! Again!

I KNOW I'm supposed to be working on my Israeli M4A1E8 (76) (M1), but I'm increasingly drawn to the Tasca M4A1 "Mid Production". My great uncle was in a maintenance company with the 67th Armored Regiment and served through Sicily and Northern Europe. The Tasca kit(s) fit right in there. I have some of the boggies done on the kit but frankly am farther with the IAF vehicle. I guess I figure I'm not cheating if I pick up the Tasca kit instead of continue with the other one. Given the time we have, I can still do both!!

I do have a question. I've heard that the thin rubber sheets in the Tasca kits deteriorated and flatten the suspension. That seems to be already happening to me on this one and my Firefly that I started a while back. Should I substitute small plastic sheet or just glue them in place, given that I don't plan to use them in dioramas but just have them sit flat?

Oh, and on the chain issue, any reason small cheap jewely chain can't be used on the fuel filler caps?

More later no doubt, if I can actually get any work done

Michael
cdharwins
Visit this Community
New Jersey, United States
Joined: October 28, 2006
KitMaker: 491 posts
Armorama: 462 posts
Posted: Saturday, July 24, 2010 - 08:34 AM UTC

Quoted Text

Also-- my attempt at 'chains.' Twisted and flattened copper wire. What do you think? Take them or leave them?


Justin,

I like you technique for the little chains. i'm going to have to try it!

Chris
thebear
Visit this Community
Quebec, Canada
Joined: November 15, 2002
KitMaker: 3,960 posts
Armorama: 3,579 posts
Posted: Saturday, July 24, 2010 - 08:42 AM UTC
Hi Micheal ...Yeah it might be a good idea to change the foam for plastic...On the early (DV) kit I used .40 sheet cut to fit but I think it has to be a bit thicker on the later M4 suspension...
As for the chain ..I still haven`t found any type of real chain small enough to use on the gas caps ..That`s why I use the Aber PE chain ..be careful with jewery chain most types are way too fancy to use in any situation..
MrDrummy
Visit this Community
Texas, United States
Joined: October 17, 2009
KitMaker: 86 posts
Armorama: 82 posts
Posted: Saturday, July 24, 2010 - 08:44 AM UTC
Well thanks! I can't take credit for it though, as I found it

Here

A real easy technique, though I would say you CAN manipulate the sections just fine after you flatten them. I had no problems anyway.

I did notice, that the Aber PE set that I ordered comes with little PE chains like Rick showed us a few pages back. I guess I'll just pull mine off and use the Aber...
barkingdigger
Staff MemberAssociate Editor
ARMORAMA
#013
Visit this Community
England - East Anglia, United Kingdom
Joined: June 20, 2008
KitMaker: 3,981 posts
Armorama: 3,403 posts
Posted: Saturday, July 24, 2010 - 09:57 AM UTC
Justin,

Excellent tip on those wire chains! I certainly wouldn't rush to replace them with PE! (As if you really would...) I'll be stealing this for my builds...

Tom
ppawlak1
Visit this Community
Victoria, Australia
Joined: March 14, 2006
KitMaker: 1,973 posts
Armorama: 1,843 posts
Posted: Saturday, July 24, 2010 - 01:03 PM UTC

Quoted Text

I hope this works. This is my first attempt to add photographs. Here is a shot of my completed RAM OP from A Troop, 31 Filed battery, 23 Field Regiment (S.P.) (RCA) 4 Canadian Armoured Division Artillery April 1945. If it works, I will add more and send the details of the kits used, etc.

Well that didn't work

John


No pic John...

Try this link for steps if you like :

https://armorama.kitmaker.net/forums/160011&page=1

HTH

I usually post from Photobucket.

Cheers

Paul
ppawlak1
Visit this Community
Victoria, Australia
Joined: March 14, 2006
KitMaker: 1,973 posts
Armorama: 1,843 posts
Posted: Saturday, July 24, 2010 - 01:06 PM UTC

Quoted Text

One more time:

Well I have follwed the DAQ etc and can't get anything to show....


John PM me if you'd like some help

You can also delete your other posts if you like..

Here you go...


Paul
MichaelSatin
Staff MemberCampaigns Administrator
AEROSCALE
Visit this Community
Colorado, United States
Joined: January 19, 2008
KitMaker: 3,909 posts
Armorama: 510 posts
Posted: Saturday, July 24, 2010 - 01:25 PM UTC

Quoted Text

I hope this works. This is my first attempt to add photographs. Here is a shot of my completed RAM OP from A Troop, 31 Filed battery, 23 Field Regiment (S.P.) (RCA) 4 Canadian Armoured Division Artillery April 1945. If it works, I will add more and send the details of the kits used, etc.

Well that didn't work

John


John,

This is probably more complicated than necessary, but here's what I do:

1. I post my picture to "my albums" here on Armorama (I go to the Photos link up there in in the Armoroma header, then make sure to log in, then click on the "my albums" header on the left of the page in the blue area at the top)
2. Once there, I select an album (or create one) and "upload photos". Browse to find one already on your computer. I try to make it a bit smaller before I upload, there's a limited amout of space (about 700 bits by whatever seems to work for me.)
3. Once the photo is uploaded, where it says "linked thumbnail", I click on the little "more" icon on the right (looks like a diagram of a chain on some sort of landscape background)
4. I then highlight and copy the text in the new "HTML code" box that appears and copy THAT into the text of my post (it helps to have two windows open, one with the new post I'm writing and one with the gallery photo)

This is WAY to complicated but I learned computerees on DOS so I still do some things the hard way. Still, it seems to work!


HTH somewhat! I mean, I just reread it and I don't get what I meant!

Michael
ppawlak1
Visit this Community
Victoria, Australia
Joined: March 14, 2006
KitMaker: 1,973 posts
Armorama: 1,843 posts
Posted: Saturday, July 24, 2010 - 01:41 PM UTC
Good post Michael,

so after the images have been uploaded to your gallery.

Click on the circled square thingy below :


This will create the circled HTML code below ....


Select the total HTML code and copy it all - you can now paste it into your post and you're good to go

Hope that's Ok ...

Cheers

Paul
ppawlak1
Visit this Community
Victoria, Australia
Joined: March 14, 2006
KitMaker: 1,973 posts
Armorama: 1,843 posts
Posted: Saturday, July 24, 2010 - 01:49 PM UTC

Quoted Text

Frustrating to say the least. No combination of what bot of you have shown me is working and thats from both Kitmaker and Photobucket


Photobucket


You've done it !! well done ! Read my last PM also.

Paul
MichaelSatin
Staff MemberCampaigns Administrator
AEROSCALE
Visit this Community
Colorado, United States
Joined: January 19, 2008
KitMaker: 3,909 posts
Armorama: 510 posts
Posted: Saturday, July 24, 2010 - 02:00 PM UTC

Quoted Text

Click on the circled square thingy below :

This will create the circled HTML code below ....

Select the total HTML code and copy it all - you can now paste it into your post and you're good to go

Hope that's Ok ...

Cheers

Paul


Thanks Paul, that's EXACTLY what I meant. Nice graphics!

Glad it all worked JB! Nice model too (as that's what we're really here for!! )

Michael
ppawlak1
Visit this Community
Victoria, Australia
Joined: March 14, 2006
KitMaker: 1,973 posts
Armorama: 1,843 posts
Posted: Saturday, July 24, 2010 - 02:07 PM UTC

Quoted Text

As i said earlier this is my completed RAM OP from A Troop, 31 Filed battery, 23 Field Regiment (S.P.) (RCA) 4 Canadian Armoured Division Artillery April 1945. If it works, I will add more and send the details of the kits used, etc.

The basic RAM is the Formations RAM II OP Conversion Kit F062. The hull was from the Tamiya M4 kit #35190. I added all of the lower hull rivets as there was none on the Tamiya kit, scratchbuilt the air cleaner covers, added a double length tow cable, and used the Friulmodel Sherman T 54E 1 tracks. This is one heavy model! I highly recommend the Formations kit, in fact I purchased two more RAM kits as well as two of their RAM Badger.

The wire on the two telephone wire reels is actually fired Milan TOW missile wire. It is incredibly thin and much closer to scale.

Photobucket


Photobucket


Lovely build there John ! Awesome !!

A rare specimen !

Thanks for posting I'm glad you're Ok to post the pics now !!

Cheers

Paul