

Campaigns
Where Armorama group builds can be discussed, organized, and updates posted.
Where Armorama group builds can be discussed, organized, and updates posted.
Hosted by Darren Baker, Richard S.
Korean War Campaign
eoinryan

Joined: April 30, 2010
KitMaker: 232 posts
Armorama: 134 posts

Posted: Thursday, January 27, 2011 - 07:25 AM UTC
Hi folks,
Some of those tiger liveries are great- Tiger Meet liveries on aircraft pop up a fair bit on Aeroscale- yous may get a few good tips and ideas over there.
@ Shaun- thanks for the heads up on the alighments for the landing gear covers- I'll be very careful, though it will be a while yet before I'm at that stage!
@ Sal: Can't wait to see the Sabre- I recently got one or two Academy kits but I haven't built them yet- let me know what they're like.
Enjoy the builds!
Eoin
Dangeroo

#023

Joined: March 13, 2009
KitMaker: 2,058 posts
Armorama: 1,656 posts

Posted: Thursday, January 27, 2011 - 08:07 AM UTC
Well, look at that! Im in bed for two days with the flu and I miss out on all the fun! 
Hyun-Jae nice choice. Ive built that set before. With a little work it can be turned into a real gem. Too bad DML discontinued their Korean War Series
Wayne nice add-on. Quite common in Korea, and lots of ammo was necessary considering the communist tactics
Quinn your choice looks familiar We will certainly have enough M46 builds to learn from echother!
Mark I wouldnt dare doing it with CA, mine always goes milky when it dries. But might depend on the manufacturer.
Sal looking forward to your experiences with wingy things. Havent built one in years myself
I am proud to announce that we now have 68 signed up starters! Heres the updated chart:


Cheers!
Stefan
Hyun-Jae nice choice. Ive built that set before. With a little work it can be turned into a real gem. Too bad DML discontinued their Korean War Series
Wayne nice add-on. Quite common in Korea, and lots of ammo was necessary considering the communist tactics
Quinn your choice looks familiar
We will certainly have enough M46 builds to learn from echother!Mark I wouldnt dare doing it with CA, mine always goes milky when it dries. But might depend on the manufacturer.
Sal looking forward to your experiences with wingy things. Havent built one in years myself
I am proud to announce that we now have 68 signed up starters! Heres the updated chart:
Cheers!
Stefan

md72

#439

Joined: November 05, 2005
KitMaker: 4,950 posts
Armorama: 289 posts

Posted: Thursday, January 27, 2011 - 09:46 AM UTC
Stefan, thanks for the heads up on the CA. Mine usually dries clear and too hard to sand so I'll keep you posted.
Thanks for updating the list too. Kinda fun to see what's going on. Eleven wing wipers! Not bad for a campaign that started on the armor side...
Thanks for updating the list too. Kinda fun to see what's going on. Eleven wing wipers! Not bad for a campaign that started on the armor side...


2IDsecondtonone

Joined: May 22, 2010
KitMaker: 47 posts
Armorama: 43 posts

Posted: Friday, January 28, 2011 - 03:31 PM UTC
Before shots of the Tamiya Willys MB Jeep to go along with the DML G.I. Pusan Perimeter 1950 figures
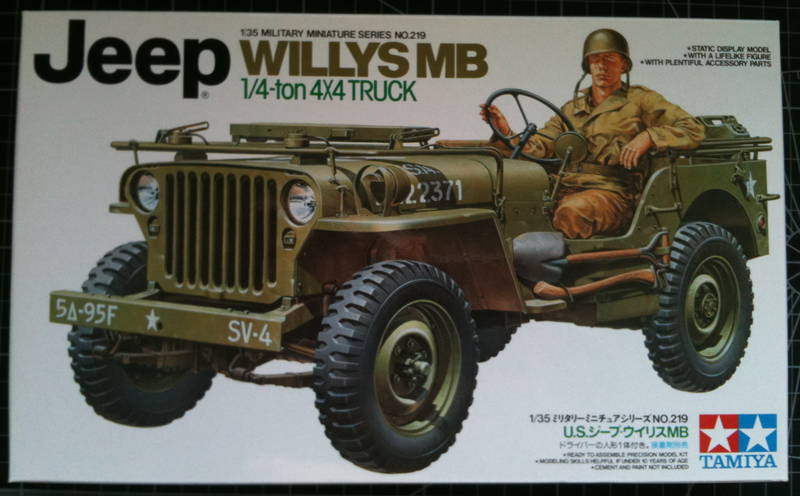

First progress shots to follow soon
First progress shots to follow soon
barkingdigger
#013

Joined: June 20, 2008
KitMaker: 3,981 posts
Armorama: 3,403 posts
Posted: Sunday, January 30, 2011 - 01:08 AM UTC
Stefan,
Seeing as everyone else is cracking on I thought I'd post a cheeky "before" shot of my M36! The Italeri Calliope underneath will be donating a lower hull & running gear for the gas-powered M36 since I cannot find any real proof that diesel M36B2s were actually fielded. Besides, I already stole the diesel hull from the Academy kit for another build...

Next time I might even get round to opening the boxes!
By the way, that mess in the background is exactly why I can't build at the workbench at the moment. I daren't post it to that "Your workbench right now" thread out of shear shame...
Tom
(I might even get to start it in the next few weeks!)
Seeing as everyone else is cracking on I thought I'd post a cheeky "before" shot of my M36! The Italeri Calliope underneath will be donating a lower hull & running gear for the gas-powered M36 since I cannot find any real proof that diesel M36B2s were actually fielded. Besides, I already stole the diesel hull from the Academy kit for another build...
Next time I might even get round to opening the boxes!
By the way, that mess in the background is exactly why I can't build at the workbench at the moment. I daren't post it to that "Your workbench right now" thread out of shear shame...
Tom
(I might even get to start it in the next few weeks!)

AgentG
Joined: December 21, 2008
KitMaker: 1,109 posts
Armorama: 1,095 posts

Posted: Sunday, January 30, 2011 - 07:31 AM UTC
I shan't comment on the dismal state of my bench, with four Group Builds/Campaigns going at one time..............
Here's my M26 in all her glory. Early Korean War Marine Pershing.


A few details to be added, and I'm calling this one finished.
G
Here's my M26 in all her glory. Early Korean War Marine Pershing.
A few details to be added, and I'm calling this one finished.
G

GregCloseCombat
Joined: June 30, 2008
KitMaker: 2,408 posts
Armorama: 2,394 posts

Posted: Sunday, January 30, 2011 - 07:35 AM UTC
Fantastic Wayne. Congrats on finishing 

AgentG
Joined: December 21, 2008
KitMaker: 1,109 posts
Armorama: 1,095 posts
Posted: Sunday, January 30, 2011 - 12:01 PM UTC
Thank you Greg.
Now for the "Glamour Shots".


G
Now for the "Glamour Shots".
G
AgentG
Joined: December 21, 2008
KitMaker: 1,109 posts
Armorama: 1,095 posts
Posted: Sunday, January 30, 2011 - 12:31 PM UTC
Ok boys and girls, I'm a dumb @$$!
I cannot remember how to resize the photo so I can post it in the proper campaign gallery.
Help, please..........
G
I cannot remember how to resize the photo so I can post it in the proper campaign gallery.
Help, please..........
G

tsweeney
Joined: February 09, 2007
KitMaker: 149 posts
Armorama: 131 posts

Posted: Sunday, January 30, 2011 - 02:55 PM UTC
This is what I have chosen for the group build

Thanks
Tom
Thanks
Tom

ltb073
Joined: March 08, 2010
KitMaker: 3,662 posts
Armorama: 3,078 posts
Posted: Sunday, January 30, 2011 - 04:32 PM UTC
Ok guys,
Started my 1st Academy kit. Plastic is softer than Tamiya's and the spruce connections are thicker, but from what little I have done it seems like a great kit. Here is my little progress

By the way nice job G-man
Started my 1st Academy kit. Plastic is softer than Tamiya's and the spruce connections are thicker, but from what little I have done it seems like a great kit. Here is my little progress

By the way nice job G-man

md72
#439
Joined: November 05, 2005
KitMaker: 4,950 posts
Armorama: 289 posts
Posted: Tuesday, February 01, 2011 - 06:18 AM UTC
tiny progress:

Got all the windows opened up, backed up the side windows with some strip styrene and painted the opening black. I've started filling with CA. Filliing is generally OK so far, my original applicator (a .7mm pencil lead) was removing the paint, so I've gone to single drops from the tube to fill the windows.
Got all the windows opened up, backed up the side windows with some strip styrene and painted the opening black. I've started filling with CA. Filliing is generally OK so far, my original applicator (a .7mm pencil lead) was removing the paint, so I've gone to single drops from the tube to fill the windows.

Emeritus

Joined: March 30, 2004
KitMaker: 2,845 posts
Armorama: 808 posts
Posted: Tuesday, February 01, 2011 - 08:57 AM UTC
Another participant reporting in!
First of all, a huge thank you to MEBM for making this entry possible by donating the kit I'm building. I'll do my best to give it a good new home.
So, the kit in question: Tamiya's 1:72 scale Mustang F-51.

To follow the campaign rules, here's the kit still unstarted. Photos taken last Friday.


Seems like a typical Tamiya kit: great mouldings, good detail all-round, superb fit. Not too many parts in this one: I ended up with the great majority of parts off the sprues after the first building session.
I'm planning to build this one mostly straight from the box, with just a few additions. Starting with the cockpit, I added a simple seat harness from left-over PE straps.

While I was at it, I drilled out the machine gun blast tubes and exhausts.

Now painting the interior. More to come soon.
First of all, a huge thank you to MEBM for making this entry possible by donating the kit I'm building. I'll do my best to give it a good new home.
So, the kit in question: Tamiya's 1:72 scale Mustang F-51.
To follow the campaign rules, here's the kit still unstarted. Photos taken last Friday.
Seems like a typical Tamiya kit: great mouldings, good detail all-round, superb fit. Not too many parts in this one: I ended up with the great majority of parts off the sprues after the first building session.
I'm planning to build this one mostly straight from the box, with just a few additions. Starting with the cockpit, I added a simple seat harness from left-over PE straps.
While I was at it, I drilled out the machine gun blast tubes and exhausts.
Now painting the interior. More to come soon.

vonHengest
Joined: June 29, 2010
KitMaker: 5,854 posts
Armorama: 4,817 posts

Posted: Tuesday, February 01, 2011 - 04:47 PM UTC
3 warbirds on one page.. sweet! You guys just may convince me to build my 1/72 Sabre yet 
vonHengest
Joined: June 29, 2010
KitMaker: 5,854 posts
Armorama: 4,817 posts
Posted: Tuesday, February 01, 2011 - 04:48 PM UTC
Quoted Text
Ok boys and girls, I'm a dumb @$$!
I cannot remember how to resize the photo so I can post it in the proper campaign gallery.
Help, please..........
G
Yo G, are you asking about resizing it on your computer, or after you've uploaded it?

Bigrip74
Joined: February 22, 2008
KitMaker: 5,026 posts
Armorama: 1,604 posts

Posted: Tuesday, February 01, 2011 - 07:17 PM UTC
@ Sal: nice looking plastic there.
@ Mark: what adhesive did you use?
@ Eetu: the exhaust looks great for kit parts and the belts are nice.
Bob
@ Mark: what adhesive did you use?
@ Eetu: the exhaust looks great for kit parts and the belts are nice.
Bob
md72
#439
Joined: November 05, 2005
KitMaker: 4,950 posts
Armorama: 289 posts
Posted: Tuesday, February 01, 2011 - 07:31 PM UTC
Hey Bob. I just used Tamiya extra thin cement for the clear panel and Strip styrene. I'm filling the windows with CA. Drop by drop...
Dangeroo
#023
Joined: March 13, 2009
KitMaker: 2,058 posts
Armorama: 1,656 posts
Posted: Tuesday, February 01, 2011 - 08:17 PM UTC
I'm glad this campaign has taken off so well, congrats everyone! into our second month now. The history installment should be up by this evening I hope...
Tom, that looks familiar... Have the same kit in the stash.
Wayne great show on the Pershing. Looks mean! Good to see a clean vehicle once in a while. And congrats on being the second finisher for this campaign! As for the pics, you can resize them in any photo program and just add them to the gallery as per the instructions in this thread.
Tom, a Chosin dio I presume? Those are nice figures, require a bit of work but still, nice figs. Built them for a Korean War Dio two years ago.
Sal, nice start. Even though it's logical, I never realized the pilot is sitting right on top of the engine... Must be a nice thought...
Mark, looks like the CA is still clear, good luck!
Eetu welcome to the campaign. Good to see an F-51. And the first time I see a Tamiya 1/72 scale kit being built, so I'm looking foward to your progress.
Cheers!
Stefan
Tom, that looks familiar...
Have the same kit in the stash.Wayne great show on the Pershing. Looks mean!
Good to see a clean vehicle once in a while. And congrats on being the second finisher for this campaign! As for the pics, you can resize them in any photo program and just add them to the gallery as per the instructions in this thread.Tom, a Chosin dio I presume? Those are nice figures, require a bit of work but still, nice figs. Built them for a Korean War Dio two years ago.
Sal, nice start. Even though it's logical, I never realized the pilot is sitting right on top of the engine... Must be a nice thought...
Mark, looks like the CA is still clear, good luck!
Eetu welcome to the campaign. Good to see an F-51. And the first time I see a Tamiya 1/72 scale kit being built, so I'm looking foward to your progress.
Cheers!
Stefan
MEBM
Joined: July 19, 2003
KitMaker: 1,055 posts
Armorama: 530 posts
Posted: Wednesday, February 02, 2011 - 08:25 AM UTC
Quoted Text
Another participant reporting in!
First of all, a huge thank you to MEBM for making this entry possible by donating the kit I'm building. I'll do my best to give it a good new home.
So, the kit in question: Tamiya's 1:72 scale Mustang F-51.
To follow the campaign rules, here's the kit still unstarted. Photos taken last Friday.
Seems like a typical Tamiya kit: great mouldings, good detail all-round, superb fit. Not too many parts in this one: I ended up with the great majority of parts off the sprues after the first building session.
I'm planning to build this one mostly straight from the box, with just a few additions. Starting with the cockpit, I added a simple seat harness from left-over PE straps.
While I was at it, I drilled out the machine gun blast tubes and exhausts.
Now painting the interior. More to come soon.
It looks great so far! I can't wait to see it finished!

Dangeroo
#023
Joined: March 13, 2009
KitMaker: 2,058 posts
Armorama: 1,656 posts
Posted: Wednesday, February 02, 2011 - 11:41 PM UTC
One month into this campaign and we have already added 5 pages to the thread. I like it! Thanks for your participation guys! Thisway it is sure to be a great campaign!
So, it's time for another history lesson. February saw the turning of the tide once again, but this time in a more permanent way:
1 February 1951 - In the Battle of Twin Tunnels the 23rd Infantry Regiment of the US 2nd Infantry Division with the attached French battalion inflicts severe losses on Chinese troops.
1 February 1951 - Operation Thunderbolt continues south of Seoul.
5 February 1951 - US X Corps (now part of 8th Army) and ROK III Corps launch Operation Roundup, a continuation of Thunderbolt on the center front, which together with Thunderbolt leads to the recapture of Wonju and UN troops advancing well north.
11 February 1951 - The Chinese launch their Fourth Phase Offensive. In the Battle of Hoengseong the ROK 8th Division is destroyed. The attack forced other units to withdraw and left the US 23rd Infantry Regiment of the 2nd Infantry Division with the attached French battalion and other supporting units exposed at Chipyong-ni behind enemy lines.
13 - 15 February 1951 - In the Battle of Chipyong-ni, the 23rd Infantry Regiment (some 4'500 men) once again mounts a stout defense against overwhelming Chinese forces (some 25'000 men). The Chinese offensive's momentum is broken. The battle is often considered the "Gettysburg of the Korean War".
20 February 1951 - Operation Killer is launched. It is aimed at eventually bringing 8th Army back to the Han River and across the 38th parallel but even more so at inflicting as many casualties to Chinese forces as possible. It continues into March and is followed by Operation Ripper. Though it is hampered more by terrain and weather than by the retreating Communist forces, it is considered a success both in terms of terrain gained and casualties inflicted on the enemy.
AgentG
Joined: December 21, 2008
KitMaker: 1,109 posts
Armorama: 1,095 posts
Posted: Thursday, February 03, 2011 - 02:36 PM UTC
Ok I figured it out! Pic posted!
At my age using a computer is like watching monkeys use tools for the first time.
G
At my age using a computer is like watching monkeys use tools for the first time.
G
Emeritus
Joined: March 30, 2004
KitMaker: 2,845 posts
Armorama: 808 posts
Posted: Saturday, February 05, 2011 - 09:23 AM UTC
Time for another update:
Out of the box, the drop tanks attach to the wing racks by two small nodes. That seemed quite flimsy, so I cut away the locators from the tank, drilled some holes and glued in brass wire for some extra sturdiness.

Working with the cockpit components and following the instructions, I painted the floor to represent wood.

Naturally, I went looking for outside references after finishing the floor. Turns out floor, along with the rest of the cockpit interior, were painted black in most Mustangs used in the Korean war.
Following the opinions expressed on several internet forum discussions I came across, I airbrushed black for the pilot's working space and interior green for the rest of the interior. The oil cooler outlet area is still to receive a coat of aluminium at this point.

Wanting to show at least some of the wood imitation on the cockpit floor, I sprayed the black on the floor unevenly and chipped away some paint from the high-traffic areas.

In the next update, I should have the interior components painted and for fuselage assembly.
Out of the box, the drop tanks attach to the wing racks by two small nodes. That seemed quite flimsy, so I cut away the locators from the tank, drilled some holes and glued in brass wire for some extra sturdiness.
Working with the cockpit components and following the instructions, I painted the floor to represent wood.
Naturally, I went looking for outside references after finishing the floor. Turns out floor, along with the rest of the cockpit interior, were painted black in most Mustangs used in the Korean war.
Following the opinions expressed on several internet forum discussions I came across, I airbrushed black for the pilot's working space and interior green for the rest of the interior. The oil cooler outlet area is still to receive a coat of aluminium at this point.
Wanting to show at least some of the wood imitation on the cockpit floor, I sprayed the black on the floor unevenly and chipped away some paint from the high-traffic areas.
In the next update, I should have the interior components painted and for fuselage assembly.
Emeritus
Joined: March 30, 2004
KitMaker: 2,845 posts
Armorama: 808 posts
Posted: Friday, February 11, 2011 - 02:29 AM UTC
Update time again. While the kit goes together very well, I've run into some difficulties with primer.
Here's the cockpit interior painted up and ready for fuselage assembly. Note the light chipping painted with interior green to represent the original interior colour under the new black finish.


Not much to say about the fit, as it's great. Not flawless, but quite close. The only places that needed filling and sanding were the left wingroot near the leading edge of the wing and the underside fuselage-wing seam where there was slight gaps. The fit of the stabilizer locating tabs was a bit loose out of the box, so I used a piece of 0,2mm styrene sheet to make it snugger.


The cowling panel line on the nose wasn't depicted in the kit, so I scaped the edges of the fuselage halves prior to assembly to make the recessed line and pressed on the rivet detail with a needle after assembly.
There I was ready for primer. Turned out to be that inevitable little disaster for this model (just hoping it's the first AND the last...).
Starting with the spinner, I had already tried out airbrushing several metallics over a grey spray primer, but I felt it could look better. So I stripped off the paint from the parts once more and tried a gloss black spray paint. My test spraying on a piece of gloss cardboard went on smoothly, but on the actual kit parts, the finish developed some inexplainable roughness, like fingerprints.
Obviously not wanting to risk ruining the rest of the kit with that, I grabbed a can of grey primer, with the idea of applying a light coat, then airbrushing black acrylic to make the actual primer surface for the metallic coating. I of course just had to grab that one can of sorry excuse for a primer I should have thrown away a long time ago...

^ The seat assembly snapped off while handling the model. I'll glue it back in later.

This is just bizarre stuff. Despite being sprayed relatively close to the surface, it seems to dry on the way, making a rough finish. And despite not covering well with a few light coats, it nevertheless finds a way to fill in recessed details. Needless to say, I wasn't amused, having to rescribe some panel lines and open up recessed rivets.
I sure wish HLJ would still ship those Mr. Surfacer spray cans overseas...
Fortunately, this stuff I used seems to sand and buff pretty well so I think I can airbrush the black over it.
Note to self: get rid of that can of junk already...
Now off to sand and buff those spinner parts some more for a decent finish. And getting rid of that rubbish primer!
Here's the cockpit interior painted up and ready for fuselage assembly. Note the light chipping painted with interior green to represent the original interior colour under the new black finish.
Not much to say about the fit, as it's great. Not flawless, but quite close. The only places that needed filling and sanding were the left wingroot near the leading edge of the wing and the underside fuselage-wing seam where there was slight gaps. The fit of the stabilizer locating tabs was a bit loose out of the box, so I used a piece of 0,2mm styrene sheet to make it snugger.
The cowling panel line on the nose wasn't depicted in the kit, so I scaped the edges of the fuselage halves prior to assembly to make the recessed line and pressed on the rivet detail with a needle after assembly.
There I was ready for primer. Turned out to be that inevitable little disaster for this model (just hoping it's the first AND the last...).
Starting with the spinner, I had already tried out airbrushing several metallics over a grey spray primer, but I felt it could look better. So I stripped off the paint from the parts once more and tried a gloss black spray paint. My test spraying on a piece of gloss cardboard went on smoothly, but on the actual kit parts, the finish developed some inexplainable roughness, like fingerprints.
Obviously not wanting to risk ruining the rest of the kit with that, I grabbed a can of grey primer, with the idea of applying a light coat, then airbrushing black acrylic to make the actual primer surface for the metallic coating. I of course just had to grab that one can of sorry excuse for a primer I should have thrown away a long time ago...
^ The seat assembly snapped off while handling the model. I'll glue it back in later.
This is just bizarre stuff. Despite being sprayed relatively close to the surface, it seems to dry on the way, making a rough finish. And despite not covering well with a few light coats, it nevertheless finds a way to fill in recessed details. Needless to say, I wasn't amused, having to rescribe some panel lines and open up recessed rivets.
I sure wish HLJ would still ship those Mr. Surfacer spray cans overseas...
Fortunately, this stuff I used seems to sand and buff pretty well so I think I can airbrush the black over it.
Note to self: get rid of that can of junk already...
Now off to sand and buff those spinner parts some more for a decent finish. And getting rid of that rubbish primer!

Charlie-66
#186
Joined: May 24, 2006
KitMaker: 771 posts
Armorama: 750 posts
Posted: Friday, February 11, 2011 - 04:58 AM UTC
Quoted Text
The jarheads welded some form of rail to the sides allowing transport of a lot of ammo. .30 cal was the basic load as the grunts required it as well.
I recently finished a book called "Marine Corps Tank Battles in Korea". In it the author mentioned the practice of turning Pershing fenders upside down so that the lip on the bottom was facing up. They would load the fenders with 30 Cal ammo cans so their supporting infantry could grab a resupply right offf the outside of the tank.

Dangeroo
#023
Joined: March 13, 2009
KitMaker: 2,058 posts
Armorama: 1,656 posts
Posted: Sunday, February 13, 2011 - 12:47 AM UTC
Eetu, nice progress on the F-51. Sorry about the primer. Looking forward to more progress!
Guy, makes sense to have ammo for the supporting infantry, especially with the Communist tactics of mass attack. Never thought of that, always thought it was for the tank.
Cheers!
Stefan
Guy, makes sense to have ammo for the supporting infantry, especially with the Communist tactics of mass attack. Never thought of that, always thought it was for the tank.
Cheers!
Stefan
 |

WEB HOSTING BY


Copyright ©2021 Armorama and Kitmaker Network, a subsidiary of Silver Star Enterprises
All Rights Reserved. Please read our Conditions of Use and Privacy Policy.
All Rights Reserved. Please read our Conditions of Use and Privacy Policy.