Texas, United States
Joined: March 17, 2006
KitMaker: 1,117 posts
Armorama: 1,115 posts
Posted: Thursday, May 20, 2010 - 07:14 AM UTC
Well just a small update for today, Ive just finish added the last of the details to the rear hull. All new retaining straps and clamps have been added to the fuel drum mounts. I decide to mount one drum and leave the other empty as I can't find any real pictures of the drums even being mounted and most of the info I can find suggest they are used for storage of personal gear and what not. As usual, plastic and brass wire was used for the construction. The location for the ditching beam has new straps in place and the beam left out to give the tank a more used look. Now I can move onto building the next fender which is a little bit changeling since I have to plum all the fuel line for the tanks. Happy modeling everyone and thanks for all the great comments so far.
Chris


On the workbench:
T-62M
ZTZ 99 MBT
Lav-25A2 with MILES Gear
M7 Priest X2
Illinois, United States
Joined: March 29, 2009
KitMaker: 1,135 posts
Armorama: 1,030 posts
Posted: Thursday, May 20, 2010 - 12:17 PM UTC
Very nice detail work!
I've been watching and will continue to watch
Currently taking back the fight to beat modeling ADD
Texas, United States
Joined: March 17, 2006
KitMaker: 1,117 posts
Armorama: 1,115 posts
Posted: Friday, May 21, 2010 - 08:37 AM UTC
On the workbench:
T-62M
ZTZ 99 MBT
Lav-25A2 with MILES Gear
M7 Priest X2
Texas, United States
Joined: March 17, 2006
KitMaker: 1,117 posts
Armorama: 1,115 posts
Posted: Friday, May 21, 2010 - 04:46 PM UTC
Well I just completed the rear fuel tanks with all new mounts and grab handles and even plumed one of the fuel lines. I would like so comments on how the fuel line looks so far? Im sure Ive could of went with an aftermarket part from mig or someone, but Im trying to do everything myself with very little premade parts. The only aftermarket I plan to use is the new metal tracks Im assembling right now and of course crew for the tank.
Chris


On the workbench:
T-62M
ZTZ 99 MBT
Lav-25A2 with MILES Gear
M7 Priest X2
New Jersey, United States
Joined: October 28, 2006
KitMaker: 491 posts
Armorama: 462 posts
Posted: Sunday, May 23, 2010 - 07:24 AM UTC
The fuel lines look great. I like the way the mounts and grab handles came out, too. Do you happen to know off hand what gauge wire you used?
Chris
On the workbench:
Mk II Male, Takom Conversion
Hobby Boss T-18
Texas, United States
Joined: March 17, 2006
KitMaker: 1,117 posts
Armorama: 1,115 posts
Posted: Sunday, May 23, 2010 - 02:08 PM UTC
On the workbench:
T-62M
ZTZ 99 MBT
Lav-25A2 with MILES Gear
M7 Priest X2
Texas, United States
Joined: March 17, 2006
KitMaker: 1,117 posts
Armorama: 1,115 posts
Posted: Wednesday, May 26, 2010 - 08:14 AM UTC
On the workbench:
T-62M
ZTZ 99 MBT
Lav-25A2 with MILES Gear
M7 Priest X2
Texas, United States
Joined: March 08, 2010
KitMaker: 2,465 posts
Armorama: 2,383 posts
Posted: Wednesday, May 26, 2010 - 11:35 AM UTC
hi cristopher
what a fantastic build! i love tha fuel tank handles & plumbing.cant wait to see more. great job fellow Texan!
Gary
Minnesota, United States
Joined: March 04, 2003
KitMaker: 4,630 posts
Armorama: 4,498 posts
Posted: Wednesday, May 26, 2010 - 01:56 PM UTC
VERY nice work. Keep it up, I am watching this thread with interest. I will use some of your work on my T-62 when I build it.
Ex-34th ID MNANG - 13F and 63D
"Fire For Effect."
Texas, United States
Joined: March 17, 2006
KitMaker: 1,117 posts
Armorama: 1,115 posts
Posted: Wednesday, May 26, 2010 - 03:31 PM UTC
Thanks for all the great comments from everyone!!!! This build has been a real joy for me and Im glad I share it with the world. Once Im finished with this build Im going to be working both a T-80 UD mod. 91 and a T-80 UDK and the build will be along the same line as this one, Im trying to build a serious of modern soviet tanks to take to an upcoming AMPS contest sometime this fall. I do want to put this T-62 on a small simple base with the idea of it running over a Georgian flag with the crew looking onto to a helpless civilian women trying to ward off the beast. Dougs original makes a great civilian holding up a broom and thought I would add some light humor on a sad time.
Chris
On the workbench:
T-62M
ZTZ 99 MBT
Lav-25A2 with MILES Gear
M7 Priest X2
South Carolina, United States
Joined: September 28, 2005
KitMaker: 778 posts
Armorama: 763 posts
Posted: Thursday, May 27, 2010 - 11:09 AM UTC
question for you why did you rebuild the fenders what was wrong with the kits?

Texas, United States
Joined: March 17, 2006
KitMaker: 1,117 posts
Armorama: 1,115 posts
Posted: Thursday, May 27, 2010 - 02:20 PM UTC
Hey David, there was nothing truly wrong with the kit's fender. They were the right dimensions, just a little overscaled and the fender supports were miss shaped in some areas and the only major drawback of the parts are the many injector pin marks and mounting holes on the bottom of the parts. Out of the box build they would be perfect, just too much work fill and sanding, just quicker for me to rebuild them instead.
Chris

On the workbench:
T-62M
ZTZ 99 MBT
Lav-25A2 with MILES Gear
M7 Priest X2
South Carolina, United States
Joined: September 28, 2005
KitMaker: 778 posts
Armorama: 763 posts
Posted: Thursday, May 27, 2010 - 02:42 PM UTC
thanks chris for the info this kit is on my wish list all pending on my wifes mood

can't wait to see how this is finshed
Texas, United States
Joined: March 17, 2006
KitMaker: 1,117 posts
Armorama: 1,115 posts
Posted: Thursday, May 27, 2010 - 02:54 PM UTC
Your welcome

Like I said it's not a bad kit at all, it just needs some improvements on it, it's worth the money. Besides ar there ever going to be any kits that are 100% correct? Probably not
On the workbench:
T-62M
ZTZ 99 MBT
Lav-25A2 with MILES Gear
M7 Priest X2
Texas, United States
Joined: March 17, 2006
KitMaker: 1,117 posts
Armorama: 1,115 posts
Posted: Thursday, May 27, 2010 - 06:03 PM UTC
Well just a very simple update for today, by far the easiest part I've made yet. Just finished adding the last of the rear fenders to the model, one side has the mounting points for the mud flap and the other side is damaged as to show a small piece of the fender missing with the support bracket still in place. Again the parts were just a bit thick and missing the support bracket on the underside. I also wanted to make some damage to the fender a bit. The weird thing is I have photos of different style mud flaps being used, some with straight truck style flaps and others with T-55 style flaps. Not sure if its just left over parts or what, but would make for something different to build.
Chris


On the workbench:
T-62M
ZTZ 99 MBT
Lav-25A2 with MILES Gear
M7 Priest X2
Texas, United States
Joined: March 17, 2006
KitMaker: 1,117 posts
Armorama: 1,115 posts
Posted: Friday, May 28, 2010 - 03:41 PM UTC
Well I just started working on the turret today and I just ran into a design flaw in the kit. Some that has been overlooked by many people, but the periscopes for the commanders hatch are not correct at all. Their undersized and not the correct shape at all. Nowhere in any of my references can I find anything the resembles what trumpeter made for the kit. Here is what the scopes should look like
.


Not like this
..

Its giving me a headache to remedy the problem, a simple solution what be to install the scopes and close the hatch, but I intend to open them up to put crew in it. So Im going to have to build all new ones with some modifies parts from my stash. I tried to use some of my left over scopes from other project, but nothing fits the bill straight from the parts bin. So some simple modification and a little imagination should fix the problem. I probably could pull parts from a T-55 kit, but Im trying to limit my aftermarket parts. I just thought I would share this over sight with everyone.
Chris
On the workbench:
T-62M
ZTZ 99 MBT
Lav-25A2 with MILES Gear
M7 Priest X2
England - South East, United Kingdom
Joined: August 05, 2009
KitMaker: 1,019 posts
Armorama: 933 posts
Posted: Saturday, May 29, 2010 - 10:28 AM UTC
Hi Chris, great progress on the build it's really shaping up and the super detailing is really expertly done.
About those periscopes, to me they look like clear inserts for a plastic kit part frame (Zvedza did this for example in their BMD-2). I haven't seen the sprues myself as I don't have this kit but it sure looks that way. Certainly would be odd if thats it...
If you want to make some easy periscopes though why not just get yourself a sheet of photo etch? Most Eduard sets for example have replacement periscopes, I'm taking some spare periscopes off an Aber T-55 PE set to make the periscopes in my BMP-2 interior. You could probably get a cheap sheet from Eduard or someone and just scavange the bits without having to spend too much.
By the way when are you going to start mounting that Slat armour?
Texas, United States
Joined: March 17, 2006
KitMaker: 1,117 posts
Armorama: 1,115 posts
Posted: Saturday, May 29, 2010 - 02:03 PM UTC
Hey Jon, actually Ive manage to solve the periscope issue!!!! Yes your right, the parts are very similar to what is in the BMD-2 kit as I started working on it by the 62, the only difference between the two is the fact there is a slight frame around the top of the scope. I ended up taking some left over parts from a Marder III project and cutting the tops off of them and building new bottoms. The scope for the marder a just a bit too long and would stick out like a sore thumb. The scopes in the kit would be fine with the hatches closed, but seeing I plan to open them up I had to fix them. I could of used some photo etch parts, but this project was going to be a totally scratch built affair for me. Besides Im not a real big fan of photo etch, just a pain in the butt to work with at times.
But from what you can see so far is Ive added small bits and piece with in the hatch like on the real thing. Locking pin and handle for the hatch ring. A switch on the side of the ring used for the spot light, new spade grip for the central scope and some sort of locking devise mounted off to the side of the clamp for the scope. Towards the front of the hatch I added the missing bezel ring and wiper for the glass.
To answer your question about the slats, Im not sure if I want to mount them now or during the painting stage. The armor for the hull is complete, but Im not sure if I want to risk breaking them while handling the model and it would making painting a little bit easier for me.
Chris


On the workbench:
T-62M
ZTZ 99 MBT
Lav-25A2 with MILES Gear
M7 Priest X2
Illinois, United States
Joined: March 29, 2009
KitMaker: 1,135 posts
Armorama: 1,030 posts
Posted: Sunday, May 30, 2010 - 05:16 PM UTC
Very nice work.
Could you offer any tips as to how you made the small parts? I always find these the most intimidating out of anything.
Currently taking back the fight to beat modeling ADD
Texas, United States
Joined: March 17, 2006
KitMaker: 1,117 posts
Armorama: 1,115 posts
Posted: Sunday, May 30, 2010 - 06:15 PM UTC
Well Sean, a really good pair of tweezers, very sharp x-acto blade, good lighting and steady hands. I mostly be using testor plastic cement ( stuff in a paint bottle) to glue with as is dries smooth and if the parts are too small for the tweers, I use the pointy end of the x-acto blade to pick the part up with. It takes me a couple of tries making part as I loose them or just don't look right. I don't even use a magnifying glass to work with. I even have a block of wood that sits on my desk that is painted a grey primer color so the parts stand out more. I hope this helps some.
Chris
On the workbench:
T-62M
ZTZ 99 MBT
Lav-25A2 with MILES Gear
M7 Priest X2
Texas, United States
Joined: March 17, 2006
KitMaker: 1,117 posts
Armorama: 1,115 posts
Posted: Sunday, May 30, 2010 - 06:20 PM UTC
oh yeh, one more tip, I tend to keep the plastic caps off of soda bottle a cheap from of work stand to use. I either put paint on the or supper glue instead of using it straight from the tube. Tooth picks also make a great source to apply supper glue to parts and don't cost too much and if too much glue builds up, just cut the ends off and you can continue working.
On the workbench:
T-62M
ZTZ 99 MBT
Lav-25A2 with MILES Gear
M7 Priest X2
Illinois, United States
Joined: March 29, 2009
KitMaker: 1,135 posts
Armorama: 1,030 posts
Posted: Sunday, May 30, 2010 - 08:13 PM UTC
Thanks!
Once I finish my T-62 I will try my luck with small parts on my T-72 builds...its always been my weakness
And keep up the good work!

Currently taking back the fight to beat modeling ADD
England - South East, United Kingdom
Joined: August 05, 2009
KitMaker: 1,019 posts
Armorama: 933 posts
Posted: Sunday, May 30, 2010 - 10:10 PM UTC
I agree with Chris, when gluing small parts I usually put a blob of super glue onto a flat surface (bit of old plastic or something) and apply the glue with an x-acto blade.
Makes precise application much easier, and since I don't have a soldering iron it's my only choice for my PE, and those parts are REALLY small!
Texas, United States
Joined: March 17, 2006
KitMaker: 1,117 posts
Armorama: 1,115 posts
Posted: Monday, May 31, 2010 - 05:27 AM UTC
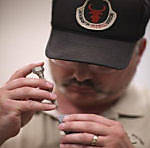
Hey Sean, here is another quick tip. If you are working with small parts and dont feel like holding onto them the whole time with tweezers, you can always mount the part on some sort of peg. I find that a tooth pick, plastic rod or even a push pin works best for holding the part. Simply drill a small hole in the base of the part or lightly tack with super glue and now you have a simple handle to use while painting or shaping or even adding detail. I included a picture of what Im talking about, simple and cheap. Yes there out tools you can buy on the market, but I dont have all week to wait for something to come in the mail or feel like traveling to a hobby shop.
Chris

On the workbench:
T-62M
ZTZ 99 MBT
Lav-25A2 with MILES Gear
M7 Priest X2
Texas, United States
Joined: March 17, 2006
KitMaker: 1,117 posts
Armorama: 1,115 posts
Posted: Monday, May 31, 2010 - 04:53 PM UTC
Well everyone, heres a little teaser of my new details on the commanders hatch. After looking at pictures of the real thing and scratching my head some, the details and shape of the hatch was really starting to bug me. Its a real shame it doesnt look anything like this picture.

I had to widen the periscope openings to except my new part and built new protective covers for them. Also the port like thing which Im guessing is for a signal flare or something was just poorly details, too shallow and long. So I built all new one from plastic and a homemade punch set. New grab handle was made from brass wire in place of the kit part. I then added the missing cast texture seen on the real deal with liquid cement.


Next up I had to work out the contours of the underside of the hatch as seen in this picture.

A paper template was made so I could test fit everything before cutting up plastic. Once I was happy with the result I proceeded to make a new ring from plastic with a couple of supports under it to provide a more stable working surface. Now Im just waiting for the squadron green putty to dry before I can start sanding to shape. After that is done I can start adding the rest of the periscopes, looking handles and the rest of the little items to it.


I think next time I tackle this kit I will cast a copy hatch from tamiyas T-55 or the detail set from cmk since their version is so much close to being correct in shape and detail. This may be a little bit of over kill, but since Ive already put so much time and detail in the rest of the kit, why over look something so simple to fix.
Chris
On the workbench:
T-62M
ZTZ 99 MBT
Lav-25A2 with MILES Gear
M7 Priest X2