England - South East, United Kingdom
Joined: August 05, 2009
KitMaker: 1,019 posts
Armorama: 933 posts
Posted: Thursday, June 17, 2010 - 10:40 AM UTC
Quoted Text
MiG Productions USA. It's cast very well, however the instructions are soooo tiny. There was a discussion on Jon's T-80 blog in which he and Chris were able to find a larger electronic version on their site in .pdf form.
Just make sure you go to Mig Productions.com the main spanish site and not USA. The downloads are there, and I totally agree Sean the instruction sheet in the kit is close to useless!

Excellent work so far this really looks good. Tomorrow I'm going to the Stalin Line Museum in Minsk and they have a T-72 there I plan to take LOTS of photos

Gary I wish that DML would do that too. It's odd given how they were the ones who made the Revell Zvesda reboxes. With the tech they have now they could make beautiful kits. Looks like it will be another T34 with a rear engine grill thats 2 degrees lower than last months release for some time though...

George lets hope the Zvezda T-90 is not just the old DML t-72 with another upgrade sprue huh?

California, United States
Joined: June 24, 2007
KitMaker: 503 posts
Armorama: 500 posts
Posted: Thursday, June 17, 2010 - 11:56 AM UTC
Quoted Text
George lets hope the Zvezda T-90 is not just the old DML t-72 with another upgrade sprue huh?
All new tool. They fancy it as factory blueprint based development. Tracks are probably going to be worth garbage bin though.
England - South East, United Kingdom
Joined: August 05, 2009
KitMaker: 1,019 posts
Armorama: 933 posts
Posted: Thursday, June 17, 2010 - 08:17 PM UTC
Quoted Text
All new tool. They fancy it as factory blueprint based development. Tracks are probably going to be worth garbage bin though.
Thats great, it'll be really interesting to see what they do with it then. Zvezda's recent German WW2 releases have been very good.
England - East Anglia, United Kingdom
Joined: October 09, 2005
KitMaker: 2,556 posts
Armorama: 2,199 posts
Posted: Wednesday, June 23, 2010 - 11:40 PM UTC
Only just seen this Sean, great work on the turret. The wiring came out really good!
As to modern Russian armor in plastic-well I certainly hope we dont see any soon, otherwise the £300 or so I just spent on miniarm T-72 updates will become pretty worthless

'As all else failed we raised our fists and weapons,
Not born as soldiers, but driven to the end'
Illinois, United States
Joined: March 29, 2009
KitMaker: 1,135 posts
Armorama: 1,030 posts
Posted: Thursday, June 24, 2010 - 04:35 AM UTC
Thanks for the comments everyone. I will be working on this very soon. I had to put the modern russian stuff down for a little beacause I was working on it so hard so I started a Leopard 2A6M. But I will be returning to this today or tomorrow.
Looking to finish the turret today or tomorrow
Currently taking back the fight to beat modeling ADD
Illinois, United States
Joined: March 29, 2009
KitMaker: 1,135 posts
Armorama: 1,030 posts
Posted: Wednesday, July 28, 2010 - 08:35 PM UTC
So a small update while I take a break from the Leopard 2A6M.
I attached the two stowage boxes. It wasn't that bad with references but man, Miniarm's instructions are terrible at best. References were a must! So for the most part I think I got it right.
To attach the center one I had to do a little carving into the turret but it turned out great and made the boxes much more sturdy. I also joined the two halves of the storage tube so I will sand that and get that attached in the morning. Then getting on with wiring the other fixtures on the turret and lastly adding the smoke dischargers!
Here are some photos:


As always, thanks for looking!

Currently taking back the fight to beat modeling ADD
Illinois, United States
Joined: March 29, 2009
KitMaker: 1,135 posts
Armorama: 1,030 posts
Posted: Thursday, July 29, 2010 - 04:12 PM UTC
Currently taking back the fight to beat modeling ADD
Texas, United States
Joined: June 29, 2010
KitMaker: 5,854 posts
Armorama: 4,817 posts
Posted: Thursday, July 29, 2010 - 05:54 PM UTC
Wish you would leave that hatch open to show the nice detail inside, but that would involve doing some extra work. Really liking the build this far.
Removed by original poster on 07/30/10 - 05:57:20 (GMT).
Illinois, United States
Joined: March 29, 2009
KitMaker: 1,135 posts
Armorama: 1,030 posts
Posted: Thursday, July 29, 2010 - 06:56 PM UTC
Quoted Text
Wish you would leave that hatch open to show the nice detail inside, but that would involve doing some extra work. Really liking the build this far.
I want to leave one of the hatches open but that would be an insane amount of work I don't think I have the skills for. I think either the commander or gunner will be sticking out of the vehicle but we shall see what happens to that idea.
And thanks for the kind words!
Currently taking back the fight to beat modeling ADD

#284
Northern Ireland, United Kingdom
Joined: October 04, 2006
KitMaker: 3,094 posts
Armorama: 2,942 posts
Posted: Friday, July 30, 2010 - 12:42 AM UTC
This is really shaping up. Keep up the good work.
On The Bench:
Ethiopian BMP-1 (Trumpeter 1/35)
AMX-13/75 (Takom 1/35)
Illinois, United States
Joined: March 29, 2009
KitMaker: 1,135 posts
Armorama: 1,030 posts
Posted: Friday, July 30, 2010 - 03:36 AM UTC
Quoted Text
This is really shaping up. Keep up the good work.
Thank you very much. I'm dreading work on the hull because I don't know how I will approach certain aspects like the retaining straps and certain sections of fuel lines and things like that.

Currently taking back the fight to beat modeling ADD
Ireland
Joined: January 28, 2010
KitMaker: 89 posts
Armorama: 47 posts
Posted: Friday, July 30, 2010 - 04:02 AM UTC
Hi Mate, this looks fantastic. Know what you mean by the hull details alright. The rear of the engine deck needs serious work to be accurate, and you have started into those retaining straps so ya gotta follow through!
At least the SP Designs hull front gives you the front bin lid the right way around.
By the way, in general how would you rate the SP front hull replacement? I used the Miniarm one on my T-90, and it was a very good fit!
As a guy who has several T-72 kits in various stages of build, and also dreading the hull detailing, I'm really looking forward to your progress on this!
Thanks for sharing it looks great!
Glen
England - East Anglia, United Kingdom
Joined: October 09, 2005
KitMaker: 2,556 posts
Armorama: 2,199 posts
Posted: Friday, July 30, 2010 - 04:34 AM UTC
This is looking wonderful Sean. Your work so far is top notch and looking very clean.
I'll try to help you out with some of the finer details. Ive just begun detailing the rear engine deck, so if you keep an eye on my T-72 build blog in the next few hours I will upload some useful pictures which should be of help to you.
As to the retaining straps-I post a quick SBS in the Russian forum in the next few minutes!
'As all else failed we raised our fists and weapons,
Not born as soldiers, but driven to the end'
Illinois, United States
Joined: March 29, 2009
KitMaker: 1,135 posts
Armorama: 1,030 posts
Posted: Friday, July 30, 2010 - 08:23 AM UTC
Thanks everyone. And also thanks to Rob's post I can go on making the straps as soon as I get a hold of the hollow brass wire.
Currently taking back the fight to beat modeling ADD
Illinois, United States
Joined: March 29, 2009
KitMaker: 1,135 posts
Armorama: 1,030 posts
Posted: Friday, July 30, 2010 - 08:39 AM UTC
Quoted Text
Hi Mate, this looks fantastic. Know what you mean by the hull details alright. The rear of the engine deck needs serious work to be accurate, and you have started into those retaining straps so ya gotta follow through!
At least the SP Designs hull front gives you the front bin lid the right way around.
By the way, in general how would you rate the SP front hull replacement? I used the Miniarm one on my T-90, and it was a very good fit!
As a guy who has several T-72 kits in various stages of build, and also dreading the hull detailing, I'm really looking forward to your progress on this!
Thanks for sharing it looks great!
Glen
Thanks alot for the kind words Rob and Glen!
The SP Designs plate wasn't hard to work with. The hardest part was the first hull I got was way oversized, but my replacement was almost prefect off the bat. Just a little sanding and filling here and there.
Other than that the Miniarm turret has been pretty nice and straight forward besides the instructions.
Currently taking back the fight to beat modeling ADD
Illinois, United States
Joined: March 29, 2009
KitMaker: 1,135 posts
Armorama: 1,030 posts
Posted: Friday, July 30, 2010 - 08:03 PM UTC
The turret is almost complete. I only had an hour or so to do work today but things are starting to move like clockwork.
Here are some photos:


And one of the figures I plan on using: It's Warriors Chechen Rebel, which is beautifully cast and well detailed. I have never painted any type of camo but I suppose you have to start somewhere.

As always, thanks for looking!
Sean
Currently taking back the fight to beat modeling ADD
Illinois, United States
Joined: March 29, 2009
KitMaker: 1,135 posts
Armorama: 1,030 posts
Posted: Friday, July 30, 2010 - 08:09 PM UTC
And the brass wire is just added to see how it may look...nothing permanent

Currently taking back the fight to beat modeling ADD
Illinois, United States
Joined: March 29, 2009
KitMaker: 1,135 posts
Armorama: 1,030 posts
Posted: Saturday, July 31, 2010 - 08:27 PM UTC
Hello everyone!
I think I've hit a nice stride with this project and as I set goals for a day things are getting accomplished.
Today's goal was to get the wheels assembled and see how I wanted to pose the vehicle so everything except the turret is dry fitted.
However, all the T-72 experts, can someone provide me a photo of this area? 
I'm leaving the fenders off and this just doesn't seem right to me and I feel like it could be seen so I have to do something with it.
Other than that, here are some progress shots:


And a fun comparison shot of a T-72 next to a Challenger 2 and Leopard 2A6M. I never really had a feel as to how low this vehicle really was.

Lastly, I found this sign of Grozny really interesting and plan on incorporating this some how.

Thats all for tonight!
Thanks for looking and comments and suggestions are welcomed as always!
Sean
Currently taking back the fight to beat modeling ADD
Victoria, Australia
Joined: November 03, 2008
KitMaker: 294 posts
Armorama: 291 posts
Posted: Saturday, July 31, 2010 - 09:51 PM UTC
HI mate,
here are some shots that I hope will help.


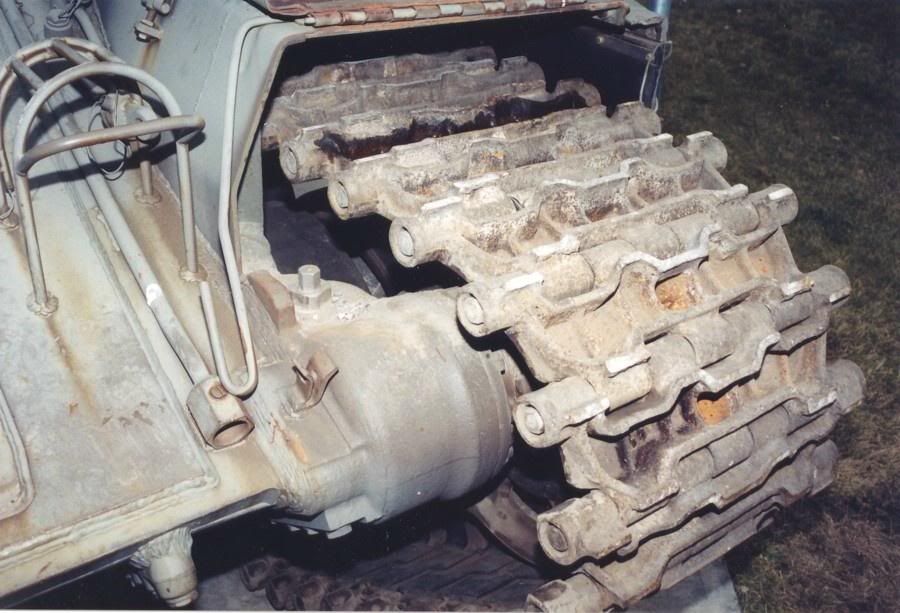
Sam
Illinois, United States
Joined: March 29, 2009
KitMaker: 1,135 posts
Armorama: 1,030 posts
Posted: Sunday, August 01, 2010 - 02:31 AM UTC
Currently taking back the fight to beat modeling ADD
Illinois, United States
Joined: March 29, 2009
KitMaker: 1,135 posts
Armorama: 1,030 posts
Posted: Sunday, August 01, 2010 - 04:08 PM UTC
After those pictures I still can't find pictures showing what I'm specifically looking for. I outlined the specific portion I was referring to.

Thanks in advance for the help
:-H
Sean
Currently taking back the fight to beat modeling ADD
Texas, United States
Joined: March 17, 2006
KitMaker: 1,117 posts
Armorama: 1,115 posts
Posted: Sunday, August 01, 2010 - 04:17 PM UTC
Hey Sean, I know the exact spot you are talking about. Give me just a little while to look through my hard drive and I should have something within my T-72 files that should help some.
Chris
On the workbench:
T-62M
ZTZ 99 MBT
Lav-25A2 with MILES Gear
M7 Priest X2
Texas, United States
Joined: March 17, 2006
KitMaker: 1,117 posts
Armorama: 1,115 posts
Posted: Sunday, August 01, 2010 - 04:46 PM UTC
Hey Sean, this should help some. These pictures are from some of the walkarounds off of this website.
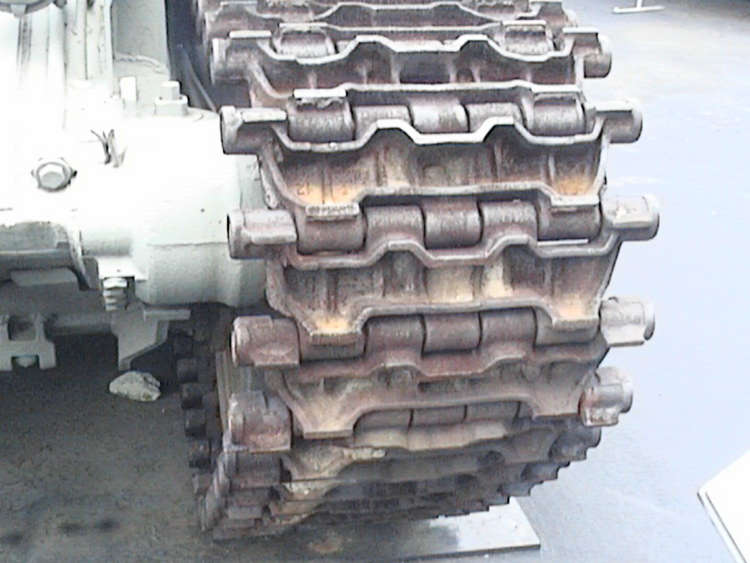
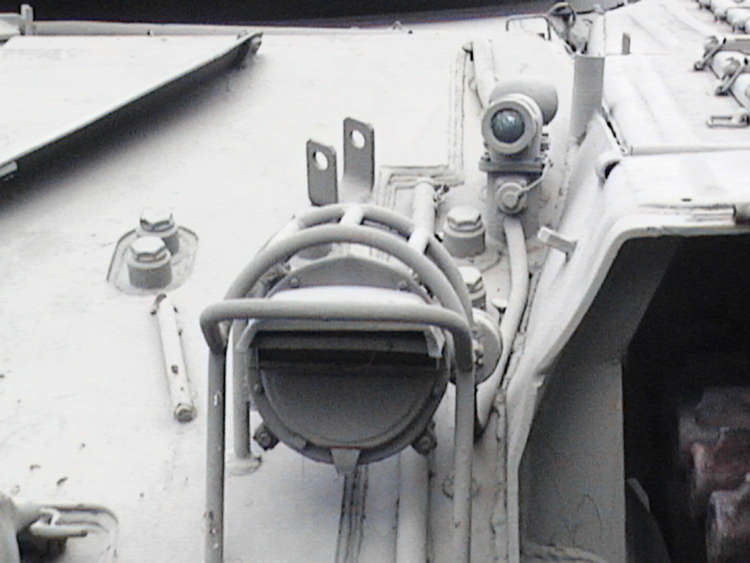

The area you have in question should be flat, The front hull plate would extend to the edge of the ide of the hull. As you can also sie some what, there is a fender support bracket that sits ontop of the plate. Not sure if this helps any, but it's the best can come up with as I doing the exact thing to my T-72 but battle damage instead.
Chris
On the workbench:
T-62M
ZTZ 99 MBT
Lav-25A2 with MILES Gear
M7 Priest X2
#284
Northern Ireland, United Kingdom
Joined: October 04, 2006
KitMaker: 3,094 posts
Armorama: 2,942 posts
Posted: Monday, August 02, 2010 - 04:52 AM UTC
RE: Your figure camo. Use Andrea or Vallejo or some other good type of paint recommended for figures. Stay away from Tamiya! Keep the coats thin and get plenty of reference (I use about four shots of camo for one 1/35 figure- it really does help). I would say be creative though, rebels don't wear standard uniforms so I would say make it interesting and do what you want. Nobody can really say its wrong.
By the way, I love that comparison shot. I too never realised just how low (and seemingly small) the T-72 really is.
Good luck with the rear deck and that front bit.
On The Bench:
Ethiopian BMP-1 (Trumpeter 1/35)
AMX-13/75 (Takom 1/35)