
Hosted by Jacques Duquette
KV-1 Model 1941
BillGorm

Joined: November 02, 2009
KitMaker: 609 posts
Armorama: 433 posts

Posted: Tuesday, September 14, 2010 - 07:58 AM UTC
Hellhound - I forgot to say that I just walked through your feature build of the HMCS Snowberry on the ModelShipwrights site. THAT is fantastic work, my friend! 

bmikk1

Joined: February 15, 2008
KitMaker: 199 posts
Armorama: 136 posts

Posted: Tuesday, September 14, 2010 - 10:15 AM UTC
Bill, I love the chipping effect, you did a great job layering them with paint, primer, and rust. I agree with your point that the lifespan of these vehicles was measured in days or weeks, but the blocky chunky design lends itself to this kind of extreme weathering. Personaly I like the "artistic" aproach and think you are on the right track for a stunning model. Looking forward to more updates.

BBD468

Joined: March 08, 2010
KitMaker: 2,465 posts
Armorama: 2,383 posts

Posted: Thursday, September 16, 2010 - 04:23 PM UTC
Hi Bill,
your KV is looking great. i think you nailed it on tha chipping effect looks awesome! looking forward to see more.
Gary
your KV is looking great. i think you nailed it on tha chipping effect looks awesome! looking forward to see more.

Gary
BillGorm

Joined: November 02, 2009
KitMaker: 609 posts
Armorama: 433 posts

Posted: Friday, September 17, 2010 - 02:35 AM UTC
Hi Brandon / Gary - Thanks for the good words about the chips. I think they're too big and obvious in many cases but I look forward to seeing how the rest of the weathering steps blend them in and tone them down. Next step is fading with Humbrol enamels (something I haven't done before). I'm practicing on an old T-34 turret at the moment but posted a couple photos in the Painting forum.
BillGorm

Joined: November 02, 2009
KitMaker: 609 posts
Armorama: 433 posts

Posted: Sunday, September 19, 2010 - 04:21 AM UTC
I've been experimenting with dry brushing enamels to achieve a faded / discolored effect and although I'm getting the hang of building up the paint slowly, I keep getting a gloss effect. I'm using Humbrol paint, which I'm taking care to stir REALLY well, and I've double checked that all the paints are matte. Can some of the folks who use Humbrol paints take a look at the photos below and weigh in on what I'm doing wrong here?
This first photo shows the paint I've carefully built up to achieve a discolored effect (the panel with the "12"). In this light the discoloration is clearly visible:

In the next two photos I've tilted the turret to the light and the gloss relative to the surrounding paint becomes evident:


This last photo shows the same effect on the bottom of a test vehicle:

Any input / advice would be welcome as I'm hesitant to proceed until I understand this better. If I can't figure it out, then perhaps I'll switch to oil paints instead. Thank you!
This first photo shows the paint I've carefully built up to achieve a discolored effect (the panel with the "12"). In this light the discoloration is clearly visible:

In the next two photos I've tilted the turret to the light and the gloss relative to the surrounding paint becomes evident:


This last photo shows the same effect on the bottom of a test vehicle:

Any input / advice would be welcome as I'm hesitant to proceed until I understand this better. If I can't figure it out, then perhaps I'll switch to oil paints instead. Thank you!
daffyduck

Joined: September 07, 2006
KitMaker: 164 posts
Armorama: 155 posts

Posted: Tuesday, September 21, 2010 - 03:48 PM UTC
Bill,
I've used the same technique of dry brushing before on a JS III build but never noticed it glossing.
Maybe the paint is not really Matte, but semi-gloss? What is the base coat, enamel?
You can try adding talcum/baby powder to matte the paint more.
Paul
I've used the same technique of dry brushing before on a JS III build but never noticed it glossing.
Maybe the paint is not really Matte, but semi-gloss? What is the base coat, enamel?
You can try adding talcum/baby powder to matte the paint more.
Paul

vonHengest

Joined: June 29, 2010
KitMaker: 5,854 posts
Armorama: 4,817 posts

Posted: Tuesday, September 21, 2010 - 07:22 PM UTC
Quoted Text
Hellhound - Totally agree about getting things right the second time around. Usually I just move on to the next model when I'm done, but this time I'm documenting my mistakes, things to do differently, etc. to save alongside Neil's "recipe". That way when I come back to this kit for the KV campaign I'll be in good shape. Speaking of which, if anyone would be interested in my notes, I'll be happy to share them when I'm done.
I would definitely be interested in your notes Bill

I'm not sure that I would go as far as relegating your KV-1 to a dark closet space. Don't worry too much about the minor imperfections, just keep focusing on your painting techniques and nobody is really going to notice them by the time you're done

BillGorm

Joined: November 02, 2009
KitMaker: 609 posts
Armorama: 433 posts

Posted: Wednesday, September 22, 2010 - 02:42 AM UTC
Paul - The base coat is Vallejo Model Air with roughly 10% Vallejo Model Air gloss mixed in. I've heard that talcum powder helps (or, as Juan suggests, using the thick stuff at the bottom of the tin), but I was hoping to stir my way to success. What I don't understand is why the test swatches on the left in my last photo (all applied straight out of the stirred tins) dried matte, but the dry brushed area on the right came out glossy. Have you found that enamels change when "over worked"?
Jeremy - The notes are basically just a compilation of this blog, but I can save you the trouble. If I do re-make this one for the KV-1 campaign, I might go way out of the box and apply a camo scheme similar to the Bismarck ... or as seen here on the F-16's from the 18th Aggressor Squadron: http://www.tamiya.com/english/products/61106f16c_n/index.htm
Jeremy - The notes are basically just a compilation of this blog, but I can save you the trouble. If I do re-make this one for the KV-1 campaign, I might go way out of the box and apply a camo scheme similar to the Bismarck ... or as seen here on the F-16's from the 18th Aggressor Squadron: http://www.tamiya.com/english/products/61106f16c_n/index.htm

vonHengest

Joined: June 29, 2010
KitMaker: 5,854 posts
Armorama: 4,817 posts

Posted: Wednesday, September 22, 2010 - 07:24 AM UTC
Wow, that's going to be interesting Bill! I'd love to see those colors applied in the Bismark or Alaskan Aggressor pattern 
Regarding enamels, be aware that what you experienced can easily happen if the paint isn't mixed thoroughly enough.
*will be testing out the Black4Track when I get home early next week.

Regarding enamels, be aware that what you experienced can easily happen if the paint isn't mixed thoroughly enough.
*will be testing out the Black4Track when I get home early next week.
Vartotojas

Joined: May 12, 2010
KitMaker: 30 posts
Armorama: 27 posts

Posted: Wednesday, September 29, 2010 - 06:55 PM UTC
Pretty nice build so far. I think I'm gonna go for some KV too. So I wanted to ask which Trumpeter Russian KV is most accurate (found these):
1/35 Russia KV Big Turret (TP00311);
1/35 Russia KV-2 Tank (TP00312);
1/35 KV-1 (Model 1941) Small Turret Tank (TP00356);
1/35 Russia KV-1 Ehkranami (TP00357);
1/35 Russia KV-1 model 1942 Simplified Turret Tank (TP00358);
1/35 KV-1 1942 Heavy Cast Turret Tank (TP00359);
1/35 Russia KV-1 Model 1942 Lightweight Cast Tank (TP00360).
Oh, and thanks for the inspiration. Looking forward to see final result.
BillGorm

Joined: November 02, 2009
KitMaker: 609 posts
Armorama: 433 posts

Posted: Thursday, September 30, 2010 - 01:13 AM UTC
Lietuvis - I'm not an expert on the KV series of tanks, but if you visit www.4bogreen.com you'll find plenty of information on the Trumpeter kits, including guidance on how to "accurize" whichever one you choose. I selected TP00359 because I understood the kit was fundamentally accurate OOTB. I also prefer the look of the cast turret, but that's purely personal preference.
Good luck!
Good luck!
Vartotojas

Joined: May 12, 2010
KitMaker: 30 posts
Armorama: 27 posts

Posted: Thursday, September 30, 2010 - 02:46 AM UTC
Quoted Text
Lietuvis - I'm not an expert on the KV series of tanks, but if you visit www.4bogreen.com you'll find plenty of information on the Trumpeter kits, including guidance on how to "accurize" whichever one you choose. I selected TP00359 because I understood the kit was fundamentally accurate OOTB. I also prefer the look of the cast turret, but that's purely personal preference.
Good luck!
Thanks for the information. I'll check www.4bogreen.com.
BillGorm

Joined: November 02, 2009
KitMaker: 609 posts
Armorama: 433 posts

Posted: Tuesday, October 05, 2010 - 04:51 PM UTC
It's been a while since my last update, so here's what I've been doing:
Per Mike's SBS, the next step in the weathering process was to dry brush on enamels to add life to the base coat. I haven't worked with enamels before, so I spent a lot of time experimenting on a scrap T-34 before going to work on the KV-1. I had a tough time finding the right balance between building up the paint slowly and not over-working it to the point where it took on a polished look. After a while, I realized I was applying too little paint rather than too much because I was so focused on working slowly. Anyway, as you can see from the following photos, I got it right in some areas and completely wrong in others. Even so, done right I can see how this is a powerful alternative to post shading and/or oil paints.


As always, comments welcome!
Per Mike's SBS, the next step in the weathering process was to dry brush on enamels to add life to the base coat. I haven't worked with enamels before, so I spent a lot of time experimenting on a scrap T-34 before going to work on the KV-1. I had a tough time finding the right balance between building up the paint slowly and not over-working it to the point where it took on a polished look. After a while, I realized I was applying too little paint rather than too much because I was so focused on working slowly. Anyway, as you can see from the following photos, I got it right in some areas and completely wrong in others. Even so, done right I can see how this is a powerful alternative to post shading and/or oil paints.


As always, comments welcome!
Vartotojas

Joined: May 12, 2010
KitMaker: 30 posts
Armorama: 27 posts

Posted: Wednesday, October 06, 2010 - 09:34 PM UTC
For my eyes it's looking pretty good. Keep it up!
BillGorm

Joined: November 02, 2009
KitMaker: 609 posts
Armorama: 433 posts

Posted: Sunday, October 10, 2010 - 02:57 PM UTC
Thanks to Christopher Columbus and the long weekend here in the US, I've managed to get some work done on my KV-1. Per Mike's SBS, I mixed up three different shades of "dirt" using MIG Productions pigments and applied them to the turret and upper hull using the SBS photos as a guide. I built the pigments up in corners and along natural breaks like the fender brackets to simulate accumulated dirt, then fixed them with Tamiya acrylic thinner. In other areas I stippled pigments on dry to simulate dust. I'm generally happy with the results because this is much further than I've gone before with weathering. On the other hand, you can see in certain places (e.g. hull front and turret sides) where I lost control of the process and added too much. Ah, well ... next time. Anyway, here are a few photos of the model as it stands now on the simple base I made. As always, comments welcome!


vonHengest

Joined: June 29, 2010
KitMaker: 5,854 posts
Armorama: 4,817 posts

Posted: Sunday, October 10, 2010 - 03:31 PM UTC
If you are looking at this as a testbed for techniques to use during your next KV build, then I'd say this is pretty darn successful. I like the choice of base as well, fits perfectly 

BillGorm

Joined: November 02, 2009
KitMaker: 609 posts
Armorama: 433 posts

Posted: Monday, October 11, 2010 - 04:18 AM UTC
Hi Jeremy - This is model six or seven, so everything is still two steps forward, one step back ... which I'm cool with so long as I learn something new with each model. Have you seen Sergiusz Peczek's KV-2 build log on planetArmor? Here's a link if you're interested:
http://www.planetarmor.com/blogs/avbench.php?name=1621
Really inspirational work and it's gotten me interested in a KV-2 for the campaign.
Did you ever get around to applying Black4Track to your model?
http://www.planetarmor.com/blogs/avbench.php?name=1621
Really inspirational work and it's gotten me interested in a KV-2 for the campaign.
Did you ever get around to applying Black4Track to your model?

vonHengest

Joined: June 29, 2010
KitMaker: 5,854 posts
Armorama: 4,817 posts

Posted: Monday, October 11, 2010 - 05:20 AM UTC
I think most of us are in the same boat in that aspect 
No I haven't, I'll check out the link as soon as I get a chance. Sounds like good stuff!
I am actually working on it today, so you should see a photo by this evening if all goes well....

No I haven't, I'll check out the link as soon as I get a chance. Sounds like good stuff!
I am actually working on it today, so you should see a photo by this evening if all goes well....

vonHengest

Joined: June 29, 2010
KitMaker: 5,854 posts
Armorama: 4,817 posts

Posted: Tuesday, October 12, 2010 - 05:38 PM UTC
That was indeed good stuff Bill, thanks for sharing!
Now time for me to share my results with you
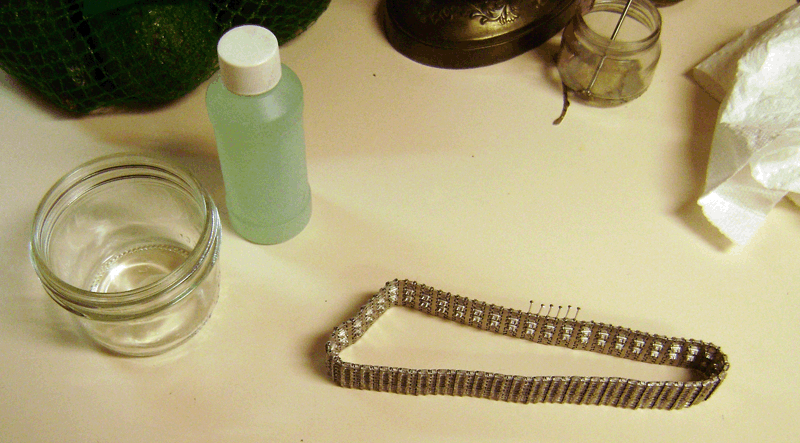
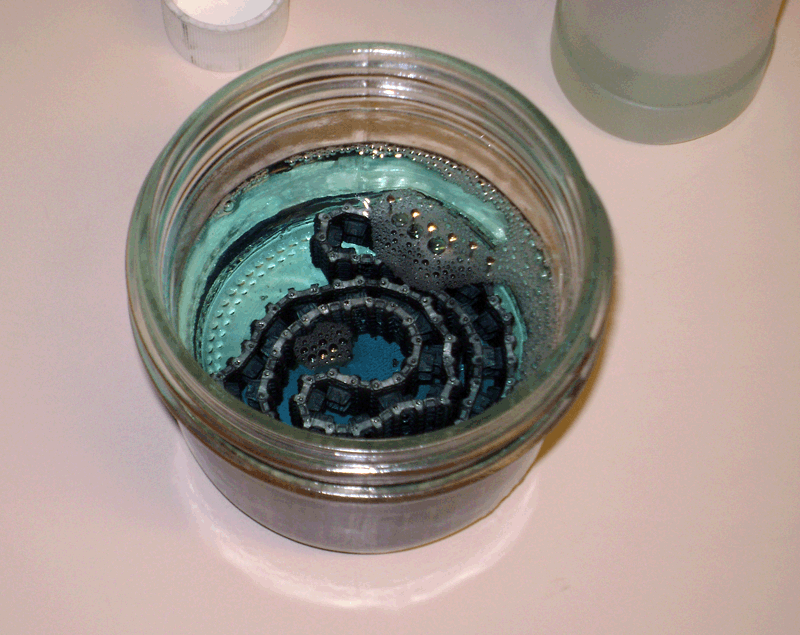
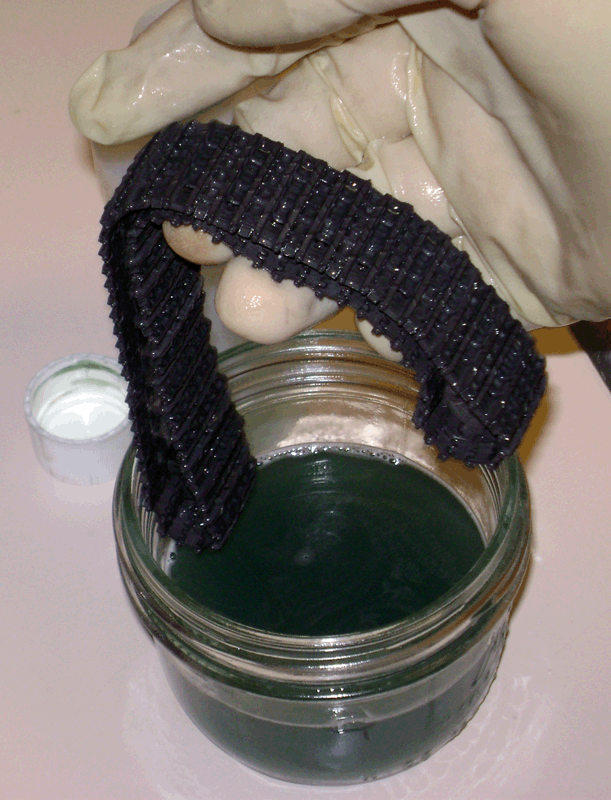
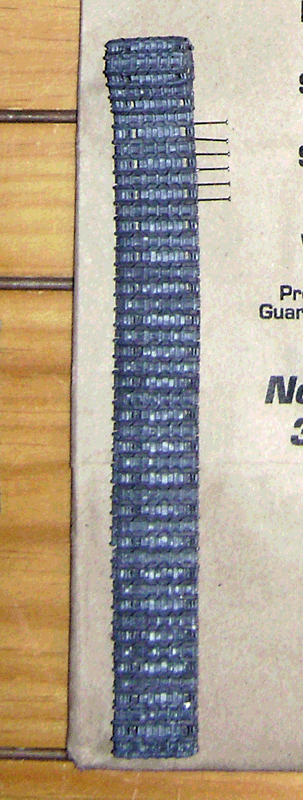
The tracks MUST be thoroughly cleaned with dishwashing detergent. It only takes about 15 seconds for the solution to blacken the tracks. The tracks come out very nicely and evenly blackened, and appear to dry lighter than they appear when whet. However I did rinse them down after soaking them in the solution, so I may have unintentionally lightened the track run myself. You can check out my full process in my Jagdtiger build. Let me know what you think
Now time for me to share my results with you


The tracks MUST be thoroughly cleaned with dishwashing detergent. It only takes about 15 seconds for the solution to blacken the tracks. The tracks come out very nicely and evenly blackened, and appear to dry lighter than they appear when whet. However I did rinse them down after soaking them in the solution, so I may have unintentionally lightened the track run myself. You can check out my full process in my Jagdtiger build. Let me know what you think

BillGorm

Joined: November 02, 2009
KitMaker: 609 posts
Armorama: 433 posts

Posted: Wednesday, October 13, 2010 - 04:24 AM UTC
Hi Jeremy - All three of your photos, especially the last one, have a blue-ish tint. Is that how the tracks look in person or is that the lighting / exposure? I like the fact that you can re-use Black4Track, it's less expensive, and it's less toxic (I think). But it doesn't sound like it provides the same degree of control as Blacken-It (i.e. how dark your tracks get) or produces the same variations in color that make the end result so realistic. I'm sure I'll give Black4Track a shot in the future, but for now I'm going to keep factoring the cost of a bottle of Blacken-It into the price of a set of Friuls. Thanks for sharing this!

vonHengest

Joined: June 29, 2010
KitMaker: 5,854 posts
Armorama: 4,817 posts

Posted: Wednesday, October 13, 2010 - 06:13 AM UTC
The bluish tint is the lighting/exposure, the tracks are actually a handsome warm brownish gray color. It's actually quite easy to lessen the blackening, just dip the tracks in for a few seconds instead of 15 seconds. You actually see the process at work, so it would be pretty easy to just pull them out when you like the color. I am actually going to dip my tracks again and see if I can get them a bit darker now that the solution has been recharged.
As for safety, the Black4Track solution is non-corrosive and should be safe to handle with your bare hands, I just chose to use a glove since I have never used this chemical before.
This is my first time using a blackening solution, and after researching the products available, this solution seemed to be the best overall. Also of note is that I can't find Blacken It locally.
Anyways this is all good stuff and it's quite fun to be learning about things. I can't wait to give the KV techniques a shot and see what I can come up with for the campaign

BillGorm

Joined: November 02, 2009
KitMaker: 609 posts
Armorama: 433 posts

Posted: Sunday, October 17, 2010 - 12:50 PM UTC
After more than three months of off and on again work, I'm calling this one 99% done. The remaining 1% is to replace the radio antenna and one of the turret lifting eyes, both of which snapped off at the last possible moment. I'll correct them both … just not right now. I enjoyed this build a lot and was happy to try a number of new things:
- Using Mr. Surfacer to create a cast appearance
- Adding gloss to the base coat rather than spraying Future later in the process
- Using dry brushed enamels as an alternative to pre-shading, post-shading, and/or oil paints
- Using multiple shades of pigments for greater realism
- Using Tamiya X-22 gloss to create wet spots (I've used linseed oil in the past)
The kit isn't quite Tamiya in terms of engineering, but it's very good and any construction issues are squarely on me. Speaking of which, I did make a number of dumb errors with this kit:
- I botched the driver's hatch despite it being called out on 4bogreen.com
- I forgot to paint the periscope lenses
- I primed the model from too far away and it left a grain on the model
I'm normally quite careful with construction, so I don't know what went wrong. Anyway, here my big takeaways from this build:
- The shade of green I used definitely looks odd, but since my objective was to follow Mike's SBS as closely as possible, I didn't give it a second thought. As MIke has told me (and I posted in an earlier note), his ISU-122 is a better guide color-wise
- I'm not impressed with Vallejo Model Air paints. They didn't cover well and they chipped very easily (e.g. on the tow cables from simple friction). I'll be going back to Mother Tamiya after this
- Adding gloss to the base coat and then using dry transfers allowed me to skip the Future - decals - Future routine. Maybe that isn't always an option (e.g. if you want to make one of the options OOTB), but it accelerated getting to the weathering stage and I have to believe a model is better with two fewer coats of anything on it
- I'm completely sold on chipping after this experience. I think it's over done many times and I certainly need to work on my own technique, but the artistic impact is undeniable
- I'm not sure what to make of Humbrol enamels. They're demanding and I had a tough time with them, but I do see how building them up slowly creates a subtle effect that would be difficult to achieve with an airbrush. I'm just not sure it's better than, say, oil paints
- Friuls are addictive. Shifting back to link-and-length tracks is going to be like the last time I came down from heroin
Finally, I'd like to thank Neil Stokes for his input and willingness to share his considerable knowledge of the KV series with me at all stages. I also want to thank Mike Rinaldi, who gave me input offline whenever I sought it. No matter what the question, he seems to know the answer.
So that's about it. I hope this was helpful for my fellow novice modellers out there. Here are some (nearly) final photos I snapped this afternoon. PLEASE let me know what you think - good or bad - since the whole point of this was to improve my skills.


BillGorm

Joined: November 02, 2009
KitMaker: 609 posts
Armorama: 433 posts

Posted: Friday, October 22, 2010 - 03:38 AM UTC
13,000+ views and no comments on the finished model? 
Come on you veteran modellers (I know you're out there!) ... how can I improve from here? Not fishing for compliments ... just want suggestions on how I can improve from here.


Come on you veteran modellers (I know you're out there!) ... how can I improve from here? Not fishing for compliments ... just want suggestions on how I can improve from here.

MrNeil

Joined: November 01, 2005
KitMaker: 266 posts
Armorama: 262 posts

Posted: Friday, October 22, 2010 - 04:07 AM UTC
Hi Bill,
The beast looks real good. The only suggestion I'd make is to put a heavier black wash into the mesh on the radiator intakes to bring out the detail, or preferably replace the styrene parts with the Eduard etched mesh on your next KV.
Look forward to seeing this one 'in the flesh' at the next local show.
Cheers,
Neil
 |


