Hi all, now Iīve received the long awaited kit.
The price is a bit higher than its sister-kit, (the bigger calibre howitzer), and double / twice as Trumpeterīs version of this gun, but has small additions or changes.
At the first look on some publications we can see, that the barrel has a nice rifeling inside. Also some other parts were re-designed.
On the decal-set, the word "Luftdurck" was corrected into "Luftdruck".
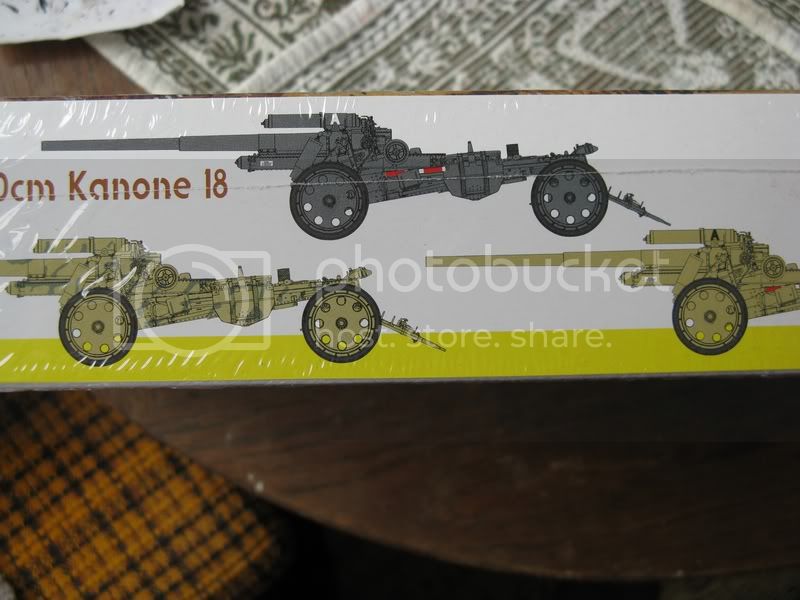
Possible camo-options are: dark-grey, dark-yellow and dark-yellow with dark-green patches/ marks.
But later we will see more.
Some years ago, my idea was "standing lonely" in a snowed landscape, which I finished some time ago. (including some ammo and wooden boxes)
So the next plan was a fire-position at the Atlantik-wall.
I found nice drawings and a few photos, which Iīll try to use.
Also some time ago, I wrote a complete build-feature for my Trumpeter-build, but got now answer about possible errors or corrections and possible additions of the text.
Using this version of the gun, perhaps I can re-work (change some parts) my build-feature.
Photos will follow soon, but were made some minutes ago. ;-)
greetings...
Soeren
Constructive Feedback
For in-progress or completed build photos. Give and get contructive feedback!
Hosted by Darren Baker, Dave O'Meara
Dragon s.10cm Kanone 18
Gorizont
Sachsen, Germany
Joined: November 28, 2007
KitMaker: 1,462 posts
Armorama: 1,289 posts
Joined: November 28, 2007
KitMaker: 1,462 posts
Armorama: 1,289 posts
Posted: Thursday, September 30, 2010 - 08:11 PM UTC
Gorizont
Sachsen, Germany
Joined: November 28, 2007
KitMaker: 1,462 posts
Armorama: 1,289 posts
Joined: November 28, 2007
KitMaker: 1,462 posts
Armorama: 1,289 posts
Posted: Friday, October 01, 2010 - 08:55 AM UTC
I donīt know about the facts of this problem, which I have now and the traffic is "normal"/ okay.
Only one image was uploadable to photobucket... this was this one.
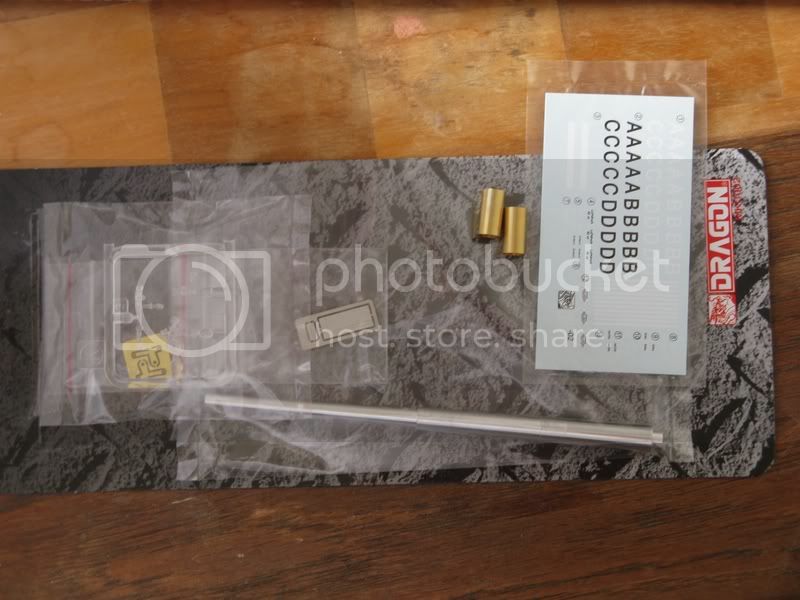
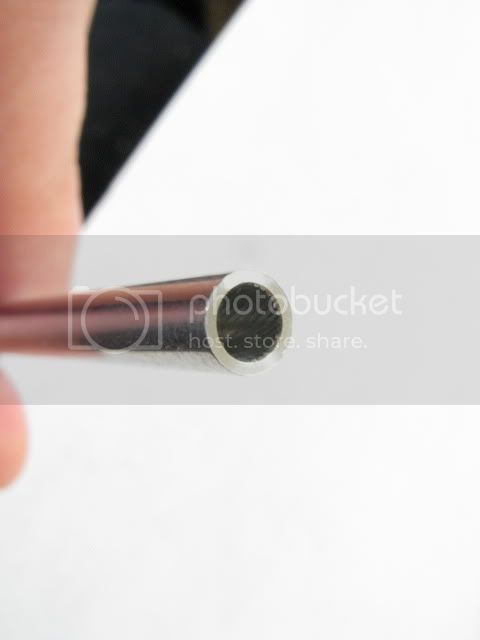
From the kit you can see the metal barrel, which has a nice rifeling inside, the 2 elevation tubes, some PE parts (including the "firing chart" -elevation to powderloads to range- (you know what I mean? but it looks good ) and the nice decal set.
greetings...
Soeren
Gorizont
Sachsen, Germany
Joined: November 28, 2007
KitMaker: 1,462 posts
Armorama: 1,289 posts
Joined: November 28, 2007
KitMaker: 1,462 posts
Armorama: 1,289 posts
Posted: Friday, October 01, 2010 - 09:07 AM UTC
small update:
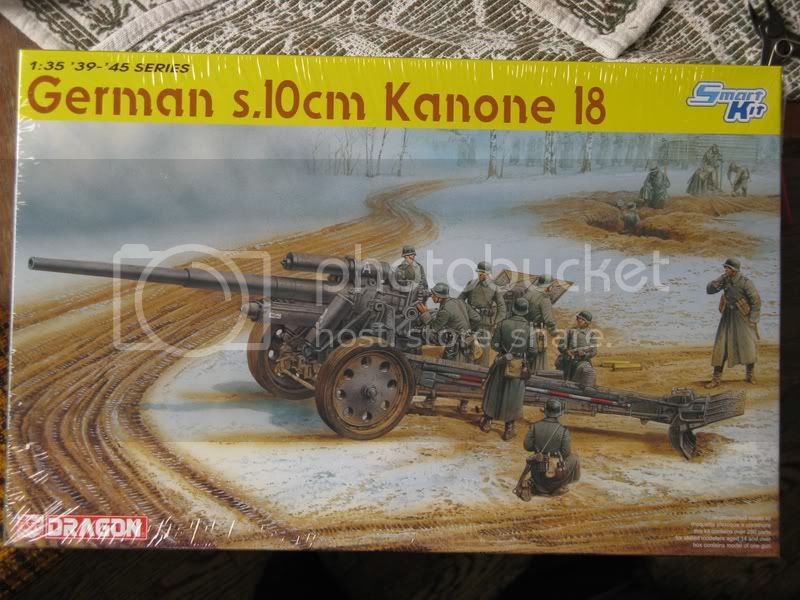
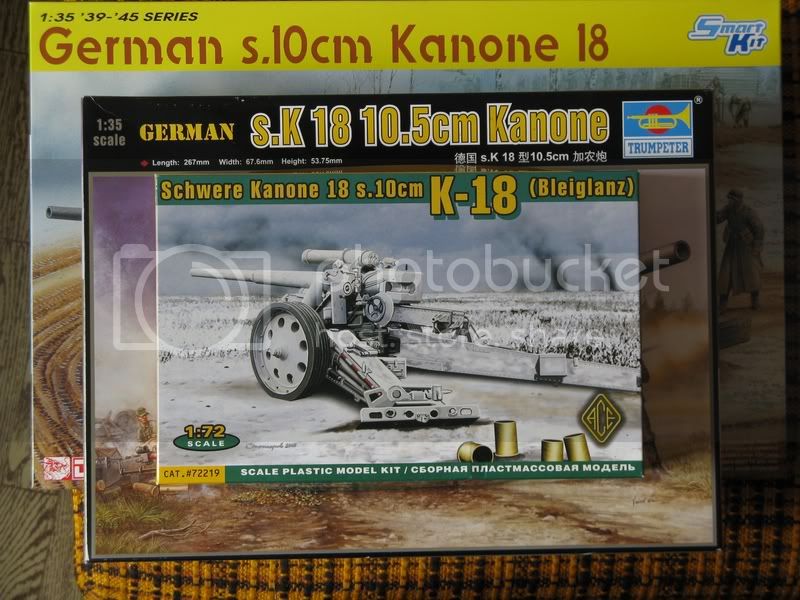
The nice looking boxart of the kit.
and the camo schemes printed onto the side of the box.
greetings...
The nice looking boxart of the kit.
and the camo schemes printed onto the side of the box.
greetings...
Gorizont
Sachsen, Germany
Joined: November 28, 2007
KitMaker: 1,462 posts
Armorama: 1,289 posts
Joined: November 28, 2007
KitMaker: 1,462 posts
Armorama: 1,289 posts
Posted: Friday, October 01, 2010 - 10:42 AM UTC
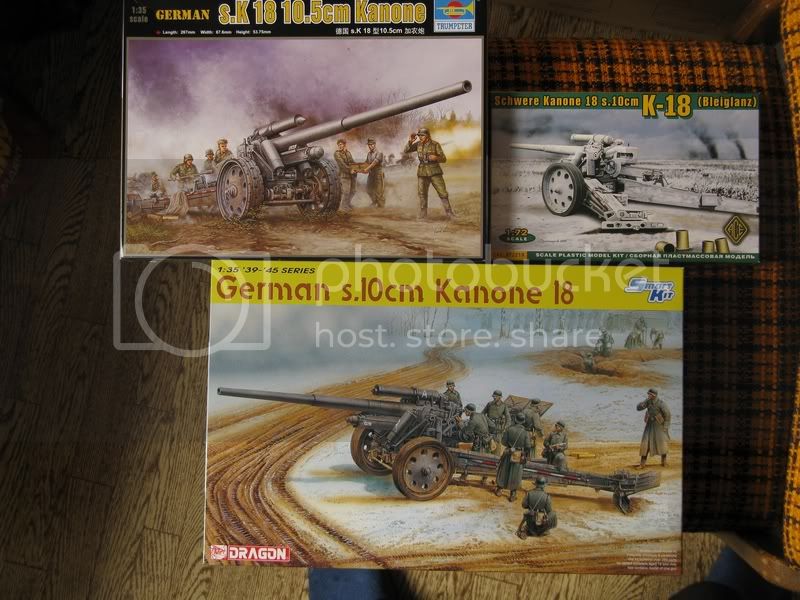
This is the box-art-comparison with my earlier Trumpeter-build.
Inside, there are some differences between both kits: accuracy, details and finally... the price.
But: both have their problems / issues (as shown on the Dragon s.Fh18 kit) and in my opinion, both are good.
(as I see in the well known comparisons)
greetings...
Soeren
Inside, there are some differences between both kits: accuracy, details and finally... the price.
But: both have their problems / issues (as shown on the Dragon s.Fh18 kit) and in my opinion, both are good.
(as I see in the well known comparisons)
greetings...
Soeren
Gorizont
Sachsen, Germany
Joined: November 28, 2007
KitMaker: 1,462 posts
Armorama: 1,289 posts
Joined: November 28, 2007
KitMaker: 1,462 posts
Armorama: 1,289 posts
Posted: Friday, October 08, 2010 - 07:08 AM UTC
So, you had to wait for updates. Sorry for that!
The last days and also the next days I had / have some "private problems". (my grandma died and my parents and me went to the "party" (I donīt know the correct name), also the second part of the ceremony will be in a few days)
I made no updates on the kit, but made some photos and some plans about the base, which should be an artillery-position at the atlantik-wall.
I have only one image, and not enough information of the positions and the things in there.
I made a drawing, for comparing the size on DIN-A4 and the bigger DIN-A3 format-frames and the adjustment of the scene on the frame.
I prefer the DIN-A3-format, but have not engough space.
Here are some images including the very first small 1/72 kit with the inspiring boxart, which I used for my first dio.
(the drawing from the Ace-kit with the wrong (to short) cartridges)
I will start building during the next days.
Perhaps some of you have interesting photos or drawings, which I could use.
My idea was from this photo:
from Ace-modelīs webpage
greetings...
Soeren
PvtMutt
Missouri, United States
Joined: July 01, 2006
KitMaker: 614 posts
Armorama: 601 posts
Joined: July 01, 2006
KitMaker: 614 posts
Armorama: 601 posts
Posted: Friday, October 08, 2010 - 10:22 AM UTC
Soeren i'll be watching this one,you about ready to start in?
Tony the Mutt
Tony the Mutt
GALILEO1
Maryland, United States
Joined: April 18, 2006
KitMaker: 1,794 posts
Armorama: 1,431 posts
Joined: April 18, 2006
KitMaker: 1,794 posts
Armorama: 1,431 posts
Posted: Friday, October 08, 2010 - 06:21 PM UTC
So sorry for the passing of your grandma, Soeren. My sincerest condolences.
You can count me in to watch this with enthusiasm, Soeren. I haven't purchased the K18 yet as I'm in an aircraft kind of mood at the moment but will surely get this one at some point.
Looking forward to the action!
Rob
You can count me in to watch this with enthusiasm, Soeren. I haven't purchased the K18 yet as I'm in an aircraft kind of mood at the moment but will surely get this one at some point.
Looking forward to the action!
Rob
Gorizont
Sachsen, Germany
Joined: November 28, 2007
KitMaker: 1,462 posts
Armorama: 1,289 posts
Joined: November 28, 2007
KitMaker: 1,462 posts
Armorama: 1,289 posts
Posted: Saturday, October 09, 2010 - 09:23 AM UTC
Hi Rob, thank you very much for your assistance!
I can not translate this correctly.
Today, Iīve started the build with the earth-spades.
I only sanded the parts and tried to compare them with my other build from Trumpeter.
But before I did this I made some new images.
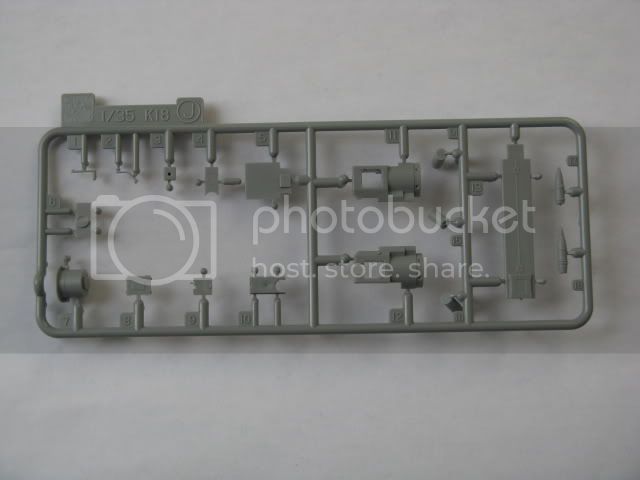
The new sprue:
The kit is nearly the same as its bigger brother.
As I saw, the new sprue is the breech and breechblock, including the part between the breech and the gun-barrel.
I have some problems with this small part (Nr. J 7), but using a scalpel (for widening a hole) I can solve this problem in a few days.
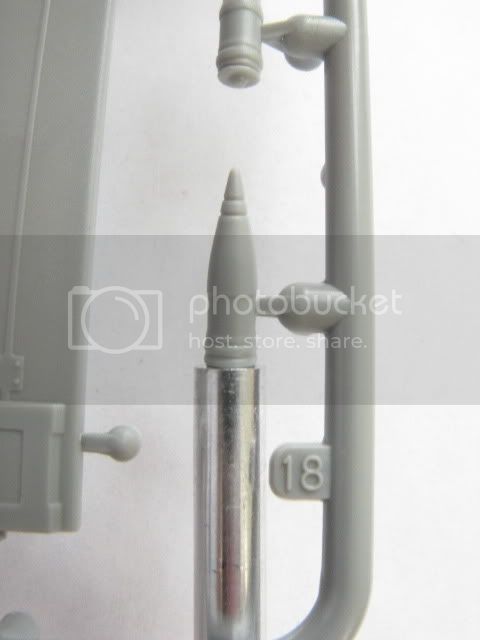
The nice rifeling of the gun-barrel.
And... the plastic ammunition fits perfectly into the gun-barrel.
greetings...
Soeren
Gorizont
Sachsen, Germany
Joined: November 28, 2007
KitMaker: 1,462 posts
Armorama: 1,289 posts
Joined: November 28, 2007
KitMaker: 1,462 posts
Armorama: 1,289 posts
Posted: Sunday, October 10, 2010 - 07:48 AM UTC
update:
I finished the first earth-spade (shovel) and also the barrel-part was very easy.
For "widening" the plastic for a good fit of the metallic-barrel, I used some glue... let it in one minute and try to remove the thinned plastic.
Be careful to remove only a bit for a good fit of the barrel.
Some hours later, I "cleaned" it inside from dryed remains and used some drops of instant-glue (CA-based) for a good connection of this part and the barrel.
greetings...
Soeren
vonMarshall
United Kingdom
Joined: July 30, 2010
KitMaker: 192 posts
Armorama: 165 posts
Joined: July 30, 2010
KitMaker: 192 posts
Armorama: 165 posts
Posted: Monday, October 11, 2010 - 01:06 AM UTC
Sorry to hear your news. The word we use in the UK for the "party" is a "wake".
Always been fascinated by the big guns but never built one yet. This DML looks great. The rifling is fantastic. Will be following this build.
Gorizont
Sachsen, Germany
Joined: November 28, 2007
KitMaker: 1,462 posts
Armorama: 1,289 posts
Joined: November 28, 2007
KitMaker: 1,462 posts
Armorama: 1,289 posts
Posted: Monday, October 11, 2010 - 07:35 AM UTC
Thank you all very much for reading the topic and answering!
Today was the 2.nd part of the "party" (babelfish translated it into " funeral")
- but this was the "bring down her ashes to earth"-day!
I also heard some infos of some nearby persons, who only "made their jobs in WW2".
So, perhaps I will build an "S.W.S" dio in future, but the Arado-232B aircraft is still in progress.
Also a Dresden in 1945 (the city) figure-diorama will be possible!
thanks to all and greetings!
Soeren
Gorizont
Sachsen, Germany
Joined: November 28, 2007
KitMaker: 1,462 posts
Armorama: 1,289 posts
Joined: November 28, 2007
KitMaker: 1,462 posts
Armorama: 1,289 posts
Posted: Wednesday, October 13, 2010 - 08:06 AM UTC
a new update:
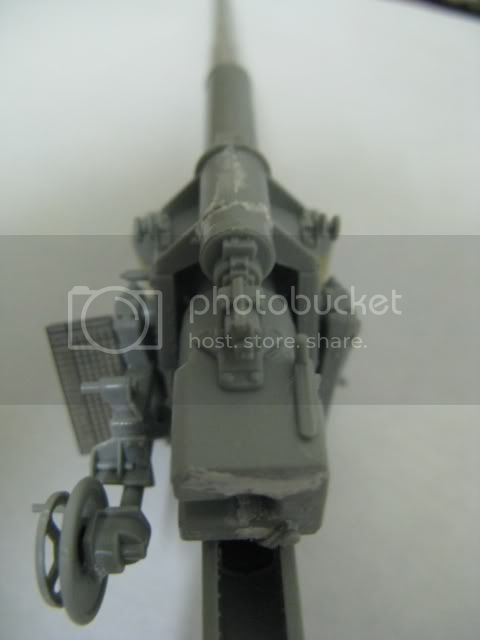
Iīve completed the gun-barrel and its cradle.
At first, I must say:
the instructions are much harder to understand, where to place the parts, than in Trumpeterīs instructions!
I have a "nice" collection of built and in-progress-kits of different models, including Dragonīs sFh18, which helped me for these parts.
Also I read in a great comparison on "perthmilitarymodeling", (thanks to Terry Ashley!), the instructions of the brother-kit also made some problems... I also can say that Trumpeterīs kit instruction was better and easier to understand!
Also I made an interesting discovery.
Trumpeter and Dragonīs barrels are different in length!
The Dragon-barrel is a bit (about one centimetre or ca. 1/3th inch) longer than Trumpeterīs one.
I have no exact information of the "calibre length", which means the "comparison of calibre to length-ratio", which is numbered in an L-number (as I read in german pages.).
Also I can not exactly measurements of the barrel on the completed kit.
My last build was easy to build, but at the end, one wheel broke away.
So itīs not easy to make photo-comparison with the 2 barrels.
Itīs better to "do not touch!" the model.
I have one length in meters, but possible one of the companies made the measurements beginning from "wrong start points" - which results in a "to long" or "to short" barrel.
So we kit-builders will use photos to have an idea or inspiration of the "size-ratios" and the different parts.
Pictures will follow very soon!
greetings...
Soeren
Gorizont
Sachsen, Germany
Joined: November 28, 2007
KitMaker: 1,462 posts
Armorama: 1,289 posts
Joined: November 28, 2007
KitMaker: 1,462 posts
Armorama: 1,289 posts
Posted: Wednesday, October 13, 2010 - 09:40 PM UTC
as promised... here are some photos.
The comparison with my earlier build, Trumpeterīs s.10cm K18.
But, a real length-comparison was made using the plastic-variant of the kitīs barrel.
(the metal-barrel was held above the gunīs barrel)
But I made a better comparison:
Dragonīs barrel is 18mm (about one inch) longer.
Also you can see, Iīve made a comparison with the two breeches.
(15cm vs 10cm.)
I made some more images of them.
greetings...
Soeren
edit:
Dragonīs barrel is correct in length.
The original-length is 5.460mm (perhaps including breech) - so Dragonīs barrel fits perfect to this.
The comparison with my earlier build, Trumpeterīs s.10cm K18.
But, a real length-comparison was made using the plastic-variant of the kitīs barrel.
(the metal-barrel was held above the gunīs barrel)
But I made a better comparison:
Dragonīs barrel is 18mm (about one inch) longer.
Also you can see, Iīve made a comparison with the two breeches.
(15cm vs 10cm.)
I made some more images of them.
greetings...
Soeren
edit:
Dragonīs barrel is correct in length.
The original-length is 5.460mm (perhaps including breech) - so Dragonīs barrel fits perfect to this.
tread_geek
Ontario, Canada
Joined: March 23, 2008
KitMaker: 2,847 posts
Armorama: 2,667 posts
Joined: March 23, 2008
KitMaker: 2,847 posts
Armorama: 2,667 posts
Posted: Thursday, October 14, 2010 - 03:46 AM UTC
Soeren, my deepest condolences on the passing of your grandmother. One is always at a loss for words at these times.
--------------------------------------------------------------------------------------------
While not my preferred scale, I will watch this build with interest (maybe I can find the 1/72 version somewhere). I checked in my book "The Guns 1939-45" by Ian Hogg and there is definitely a difference between the barrel lengths in the 15 cm and 10 cm. The 15 cm was an L30 and 4.495 m in length. The 10 cm was an L52 and was 5.46 m long. The barrel with the rifling looks beautiful.
Cheers,
Jan
GALILEO1
Maryland, United States
Joined: April 18, 2006
KitMaker: 1,794 posts
Armorama: 1,431 posts
Joined: April 18, 2006
KitMaker: 1,794 posts
Armorama: 1,431 posts
Posted: Thursday, October 14, 2010 - 05:55 AM UTC
Hi Soeren,
Great progress so far! The length of the Dragon barrel is pretty significant when you put them side-by-side with the one from Trumpeter. I'm really liking this kit, especially that newer breech piece they use. I really should hurry up and get one of these...
Keep it up!
Rob
Great progress so far! The length of the Dragon barrel is pretty significant when you put them side-by-side with the one from Trumpeter. I'm really liking this kit, especially that newer breech piece they use. I really should hurry up and get one of these...
Keep it up!
Rob
Gorizont
Sachsen, Germany
Joined: November 28, 2007
KitMaker: 1,462 posts
Armorama: 1,289 posts
Joined: November 28, 2007
KitMaker: 1,462 posts
Armorama: 1,289 posts
Posted: Thursday, October 14, 2010 - 06:13 AM UTC
Hi Jan, I twice build/built the same gun - by two different companies.
The Trumpeter barrel of the (finished) s.10cm K18 is shorter than Dragonīs one.
I also found the 5,46m length on a german webpage, which is 5.460mm and in 1/35 it is 156mm long.
So Dragonīs barrel is perfect... also 156mm in length, including breech.
Also Trumpeter used the earlier-style tire-patterns, while Dragon used the newer ones.
Replacement-wheel-sets are available in resin, but not in my country.
Also it would be nice, to have other types of wheels, because the "disk-with- hole-types" are newer than others.
I have some images of "spider-wheel-types".
I completed the gun-cradle and another part.
The other part is for "turning" the barrel and cradle for some degrees for firing in other directions without moving the whole gun.
It also contains the firing-chart (elevation, distance, powder-load) and an handwheel and mechanism for turning the barrel.
Pictures will follow soon.
greetings...
Soeren
Gorizont
Sachsen, Germany
Joined: November 28, 2007
KitMaker: 1,462 posts
Armorama: 1,289 posts
Joined: November 28, 2007
KitMaker: 1,462 posts
Armorama: 1,289 posts
Posted: Thursday, October 14, 2010 - 09:10 AM UTC
something to add.
The upper gun-part is not completed, but the missing parts will be added tomorrow or so.
These (missing parts) are the two elevation-cylinders, one more small metallic plate and later the sight-system.
Here are some photos:
and with the small Ace-kit.
greetings...
Soeren
The upper gun-part is not completed, but the missing parts will be added tomorrow or so.
These (missing parts) are the two elevation-cylinders, one more small metallic plate and later the sight-system.
Here are some photos:
and with the small Ace-kit.
greetings...
Soeren
Gorizont
Sachsen, Germany
Joined: November 28, 2007
KitMaker: 1,462 posts
Armorama: 1,289 posts
Joined: November 28, 2007
KitMaker: 1,462 posts
Armorama: 1,289 posts
Posted: Friday, October 15, 2010 - 05:56 AM UTC
Iīve added the both elevation-tubes and the small metal-plate.
The parts are moveable.
Pictures will follow later, because of the emptyness of the recherchable batteries.
The metallic parts again were glued with instant-glue (CA-based).
But, in my other builds (soviet venus landers) I use "non-CA-based glue" for some parts. And for some few I use the instant-glue.
Back to here: I tried to fill some gaps on the breech and other parts, but I (or we) will see the result after painting.
Perhaps I also will buy and build the base-kit... the s.Fh.18 from this company, including a rifled barrel.
greetings...
Soeren
tread_geek
Ontario, Canada
Joined: March 23, 2008
KitMaker: 2,847 posts
Armorama: 2,667 posts
Joined: March 23, 2008
KitMaker: 2,847 posts
Armorama: 2,667 posts
Posted: Saturday, October 16, 2010 - 03:22 AM UTC
Is it not always the case that your batteries run down when you really want to take a picture!
Your build is coming along nicely but I particularly like the Ace kit. From enlarging the image it appears that the detail on it is quite good.
Cheers,
Jan
Your build is coming along nicely but I particularly like the Ace kit. From enlarging the image it appears that the detail on it is quite good.
Cheers,
Jan
Gorizont
Sachsen, Germany
Joined: November 28, 2007
KitMaker: 1,462 posts
Armorama: 1,289 posts
Joined: November 28, 2007
KitMaker: 1,462 posts
Armorama: 1,289 posts
Posted: Saturday, October 16, 2010 - 04:54 AM UTC
Hi Jan, with your next post youīre Colonel.
Yes, the Ace-kit is a good quality kit!
Itīs easy to build and perhaps easy to refine.
My first plans were to use this one in my snow-diorama or perhaps in the Atlantik-wall-scene. (because of the smaller size)
Here are the images from yesterdayīs work of Dragonīs kit.
Today, I started building the limber.
Perhaps I wouldnīt need it, but the nice quality of the parts is a... I like it !
greetings...
Soeren
PS: Some parts were sanded/cleaned after making the photos.
Yes, the Ace-kit is a good quality kit!
Itīs easy to build and perhaps easy to refine.
My first plans were to use this one in my snow-diorama or perhaps in the Atlantik-wall-scene. (because of the smaller size)
Here are the images from yesterdayīs work of Dragonīs kit.
Today, I started building the limber.
Perhaps I wouldnīt need it, but the nice quality of the parts is a... I like it !
greetings...
Soeren
PS: Some parts were sanded/cleaned after making the photos.
GALILEO1
Maryland, United States
Joined: April 18, 2006
KitMaker: 1,794 posts
Armorama: 1,431 posts
Joined: April 18, 2006
KitMaker: 1,794 posts
Armorama: 1,431 posts
Posted: Saturday, October 16, 2010 - 06:15 AM UTC
Wow, Soeren, this is looking really good! Really like the progress so far.
Question, did you decide against filling the seams on the breach? The breech is supposed to be one solid unit so I was just curious.
Good job so far!
Rob
Question, did you decide against filling the seams on the breach? The breech is supposed to be one solid unit so I was just curious.
Good job so far!
Rob
Gorizont
Sachsen, Germany
Joined: November 28, 2007
KitMaker: 1,462 posts
Armorama: 1,289 posts
Joined: November 28, 2007
KitMaker: 1,462 posts
Armorama: 1,289 posts
Posted: Sunday, October 17, 2010 - 01:04 AM UTC
small update:
Today I hope to finish the limber.
Also I found some small "problems" in the instructions.
Some parts were shown with wrong numbers.
The parts are: E18 with E19 and E3 with E4.
So be careful and make a "test-fit" before glueing.
Yes, I filled some seams of the breech-part and others.
The breech-part (I mean the "big box" in which the grenades and shells get loaded) has nearly the same part-layout as the (also delivered) part from the "base-kit" of its bigger brother.
The seam of the breech-part is vertical, and has one additional part above the two single parts which create the seam.
I can make better comparison pictures.
greetings...
Soeren
edit:
I try to solve some problems using Trumpeterīs instructions and my built kit from this company.
Explanation follows later.
edit 2:
Also take a careful look at the images of the nearly completed limber for comparing it with the build-steps before!
It shows the correct align of some parts which were shown wrong at one build-step before.
I had to remove some parts again, for adding them at the correct places.
Gorizont
Sachsen, Germany
Joined: November 28, 2007
KitMaker: 1,462 posts
Armorama: 1,289 posts
Joined: November 28, 2007
KitMaker: 1,462 posts
Armorama: 1,289 posts
Posted: Sunday, October 17, 2010 - 08:42 AM UTC
now the images:
There is a small mistake by Dragon in some parts of their instructions.
Also I would recommend, to add the V-shaped holders of the axle as the last step and add both D29 parts after then.
Also can be seen, that parts E3 and E4 show in different directions on the images.
This image shows the corrected parts.
Finally, the completed limber.
and
But I have not glued the wheels and the front-part.
The wheels get painted first, then glued. (unlike in my Trumpeter-build; there I removed the rubber-tires before painting and added them later again)
Also the barrel and breech parts with filled seams.
Also there are some more parts to fill, but I think, itīs enough.
greetings...
Soeren
tread_geek
Ontario, Canada
Joined: March 23, 2008
KitMaker: 2,847 posts
Armorama: 2,667 posts
Joined: March 23, 2008
KitMaker: 2,847 posts
Armorama: 2,667 posts
Posted: Monday, October 18, 2010 - 05:16 AM UTC
Soeren, this is the type of build posting that is most valuable to anyone thinking of building this kit (or any other Dragon kit). Dragon, as well as other manufacturers, are not perfect with their instructions; as I have often found out. It is best to study the instructions before you put glue to plastic. A lot of times the order of build instructions can lead to trouble. I have found this even with a recent Revell kit that I am building.
Cheers,
Jan
P,S, - Thank you for the congratulations on my promotion. I wasn't even aware that it was about to occur.
Cheers,
Jan
P,S, - Thank you for the congratulations on my promotion. I wasn't even aware that it was about to occur.
GALILEO1
Maryland, United States
Joined: April 18, 2006
KitMaker: 1,794 posts
Armorama: 1,431 posts
Joined: April 18, 2006
KitMaker: 1,794 posts
Armorama: 1,431 posts
Posted: Tuesday, October 19, 2010 - 04:00 AM UTC
Excellent progress, Soeren! The limber looks great. Don't know if you mentioned it earlier but are you depicting the model in combat or travel?
Keep up the good work!
Rob
Keep up the good work!
Rob