Campaigns
Where Armorama group builds can be discussed, organized, and updates posted.
Urban Warfare Campaign
ltb073
Visit this Community
New York, United States
Joined: March 08, 2010
KitMaker: 3,662 posts
Armorama: 3,078 posts
Posted: Monday, March 07, 2011 - 03:58 PM UTC
Ok Guys got some work done on my other campaigns today so hopefully I can get started this week on the one Here is some of the stuff I will be using, Mini Art Garage and Italeri Field work shop
Photobucket
Main Vehicle will be this KV-1
Photobucket
hiding out in the garage will be these figures
Photobucket
along with a bunch of stuff from the spare parts box and whatever else I can find. looking forward to starting this 1
VLADPANZER
Visit this Community
Lebanon
Joined: December 20, 2010
KitMaker: 568 posts
Armorama: 549 posts
Posted: Tuesday, March 08, 2011 - 06:14 AM UTC
Hi all,

Thanks a lot MBR for the info, it will be of great help!

Jesse, you probably know about these but here they are any ways:
http://www.verlindenonline.com/store/product_info.php?products_id=365
http://www.hlj.com/product/TRS35011
http://www.hlj.com/product/DRA6389
Hope it’s of some help.

I have already started on my diorama, started painting some figures and started on the buildings. Unfortunately I could not take any pictures (out of batteries). I will upload pictures soon.

One more question: would there be any Italian camouflage pattern pants in Germany, towards the end of the war.

Regards,
melonhead
Visit this Community
Wisconsin, United States
Joined: July 29, 2010
KitMaker: 662 posts
Armorama: 457 posts
Posted: Tuesday, March 08, 2011 - 10:07 AM UTC
thanks for the links...for the first one, i was contemplating that one. but to be honest, the runner looks a little "speshul" so, ive been wanting to try to not use it because it looks a little laurel and hardy -ish. the second one. i saw, but i didnt see anything online that showed a good pose for them. glad you posted it. i may contemplate that one. the last one. that one is a very good possiblity. i could use at least 2 to 4 of those figures.
if i use one of bottom 2 links you posted, this is the tank commander i would use. which, i probably will be doing...
http://www.cybermodeler.com/hobby/figures/dml/images/dml_6375_title.jpg

searching online last night, i found a great tank commander that i want to try to use. http://www.verlindenonline.com/store/product_info.php?products_id=595
to use that one, i would have to find something worth using on the ground. so, ill have to make a decision here. i may end up just getting all of them and place and pose to see what looks best.
exer
Visit this Community
Dublin, Ireland
Joined: November 27, 2004
KitMaker: 6,048 posts
Armorama: 4,619 posts
Posted: Tuesday, March 08, 2011 - 11:46 AM UTC
Hi Jesse one thing to be aware of is as far as I know the panzer wrap jacket wasn't worn in Nth Africa or Tunisia so you need a crew in Tropical uniform. Take a look at Miniart- the three guys in tropical uniform in this set or these guys from masterbox or this set from Tristar


For infantry try this set from Tristar
melonhead
Visit this Community
Wisconsin, United States
Joined: July 29, 2010
KitMaker: 662 posts
Armorama: 457 posts
Posted: Tuesday, March 08, 2011 - 12:50 PM UTC
ive looked at the ones that you had mentioned...he ones that you hot linked the photo for, unfortunately, they are too "posed". very bland nothing about them tells a story. too statuesque. one of the other sets would be ok but the look im going for is a look of "urgent". the story im trying to tell with this is "there is contact by enemy in that direction". so, i may have to finagle the commander uniform a little bit. to help make it match the theater
exer
Visit this Community
Dublin, Ireland
Joined: November 27, 2004
KitMaker: 6,048 posts
Armorama: 4,619 posts
Posted: Saturday, March 12, 2011 - 04:46 AM UTC
Okay I've made a start. I cast these pieces up from the Form-U-Lay mould for FL90 Two Storey Factory a while ago I've cut them to make one large wall. Hope fully I can disguise the joins

ltb073
Visit this Community
New York, United States
Joined: March 08, 2010
KitMaker: 3,662 posts
Armorama: 3,078 posts
Posted: Tuesday, March 15, 2011 - 01:33 AM UTC
Made a little progress here, all major building parts have been trimmed and sanded and ready for gluePhotobucket
still trying to get caught up with other campaigns so a slow go here
meaty_hellhound
Visit this Community
Alberta, Canada
Joined: July 23, 2010
KitMaker: 786 posts
Armorama: 753 posts
Posted: Tuesday, March 15, 2011 - 03:24 AM UTC
wow, already some huge progress by Pat and Sal (and a nice example by MBR)... makes me so keen to get started on my dio base.

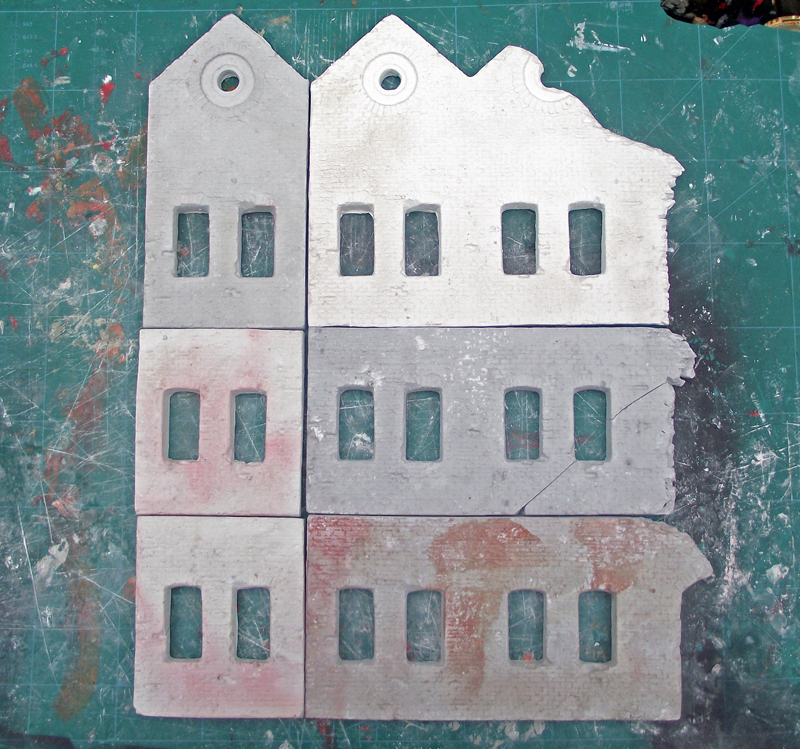
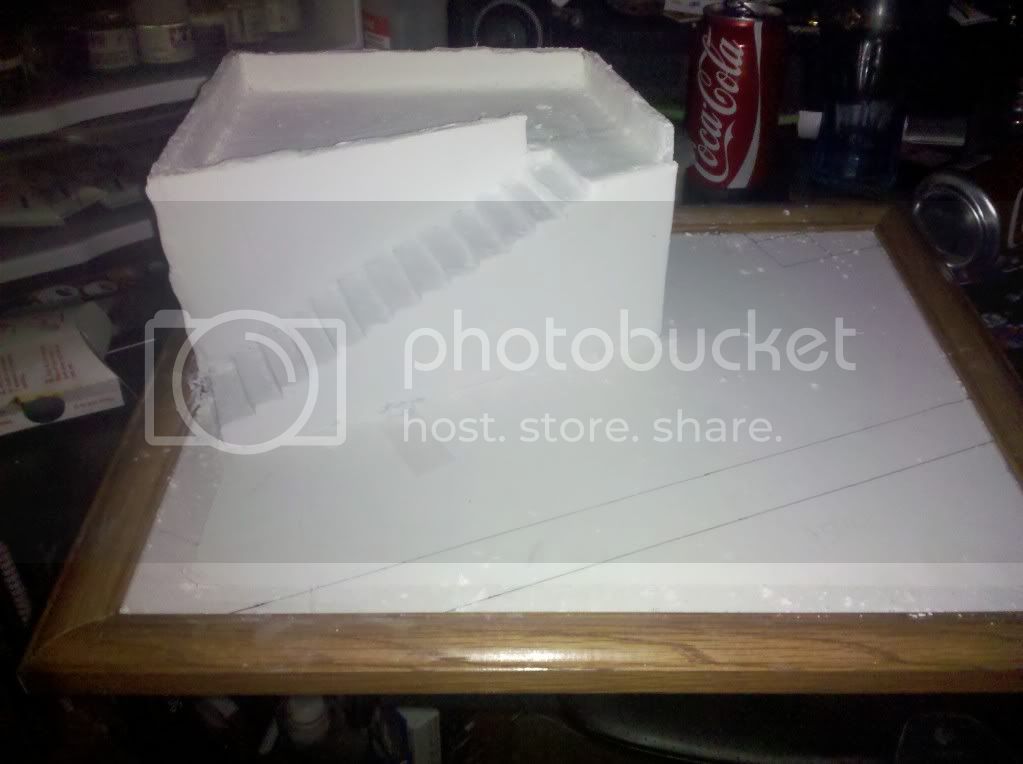
here's my progress so far:

only 6,897 more to make LOL.

but seriously, i would like to start a discussion with those who will be making a brick structure as i plan on testing some painting techniques on small scraps.
1) do you paint the whole wall brick colour and then use a white wash for the recessed mortar?
2) do you paint the whole wall brick colour and use white powder pigment to whiten the recessed mortar and dust up the brick?
3) or do you paint the wall white and then paint the bricks individually by hand leaving the mortar areas white?

i've seen some brilliant work done with No2 technique and you can end up painting so many variations of brick colour over a base colour that No3 doesn't seem that crazy.

are there other options i should investigate? cheers, bd.
VLADPANZER
Visit this Community
Lebanon
Joined: December 20, 2010
KitMaker: 568 posts
Armorama: 549 posts
Posted: Tuesday, March 15, 2011 - 03:31 AM UTC
Hi all,

The base will be approximately 40cm by 50cm. Until now I have painted several of the figures that I will be using on the diorama. I will be using several figure sets:
Dragon “Cross of iron” #6006
Dragon “Fallen comrade” #6119
Tamiya German front line infantry #35196
Tamiya Russian Army Assault Infantry #35207

I will also be adding figures from various other sets; I will be scratch building four buildings along with the roads. I have already started on the first building but it is still wet so I didn’t take any pictures. Here are some pictures of my progress:


(how can I improve my fig’s?)
That’s all for now!

Bruce, I hear the first method is the best one.Looking forward to see your work!
anti-hero
Visit this Community
Tennessee, United States
Joined: March 20, 2005
KitMaker: 420 posts
Armorama: 307 posts
Posted: Tuesday, March 15, 2011 - 11:20 AM UTC
Here's one Bruce,
Paint the whole structure the mortar color.
Then you get cosmetic sponges or some other similar material. (Foam mattress pads or the spongy foam packing material used with some computer components.)
Dip this in the brick color you intend to use and dab that a time or two on a paper napkin or such. You don't want the foam completely soaking with paint.
Then LIGHTLY (until you get the hang of the technique) dab the sponge on your brick surface. You should get color on the bricks but none in the mortar lines. It even leaves a pretty nice mottled effect on the bricks.
I'll post some pics later to show how it looks.
anti-hero
Visit this Community
Tennessee, United States
Joined: March 20, 2005
KitMaker: 420 posts
Armorama: 307 posts
Posted: Tuesday, March 15, 2011 - 11:34 AM UTC

This was done using this method. I went in later with a brush to pick out different bricks in different colors, but the main part was done with the sponge.


While I'm here...Here's my idea for this campaign.


Don't really know what vehicles or figures I'm going to use yet...or what they will be doing but since this is urban, I figure the buildings will be "the stars" in my dio.
I was thinking of trying to make each building a different material or style. The arch/city gate will be all brick, one will be stone and brick mixed, one with be fachwerk, etc. We'll see how it goes!
ltb073
Visit this Community
New York, United States
Joined: March 08, 2010
KitMaker: 3,662 posts
Armorama: 3,078 posts
Posted: Wednesday, March 16, 2011 - 03:45 PM UTC
@ Bill outstanding job on that brick wall but I don't think your method will work on my vac-form bricks. Looking forward to seeing your new build

I was able to get out of work tonight by working a double tomorrow so here is what I was able to get done on my Garage. All half's are glued together and wall and lower (supplied) roof onPhotobucket
The widow frames are awaiting some plastic glass to be broken and I will have to scratch the upper half of the roof but haven't figured out what I will use as of yet
vonHengest
Visit this Community
Texas, United States
Joined: June 29, 2010
KitMaker: 5,854 posts
Armorama: 4,817 posts
Posted: Wednesday, March 16, 2011 - 05:17 PM UTC
I will need to scratch my own glass as well, and am open to suggestions from anyone who's done it before.
ltb073
Visit this Community
New York, United States
Joined: March 08, 2010
KitMaker: 3,662 posts
Armorama: 3,078 posts
Posted: Thursday, March 17, 2011 - 12:54 AM UTC

Quoted Text

I will need to scratch my own glass as well, and am open to suggestions from anyone who's done it before.


Jeremy, what I have done it the past was to take the clear plastic bag that the spruces come in and glue the window frames to that. Then i us some Testors window maker glue on the glass. When it dries take a hobby knife an cut through the part that you want to make look broken or damaged

Hope that helps ya out there bud
mmeier
Visit this Community
Nordrhein-Westfalen, Germany
Joined: October 22, 2008
KitMaker: 1,280 posts
Armorama: 1,015 posts
Posted: Thursday, March 17, 2011 - 01:06 AM UTC
As for the roof: Miniart has added one as part of their "modular building" sets. And since the "modular building" seems to be based on the garage this might work

Broken Windows: One version was using the glass used in microscopes to cover the probes (not the carrier, the thin plate layed over that)
meaty_hellhound
Visit this Community
Alberta, Canada
Joined: July 23, 2010
KitMaker: 786 posts
Armorama: 753 posts
Posted: Thursday, March 17, 2011 - 02:50 AM UTC
that's a great example Bill of brickwork. really nice architectural design. since i have only done a few projects with cobblestone i realized that i came back and handpainted about 70% of the stones to create variation, so i can see that it does not seem that crazy to have to handpaint the other 30% of the bricks. interesting suggestion to apply the brick colour in a sponge/drybrush technique.

thanks for the info, cheers bd.

For glass, i have used the hard clear plastic that some resin figures/accessories have been packed in such as Alpine. i saw one incredible display of broken glass by a fellow who used the glass slider/holder thingies for microscopes which he broke and glued in place. since it is real glass it looked amazing. the fellow did mention it was not the easiest to work with as you can get cut by it but... wow.
vonHengest
Visit this Community
Texas, United States
Joined: June 29, 2010
KitMaker: 5,854 posts
Armorama: 4,817 posts
Posted: Thursday, March 17, 2011 - 02:52 AM UTC
Interesting solutions guys, and thanks for sharing!

Sal: I would think that would leave you with wavy looking windows, unless you have some really thick sprue bags?

MBR: My windows are going to be pretty large, but that may work for areas where I do not need much in the way of glass such as in the corners or something.
ltb073
Visit this Community
New York, United States
Joined: March 08, 2010
KitMaker: 3,662 posts
Armorama: 3,078 posts
Posted: Thursday, March 17, 2011 - 03:07 AM UTC

Quoted Text

Interesting solutions guys, and thanks for sharing!

Sal: I would think that would leave you with wavy looking windows, unless you have some really thick sprue bags?


Here is an example of the window method I was talking about. Not the best photo thoughPhotobucket
You have to remember I am cheap so if its free its for me

I also used a piece of thin plastic to make a windshield sort of like Bruce's method, I think it was plastic that cookies came in.

I would think braking the microscopy glass would be quite difficult
vonHengest
Visit this Community
Texas, United States
Joined: June 29, 2010
KitMaker: 5,854 posts
Armorama: 4,817 posts
Posted: Thursday, March 17, 2011 - 06:29 AM UTC
Bruce: I do have some of that material and may give it a go. The type that Alpine Miniatures comes in seems to tear/crack easily.
I would like to see the slide glass method that you guys have been talking about. I'll google it and see what I come up with, but if any of you have links I would greatly appreciate it if you wouldn't mind sharing.

Sal: Interesting, is that just the glue I'm looking at or is it the glue with the plastic?
VLADPANZER
Visit this Community
Lebanon
Joined: December 20, 2010
KitMaker: 568 posts
Armorama: 549 posts
Posted: Thursday, March 17, 2011 - 07:18 AM UTC
I too use Bruce’s method of using clear plastic, it is highly effective. I was thinking of using the glass slates but as mentioned they can be harmful.

Bill: That looks like one hell of a project.

Sal: You could use corrugated steel. I have seen cardboard in the same shape used to simulate it.
melonhead
Visit this Community
Wisconsin, United States
Joined: July 29, 2010
KitMaker: 662 posts
Armorama: 457 posts
Posted: Thursday, March 17, 2011 - 11:50 AM UTC
does anyone by chance have any reference pics african towns during the times of ww2? im having to blindly make a african house and i have a feeling its going to be completely be inaccurate. plus i need some ideas of how a town was setup so i can plan the terrain
vonHengest
Visit this Community
Texas, United States
Joined: June 29, 2010
KitMaker: 5,854 posts
Armorama: 4,817 posts
Posted: Thursday, March 17, 2011 - 12:16 PM UTC

Quoted Text

does anyone by chance have any reference pics african towns during the times of ww2? im having to blindly make a african house and i have a feeling its going to be completely be inaccurate. plus i need some ideas of how a town was setup so i can plan the terrain


If you let us know which part of Africa you are looking to represent, it would help us in helping you.
melonhead
Visit this Community
Wisconsin, United States
Joined: July 29, 2010
KitMaker: 662 posts
Armorama: 457 posts
Posted: Thursday, March 17, 2011 - 02:15 PM UTC
this is what i have so far. id like to try to keep with this style if possible.
vonHengest
Visit this Community
Texas, United States
Joined: June 29, 2010
KitMaker: 5,854 posts
Armorama: 4,817 posts
Posted: Thursday, March 17, 2011 - 03:17 PM UTC
Excellent, that's pretty standard housing for at least North Africa and is still in use today so you are in luck. Just google North African house or something along that line and you will be good to go.

Just fyi, Miniart's North African House 35540 is a good reference to look at for ideas.

ps: Correct me if I'm wrong guys, I don't want to steer our friend in the wrong direction here.
VLADPANZER
Visit this Community
Lebanon
Joined: December 20, 2010
KitMaker: 568 posts
Armorama: 549 posts
Posted: Thursday, March 17, 2011 - 10:33 PM UTC

This is the only picture I have of North Africa, small but rather clear. These houses had a lot of arches, and the houses used to be painted white to reflect the heat.


Hope this is of some help,