Art of the Battlefield (artillery)
New York, United States
Joined: March 08, 2010
KitMaker: 3,662 posts
Armorama: 3,078 posts
Posted: Monday, October 03, 2011 - 03:09 PM UTC
Active Campaigns on the bench:
Operation Fall Gelb - Pz.Kpfw. IV Ausf. C
Engineering the Future - M-26 Recovery Vehicle
115 Campaigns completed
California, United States
Joined: December 06, 2004
KitMaker: 3,694 posts
Armorama: 2,693 posts
Posted: Tuesday, October 04, 2011 - 04:34 AM UTC
I am finishing up a Tamiya BMW R75 w/sidecar right now.
I did start in on the leIG18 but the quality of the molding leaves something to be desired. The edges are kind of rough, not something I remember seeing in Italeri kits. I am thinking that these molds came from Eastern Europe. The ends of the accessories box that sits in the trail has no bottom provided. Also the tabs on which the two ends sit are set too far from the edge so I am sanding the ends of the box back. I have fashioned a bottom out of some scrap plastic but the plastic I used might be a bit too thick. I don't want the accessory box to sit too high. Nothing worth photographing right now.
Lisboa, Portugal
Joined: March 04, 2008
KitMaker: 5,386 posts
Armorama: 4,727 posts
Posted: Tuesday, October 04, 2011 - 06:55 AM UTC
I'm in with this one:
Sorry it took so long to post some pics.. but I didn't started it yet, still have a couple of things to finish.


Active Builds: 0
Active Campaigns: 0
England - South East, United Kingdom
Joined: July 26, 2011
KitMaker: 35 posts
Armorama: 28 posts
Posted: Tuesday, October 04, 2011 - 03:41 PM UTC
Been slacking off and beating up the Chinese PLA in Flashpoint:Dragon Rising but in between have got this much done


Hawaii, United States
Joined: August 27, 2006
KitMaker: 1,646 posts
Armorama: 1,557 posts
Posted: Wednesday, October 05, 2011 - 11:19 AM UTC
Quoted Text
I am finishing up a Tamiya BMW R75 w/sidecar right now.
I did start in on the leIG18 but the quality of the molding leaves something to be desired. The edges are kind of rough, not something I remember seeing in Italeri kits. I am thinking that these molds came from Eastern Europe. The ends of the accessories box that sits in the trail has no bottom provided. Also the tabs on which the two ends sit are set too far from the edge so I am sanding the ends of the box back. I have fashioned a bottom out of some scrap plastic but the plastic I used might be a bit too thick. I don't want the accessory box to sit too high. Nothing worth photographing right now.
Gary: I'm with you!! My Italeri 105 Howie has got a lot of flash and all the ejector pins are in the most visible, yet least accessible, places. I'm at a point where I'm just going to leave a bunch of them. Progress thus far not worth the photo. Hopefully later this week.
Sal: That thing is a monster. Can't wait to see more.
Great project variety all around.
Happy Modelling, -zon

"Certainty of death.
Small chance of sucess.
What are we waiting for?"
-Gimli, Return of the King.
Auckland, New Zealand
Joined: June 01, 2011
KitMaker: 1,716 posts
Armorama: 1,638 posts
Posted: Friday, October 07, 2011 - 10:47 AM UTC
I know the voices ain't real but they do come up with some great ideas
Never trust a man who left alone with a tea cozy and doesn't try it on ( Billy Connolly )
Overkill is often very understated
New York, United States
Joined: March 08, 2010
KitMaker: 3,662 posts
Armorama: 3,078 posts
Posted: Friday, October 07, 2011 - 01:29 PM UTC
Dave, nice progress on the Dora is that the 1/72 Kit

John, I liked that kit but traded it for something else, dont remember what though

Phill, That Grasshopper looks pretty cool

looking forward to seeings everybody progress.
Doing another marathon work weekend, but I will try to check, so I won't be putting up any progress until Monday

Active Campaigns on the bench:
Operation Fall Gelb - Pz.Kpfw. IV Ausf. C
Engineering the Future - M-26 Recovery Vehicle
115 Campaigns completed
British Columbia, Canada
Joined: August 13, 2009
KitMaker: 420 posts
Armorama: 416 posts
Posted: Saturday, October 08, 2011 - 08:56 AM UTC
Here's some progress on the gun.
some issues with the kit nothing serious though


England - South East, United Kingdom
Joined: July 26, 2011
KitMaker: 35 posts
Armorama: 28 posts
Posted: Sunday, October 09, 2011 - 03:08 PM UTC
Quoted Text
Dave, nice progress on the Dora is that the 1/72 Kit
Yes. There was no way I could do the 1:35 one - as much as I would have liked too!
Weekend progress has been confined to getting the rail tracks and base done - all ballasted, painted and now assembled. All the joins need ballasting, and the railway line joiners (fishplates I think they are called) need to be glued in and painted before the entire assembly is slid into place on the dio.
No point in putting pictures up - I will do some when the base is positioned on the dio later this week.
New York, United States
Joined: March 08, 2010
KitMaker: 3,662 posts
Armorama: 3,078 posts
Posted: Sunday, October 09, 2011 - 05:54 PM UTC
Ian Nice progress PE on the outer and inner armor wow

I managed to make a little head way as well I completed the 1st 3 steps on the upper half

I had 1 oops

these 2 wooden like planks I thought the direction were telling me to put them on top of 2 of the vent covers and I couldn't figure out why 2 and not 3

then when I turned the page to a different part i saw that they go between the vent covers. Now it makes sense and I was able to correct it paint should cover the sanded down glue marks. Here is the drivers compartment

Active Campaigns on the bench:
Operation Fall Gelb - Pz.Kpfw. IV Ausf. C
Engineering the Future - M-26 Recovery Vehicle
115 Campaigns completed
England - East Anglia, United Kingdom
Joined: August 12, 2005
KitMaker: 14,499 posts
Armorama: 11,675 posts
Posted: Sunday, October 09, 2011 - 06:18 PM UTC
Hi Ian and Sal,
Nice progress guys.
Al
'Action this Day'
Winston Spencer Churchill
California, United States
Joined: December 06, 2004
KitMaker: 3,694 posts
Armorama: 2,693 posts
Posted: Tuesday, October 11, 2011 - 05:30 AM UTC
I am fighting with ill-fitting parts and vague instructions. Grrr. I have built up part of the trail and am trying to divine how the gun itself is supposed to go together. I've already made a boo-boo in that the two sides of the trail aren't quite aligned. Hopefully it won't look so obvious once the thing is all built.

I am using Micro Liquitape on the gun parts to let me stick them together temporarily and experiment on how they are supposed to mate up.
California, United States
Joined: December 06, 2004
KitMaker: 3,694 posts
Armorama: 2,693 posts
Posted: Tuesday, October 11, 2011 - 10:29 AM UTC
Grrrrr.
In that last picture, the axle is not glued in. I decided to glue it. As I touched the liquid glue to the axle/trail joint, everything fell off. I was quite stunned.

The two pieces on the right used to be part of the trail. Should be a simple matter of gluing the axle to the trail then gluing the two pieces back on but for such a small kit, this is turning out to be a giant hassle.
Hawaii, United States
Joined: August 27, 2006
KitMaker: 1,646 posts
Armorama: 1,557 posts
Posted: Tuesday, October 11, 2011 - 06:32 PM UTC
Ian: nice work. the gun shield looks interesting and hard to build.
Sal: good job on that thing!! It's a beast.
Gary: I share your pain. Looks like you are getting it though!
Some progress for me. Lots of clean up. I accidentally glued the cradle in it's current elevation, so I wont be able to put in the pin that holds the cradle to the carriage. Hopefully it will come out OK.

Happy Modelling, -zon
"Certainty of death.
Small chance of sucess.
What are we waiting for?"
-Gimli, Return of the King.
England - South West, United Kingdom
Joined: October 03, 2011
KitMaker: 9 posts
Armorama: 8 posts
Posted: Wednesday, October 12, 2011 - 07:24 AM UTC
Well here goes my 2nd ever campaign

Going to build this little verteran, The Eduard PE set is the 1st time i've tried using PE so fingers crossed I don't end up with 25 pdr bits glued all over me

Dose anyone know of any 25 pdr brass ammo sets can't find one anywhere
Cheers
Paul
California, United States
Joined: December 06, 2004
KitMaker: 3,694 posts
Armorama: 2,693 posts
Posted: Wednesday, October 12, 2011 - 07:31 AM UTC
If there aren't any brass 25pdr ammo sets then you probably won't have to wait for long with Dragon and AFV Club coming out with 25pdrs. I'm surprised there aren't any for the Bronco and Tamiya kits.
England - South East, United Kingdom
Joined: July 26, 2011
KitMaker: 35 posts
Armorama: 28 posts
Posted: Thursday, October 13, 2011 - 10:45 AM UTC
Sorry that it is a very rushed and not well focused photo.
All the bits are dry mounted as I have built the major sections without adding the finer detailing parts and I will go back and follow up with those pieces as I am starting to get a feel for where the building needs to be stopped to allow painting to be done
When I get opportunity later in the week I will get them all on a black back cloth and get some close ups of the individual sections.
This model is all about large numbers of very small parts, a lot of repetitive gluing and being able to project manage yourself well!!!

New York, United States
Joined: March 08, 2010
KitMaker: 3,662 posts
Armorama: 3,078 posts
Posted: Friday, October 14, 2011 - 12:31 AM UTC
Some nice progress guys keep at it
Welcome Paul, sorry that I can't help you out there but maybe another member can
I switched gears the last few days and was working on my M-3 Honey over at the Allied Armor Campaign, had to give my fingers a rest

and now im getting ready to go away for the weekend with the gun club so I wont be back until Sunday night hope to see lots of progress when I get back
Active Campaigns on the bench:
Operation Fall Gelb - Pz.Kpfw. IV Ausf. C
Engineering the Future - M-26 Recovery Vehicle
115 Campaigns completed
British Columbia, Canada
Joined: August 13, 2009
KitMaker: 420 posts
Armorama: 416 posts
Posted: Friday, October 14, 2011 - 11:53 AM UTC
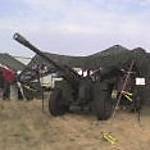
Ready for paint!
other than a few small details (tools, stakes and wheels) that will be added after painting assembly is complete. final assembly will be done once it's painted.


couple of issues with the kit, but as a gunner knew how to fix them. otherwise a fun build.
British Columbia, Canada
Joined: October 02, 2010
KitMaker: 11 posts
Armorama: 9 posts
Posted: Friday, October 14, 2011 - 12:55 PM UTC
progress on the DANA
completed components

components dry fitted

sorry couldn't resist an 8 legged freaks tribute!!!

you'll be seeing more of this spider in other progress pics.
that's all i've got so far. good luck to y'all on your builds
"When you want to be the best, you have to have the best."
England - East Anglia, United Kingdom
Joined: August 12, 2005
KitMaker: 14,499 posts
Armorama: 11,675 posts
Posted: Saturday, October 15, 2011 - 11:42 PM UTC
Great progress folks,
Here's where I'm at following some work earlier in the week.


Al
'Action this Day'
Winston Spencer Churchill
California, United States
Joined: December 06, 2004
KitMaker: 3,694 posts
Armorama: 2,693 posts
Posted: Sunday, October 16, 2011 - 01:50 AM UTC
Progress of sorts. The barrel assembly (top piece) will probably need some putty and sanding to fill some gaps on the front. This image shows how the breech block is fixed (the thing sticking up from the bottom piece). The barrel assembly was hinged at the front. To load, the barrel assembly was tipped up at the rear and loaded much like a double barreled shotgun.

New York, United States
Joined: June 14, 2010
KitMaker: 702 posts
Armorama: 604 posts
Posted: Sunday, October 16, 2011 - 12:07 PM UTC
Heres my kit for the campaign..the Dragon M 270 MLRS. I plan to add Fruil or Bronco tracks...
The kit..

and the paper ...


A recent issue of FSM gave me the inspiration to pick this kit up!
Massachusetts, United States
Joined: September 20, 2010
KitMaker: 137 posts
Armorama: 100 posts
Posted: Sunday, October 16, 2011 - 12:23 PM UTC
And because no campaign is complete without two guys building the same kit:


As usual, might be a couple months before I get started as I am working on several campaigns.
My modelling time has been severely curtailed by a motorcycle accident. I'll do my best to complete the campaigns I have signed up for, but I think a few of them won't be done in time.
New York, United States
Joined: March 08, 2010
KitMaker: 3,662 posts
Armorama: 3,078 posts
Posted: Sunday, October 16, 2011 - 02:43 PM UTC
Active Campaigns on the bench:
Operation Fall Gelb - Pz.Kpfw. IV Ausf. C
Engineering the Future - M-26 Recovery Vehicle
115 Campaigns completed