Campaigns
Where Armorama group builds can be discussed, organized, and updates posted.
GETTER DONE CAMPAIGN
Bigrip74
Visit this Community
Texas, United States
Joined: February 22, 2008
KitMaker: 5,026 posts
Armorama: 1,604 posts
Posted: Sunday, April 03, 2011 - 10:50 AM UTC
@ Delbert: it is not like any of the rest of us have not done the same thing BTW nice F4F.

Bob
squidgy
#144
Visit this Community
Alberta, Canada
Joined: February 18, 2005
KitMaker: 268 posts
Armorama: 111 posts
Posted: Sunday, April 03, 2011 - 02:05 PM UTC
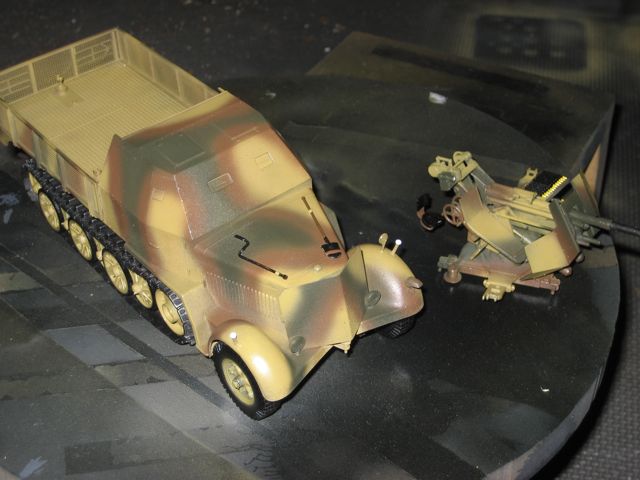
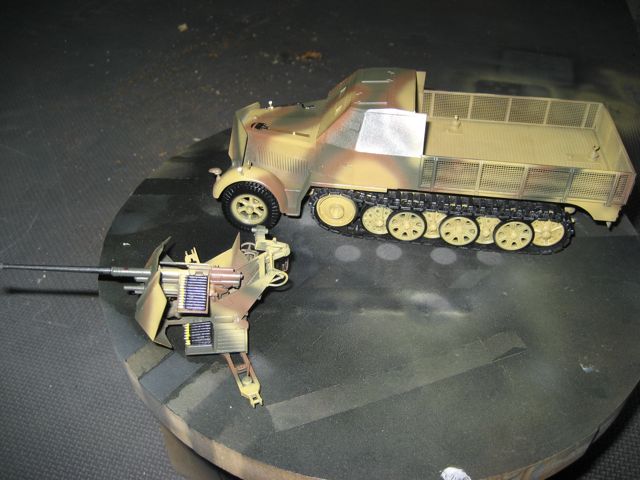
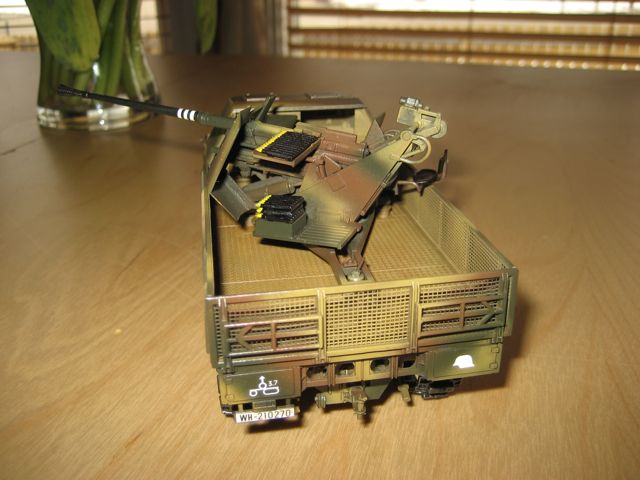
hi guys .. thanks for all the feedback, i had a few issues doing camo, tried to spray colours on to base of dark yellow, looked nasty, so ended up painting all the upper surfaces dark green and then spared the brown and filled in will dark yellow, i managed to do it all in one sitting, 4 hrs.....

hi bob r .. it is the old tamiya kit from the 70's and the mesh is the one that comes with the kit, made of nylon or something, the instructions have a template on them, i traced over and then "painted" the mesh with thin tamiya bottle glue... and cut them out...

i have finished the small paint jobs, put on tracks and wheels and sprayed with gloss from rattle can prior to dark wash , putting on decals and then dull cote

...


ps ignore the blood on the gun as i cut my self and did not realize that i had
got some on the gun...
zontar
Visit this Community
Hawaii, United States
Joined: August 27, 2006
KitMaker: 1,646 posts
Armorama: 1,557 posts
Posted: Monday, April 04, 2011 - 11:27 AM UTC
Mark: the camo looks great. I'm curious about your "painting" the nylon mesh with thin cement. Did this help stiffen it for cutting or something. I recently did some similar mesh on another project and the short end left by cutting bent around a bit, so I am wondering if your method prevented this.

Greg: Thanks for the comment.

Delbert: Thanks for sharing anyway!! Nice wingy thingy.

No pictures, but I've begun cleaning the track links and filling the ejector marks. What fun...

Happy Modelling, -zon
squidgy
#144
Visit this Community
Alberta, Canada
Joined: February 18, 2005
KitMaker: 268 posts
Armorama: 111 posts
Posted: Monday, April 04, 2011 - 12:12 PM UTC
hi zon

yepper thats what i did, i laid out the mesh over the template cut out the shape with about an 5mm extra on each side, then painted both sides with liquid glue, once it dried i then used scissors to cut to exact size,

i have a couple of questions for you, i really like what you did with the inside of the half track, did you paint the items as sub assemblies and how did did you get the scrapped of paint look ?

cheers mark
zontar
Visit this Community
Hawaii, United States
Joined: August 27, 2006
KitMaker: 1,646 posts
Armorama: 1,557 posts
Posted: Monday, April 04, 2011 - 02:09 PM UTC

Quoted Text

hi zon

i have a couple of questions for you, i really like what you did with the inside of the half track, did you paint the items as sub assemblies and how did did you get the scrapped of paint look ?

cheers mark


Mark, Thanks for the compliment.

The initial color was handled in sub assemblies, but the wear and tear was added after putting them together. Essentially, I had the bottom, each side and the radio and rifles and top as separate assemblies, but the sides had the bits and pieced glued to them. I sprayed them all first with german grey, which turned out to be unnecessary and gave the yellow a bit of a greenish tinge). then sprayed on the yellow and did the detail painting (gas mask canister and steering wheel) over the yellow base. I had carefully masked the sides where they would fit to the bottom to avoid too much scraping later.

Then I glued it all together and started on the wear and tear. First I created highlights using Vallejo's equivalent to Tamiya's XF-60 (can't remember the vallejo off-hand) lightened with Vallejo Off-White and thinned a bit. For the scratches on the sides and bottom, I made random scratches and scuff marks where I thought people would stand, scape, etc. using the highlight mix. Then I made slightly smaller scatches/blotches with Vallejo's equivalent to Tamiya's German Grey. This results in a small ring of light yellow just around the grey, which helps it stand out a bit more, although in truth, I should have lightened the yellow a bit more to up the contrast.

For the floor, after the first (highlight) and second (grey) round of scuffs, I also put down blotches of the grey, then wet the brush in clean water and swirled around the paint I just put down, making a wash of sorts. This was done very lightly and not very evenly across the floor.

I used 00 and 000 brushes. Sorry I don't have the Vallejo equivalents, but the Vallejo website has a pdf listing their equivalents to Tamiya and other colors. I just don't have that with me right now.

Hope this helps and let me know if you still have questions.

Happy Modelling, -zon
squidgy
#144
Visit this Community
Alberta, Canada
Joined: February 18, 2005
KitMaker: 268 posts
Armorama: 111 posts
Posted: Tuesday, April 05, 2011 - 12:07 PM UTC
hi guys...

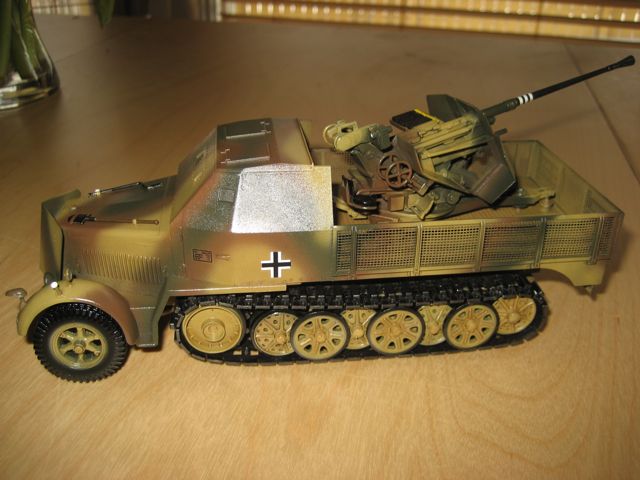
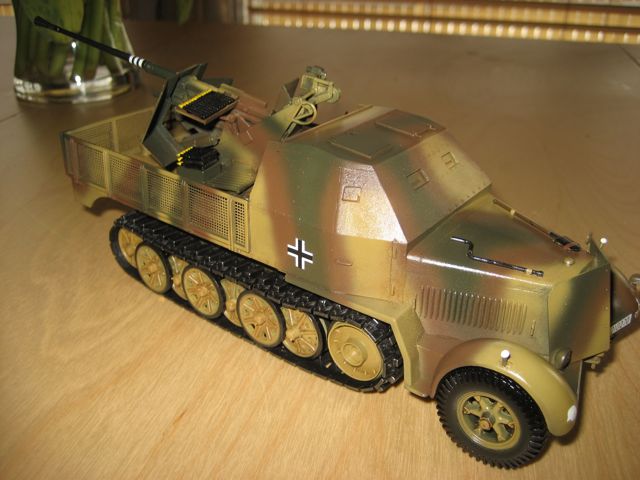
ok decals done., and a light wash (first time ever done one, this is a lot off first's on this model).. hopefully later on this week i can get the dull cote done and a light spray of tan to give a dusty appearance...


zontar
Visit this Community
Hawaii, United States
Joined: August 27, 2006
KitMaker: 1,646 posts
Armorama: 1,557 posts
Posted: Wednesday, April 06, 2011 - 11:06 AM UTC
Nice Mark! Looks good with the gun mounted on it.

Happy Modelling, -zon
ltb073
Visit this Community
New York, United States
Joined: March 08, 2010
KitMaker: 3,662 posts
Armorama: 3,078 posts
Posted: Wednesday, April 06, 2011 - 11:21 AM UTC
Mark let me see if I got this correct, the dark yellow was last, then gloss, then you gonna add some washes then a dull coat ok it's looking good does the gloss coat help the washes settle I'm still trying to figure out what steps to do and when
jcourtot
Visit this Community
Indiana, United States
Joined: June 06, 2008
KitMaker: 344 posts
Armorama: 251 posts
Posted: Wednesday, April 06, 2011 - 11:41 AM UTC
Wow Mark...looking really good!!! Gun looks great. Cant wait to see it finished up!

Johnathon

P.S. Been having some problems with my M60...but i do have some progress done...i'll try to post some pics either tonight or tomorrow.
squidgy
#144
Visit this Community
Alberta, Canada
Joined: February 18, 2005
KitMaker: 268 posts
Armorama: 111 posts
Posted: Wednesday, April 06, 2011 - 03:25 PM UTC
hello guys

thank you all for the possessive feedback..

re:- sol

for the finishing off the model, these are the steps that i do..

1. i finish off the camo painting, in this case the yellow was the last colour to be sprayed (i use tamiya acrylic paints for the most part)

2. Then i painted the tools etc, which were off the model from beginning.

3. once all wheels and tracks were put on, i sprayed the whole model with glosscote (from a rattle can) and let it dry for at least 5 hrs.

4. put the decals on using decal sol and set (to get rid of the silvering)

5. then i resprayed the model again to cover the decals, wash flows better on gloss than matt.

6. i mixed up my wash (the mixture i use is from Mig, i use the Mig wash base to which i added chocolate brown oil paint) my mix is about 10-2,

7. i applied it with a very small brush and let gravity take it along seams etc. i picked out bolt heads and wheel hubs, (to me it made them stand out a bit, when compared to the pictures before the wash), try to have a spare brush handy to help soak up any excess or to spread it around,

and thats about it, once i get some free time this week i will finish off with a dull cote and then give the model a light spray with light tan to simulate a little dust,

normally i just build the model oob and just paint it as if it has just rolled off the production line (it had to have been brand new at one time is my justification)

i searched around the internet for ways to do the washes and filters etc, and finally came up with the system above, please bear in mind that this was my first time that i have used a filter and wash and i will get better i am sure, i think i may have overdone the wheels.. but hey thats the fun in doing this, i am trying not to take it to seriously after-all this should be fun...

cheers
Bigrip74
Visit this Community
Texas, United States
Joined: February 22, 2008
KitMaker: 5,026 posts
Armorama: 1,604 posts
Posted: Thursday, April 14, 2011 - 09:00 AM UTC
I need a little color help with my M3 Stuart, it will be USMC in the pacific and I do not think that OD was the correct color. Here is a color chart that I made with what I have in my paint collection. I am leaning towards XF58.
COLOR CHART OD/GREEN

I went with XF58 to paint the Stuart.

Tamiya M3 Stuat
Tamiya M3 Stuat

Bob
zontar
Visit this Community
Hawaii, United States
Joined: August 27, 2006
KitMaker: 1,646 posts
Armorama: 1,557 posts
Posted: Friday, April 15, 2011 - 06:46 PM UTC
Bob: I'm not much of a color expert, but the green looks good to me. It looks very close to how I remember a restored Wyllis jeep on display in a car gallery here.

Happy Modelling, -zon
jccraemer
Visit this Community
North Carolina, United States
Joined: December 24, 2007
KitMaker: 462 posts
Armorama: 262 posts
Posted: Friday, April 15, 2011 - 07:08 PM UTC
Bob I would go with the xf-58 It looks right on the stuart

john
Bigrip74
Visit this Community
Texas, United States
Joined: February 22, 2008
KitMaker: 5,026 posts
Armorama: 1,604 posts
Posted: Friday, April 15, 2011 - 07:35 PM UTC
John & Zon, thanks for your input now it is on to some future, decals, more future, weathering and a flat coat.

Bob
Bigrip74
Visit this Community
Texas, United States
Joined: February 22, 2008
KitMaker: 5,026 posts
Armorama: 1,604 posts
Posted: Saturday, April 16, 2011 - 08:00 AM UTC
I finally set down and produced a spreadsheet, let me know if any thing needs to be changed.

April 16, 2011

Bob
GregCloseCombat
Visit this Community
California, United States
Joined: June 30, 2008
KitMaker: 2,408 posts
Armorama: 2,394 posts
Posted: Sunday, April 17, 2011 - 01:44 PM UTC
Hi Bob, I think that lighter green was used in the early part of WWII but I really have no clue. Looks good though either way. Also, the chart has me as 1/72 but I'm doing 1/48 - thanks


I got the ground work going now and will play around with the splintered tree
zontar
Visit this Community
Hawaii, United States
Joined: August 27, 2006
KitMaker: 1,646 posts
Armorama: 1,557 posts
Posted: Sunday, April 17, 2011 - 05:40 PM UTC
Greg: coming along nicely. Is that a picture frame base?

Happy Modelling, -zon
Bigrip74
Visit this Community
Texas, United States
Joined: February 22, 2008
KitMaker: 5,026 posts
Armorama: 1,604 posts
Posted: Sunday, April 17, 2011 - 05:56 PM UTC
Greg, thanks for the kudos I made the change and will be on the next posting.

Bob
GregCloseCombat
Visit this Community
California, United States
Joined: June 30, 2008
KitMaker: 2,408 posts
Armorama: 2,394 posts
Posted: Sunday, April 17, 2011 - 07:36 PM UTC
Thanks Bob and Zon

It's a old picture frame with my sidewalk/paver weed preventer polymeric sand. You spread the sand and spray it with water and it dries solid. Then I can go back with some clay to make track marks in the ground. Then I paint it with cheap art acrylics or oils.
zontar
Visit this Community
Hawaii, United States
Joined: August 27, 2006
KitMaker: 1,646 posts
Armorama: 1,557 posts
Posted: Sunday, April 17, 2011 - 09:47 PM UTC

Quoted Text

Thanks Bob and Zon

It's a old picture frame with my sidewalk/paver weed preventer polymeric sand. You spread the sand and spray it with water and it dries solid. Then I can go back with some clay to make track marks in the ground. Then I paint it with cheap art acrylics or oils.


Greg: Thanks for the response. For the backer, do you use the thing that comes with the frame, or do you replace it with masonite or something else? I'm soon to start one and I wasn't sure about the backing. Thanks again!

Happy Modelling, -zon
zontar
Visit this Community
Hawaii, United States
Joined: August 27, 2006
KitMaker: 1,646 posts
Armorama: 1,557 posts
Posted: Sunday, April 17, 2011 - 10:01 PM UTC
Small progress on my 250/3. I've assembled the tracks into groups and prepped for painting the lower hull beneath the fenders. Also, I cleaned up the jerry can rack. It was molded in three separate pieces and the cross bars of the rack didn't mate up very well, so I replaced them with some strip. I also cut the "seems" in each of the cans to match the ones that came with the Africa Corp Infantry set I'm using for Desert Fox.


Happy Modelling, -zon
dvarettoni
Visit this Community
South Carolina, United States
Joined: September 28, 2005
KitMaker: 778 posts
Armorama: 763 posts
Posted: Monday, April 18, 2011 - 01:57 AM UTC
hey all small up date


Photobucket


Photobucket

hope to have more this week thanks
dave
dvarettoni
Visit this Community
South Carolina, United States
Joined: September 28, 2005
KitMaker: 778 posts
Armorama: 763 posts
Posted: Monday, April 18, 2011 - 09:25 AM UTC
ok i think that I'm all done hope you all like thanks
dave


Photobucket


Photobucket


Photobucket


Photobucket


Photobucket


Photobucket


Photobucket


Photobucket


Photobucket


Photobucket


Photobucket


Photobucket

GregCloseCombat
Visit this Community
California, United States
Joined: June 30, 2008
KitMaker: 2,408 posts
Armorama: 2,394 posts
Posted: Monday, April 18, 2011 - 10:23 AM UTC
@Zon - I put everything over the glass in the picture frame. You can add some reinforcement to the rear of the frame by gluing/tacking balsa wood or something similar, but I didn't.

Nice jerrycan rack by the way


@David - congrats. That turret basket is so awesome

Bigrip74
Visit this Community
Texas, United States
Joined: February 22, 2008
KitMaker: 5,026 posts
Armorama: 1,604 posts
Posted: Monday, April 18, 2011 - 10:34 AM UTC
David, nice job and I have marked you down as finished.

Bob