Armor/AFV: Modern Armor
Modern armor in general.
Hosted by Darren Baker
ASLAV w/Turret Bar Armour, IRAQ 2006
Adamskii
Visit this Community
South Australia, Australia
Joined: November 06, 2010
KitMaker: 537 posts
Armorama: 474 posts
Posted: Thursday, January 06, 2011 - 06:56 AM UTC
[quote]
Quoted Text

The bolts joining all the bar armour panels are added. This takes a while but I find it difficult to get a clear image of them - when I finally nail It I will post one.


In the instructions, there is a drawing that shows how the tube supports are attached to the top and bottom of the bar armour panels and show where the bolts go. [/qoute]

Thanks Jason for the information as always. The pic I talk of here is not the instruction one - that is fine. I can't seem to take a clear pic with my camera to show everyone what mine looks like. Even in the later turret pics the bolts are almost invisible and only in one other pic in the post can one set be seen out of about 30 bolt heads! Like i said, when I finally nail taking a good picture of the bolts, i will post it. I might try buying a tripod and see if that works. All my pictures are taken freehand and it shows I think.

Am very glad to hear of the remastering. Will comment more when I get to work and have a free moment - will run late if I type much more now !

Thanks Adam
Adamskii
Visit this Community
South Australia, Australia
Joined: November 06, 2010
KitMaker: 537 posts
Armorama: 474 posts
Posted: Thursday, January 06, 2011 - 05:38 PM UTC

Quoted Text

It is actually 4, but who's counting. I HATE PE. So if I can get away without having to use it, I don't use it. One thing that Trumpeter did get almost right was the head light mounts and indicator mounts. The indicator mount is about 1 mm too high and the large front facing indicator is a bit out of shape and the mounting point for the back of the head light is wrong. But with this kit and every other one I have done, where do I stop when it comes to making it as accurate as possible and fix every part of the base kit????. At the time I scratch built the parts for this one, It was based on the Trumpeter LAV-25 kit and not the ASLAV kit. Then when the ASLAV kit hit the market I added a few things and removed a few things. As it was I could have added another 20 parts to the kit, but then the price really starts to get out of peoples reach.
This kit is currently being remastered (as is the PC) with a few new parts (headlight cluster etc) and even more detail. I did this kit almost 3 years ago and my casting has vastly improved since then from bench drop pouring to vacuum and pressure as has my scratch building ability. For instance, the barrel is now one piece, the headlights will be replaced with the same ones as the Fitter, and the periscopes will be done in clear resin. I don't intend to replace the kit PE headlight mounts, because as far as I'm concerned they are good enough.


Seems I have perhaps struck a raw nerve, certainly not my intentions to do so.

It is interesesting to point out the differences between the three (of the 4 available) Conversion kits I have done. I will at the end of the builds, add a debrief/ review of the 3 kits and compare certain elements. This is important if anyone else was to choose to do a Diorama with 2 or more Australian Lav's, as inconsistencies will show when two vehicles that are supposed to have the same item have obvious differences in the modelling.

That is the reason for highlighting the headlight assembly. In a multi vehicle diorama setting it does'nt matter whether the headlamps are scale perfect nearly as much as them all being the same. For example, if I had to build two Abrams tank for a diorama, I wouldnt put an Academy and a Tamiya kit side by side as there would certainly be differences in thickneses, shapes, size and contour that would be apparent- matters not which one is the right one, just that the two are the same.

So, if I had realised way back when I started these 3 that one of them did not have the same headlight asemblies as the other two, I would never of fitted the unique parts, rather I would of used the comman parts to all three.

The same issue is encountered with the change in brushguards and prop guards, when placing one kit that has whitemetal , and one with resin items. It does'nt matter which is more accurate, as long as the three are consistant.

I think it is really important for the purchaser to be aware of these differences so they can plan thier build to accomodate them. Also because the after sales service from ACM and MH is good enough that you can easily ask for a replacement part to be supplied individually in the style desired. Might not always get it, but doesnt hurt to ask.

I have avoided the prop guard issue by not fitting any to any of the 3, but If i did want to fit it to the two without Bar Armour, I would use the kit supplied parts to prevent the differences between the resin and whitemetal being apparent.

I did not do this on the headlight guard - I built the PC without the fitters vehicle in my possesion so did'nt know of the changes to parts - But a single conversation to Jason at ACM and I have a replacement set on the way to make it consistant ! Brilliant.

I will photograph (as best I can) the 3 prop guards to help explain what I mean. I have to consider the following in a Diorama model - Do not make the audience ask questions that have no answers. If one vehicle has prop guards, and the other 2 don't, well that might be a scene that is common as muck in overseas deployment patrols, but to the layperson for whom the diorama audience is aimed at, seeing two vehicles with missing guards while one has them might well have them asking why, and without technical explanation, making suppositions like perhaps the modeller forgot to add them? or things like that. This goes for any difference between the vehicles.However, Generally the Audience at a competition for example has reasonable appreciation that as the standard of the build goes up, the reliability of it's accuracy does as well. Not many people invest years building something to have not checked for accuracy / feasability along the way.

As for the comments regarding what does one leave in and take out when making a kit, or how accurate a component or sub assembly needs to be, I'm certainly no expert vendor. Rather my expertise lies in being a consumer of the products and I know that if I want improvements, then I have to swallow differences between generations of editions. But will have to plan my build around accomodating these difference for the overall benefit of a multi vehicle diorama, so no one asks innocently "why is that bit fatter than that one?" and walks away not remembering the good things of the diorama, but the questions raised by bad planning.

Hope this helps in understanding the reasons I pointed out my surprise at finding no headlights in the conversion kit. It's not a criticism of an otherwise supremely competent product, but an informed observation that does have value when taken in context. Having the history behind developement and the manufacturers decisions reasons certainly helps us understand why it is this way.

Always appreciated to have such comments.

Adam


jasmils
Visit this Community
Queensland, Australia
Joined: December 23, 2003
KitMaker: 1,016 posts
Armorama: 745 posts
Posted: Thursday, January 06, 2011 - 07:32 PM UTC

Quoted Text

Seems I have perhaps struck a raw nerve, certainly not my intentions to do so.


No, s**t no. I just don't have the vocabulary to write without sounding like I'm on the defensive. And I don't do "Smiley Faces" to convey mood (well, occasionally I do ).
My main aim with ACM is to produce the most accurate model that I can and still make it affordable. I could have the kits cast in China and then it would be within everyone's reach. But I prefer to do it myself. That way if something needs to be changed I can do it right then and there. As you pointed out, the instructions are a prime example. If I had ordered 200 kits only to then find out that a couple of parts are labelled incorrectly, I then have 200 sets that are useless. Same goes for the kits.
So when it comes to customers picking faults, I take it on-board and try to fix the problem as soon as possible. The headlights are another example, as are the jerry can racks on the PC and the Fitter. All of the "common" parts across the whole 4 sets are being redone to keep the constancy.
And yes your right, if a customer needs a replacement part, ask away!

Cheers Jason
Adamskii
Visit this Community
South Australia, Australia
Joined: November 06, 2010
KitMaker: 537 posts
Armorama: 474 posts
Posted: Friday, January 07, 2011 - 02:56 AM UTC
Almost finished.

Front right headlight and mirror assembly. No guards fitted (removed for bar Armour)

Front left


heres the pics I promised of the bolts on the bar Armour. Difficult to get a good pic, but heres best I could muster.


the yellow lines all point to an individual bolt head that was applied.


the corrected episcopes and thier blank off's

the footman loops removed form turret for travel stenciling.

the start of the wiring of the headlamp assemblies

left side

The wiring for the telephone box, INVS etc.

right side mag 58 detail (need to add handle and sight)

left side

footman loops and props added- no guards (removed for BA). Footman loops are a challenge and I find once their on you have to be carefull how vehicle is handles as they break away very easy.


Virtually finished ! (until I realised I forgot the drivers episcope covers)


Lastly. My ASLAV FOV so far.


spare tyres on the roof!


Thats it for a while maybe. I will fine tune each vehicle with corrections and extra detailing over the next few days. The ASLAV project goes on hold until Easter, when I will paint the 3 beasts. ( I took an extra week off work to focus on this). So between now and then It's research on markings and stowage, And to get some good tie down straps for the tyres and other equipment (including the various bustle racks etc needing strapping added).

My Building will shift to finishing my 3 buildings for the diorama, also I have to finish the DYNA and the M1114 Hummer. The street needs to be made etc etc the list is long! Over 23 figures to be painted aswell. Good thing competition is 5 months away.....

Adamskii


Boggie
Visit this Community
Newfoundland, Canada
Joined: December 08, 2005
KitMaker: 1,370 posts
Armorama: 1,331 posts
Posted: Friday, January 07, 2011 - 04:57 AM UTC
Very impressive collection, great work.
csmanning
Visit this Community
Alberta, Canada
Joined: March 23, 2008
KitMaker: 333 posts
Armorama: 321 posts
Posted: Friday, January 07, 2011 - 07:16 AM UTC
Nice Nice Nice!!!! Well Done! Can't wait to see some paint on all those beasts!

Thanks so much for posting ALL your pictures of your build log it truly makes learning and following what you're doing and your techniques alot easier. I wish more people who do build logs follow your lead! Very well done!

I started my gun car back in November and am almost ready for the anti slip coating. Your build log is perfect timing for me. I have your build book marked! Cheers mate!

Carmen
specmod
Visit this Community
Australia
Joined: August 12, 2009
KitMaker: 93 posts
Armorama: 91 posts
Posted: Friday, January 07, 2011 - 10:04 AM UTC
Man how do you do it, seriously, that is fast building, and good. I have the Lav PC and the fitter and when ever I open the boxs I get a shiver down my spine with all that resin, brrrrrrrrrrrr. Both you and Sam though have given me a heap of ref pics to go off, so I guess i have no excuse now. Well done mate, looking forward to seeing paint on these, I really am. Cheers
Adamskii
Visit this Community
South Australia, Australia
Joined: November 06, 2010
KitMaker: 537 posts
Armorama: 474 posts
Posted: Friday, January 07, 2011 - 11:32 AM UTC

Quoted Text

I started my gun car back in November and am almost ready for the anti slip coating. Your build log is perfect timing for me. I have your build book marked! Cheers mate!

Carmen


Thankyou for the comments. I was very disillusioned with the prospect of adding anti slip until I saw the Tamiya grit paint. In fact I never added it to the PC when I built it ( I have since retrospectively added it). I don't like masking mcuh so the brush application suited me fine. If you do use it, I found the most effective way to add was to add it with a brush suitable for "stippling", let is skin over/semi cure and then restipple . The fine edges where the paint needs to be removed around vertain details i either brush up to the edge freehand, or, crape the cured paint back fro the edge with a 1mm rod end.

Good luck

Adam
Adamskii
Visit this Community
South Australia, Australia
Joined: November 06, 2010
KitMaker: 537 posts
Armorama: 474 posts
Posted: Friday, January 07, 2011 - 11:40 AM UTC

Quoted Text

Man how do you do it, seriously, that is fast building, and good. I have the Lav PC and the fitter and when ever I open the boxs I get a shiver down my spine with all that resin, brrrrrrrrrrrr.


LOL, I really enjoyed the PC and Fitters build. I wish I had blogged the PC, but it would of been a mess. Essentially once the suspensions done, the top half is just a big box with details glued to it. Its amazing how fast you go through those resin risers. Seriously of all the time spent building , about 1/3 rd was spent blogging the build. Having to reduce photo file sizes edit each pic to crop for best shape and some annotations took alot longer than I thought - and its on a laptop with no mouse!

In hindight I should of done a photo set showing how I glue footman loops on, and how I apply the antislip. maybe one or two other things could of had better sequence pics. But I hope it offers some assistance!

Regards
Adam
kohtbon007
Visit this Community
Singapore / 新加坡
Joined: September 20, 2005
KitMaker: 21 posts
Armorama: 20 posts
Posted: Friday, January 07, 2011 - 04:42 PM UTC
What an awesome collection!!!!!! Where did you get the conversions and info to finish them. Dun mind starting collecting them for myself. Real fatastic work.
Regards,
Desmond
Adamskii
Visit this Community
South Australia, Australia
Joined: November 06, 2010
KitMaker: 537 posts
Armorama: 474 posts
Posted: Friday, January 07, 2011 - 05:45 PM UTC
Was looking for what paint I used on my first conversion - almost 8 years ago now I built an ASLAV conversion from the old revell kit. I used mostly Defence Models and Graphics conversion set elements and a tonne of scratchbuilding.
It was A humbrol paint , but not sure which one.

Was fun to look at this model I build so long ago, and how rough some of the elements are, but not bad considering the total lack of reference! But the paint job wasnt bad! The wheels are funny - really really bad knock off's I think!

I think I have come a long way since then !

check it out
http://www.track-link.net/gallery/2394

Adam
Austmouse
Visit this Community
Australian Capital Territory, Australia
Joined: February 11, 2008
KitMaker: 104 posts
Armorama: 98 posts
Posted: Friday, January 07, 2011 - 07:22 PM UTC

Quoted Text

What an awesome collection!!!!!! Where did you get the conversions and info to finish them. Dun mind starting collecting them for myself. Real fatastic work.
Regards,
Desmond


Desmond
Try www.mheaust.com.au/MHE/catalogue.htm

Mouse house sells all the bits you need made by Mouse Armour or Arms Corps Models.

Reference material - try our book Military Briefs No.4 ASLAV.

John M
Adamskii
Visit this Community
South Australia, Australia
Joined: November 06, 2010
KitMaker: 537 posts
Armorama: 474 posts
Posted: Friday, January 07, 2011 - 08:37 PM UTC
As John said - almost everything can be found at Mouse House. just need to buy the donor kits for conversion.

I would reccomend buying the bulged wheels instead of just the hubs - the price is well worth it. I have tried to assemble the wheels and as per kit instruction with the hubs and think its far easier with the full resin wheel.

The reference book Australian Military Equipment Profiles No.4 ASLAV is a great start to this FOV (family of Vehicles), and I thoroughly recommend it - mine currently is almost in pieces I have thumbed it so much - testiment to the value of the many colour photos and information!

Lastly there are several very very good threads on this website and others that are packed with information on ASLAV FOV, And I suggest this one as a primary source :

https://armorama.kitmaker.net/forums/120708&page=19#1411438

thanks

Adam
Adamskii
Visit this Community
South Australia, Australia
Joined: November 06, 2010
KitMaker: 537 posts
Armorama: 474 posts
Posted: Friday, January 07, 2011 - 10:21 PM UTC
OK I said previously I should of detailed the surface Anti slip texture better - and have had offline requests to do so, so here goes !

I dont have a library of ASLAV kits available but will use my very very old LAV command kit from ESCI ! I have been using it as a mock up for the diorama as its detail is so bad it cant be seriously used as anything other that a toy or a mock up...


Anyways
compared to the PC which had the texture added after he build was completed.
also you can see the product I am using from Tamiya.

the brush I use is a piece of rubbish I got from a discount from in a pack of 10 for $2 (throw it away afterward)

put a reasonable amount on the brush (its as thick as cold custard)

Apply to the surface to be coated. I havechosen NOT to mask any areas that the paint does not go. So I will paint freehand.

the paint is applied over the surface to "wet it out"

I use the side of the brush to "blot" the texture paint across the surface - if you try to paint in a traditional sense, it will leave the most serious brushstrokes you ever seen...

the blotted surface

Now the important bit - let the paint "skin" for about 5 - 10 minuites, it may look very thin and sparse, uneven at this stage but we will even it out. Take the same brush you were using ad push it straight down on the table to make the bristles force apart - we want the opposite of a nice point.

Now we stab the surface with the brush at a right angle to the surface. This process I call "stippling". Needto be a little gentle, but the bristles make the surface more of the texture we want. left side in the pic has has been stippled, the right side is only blotted.

stippling both sides.. this process can be repeated over a few times to get it right. The paint as tiny ceramic beads it it that feel like fine sand grit, but we help expose that by this process.

the surface textured with anti slip! While it is still wet, I push a 1mm rod around the bits that could of been masked, where the texture should not be. Check your references. The paint once dry can be "peeled" off as it has a skin like property. It doesnt dry 'hard" like an enamel and I have found that you can easily tidy up over paint edges with a sharp knife and a steady hand

A very rough job but you get the idea !

and a final comparison

Hope this helps anyone ese wanting to try this very simple method!

Adam

Adamskii
Visit this Community
South Australia, Australia
Joined: November 06, 2010
KitMaker: 537 posts
Armorama: 474 posts
Posted: Saturday, January 08, 2011 - 01:51 AM UTC
Something that has been on my mind for a while, is the Bar Armour mounting brackets. There is evidence of the BA installed on the hull by the removed light and prop guards, and of course the cross bar mounts and the the turret armour. But the full skirt of BA has many more mounting points- some quite ingenious in thier use of fixed points such as clamping onto grab handles or lifting rings. One such mount can be seen in many photos of Type 1 hulls that have the BA removed from the hull, it is located just above the front wheels between the suspension structs. (see the yellow lines) The line at the rear points to one of these mounts as supplied in the conversion kit. The front arrow points to the one I want to add.


I know its not on all of them, obviously it also can get removed when uninstalling the Armour. However I really like the extra piece of evidence that helps sell to my Audience that there is more history to this vehicle. So with that in mind here is a very quick mod I did this afternoon.

Basically i copy the size and shape of the one at the rear for consistency. I use evergreen styrene square rod 1.5mm X 1.5mm to make the bar, and evergreen styrene flat strip 0.5mm x 1.5mm. I dont have any styreen strip 0.5 x 1.5mm so I cut some from a piece of 0.5 x 4.0mm (just to be confusing). The yellow line shows where I cut out a piece the size I need.

I use "plastruct" liquid cement for glueing the styrene together - works very well, super glue will work ok but sometimes styrene doesnt bond with super glue.

now I want to glue the bar/rod to the flat at 90 degrees. I glue it 1.5mm from the edge of the flat, its ok to have alot of overhang the other end as I will trim it off soon to size.

90 degrees

Trim off overhang same as other side - 1.5mm from bar. The flat should now be 5mm long with the bar mouted perpendicular at the midpoint - the same as the kit conversion size.

next centrally drill two 0.5mm holes in the flat where two bolts would go for mounting.

close up

Now to trim the bar down to fit under the hull. I measure the distance from the wall to the edge - the same distance the rear mount hangs out (level with the outer edge of the hull at its widest point)

Amazingly its exactly 10mm so I cut the square bar/rod there

I glue the mount in place (using reference pictures to find point of best alignment).

And we now have two matching brackets (repeat for both sides) as the rear ones.

the original pic again just for comparison


Something to think about . With each specialist mod I reduce the number of cars to choose from with markings, So do think about this before starting - if you want a specific vehicle, double check such a mod exists on it. If you do not have a specific vehicle in mind then I hope this gives you an option to think about.

Adam
csmanning
Visit this Community
Alberta, Canada
Joined: March 23, 2008
KitMaker: 333 posts
Armorama: 321 posts
Posted: Saturday, January 08, 2011 - 08:11 AM UTC
Again... perfect timing... I have the lower hull completely done with the exception of these additional mounts. Your construction pics are bang on. The gun car I'm building has these mounts as well. Thanks for providing the size of the styrene you used (my missing piece to my puzzle). I've been sick and haven't made it out to the hobby tsore to pick up some... you've made my job easier. Cheers!!

Keep up the great work!!
jasmils
Visit this Community
Queensland, Australia
Joined: December 23, 2003
KitMaker: 1,016 posts
Armorama: 745 posts
Posted: Saturday, January 08, 2011 - 12:42 PM UTC
For those modeller who would like to add this part of BA support to their ASLAV, here is a quick drawing I did. Please note, it is not to scale.

Cheers Jason

csmanning
Visit this Community
Alberta, Canada
Joined: March 23, 2008
KitMaker: 333 posts
Armorama: 321 posts
Posted: Saturday, January 08, 2011 - 01:02 PM UTC
There he is.... I knew you'd post those images sooner or later. Spot on!Cheers!!

Carmen
Adamskii
Visit this Community
South Australia, Australia
Joined: November 06, 2010
KitMaker: 537 posts
Armorama: 474 posts
Posted: Saturday, January 08, 2011 - 06:46 PM UTC
A quick guide to how how I apply footman loops / tiedowns.

First ly here are the tools I need plus one length of resin tie down from ACM.


This is a length of tie down, about 4 inches long

I start with a very sharp new xatco no11 knife blade, and insert under one of the footman loops in the middle of the riser.

slowly slice under the loops to lift them away from the riser. ( you could try other methods, but this works for me)

I go along to the end - carefully

I flip it over and cut back the other end.

I nearly got all of this one off before it broke. thats ok because can use the little bits later.

Am going to demonstrate on my test vehicle. ESCI Lav command.

A drop of thick gel superglue

lower the loops from the middle into the drop and pull out leaving a tail of adhesive on the loops , dont go in too far as you might fill the loops.

Align the glued end where you want it to go on the vehicle - the unglued end is good to hold onto. The loops maintain reasonable straight edge when upright so shouldnt need tools to align at this point.

Insert a knife to prop up the unglued end.

apply a small drop of gel superglue to the riser you cut off earlier

swipe it along the underside of the loops that are in the air.

use a knife or other tool to align any twisting - a gel or slower cure glue helps rather than instant dry.

if any of the glued ones want to pop up, use the back of the knife to press them down .

trim any overhang

checking alignment

any loops that didnt stick down, I apply a tiny bit of adh to them via piece of wire or toothpick.

All done !


Let them dry, and when handling avoid letting fingers roll over them as they pluck off real easy. the ones on edges of ASLAV are very susceptable to accidental removal. Other methods to remove loops from riser are to scribe it away from loops with a steel rule and sharp knife, or scissors. I dont have much success with them. I have no success with the PE ones, I detest using them as they spring load themselves in aevery direction but the one I want!

Hope this tip helps

Adam
Adamskii
Visit this Community
South Australia, Australia
Joined: November 06, 2010
KitMaker: 537 posts
Armorama: 474 posts
Posted: Tuesday, February 08, 2011 - 12:54 PM UTC
Tow cables.

I just got some tow cables for this project and I am very happy with them. No one to my knowledge does an ASLAV MEAO tow cable set. So need to adapt something else. Looks to me like the cable used on the ASLAV was borrowed from the Aussie Abrams. So I got a hold of some Abrams Cables and wow.. I reckon their spot on!

heres some pics of the real things.. quality is ordinary, but the best reference pics are in books and I dont want to scan them - the cable trails across the front in aready position in case of need of recovery. So it is a short cable.

attention to the shape and size of the eye at the end of the cable


These cables I got from Eureka XXL model accesories. really cheap too. two cables and 4 eyes in a pack, so 2 packets gives me 4 cables (enough for 3 vehicles and a spare to add to the fitters - stashed nicely in the windscreen basket)

And the picture from the catalogue


I have not built and installed yet ( I am certain feedback may interfere with this ) but am 99% happy they will fit.

When installed will post some pics..

Adam
jashby
Visit this Community
Queensland, Australia
Joined: July 01, 2009
KitMaker: 278 posts
Armorama: 248 posts
Posted: Tuesday, February 08, 2011 - 06:25 PM UTC
Nice job Adam.
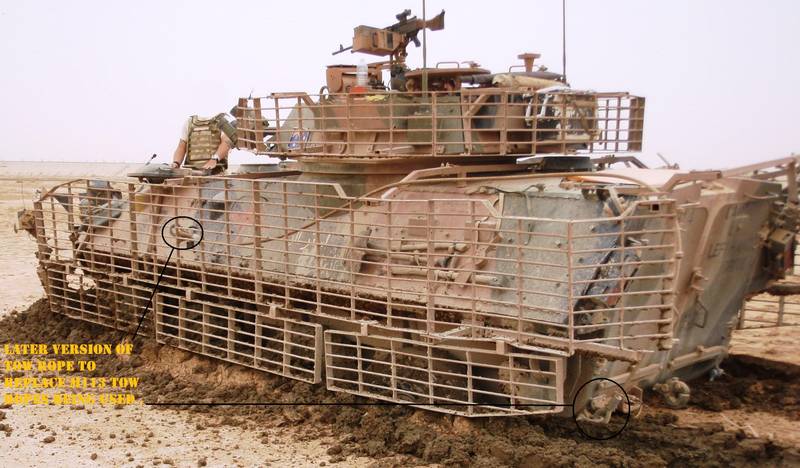
Hate to be the one to bust your bubble but the tow cables are old M113 ones. Plus a couple that were "acquired" in typical Aussie fashion from some Bradleys in the AO.
We needed something that we could hook up fast to extract vehicles from IED strikes. The ASLAV only has a nylon winch extension rope and chains so the old M113 wire ropes were used. Much to the disapproval of the RAEME bigwigs. Something to do with the load rating of the rope, i.e. the M113 weighs 11.54 T against the ASLAV 15T. Towards the end of OBG(W)-4 we actually received some purpose built wire ropes for the task which were a fair bit longer than the M113 and consisted of D shakles and eyelets on the ends of the rope.
Just some back ground info for you.
Doesn't really matter because the American Tow ropes all have a very similar eye loop on them from what I have seen. They just seem to be beefed up to suit the vehicle towing weight and the wire rope thicker and longer but yours look the part.
Cheers, John

jashby
Visit this Community
Queensland, Australia
Joined: July 01, 2009
KitMaker: 278 posts
Armorama: 248 posts
Posted: Tuesday, February 08, 2011 - 06:27 PM UTC
BLACKWATER
Visit this Community
Yunnan, China / 简体
Joined: August 05, 2010
KitMaker: 449 posts
Armorama: 441 posts
Posted: Wednesday, February 09, 2011 - 12:41 AM UTC
Shock. They need strong determination to complete and superb skills.
Thanks for sharing
Cheer
Blackwater
Adamskii
Visit this Community
South Australia, Australia
Joined: November 06, 2010
KitMaker: 537 posts
Armorama: 474 posts
Posted: Wednesday, February 09, 2011 - 01:52 AM UTC
Thanks for the heads up guys. Fortunately I have some m113 towing eyes. and guess what they are almost identical - the difference being the casting process. The length of the cable is longer but thats nothing that cant be fixed.

I absolutely must have towing cables on my vehicles. Nearly always present. i am happy to have the adapted earlier ones to suit the dio.

Thats the best part of using a forum to prepare because trying to find this information on your own is impossible. So thanks muchly for the background info!

Here are the other pictures I used to determine the size and shape of the towing eye I wanted in the first place.


And a pic I had of the new version but did not see what it was until you explained it. ( I should of seen this difference and asked earlier)


Adamskii
Adamskii
Visit this Community
South Australia, Australia
Joined: November 06, 2010
KitMaker: 537 posts
Armorama: 474 posts
Posted: Tuesday, April 19, 2011 - 02:01 AM UTC
Welcome back ASLAV lovers.... lol

SO almost time to paint. but first I have to address the problem stuff. The biggest issue with the type 1 is I needed to fit a "boxes with no name" as it was going to be the lead vehicle in the convoy.

SO heres how it happned

Firstly my type 2 hull had the "boxes with no name" fitted and I used that as the reference and duplicated what I did there - even if its wrong at least Its going to be consistant.. ( and I did have to fix an significant problem)

The spare "Boxes with no names" sprues I had floating around in my spares box. What sort of person has this ???

The major parts fitted prior to wiring. The PC is on left side.

pre wiring front view

post wiring front view

Interestingly I didnt use the green enamelled wire supplied in the kit - I replaced it with 0.3mm solder. The kit supplied solder is 0.5mm I believe so I maintained the integrity of different thickness in cables. I hope.
The two vehicles with the "boxes with no names" attached - the lead vehicle and tail end charlie (pc)


Now the correction I had to do was the two cube shaped boxes on the sides of the hull each have an antenna. I had up till now had both of mine the same height and thickness. A close examination of reference pics reveals that the starport side one is longer and thicker, while the port side is definitely thinner and shorter! So I made the correction using 1mm rod for the starport side, and 0.5mm rod for the port side, the port side being roughly 25% shorter aswell.

A few minor gap clean ups and the type 1 hull is ready for paint!

The type 2 hull however has to be decidid IF I will fit spall liner wrapped sandbags. Probably scratchbuild them, using Sams as reference. Pretty sure this will happen - so better buy some tamiya tape - 2mm for the straps.

be back in day or two and will hopefully have these puppies under paint by the end of the weekend!

Adam

EDIT : removed technical term for the "boxes with no names" and used a generic label.