

Hosted by Darren Baker
Irish ARW - Ford F-350 SRV - Special Forces

HeavyArty


Joined: May 16, 2002
KitMaker: 17,694 posts
Armorama: 13,742 posts
Posted: Saturday, February 12, 2011 - 10:09 AM UTC
Roy, this is coming out great. A really cool conversion into a neat vehicle. You are doing a great job on it and I'll be watching this one to see how it will come out. Keep up the great work.

vonHengest
Joined: June 29, 2010
KitMaker: 5,854 posts
Armorama: 4,817 posts

Posted: Saturday, February 12, 2011 - 10:37 AM UTC
This is great stuff Roy, and good man for sticking to it and moving along so quickly. Am watching this 

retiredyank
Joined: June 29, 2009
KitMaker: 11,610 posts
Armorama: 7,843 posts
Posted: Saturday, February 12, 2011 - 10:47 AM UTC
Roy, looks like you have your work cut out for you. Can't wait to see how you enlarge the seats. All this and on a resin model. Makes me sick to even think about attempting something like this. You make it look almost too easy. Are you just going to use some doped tissue for the dust cover?

RKinsella

Joined: September 29, 2007
KitMaker: 603 posts
Armorama: 575 posts

Posted: Saturday, February 12, 2011 - 11:31 AM UTC
Al: got your email mate, I'm having a think about it alright.. 
Gino: Good to see you here man, thanks so much for the encouragement!
Jeremy: Cheers, Yeah I'm trying to get something done each day, even if its only something small. Infact I spent three hours earlier cutting, sawing, sanding & scratching the new rear bumper & tow hook!
Its finished & attached now, I'm just uploading the photos to photobucket as I write this. I'll post the photos tomorrow evening!
Matt: Good to see you back! I have a few ideas for the seats, something I did before on a 120mm Figure to enlarge some pouches. Your probably scratching your head now but stay tuned & all will be revealed!
In regard to the dust cover, I'm between two ideas.
Firstly I was going to use some tissue soaked in wallpaper paste, this would be very thin though..
Secondly I was thinking I might use some Lead Foil..
The canvas cover in question is a pretty heavy canvas in reality, more similiar to a leather material, most likely rubber or a composite plactic. I guess to stop the fine dust getting through the fabric!
It might appear more realistic if I use the foil but I I'll try both methods anyway before I settle with one of them!

Karl187

#284

Joined: October 04, 2006
KitMaker: 3,094 posts
Armorama: 2,942 posts

Posted: Sunday, February 13, 2011 - 01:25 AM UTC
I reckon thinly rolled magic-sculpt would be a good bet for the dust cover.

RKinsella
Joined: September 29, 2007
KitMaker: 603 posts
Armorama: 575 posts
Posted: Sunday, February 13, 2011 - 02:24 AM UTC
..guess I have a third option now! Cheers Karl 
RKinsella
Joined: September 29, 2007
KitMaker: 603 posts
Armorama: 575 posts
Posted: Sunday, February 13, 2011 - 03:13 AM UTC
Last night I started scratching the rear fender (Bumper).

As the kit bumper is more suited to the commercial market & has lovely lines & curves, the Irish F-350 is a less glamorous design and very simple in design.
To start with I had to remove the fitting for the commercial bumper seen below.

The original bumper/fender itself is not needed & cannot be converted so I had to scratch a brand new one.
I began by marking out with a pencil what I needed to remove from the rear end chasis (see below)

I cut this away and sanded the area down.
Next I added some thin plastic card to the corners of the pick up hull to simulate the where the hull end curves in, usually hidden away by commercial bumpers on most vehicles.

next I added new attachments for the scratched tail fender. They are just an extension of the main chassis as the rear fender doesn't hug the rear body and is extended a few inches from the main chassis and body.

I began building the rear bumper (fender) using tow pieces of thick plastic card glued together.
I measured out the length & depth of the bar and cut away a small rectangular section in the centre for the tow hook assembly.
I used small cut out pieces of P600 super fine Sandpaper as the foot grips on the top of the frame. I scratched the registration plate, added an electrical socket for towing and some PE rear reflectors found in my spares box to the face of it too.

A tow bar attachment is built into the Vajra kit but it is the wrong type for this project & is also in the incorrect position for the Irish F-350.
To correct this I removed the original cast. I rebuilt the required tow hook bar & joint from scratch. Attaching it up higher onto the rear chassis & later adding a tow hook pilfered from one of my spare Humvee kits.
Here is the new rear fender now attached to the hull, along with the scratched tow hook


As the kit bumper is more suited to the commercial market & has lovely lines & curves, the Irish F-350 is a less glamorous design and very simple in design.
To start with I had to remove the fitting for the commercial bumper seen below.
The original bumper/fender itself is not needed & cannot be converted so I had to scratch a brand new one.
I began by marking out with a pencil what I needed to remove from the rear end chasis (see below)
I cut this away and sanded the area down.
Next I added some thin plastic card to the corners of the pick up hull to simulate the where the hull end curves in, usually hidden away by commercial bumpers on most vehicles.
next I added new attachments for the scratched tail fender. They are just an extension of the main chassis as the rear fender doesn't hug the rear body and is extended a few inches from the main chassis and body.
I began building the rear bumper (fender) using tow pieces of thick plastic card glued together.
I measured out the length & depth of the bar and cut away a small rectangular section in the centre for the tow hook assembly.
I used small cut out pieces of P600 super fine Sandpaper as the foot grips on the top of the frame. I scratched the registration plate, added an electrical socket for towing and some PE rear reflectors found in my spares box to the face of it too.
A tow bar attachment is built into the Vajra kit but it is the wrong type for this project & is also in the incorrect position for the Irish F-350.
To correct this I removed the original cast. I rebuilt the required tow hook bar & joint from scratch. Attaching it up higher onto the rear chassis & later adding a tow hook pilfered from one of my spare Humvee kits.
Here is the new rear fender now attached to the hull, along with the scratched tow hook

seb43

Joined: August 30, 2005
KitMaker: 2,315 posts
Armorama: 2,158 posts

Posted: Sunday, February 13, 2011 - 03:58 AM UTC
Looking real good
Keep it the good work
Congrats
Seb
Keep it the good work
Congrats
Seb
Shanelangston
Joined: October 27, 2010
KitMaker: 85 posts
Armorama: 84 posts
Posted: Sunday, February 13, 2011 - 04:28 AM UTC
Nicely done! Still watching buddy!

_Viper_

Joined: April 15, 2010
KitMaker: 163 posts
Armorama: 86 posts
Posted: Sunday, February 13, 2011 - 07:16 AM UTC
RK, you are I-N-S-A-N-E!
It's coming alomg great. I am glued!

It's coming alomg great. I am glued!
RKinsella
Joined: September 29, 2007
KitMaker: 603 posts
Armorama: 575 posts
Posted: Tuesday, February 15, 2011 - 10:15 AM UTC
Seb, Shane, Nicola, Thanks so much guys!
I moved on to the front bumper section today & spent alot of hours scratching the bull-bar rig.

I began by returning to the front bumper again and sanding it completely down. The SRV has a plain bumper as I mentioned before so I had to get rid of any signs of the commercial fender in it!

Next I put some plastic card in behind the front bumper slats where the chassis is hidden. The frame that supports the Bull Bars are attached here on the Irish F-350's.

Using Plastic card I scratched the Bull Bar frame.

I added the base of the Frame where the motorised hoist is located.

Then using cut down cotton bud sticks I added the two main frame bars to the centre section, connect at both sides to the Bull Bar frame.

I had an old Bull Bar set from a die cast 1/43 Jeep I had been fooling around with & was amazed to find that I could use the leading edge sections as a perfect frame for my 1/35 Bull Bars!

I added these to the partially constructed Bull Bar frame and found them to be just perfect!
Next using very fine stretched plastic sprue I added the smaller bars to the inside of the left and right side bar frame.

And here is everything dry fitted so far.

My F-350's hoist is going to be covered like the photo so I'll be returning to this later in the build when I'll be constructing the rest of the canvas sections!

BTW I wasn't entirely happy with the result at first but later AFTER these photos were taken I went back to re-adjust some of these fine bars. I'm going to leave this section for a few days and take a look at it with fresh eyes during the week, if I'm not entirely happy with these small bars again I may use another media to build this small section. Infact I have some small brass roads being delivered over the next few weeks from Lucky Model so they might be perfect!
I moved on to the front bumper section today & spent alot of hours scratching the bull-bar rig.
I began by returning to the front bumper again and sanding it completely down. The SRV has a plain bumper as I mentioned before so I had to get rid of any signs of the commercial fender in it!
Next I put some plastic card in behind the front bumper slats where the chassis is hidden. The frame that supports the Bull Bars are attached here on the Irish F-350's.
Using Plastic card I scratched the Bull Bar frame.
I added the base of the Frame where the motorised hoist is located.
Then using cut down cotton bud sticks I added the two main frame bars to the centre section, connect at both sides to the Bull Bar frame.
I had an old Bull Bar set from a die cast 1/43 Jeep I had been fooling around with & was amazed to find that I could use the leading edge sections as a perfect frame for my 1/35 Bull Bars!
I added these to the partially constructed Bull Bar frame and found them to be just perfect!
Next using very fine stretched plastic sprue I added the smaller bars to the inside of the left and right side bar frame.
And here is everything dry fitted so far.
My F-350's hoist is going to be covered like the photo so I'll be returning to this later in the build when I'll be constructing the rest of the canvas sections!
BTW I wasn't entirely happy with the result at first but later AFTER these photos were taken I went back to re-adjust some of these fine bars. I'm going to leave this section for a few days and take a look at it with fresh eyes during the week, if I'm not entirely happy with these small bars again I may use another media to build this small section. Infact I have some small brass roads being delivered over the next few weeks from Lucky Model so they might be perfect!

grimmo

Joined: January 17, 2006
KitMaker: 752 posts
Armorama: 569 posts
Posted: Tuesday, February 15, 2011 - 01:15 PM UTC
Roy, that is some fantastic work! really well done. I'm waiting to see how this looks when finished!
Just a q, do the irish SF use steyrs or M4's? if you need some styers, let me know as i have a few of them lying around.
Just a q, do the irish SF use steyrs or M4's? if you need some styers, let me know as i have a few of them lying around.

F3066
Joined: November 20, 2004
KitMaker: 71 posts
Armorama: 55 posts

Posted: Tuesday, February 15, 2011 - 06:27 PM UTC
umm, wow glad there was page 2 otherwize i would have been disapointed this is one hell of a kick ass build you have going on here special forces stuff is always at home with the scratchbuilder keep it going and keep us posted
personaly ithink the main bars on the bull bar were the winch is mounted are to thick need to use a smaller tube stock ......jamie
personaly ithink the main bars on the bull bar were the winch is mounted are to thick need to use a smaller tube stock ......jamie
RKinsella
Joined: September 29, 2007
KitMaker: 603 posts
Armorama: 575 posts
Posted: Tuesday, February 15, 2011 - 08:13 PM UTC
Matt your very kind thank you! However I purchased alot of these Austeyrs from the Victorian Modelshop in Australia about 3 years ago & I still have enough to keep me going for another few projects at least, but thanks again for your offer!!
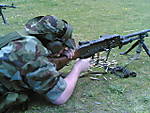
Although the ARW are mostly seen in photographs with Modified Ster AUG 1's, the AUG 3 is very popular & has likely replaced most A1 models. Like all SF units there is no shortage of differing weapons in the ARW's armoury, H&K weapons are numerous & the H&K416 (a German veriant of the US M4 Carbine) is also available to the unit.
J, thanks for your kind words mate! I understand where you are coming from with the centre bars, but honestly this is more a result of my bad camera skills than the wrong size of tube With the White color, the proximity of the kense being so close & ultimately the flash everything is appearing chunkier in the pics including the main frame I built too! Infactvwhen I posted the photos last night I actually got a fright looking at the frame thinking it was oversized but when I went back to the model itself I was relieved to find everything looked ok ..but please feel free to point out anymore things that don't look right, I'm open to suggestion from a fresh set of eyes
Although the ARW are mostly seen in photographs with Modified Ster AUG 1's, the AUG 3 is very popular & has likely replaced most A1 models. Like all SF units there is no shortage of differing weapons in the ARW's armoury, H&K weapons are numerous & the H&K416 (a German veriant of the US M4 Carbine) is also available to the unit.
J, thanks for your kind words mate! I understand where you are coming from with the centre bars, but honestly this is more a result of my bad camera skills than the wrong size of tube
With the White color, the proximity of the kense being so close & ultimately the flash everything is appearing chunkier in the pics including the main frame I built too! Infactvwhen I posted the photos last night I actually got a fright looking at the frame thinking it was oversized but when I went back to the model itself I was relieved to find everything looked ok ..but please feel free to point out anymore things that don't look right, I'm open to suggestion from a fresh set of eyes 
DutchBird

#068

Joined: April 09, 2003
KitMaker: 1,144 posts
Armorama: 526 posts

Posted: Tuesday, February 15, 2011 - 08:43 PM UTC
This one looks really good, impressive and something that others can learn from (a good 'how to' guide). Just two perhaps nitpicking points:
- There seems to be the remnant of an airbubble in the oval thingy in the centre of the engine grill.
- The 'ghost' of where the original bumper was supposed to go seems to be a bit more rounded, and the end-plate is slightly thickened. On the last image of the rear you posted it seems it is still square and not thickened yet.
I am looking forward to the next installment of this build-log.
Harm
- There seems to be the remnant of an airbubble in the oval thingy in the centre of the engine grill.
- The 'ghost' of where the original bumper was supposed to go seems to be a bit more rounded, and the end-plate is slightly thickened. On the last image of the rear you posted it seems it is still square and not thickened yet.
I am looking forward to the next installment of this build-log.
HarmKarl187
#284
Joined: October 04, 2006
KitMaker: 3,094 posts
Armorama: 2,942 posts
Posted: Wednesday, February 16, 2011 - 01:03 AM UTC
I think the bull bars look just right- with the different materials in their natural color it is bound to look weird in a picture, especially if it isn't professionally lit (thats not a commentary on your photo skills Roy!). I reckon it will all look better under a coat of primer- a single color will help to bring it all together before painting the camo begins.
RKinsella
Joined: September 29, 2007
KitMaker: 603 posts
Armorama: 575 posts
Posted: Wednesday, February 16, 2011 - 04:28 AM UTC
Hi Harm, thanks for your kind words!
Your completely correct about the air bubbles in the front section (that would be the Ford badge to be precise), infact the cast has quite a few air bubbles through out. In particular the rear pick up section on both sides of the back door!
I will be filling these in later when I am finished the entire scratch conversion, no point doing it now & having to return to it again later!
I'm just a little bit lost as to the rounded bit at the rear you mentioned, however if something that's meant to have a sharp edge is looking a little rounded I can assure you it's just like Karl said, it's likely the photo! Ive spent quite a while ensuring everything has been sanded down flat were need be
I'll try attach better photos later
Karl, as ever thanks for the support man!
I'm of the same opinion that this will hopefully look a whole lot better with colours applied & some more care taken with the camera!
Infact I might start taking photos that are not so close to the camera lense & without the flash, it's not doing tge model much justice!

Sudzonic

Joined: December 07, 2007
KitMaker: 2,096 posts
Armorama: 1,983 posts

Posted: Wednesday, February 16, 2011 - 04:33 AM UTC
Loving it Roy keep up the good work on this one it is going to be an awsome build..
RKinsella
Joined: September 29, 2007
KitMaker: 603 posts
Armorama: 575 posts
Posted: Wednesday, February 16, 2011 - 04:40 AM UTC
Cheers Scott! Good to see you here man 

squad55
Joined: September 19, 2005
KitMaker: 44 posts
Armorama: 37 posts
Posted: Wednesday, February 16, 2011 - 09:23 AM UTC
Roy,
This is the Dogs B****X!!!!!!! Outstanding work, the detail on this build is as per your usual high standard, I find scratch building difficult even on the small amount that i do, however you have turned it into an art my friend.
This is goin to stand out in any competition... keep up the momentum! Fantastic conversion!
Al.

SEDimmick
Joined: March 15, 2002
KitMaker: 1,745 posts
Armorama: 1,483 posts

Posted: Wednesday, February 16, 2011 - 09:49 AM UTC
Looks good, but personally I'd redo the fine bars that are protecting the headlights. The bottom one looks thicker then the rest of them on the left handside. Try some .10,.15 or .20 styrene rods or brass rods instead?
RKinsella
Joined: September 29, 2007
KitMaker: 603 posts
Armorama: 575 posts
Posted: Wednesday, February 16, 2011 - 08:00 PM UTC
Alan; your spoiling me something rotten with those comments, cheers bud!
Scott; I have to agree with you, I'm not entirely happy with those fine bars, I mentioned this earlier. As soon as those brass rods I ordered arrive I'll be returning to this section to improve it
Didn't get anything done yesterday with other commitments but hoping to get some bits done later today
Scott; I have to agree with you, I'm not entirely happy with those fine bars, I mentioned this earlier. As soon as those brass rods I ordered arrive I'll be returning to this section to improve it
Didn't get anything done yesterday with other commitments but hoping to get some bits done later today

VINICIUS

Joined: April 14, 2006
KitMaker: 18 posts
Armorama: 18 posts
Posted: Wednesday, February 16, 2011 - 08:24 PM UTC
love it, nice project on a unnusual vehycle, i never had seen this before, nice to see and thanks for share, looking forward
cheers
Pompeo
cheers
Pompeo
RKinsella
Joined: September 29, 2007
KitMaker: 603 posts
Armorama: 575 posts
Posted: Thursday, February 17, 2011 - 04:32 AM UTC
Obrigado Vinicus
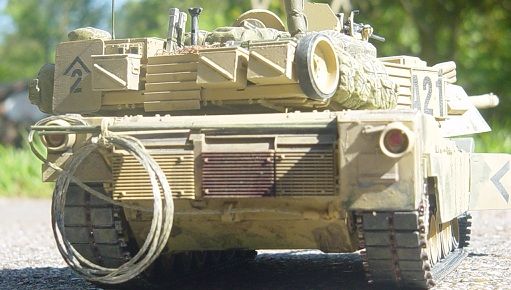
I got back to work today detailing the rear pickup bed door.
Using a tiny plastic stencil sheet containing letters & numbers that I got from my bud Aaron Smith I designed the F-350 moulded badge seen on the rear door.


you can see from the photo above that I also added the ford badge shape to the right hand side of the door too. This is sprayed over with the body color on the Irish SRV.

I continued on cutting and bending some small PE I had and used it to detail the tie-down hooks that run horizontally along the back door.
I also rebuilt the the rear handle for the back door in the centre.

Here is the newly refurbished door attached to the rear pick up bed.

I got back to work today detailing the rear pickup bed door.
Using a tiny plastic stencil sheet containing letters & numbers that I got from my bud Aaron Smith I designed the F-350 moulded badge seen on the rear door.
you can see from the photo above that I also added the ford badge shape to the right hand side of the door too. This is sprayed over with the body color on the Irish SRV.
I continued on cutting and bending some small PE I had and used it to detail the tie-down hooks that run horizontally along the back door.
I also rebuilt the the rear handle for the back door in the centre.
Here is the newly refurbished door attached to the rear pick up bed.
squad55
Joined: September 19, 2005
KitMaker: 44 posts
Armorama: 37 posts
Posted: Thursday, February 17, 2011 - 07:41 AM UTC
nice roy! nice....
 |

WEB HOSTING BY


Copyright ©2021 Armorama and Kitmaker Network, a subsidiary of Silver Star Enterprises
All Rights Reserved. Please read our Conditions of Use and Privacy Policy.
All Rights Reserved. Please read our Conditions of Use and Privacy Policy.