@Korpse – Neil,
Every time that I look in on your post you have something new for us to see. The last time I dropped by you were in the process of detailing your Panzer IV flatcar and now you’ve managed some camouflage and have moved onto building a quad 20. I like the modifications that you undertook on the quad 20 and again a good friend of yours has come to the rescue with some high quality photo-etch items to enhance your build. Your friend sure knows his deal and has come up with some very well detailed photo-etched items that are far better than what’s currently available on the aftermarket scene. Looks like you can position the quad 20 just like on the real deal, how cool is that!
Nice job on the case. I read through your step-by-step on how you went about putting together the acetate case. I have a suggestion if you are going to put another case together in the future. Instead of using a Stanley knife try using a P-cutter. I’ve used it for cutting acetate without having to apply the type of pressure you mentioned using with the Stanley. The P-cutter and blades are relatively inexpensive and available at most hardware stores. The blades are also available in a few different widths; the blades remove material as you move them across the acetate leaving a small trench on the first pass that will help guide the cutter on the seceding passes. I use it for cutting styrene sheets. I provided you with a photograph of the one I use.
Again, keep it coming; I’m really enjoying this build.
-Eddy
Hosted by Darren Baker
Armageddon BP-44 Armored Train 1/72
Posted: Sunday, July 17, 2011 - 07:27 PM UTC
PanzerAlexander
Attica, Greece / Ελλάδα
Joined: February 17, 2010
KitMaker: 625 posts
Armorama: 608 posts
Joined: February 17, 2010
KitMaker: 625 posts
Armorama: 608 posts
Posted: Monday, July 18, 2011 - 09:20 AM UTC
Neil, Eddy,
Thanks for providing this useful information.
Last time I had to give 20 Euros to make the plexiglass case for my Leopold gun and it's too much for a 1/72 kit.
I would try 2 part expoxy glue . It cures clear and provides the strongest bond.
P.A.
Thanks for providing this useful information.
Last time I had to give 20 Euros to make the plexiglass case for my Leopold gun and it's too much for a 1/72 kit.
I would try 2 part expoxy glue . It cures clear and provides the strongest bond.
P.A.
Korpse
Queensland, Australia
Joined: October 06, 2009
KitMaker: 382 posts
Armorama: 378 posts
Joined: October 06, 2009
KitMaker: 382 posts
Armorama: 378 posts
Posted: Friday, July 29, 2011 - 11:13 PM UTC
Hi Eddy,
thanks for the tip with that groove cutter, it has to be better than the knife blade !
I don't think this will be the only case I make, but for now I'll be spending all my spare time on completing the paint job & weathering on the train, and building the diorama for inside the case.
at present I've been focused on the diorama.
by the 105-M howitzers in the turrets, this is a late 1944 train.
I didnt want to do a snow scene.
So I guess this will be a Spring 1945 diorama
At least one train took part in the defensive battle on the Oder, & trains that were able to, retreated into the reich, 3 being operational near Zossen, right up to the last day of the war. A number of trains were operational, in what territory was still left, mainly in parts of Germany and Austria.
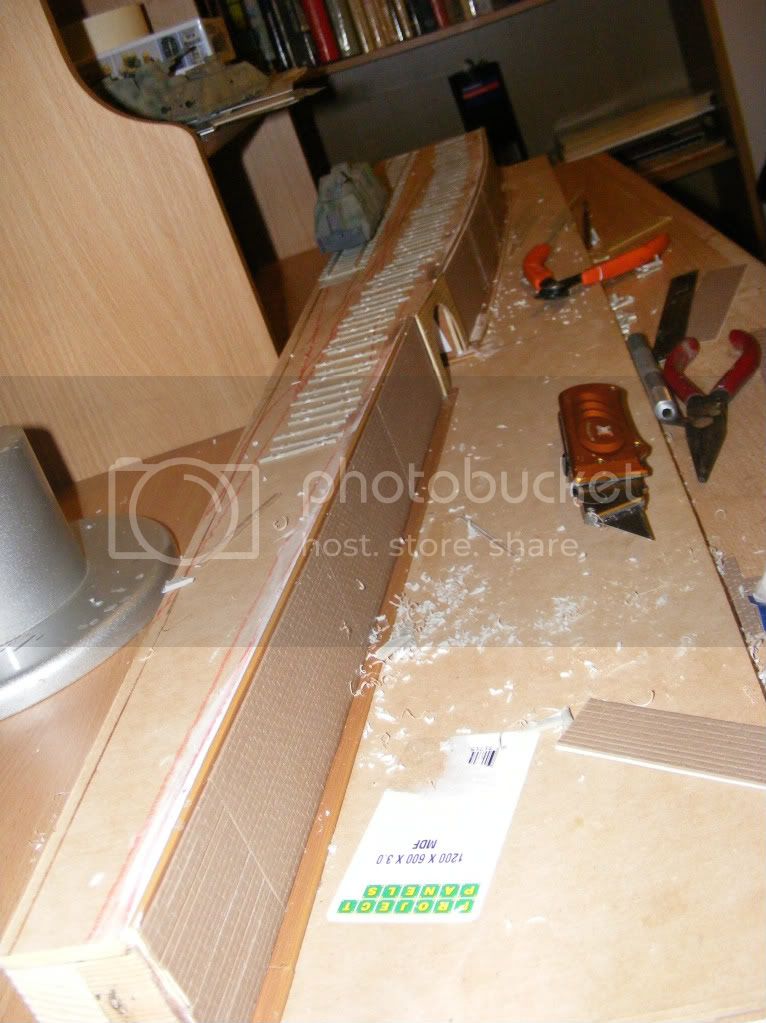
I'm setting the scene near a german town or city, late in the war. I've seen pictures of elevated train lines, with brick or stone walls, and am basing the diorama on that type of scene. Down below will be grassed areas and cobblestone road.
Its not much to look at yet, still have to lay all the tracks, and a set of points, as well all the lower area road and scenerey but here is where its at
cheers
Neil
SchoeniR6
Germany
Joined: November 21, 2010
KitMaker: 189 posts
Armorama: 189 posts
Joined: November 21, 2010
KitMaker: 189 posts
Armorama: 189 posts
Posted: Saturday, July 30, 2011 - 01:36 AM UTC
Great!!!!!
Absolutly. The tunnel is a eye catcher.
Regards
Absolutly. The tunnel is a eye catcher.
Regards
Posted: Tuesday, August 02, 2011 - 07:43 PM UTC
@Korpse - Neil,
I like your idea! Thanks for posting the beginning of your diorama, waiting to see it unfold as you build onto it.
-Eddy
I like your idea! Thanks for posting the beginning of your diorama, waiting to see it unfold as you build onto it.
-Eddy
Firefly74
Queensland, Australia
Joined: April 15, 2010
KitMaker: 224 posts
Armorama: 205 posts
Joined: April 15, 2010
KitMaker: 224 posts
Armorama: 205 posts
Posted: Saturday, August 06, 2011 - 02:20 PM UTC
G'day Neil, been a while since I dropped in for a look, impressive progress!
The quad flak gun looks great.
Your dio and case are going to look great when finished.
Looking forward to seeing it all come together.
Cheers,
TIm
The quad flak gun looks great.
Your dio and case are going to look great when finished.
Looking forward to seeing it all come together.
Cheers,
TIm
Korpse
Queensland, Australia
Joined: October 06, 2009
KitMaker: 382 posts
Armorama: 378 posts
Joined: October 06, 2009
KitMaker: 382 posts
Armorama: 378 posts
Posted: Friday, September 02, 2011 - 12:29 AM UTC
Hello
thanks to all for the replies & comments
I have been regularky progressing the diorama and the train itself had internet problems the last few weeks, but can now give an update
The Diorama
I laid all the track and ballasted it, but got advice that the track was too close to the front edge to be realistic, so had to be moved back a bit, so that it was closer to similar scenes in Germany (black & white photos also below). The rear track also had to be moved, as the locomotive was too wide to allow it to sit on the track & for the case to be be fit on.
A lot of rework fixed this. I'm still finishing the paintjob on the track. I put a stone wall facing on the front. Artificial grass & trees to one side of the tunnel, and paving to the other side. Still working on the finish of these.
The Train
gave it some washes, applied decals to most wagons and sealed the
carriages with overall coats of Dullcote. Still have weathering & fine detailing to add, and still working on final positioning on the track.
aside from the train & diorama, have to decide what will go on the spare track, vehicles on the paved road below, figures around the train & down below etc, so still a lot to do till I can put the cover on this one, and start a new project
various progress pictures below, no single item is finished yet
cheers
Neil
r2d2
England - South East, United Kingdom
Joined: April 13, 2006
KitMaker: 424 posts
Armorama: 419 posts
Joined: April 13, 2006
KitMaker: 424 posts
Armorama: 419 posts
Posted: Friday, September 02, 2011 - 09:51 AM UTC
This is just an AWESOME piece.
Posted: Saturday, September 03, 2011 - 06:58 AM UTC
@Korpse – Neil,
This project of yours is turning out to be one of the most interesting, enjoyable, informative and inspirational build logs that the Braille building world has had the good fortune to have bestowed upon all of us. You’ve taken this Braille building thing to a ‘whole n’other level’. Can I come over and play?
Neil, all your hard work is paying off. That fifth photograph from the top looks authentic and realistic. And the photograph of the car coming out of the tunnel also looks great and adds action. I don’t think that any of these trains exist today? But you’ve brought them all back to life again for the entire world to see.
I do have one question, were did you get the tracks? Did you also make these yourself, they are very detailed and look to scale and realistic. Anyhow, keep us all posted. Waiting to see more.
Happy modeling,
-Eddy
Korpse
Queensland, Australia
Joined: October 06, 2009
KitMaker: 382 posts
Armorama: 378 posts
Joined: October 06, 2009
KitMaker: 382 posts
Armorama: 378 posts
Posted: Saturday, September 03, 2011 - 01:01 PM UTC
Hi Val & Eddy
thanks for the comments
Eddy I'm glad you are enjoying the progress. I'm enjoying the build, though parts of it have been a bit tiresome, its all starting to come together.
Yes please come over and have a look, but I think you live about 10,000km away
Your question with the tracks - they are Hobbyboss. The kit ones are mostly not too bad, but not as good as Hobbyboss. The Hobbyboss are about 1mm too wide for 1/72 scale standard gauge, but are the best available. Scratch building the tracks would have added months to the build,
I'm still tweaking the paintjob on the diorama, particularly the brick retaining wall, to disguise the joins and make it look overall more realsitic.
No single component of the train is fully finished yet, but most are close.
I'm starting on some figures. As the scene is in a town near a large railway station (Hauptbahnhof) I'm adding some Preiser Refugess in 1/72 scale. These unfortunates could have just got off a train now being homeless, or be heading to the train station to escape to somewhere safer.
A couple of pictures below
cheers
Neil
tread_geek
Ontario, Canada
Joined: March 23, 2008
KitMaker: 2,847 posts
Armorama: 2,667 posts
Joined: March 23, 2008
KitMaker: 2,847 posts
Armorama: 2,667 posts
Posted: Sunday, September 04, 2011 - 05:26 AM UTC
Neil,
The only word that comes to mind about this massive build is breathtaking. Even if not totally finished to your liking, it is as good if not better than museum quality. You have set the bar to astronomical heights and I wonder if anyone or even you could ever top this build. The pictures of the locomotive and tenders caused me to take multiple looks to try to determine if they were the model or a preserved example. I have followed this build from the start and must also add my thanks to you for sharing it with the community.
Cheers,
Jan
PedroA
Valencia, Spain / España
Joined: December 27, 2010
KitMaker: 324 posts
Armorama: 322 posts
Joined: December 27, 2010
KitMaker: 324 posts
Armorama: 322 posts
Posted: Sunday, September 04, 2011 - 10:35 AM UTC
This is the best site for your monster. Great scene. I hope to see finished.
Regards. Pedro.
Regards. Pedro.
warreni
South Australia, Australia
Joined: August 14, 2007
KitMaker: 5,926 posts
Armorama: 712 posts
Joined: August 14, 2007
KitMaker: 5,926 posts
Armorama: 712 posts
Posted: Sunday, September 04, 2011 - 11:07 AM UTC
Quoted Text
Hi Val & Eddy
thanks for the comments
Eddy I'm glad you are enjoying the progress. I'm enjoying the build, though parts of it have been a bit tiresome, its all starting to come together.
Yes please come over and have a look, but I think you live about 10,000km away
Hey! I am just around the corner!! When are you going to let everyone here in Qld have a look young fella?
Korpse
Queensland, Australia
Joined: October 06, 2009
KitMaker: 382 posts
Armorama: 378 posts
Joined: October 06, 2009
KitMaker: 382 posts
Armorama: 378 posts
Posted: Thursday, September 08, 2011 - 12:08 AM UTC
Hi Jan, Pedro & Warren
thanks for the very kind comments, much appreciated, its a pleasure to put the build where interested people can see it.
Warren I think you must be the only other person in Queensland who cares to see a Braille Scale armoured train model. My experience is that most modellers in these parts are into 1/35th & 1/48 armour (tigers panthers and shermans etc) & 1/72nd and 1/48th aircraft, all of which are about as interesting to me as my train is to them (just about zero)
Slow midweek progress on the train.
I have painted a few more figures for the scene, these are cast in white metal by Fantassin. I'm not a big fan of white metal figures & these are no exception. Some are pretty good, but others are a bit stumpy for my liking, and have legs that look a bit too short for the bodies. However in real life some people also look like that, so I'll add a few to the scene. Some of the faces are moulded a bit coarsely too.
The Field MP (second from the left with the silver Feldpolizei gorget on his chest) has a fat looking body, even his face is fat, and he has short legs, I'm not sure I like his look, he will contrast interestingly with a set of Presier Feldpolizei that I have yet to assemble and paint, who will also be in the scene, as the Preiser figures are generally quite slim & fit looking.
I am finishing a UM T-38 for the tub wagon (and a UM tub wagon),
Picture below of some Fantassin figures & the T-38 can be glimpsed to the upper right. I'll paste better pictures when the T-38 is finished
cheers
Neil
Firefly74
Queensland, Australia
Joined: April 15, 2010
KitMaker: 224 posts
Armorama: 205 posts
Joined: April 15, 2010
KitMaker: 224 posts
Armorama: 205 posts
Posted: Friday, September 09, 2011 - 02:34 PM UTC
Hi Neil. Your almost there! Looks amazing. Your paint work and weathering is superb.I too thought I was looking at a real preserved train till I noticed how big those trees were in the background of the photo!
It's truely an individual and remarkable project that I think few people would have the patience and dedication to complete.
Looking forward to seeing it all finished.
Cheers,
Tim
It's truely an individual and remarkable project that I think few people would have the patience and dedication to complete.
Looking forward to seeing it all finished.
Cheers,
Tim
Korpse
Queensland, Australia
Joined: October 06, 2009
KitMaker: 382 posts
Armorama: 378 posts
Joined: October 06, 2009
KitMaker: 382 posts
Armorama: 378 posts
Posted: Saturday, September 17, 2011 - 11:35 PM UTC
Hi Tim
thanks for the comments. You and Warren are welcome to drop around anytime
I have put a fence up, something similar to the old period black and white picture & have ripped up the bad cobblestone road and replaced it with better stuff. Fence is Atlas, road is Vollmer.
I am working now on finishing the final paintjob, weathering, chipping etc on each wagon. Should be finished the train very soon, then can do the diorama.
Here are pics of thefence and new roadway, still improving both
cheers
Neil
tread_geek
Ontario, Canada
Joined: March 23, 2008
KitMaker: 2,847 posts
Armorama: 2,667 posts
Joined: March 23, 2008
KitMaker: 2,847 posts
Armorama: 2,667 posts
Posted: Tuesday, September 20, 2011 - 06:44 AM UTC
Neil,
Always a treat to visit this thread and see the super job that you are doing on this project. Some of those last pictures of the train on the dio can really leave one guessing as to the scale. In fact, I found this thread and showed a few members these pages on my laptop at the last local IPMS meeting. The majority consensus was that the scale was anything larger than Braille.
Cheers,
Jan
Korpse
Queensland, Australia
Joined: October 06, 2009
KitMaker: 382 posts
Armorama: 378 posts
Joined: October 06, 2009
KitMaker: 382 posts
Armorama: 378 posts
Posted: Monday, September 26, 2011 - 10:34 PM UTC
Hi Jan
thanks glad you like it, & funny your friends thought it was larger than braille. I must have gotten a few bits right
and dont forget I still have the other half of the train, I have a totally different idea for it, in the near future
to update progress
I have about finished each wagon and its now been attached to the track to prevent movement & damage.
Some crew members have been placed on and around the train, being a few Fantassin white metal figures, but most are Caesar panzer crew, which are really quite good, and in many useful poses.
I have also put the civilians in place, and a few vehicles. I still will add a couple more vehicles, maybe something more on the spare track, and more figures on the road and grassed areas.
This is a large and hard scene to photograph, so just a few pics now, I'll add more regularly of the different parts of the train & diorama
cheers
Neil
PH-Designs
England - West Midlands, United Kingdom
Joined: June 21, 2011
KitMaker: 87 posts
Armorama: 83 posts
Joined: June 21, 2011
KitMaker: 87 posts
Armorama: 83 posts
Posted: Monday, September 26, 2011 - 11:21 PM UTC
Very nice indeed Neil.
Pete
Pete
PedroA
Valencia, Spain / España
Joined: December 27, 2010
KitMaker: 324 posts
Armorama: 322 posts
Joined: December 27, 2010
KitMaker: 324 posts
Armorama: 322 posts
Posted: Wednesday, September 28, 2011 - 09:59 AM UTC
Great work Neil. You are right, you need more vehicles and people in the street. Now you see this space empty.
Regards.
Pedro.
Regards.
Pedro.
tread_geek
Ontario, Canada
Joined: March 23, 2008
KitMaker: 2,847 posts
Armorama: 2,667 posts
Joined: March 23, 2008
KitMaker: 2,847 posts
Armorama: 2,667 posts
Posted: Friday, September 30, 2011 - 04:29 AM UTC
Neil,
It's hard to believe that there is still another half to be built! This first half and the base is more than intimidating enough. I personally liked seeing the armoured car and the Draisine on the track beside the train.
As for people thinking that it's a larger scale, perhaps you are too close to this build to really appreciate it. Now all you need to do is motorize the monster and have it run on tracks through your back garden.
Cheers,
Jan
Korpse
Queensland, Australia
Joined: October 06, 2009
KitMaker: 382 posts
Armorama: 378 posts
Joined: October 06, 2009
KitMaker: 382 posts
Armorama: 378 posts
Posted: Saturday, October 22, 2011 - 08:50 PM UTC
Hello
its been a long time since I updated.
thanks to all for the comments.
The train is finished and on the diorama
The diorama is finished but may get some more rail vehicles, and some more road vehicles, & more people & soldiers on the road and grassed area.
Not much more to add. Its finished and mounted on the wall, under its perspex cover. All pictures (except the last) taken with the cover off, as glare and reflection make photography too hard with the cover on.
cheers
Neil
tread_geek
Ontario, Canada
Joined: March 23, 2008
KitMaker: 2,847 posts
Armorama: 2,667 posts
Joined: March 23, 2008
KitMaker: 2,847 posts
Armorama: 2,667 posts
Posted: Sunday, October 23, 2011 - 04:08 AM UTC
Neil,
I am totally at a loss for superlatives to convey how great this monster creation turned out. The figures alone (the painting of, and poses) are a masterpiece, especially so when one considers the scale. Your build has been both intimidating and inspirational, in so many ways. I don't think that I exaggerate when I say that this belongs in a museum and preserved for posterity. At the very least, you really should submit this creation as minimally, a Photo Feature to the site. Congratulations and thanks for the sharing of this build with the community.
Cheers,
Jan
weathering_one
Ontario, Canada
Joined: April 04, 2009
KitMaker: 458 posts
Armorama: 456 posts
Joined: April 04, 2009
KitMaker: 458 posts
Armorama: 456 posts
Posted: Sunday, October 23, 2011 - 08:38 AM UTC
Super build Neil!!! Everything looks great and I also must say that the figure painting really caught my eye. Will you be taking a break or start on the second train?
Regards,
AJ
Regards,
AJ
PedroA
Valencia, Spain / España
Joined: December 27, 2010
KitMaker: 324 posts
Armorama: 322 posts
Joined: December 27, 2010
KitMaker: 324 posts
Armorama: 322 posts
Posted: Monday, October 24, 2011 - 01:38 AM UTC
Great built Neil but if you make similar ones, you will need to buy a new house.
Regards. Pedro.
Regards. Pedro.