_GOTOBOTTOM
Constructive Feedback
For in-progress or completed build photos. Give and get contructive feedback!
Newbie first tank - Merk IV
_Viper_
Visit this Community
Roma, Italy
Joined: April 15, 2010
KitMaker: 163 posts
Armorama: 86 posts
Posted: Saturday, April 30, 2011 - 01:12 PM UTC
Dear all,

it is with great trepidation and quite some anxiety that I am posting pics of my first build on this great website and community.
I want to start by thanking all of you for having been a great wealth of information over the course of the last year or so it took me to complete this building. I thank you because you have shared everything about your builds and techniques debating among the community on each possible way to tackle different issues (heck, even on how and when you decide to cut off pieces from the sprues!).

So…what good you see in this build has mainly been achieved by trying to put into practice things I have read and seen on this very website and to you all shall get the credit (well, yeah, maybe also a little bit to me, no?) . On the other end, what bad you see is mainly due to my inability to effectively put into practice things “learnt” here and as such the blame is all mine.

Ok then, before I let you with the images, here is a brief summary about the kit and the build.
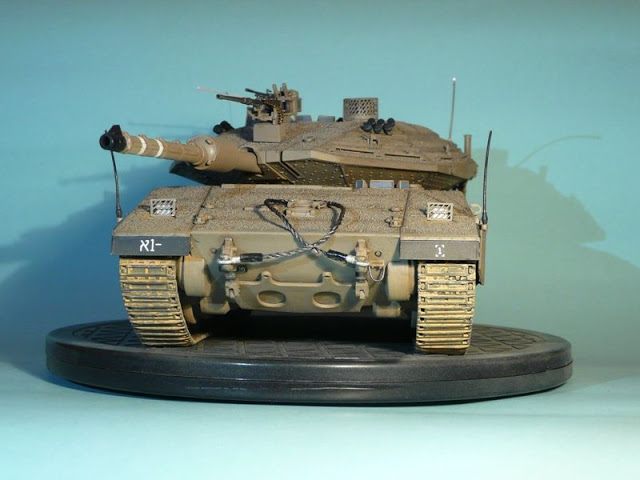
It is the “old” (i.e. first issue) Academy Merkava IV.
I used the Legend Merk. IV LIC resin set. A word of caution here: I bought the set almost at the same time as the kit, as such, it was the set intended to be used for Legend’s own Merk. IV. Fitting it to the Academy kit was really not an easy task, at least for me. It seems that the Legend’s kit dimensions are a bit different than Academy’s. This was mainly evident in the belly armor area, that I eventually had to split in half and “enlarge” because it was a little too short (some 5 mm) in length. Also, there seems to be a mismatch between the relative position of the front and back hooks where the armor gets attached and as such I had to re-adapt the rods (increasing the length of the front ones and shortening the back ones).
I chose not to install the “heavy” side skirts and went for the Academy ones instead, though I replaced the “wavy” pattern of the bottom part for the straight ones seen on more recent tanks (scratchbuilt)
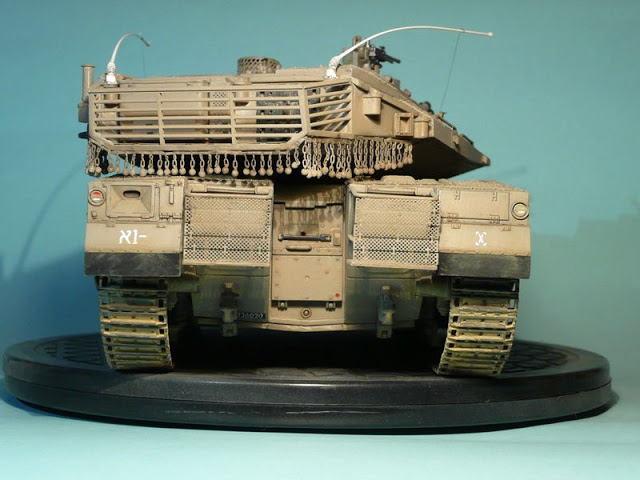
I also used Legend’s ball and chain turret skirt. It was really not fun putting it together. Long and boring and also painting it while retaining the “flexibility” in all the chains was a real challenge for me as well.

Techniques (all were a true first for me):
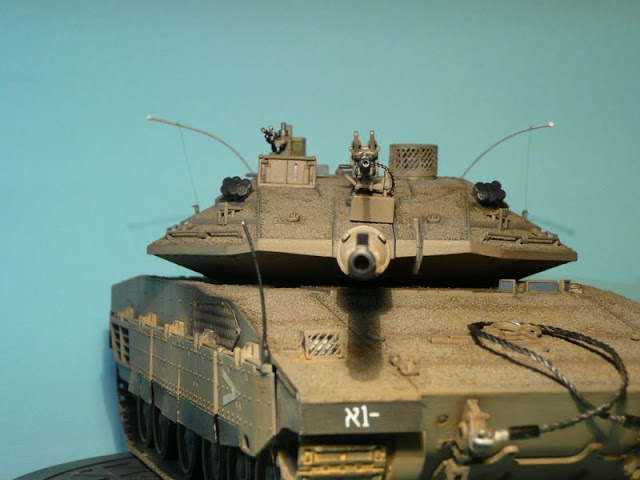
• Anti-slip coating: I tried to replicate it using sandblasting powder and white glue+water. I tried to follow some of the advices of my conational Guido when picking the size of the powder, but I guess I either made a mistake there or I used too much of it. In all I am not too happy with the result as it seems that some of the finer details of the kit surface (e.g. rows of bolts/rivets on each armor plate) have gotten lost under/with the anti-slip. From a distance it does look somewhat the part but if you get closer and compare with pictures of the real tank it does not match too well. To “punish” me for this, I ordered Academy’s new Merk. IV that has anti-slip molded on 
• Painting: I primed with Tamiya Light Grey primer, then pre-shaded in black all panel joints and some recesses and finally painted the beast in Lifecolor 1982 Sinai Gray. Second or third hand was given just a tad lighter. It seems the color is affected by lighting conditions (kind of the real thing, from what I have read), but it looks to me a bit less “green” when compared to the real thing. I then sealed the whole with a good coat of gloss (Gunze Aqueous). Then decals went on. There is a slight mismatch between front and back fender numerals (see pictures) but I messed with one decal and ended up losing it…It was also my first time using Microsol and I must say I am really satisfied with the results: at least to me it looks like it does have a “painted on” look in most location, what do you think?
• Weathering: after another gloss coat I started the wash process. Initially I employed a brown wash but I think I had picked too reddish a brown oil color and it just did not look ok, so I darkened it with some black and things looked a bit better. Also, given the way the anti-slip was made, I could no go all the way across with a large flat brush, but had to do more of a pin wash instead (if I have correctly understood what that means!). On the side skirts I also tried a bit of “rain streaks” effects – not sure how it looks, though, especially after the pigments. Yeah, pigments! After the final matt coat (and the experience on the turret almost threw the model in the trash: Gunze Matt is most likely intended to be used as Tamiya’s, i.e. as a “matting” agent for their gloss, because the moment it started drying I was seeing a nice white coat developing all over! I tried to gloss it again and then ended up trying the Vallejo matt coat which gave much better and safer results) I applied some MIG pigments. It was difficult (and still is) to get the right feeling. I need much more practice on this for sure. In some areas I tried a pigment+water application going back after it had dried and remove the excess, ending up with too much in some instances or having it in places not oringially intended. In other areas I tried the dry approach and it difficult to understand how much you are putting.
• Tracks: here is where I made one major mistake: I waited until most of tank was put together AND painted before tackling them. It was a pain and here also I risked the whole work a couple of times. The kit link and length tracks also were a challenge in itself. Something I need to keep practicing or, better, do without! I am leaning to buying Friul’s for my next Merk. So far I have built Bronco’s individual tracks for a “dormient” Chally 2 I would like to build and I must say that working tracks look the part much better and (hopefully) will also end up being easier to wrap around the running gears. Anyhow, for painting them I used several layers building up from steel, than balck wash, than black+rust paint, then some “rubbing” with fine sandpaper to ring the steel back out and finally wet pigments to “dust” them.

Well, that’s all folks for me.

Now it is your turn.

Have no mercy but please be kind! LOL!


_Viper_
Visit this Community
Roma, Italy
Joined: April 15, 2010
KitMaker: 163 posts
Armorama: 86 posts
Posted: Saturday, April 30, 2011 - 01:16 PM UTC
More Pics:


jashby
Visit this Community
Queensland, Australia
Joined: July 01, 2009
KitMaker: 278 posts
Armorama: 248 posts
Posted: Saturday, April 30, 2011 - 02:08 PM UTC
Hi Nicola,

It appears that you are a very good padawan who listens an learns from the force. For your first model I think you should be very happy with th result. It looks quite good. The best part is that you yourself have identified the shortcomings and are prepared to improve. Thats the best part of this hobby. You learn from your mistakes and improve as you continue. Unlike Doctors who bury their mistakes we can put ours up so we can look back to see how far we have come.
I to have only just gotten back into the hobby seriously now that I am seperating from the ADF and have the time. I agree as you said this site is the best. Can I also suggest Youtube as they have some very good modellers on that have presented some very good tutorial videos. People like scalemodelmedic, scalemodeladdict and sleepylafiel (his are in Japenese but still very well worth watching).

So I'm not going to tell you what is wrong or right because you have already done that. More wiser members with much more experience can advise you but personally I think it is an admirable first model and definately a starting point from which to gauge your own skill improvement. Well done and hope to see more from you.

Cheers, John
Ragnar2004
Visit this Community
Ohio, United States
Joined: February 15, 2004
KitMaker: 213 posts
Armorama: 139 posts
Posted: Saturday, April 30, 2011 - 03:11 PM UTC
Hello Nicola,
Wonderful Merkava there! You're doing a great job there. Keep it up and hope to see more of your stuff.

Best,

Walter
Rampenfest
Visit this Community
California, United States
Joined: April 28, 2011
KitMaker: 193 posts
Armorama: 188 posts
Posted: Saturday, April 30, 2011 - 03:12 PM UTC
Looks absolutley fantastic! Great job!
_Viper_
Visit this Community
Roma, Italy
Joined: April 15, 2010
KitMaker: 163 posts
Armorama: 86 posts
Posted: Sunday, May 01, 2011 - 12:51 AM UTC
John,

Thanks! May the force be with you also!
As for the videos, I indeed did watch a few ("Swinehunden" and a Japanese one). You are right, very helpful. I will look for the others you have mentioned.

Walter, Joe,

Thanks for the words!

As an additional comment and directed especially at those that have reached Jedi levels, I find that 800x600 pics are not helping seeing all of the weathering (meaning the good AND the bad), so if any wishes Hi-res pics, let me know and I will link them here.

Delbert
#073
Visit this Community
Pennsylvania, United States
Joined: October 05, 2002
KitMaker: 2,659 posts
Armorama: 1,512 posts
Posted: Sunday, May 01, 2011 - 01:26 AM UTC
only got a couple of words...........

Very Nice.......

retiredyank
Visit this Community
Arkansas, United States
Joined: June 29, 2009
KitMaker: 11,610 posts
Armorama: 7,843 posts
Posted: Sunday, May 01, 2011 - 01:46 AM UTC
Great for a first. The secret to building is to learn from your mistakes and improve upon them.
collin26
Visit this Community
Connecticut, United States
Joined: March 24, 2007
KitMaker: 317 posts
Armorama: 259 posts
Posted: Sunday, May 01, 2011 - 02:29 AM UTC
Nicola,
This is light years ahead of my first. Keep it up friend! Real sharp model with nice details.
dvarettoni
Visit this Community
South Carolina, United States
Joined: September 28, 2005
KitMaker: 778 posts
Armorama: 763 posts
Posted: Sunday, May 01, 2011 - 02:34 AM UTC
out standing for your first build keep it up
dave
Karl187
#284
Visit this Community
Northern Ireland, United Kingdom
Joined: October 04, 2006
KitMaker: 3,094 posts
Armorama: 2,942 posts
Posted: Sunday, May 01, 2011 - 05:05 AM UTC
Excellent first build, light years ahead of my first aswell!
You should be very proud of this.
stansmith
Visit this Community
England - North West, United Kingdom
Joined: July 18, 2010
KitMaker: 611 posts
Armorama: 584 posts
Posted: Sunday, May 01, 2011 - 05:52 AM UTC
that looks fantastic, i hope mine turns out the same!
cheers stan
_Viper_
Visit this Community
Roma, Italy
Joined: April 15, 2010
KitMaker: 163 posts
Armorama: 86 posts
Posted: Sunday, May 01, 2011 - 07:58 PM UTC
Delbert, Matt, Iain, David, Karl, Stan,

thank you for your words! Very encouraging and flattering as well.

As stated before, much of the credit shall also go this wonderful community

Also, I promise there will be more in the future, though I think the very next kit will have...wings!

Out of the other ones that may have viewed this topic, I encourage also some constructive criticism, especially if I have missed it in my own evaluation. It will be of great help for the future.

Thanks again!
vonHengest
Visit this Community
Texas, United States
Joined: June 29, 2010
KitMaker: 5,854 posts
Armorama: 4,817 posts
Posted: Tuesday, May 03, 2011 - 02:48 PM UTC
If this is your first build, then my only feedback is DON"T STOP! Keep on modeling Nicola!
Nito74
Visit this Community
Lisboa, Portugal
Joined: March 04, 2008
KitMaker: 5,386 posts
Armorama: 4,727 posts
Posted: Wednesday, May 04, 2011 - 01:37 PM UTC
I agree Jeremy !
what a great first kit !!!... what the heck, that's a great build no matter it's his first or tenth...
But being the first kit, it's a very good job Nicola !! Keep them coming, the great thing about modeling is that we don't ran out of subjects or versions .. just space and time.

Coolaznkid
Visit this Community
Texas, United States
Joined: August 11, 2006
KitMaker: 74 posts
Armorama: 44 posts
Posted: Monday, August 22, 2011 - 11:37 AM UTC
Nice work!

Now fall into the addiction that is scale modeling...lol
18Bravo
Visit this Community
Colorado, United States
Joined: January 20, 2005
KitMaker: 7,219 posts
Armorama: 6,097 posts
Posted: Tuesday, August 23, 2011 - 07:16 PM UTC
Molto bello! Ottimo lavoro,
_Viper_
Visit this Community
Roma, Italy
Joined: April 15, 2010
KitMaker: 163 posts
Armorama: 86 posts
Posted: Tuesday, August 23, 2011 - 09:07 PM UTC
Guys,

thanks again for the appraisals! Really encouraging!

Yeah, I have already fallen waist deep in the scale modelling addiction!
Darn, I just need more time to build!!!!!!!!!!

Joel_W
Staff MemberAssociate Editor
AUTOMODELER
Visit this Community
New York, United States
Joined: December 04, 2010
KitMaker: 11,666 posts
Armorama: 1,143 posts
Posted: Wednesday, August 24, 2011 - 01:53 AM UTC
Simply an outstanding 1st effort. Actually, as others have said, it's a excellent build no matter how many models you've built prior to this one. I particularly like your weathering. The pre-shading came out great, as it works well with the one color paint scheme.

As for the tracks, they always seem to be one of the hardest parts of the model for me to complete.

Looking forward to your next build.
MSGsummit
Visit this Community
Tennessee, United States
Joined: November 16, 2002
KitMaker: 751 posts
Armorama: 545 posts
Posted: Wednesday, August 24, 2011 - 03:30 AM UTC
Nicola,
Really awesome 1st build brother! I think this one could pass for your 9th or 10th build!

For constructive criticism.......the only thing that looks a little off to me is your tow cable and the antenna's. They look too shiny. I think the antenna may look that way just because of the lighting or just how it photographed. The tow cable though looks like it could stand to be darkened/weathered some to bring it more in line with the rest of the tank......less of a silver color, maybe more of a dark metallic grey?
_Viper_
Visit this Community
Roma, Italy
Joined: April 15, 2010
KitMaker: 163 posts
Armorama: 86 posts
Posted: Wednesday, August 24, 2011 - 10:05 PM UTC
Thank you Joel and Art!

Art, I concur! Looking back at it 4 months later, the tow cable is really too pristine. I should have painted it more of a rusty color for the cable and a darker grey as you said for the hooks + pigments to weather it even more.

Reality is the cable was "thrown" on at the very last minute after throwing two away (the horns on the tank do not fit the eye shackles of the cables) and I used the one I was most satisfied with without paying attention to the "context".

Thanks for pointing that out!

Buckeye198
Visit this Community
Ohio, United States
Joined: May 02, 2010
KitMaker: 596 posts
Armorama: 265 posts
Posted: Thursday, August 25, 2011 - 03:30 AM UTC
I'm always impressed every time that people on this forum say it's their first model...without fail, they are ALWAYS better than the models I've been building for years!! Fantastic work, Nico! But while Art has you working on the tow cable, see if you can get it to lay flat on the Merk and little bit of sag where it's off. Also, the lower front armor plating looks kinda bland compared to every other surface of the model. I think just a bit of dusting on the front--as well as over the ID decals would really finish it off. (Conversely, maybe it's just your camera's flash that's brightening up that surface.) Even if you were to shelf the model now and call it finished, it would still be miles ahead of all of my kits!
_Viper_
Visit this Community
Roma, Italy
Joined: April 15, 2010
KitMaker: 163 posts
Armorama: 86 posts
Posted: Thursday, August 25, 2011 - 08:44 PM UTC
Robby,

that is very flattering, although I think you are being way too hard on yourself (i am the same!).
To be 100% honest, this is NOT the first kit I have built in my life, I started out with my dad (he was doing most of the work) when I was 5-6 years old and must have built 10-20 kits since.
This is the first using a lot of "new" techniques (airbrush, washes, etc.) I have tried to assimilate since looking at this forum+few books+few online video tutorials and it is the first one I consider "decent".

As for your feedback, I went back last night and looked at the area you have mentioned: I have to say in this case it is moslty due to the lighting conditions of the pictures (heck, after trying hard at building I also have to learn how to take pics - I suck!).
As for the chevrons (if those are the decals you are referring to), they are weathered ok in person (many streaks and marks) but - again - it does not show well in pics.
It is also to be said that areas with the antislip have the surface more "broken" and this contrasts to the area where there is none (also, because, as I have already stated, I think I have overdone a bit the antislip).

Thanks again to all.

 _GOTOTOP