

Hi Ken,
Brillient, thanks, exactly what I needed.
Cheers
Al
Hosted by Darren Baker
Accurate Armour - Crusader Gun Tractor

AlanL

Joined: August 12, 2005
KitMaker: 14,499 posts
Armorama: 11,675 posts
Posted: Tuesday, June 14, 2011 - 04:16 PM UTC

Keef1648

Joined: January 23, 2008
KitMaker: 1,240 posts
Armorama: 1,192 posts

Posted: Wednesday, June 15, 2011 - 12:55 AM UTC
Nice build Alan.
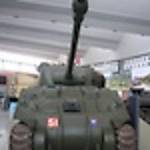
An interesting beastie that I completed 10 or so years ago. Here are the two pictures sitting on the AA gallery.
A couple of parts do need tweeking but all in all a subject worth building.


Thanks for sharing your build.
Keith.
An interesting beastie that I completed 10 or so years ago. Here are the two pictures sitting on the AA gallery.
A couple of parts do need tweeking but all in all a subject worth building.
Thanks for sharing your build.
Keith.
AlanL
Joined: August 12, 2005
KitMaker: 14,499 posts
Armorama: 11,675 posts
Posted: Wednesday, June 15, 2011 - 04:49 AM UTC
Hi Keith,
Nice job on the kit.
Hi Ken
Any additional pics that might be of use?
Also is their any wiring needed down the inside of the hull?
Cheers
Al
Nice job on the kit.
Hi Ken
Any additional pics that might be of use?
Also is their any wiring needed down the inside of the hull?
Cheers
Al
AlanL
Joined: August 12, 2005
KitMaker: 14,499 posts
Armorama: 11,675 posts
Posted: Wednesday, June 15, 2011 - 07:29 AM UTC
Hi folks,
Tonights contribution.
Added the small levers to the drivers/co drivers hatches and the steering handles. I positioned these a bit urther back to avoid any clash with the instrument panel when it gets to fixing time. Also added the oil can to the crew area and sorted the can's for the rear.


Al
Tonights contribution.
Added the small levers to the drivers/co drivers hatches and the steering handles. I positioned these a bit urther back to avoid any clash with the instrument panel when it gets to fixing time. Also added the oil can to the crew area and sorted the can's for the rear.
Al
AlanL
Joined: August 12, 2005
KitMaker: 14,499 posts
Armorama: 11,675 posts
Posted: Sunday, June 19, 2011 - 04:46 AM UTC
Hi Guys,
Before I get to sticking things down what are your thoughts on the interior colour? Would it have remained silver/white or would they have had a repaint job in green? I was going with green based on a complete re-work of the chassis but ........(the 5000 $ question?)
Things are moving along quite well. Pity there are no decals for the 17pdr ammo boxes.
AL
AlanL
Joined: August 12, 2005
KitMaker: 14,499 posts
Armorama: 11,675 posts
Posted: Sunday, June 19, 2011 - 08:30 AM UTC
This is the point I've reached now.


Al
Al
AlanL
Joined: August 12, 2005
KitMaker: 14,499 posts
Armorama: 11,675 posts
Posted: Wednesday, June 22, 2011 - 07:24 AM UTC
Quoted Text
Hi Guys,
Before I get to sticking things down what are your thoughts on the interior colour? Would it have remained silver/white or would they have had a repaint job in green? I was going with green based on a complete re-work of the chassis but ........(the 5000 $ question?)
Things are moving along quite well. Pity there are no decals for the 17pdr ammo boxes.
AL
Hi folks, any thoughts on white or green interior???
A small amoutn doen, rear stowage boxes fitted and once I get some thoughts on above I'll complete the interior.


Al
Dutchy3RTR

Joined: June 28, 2009
KitMaker: 340 posts
Armorama: 337 posts

Posted: Wednesday, June 22, 2011 - 09:17 AM UTC
Open topped vehicle interiors would be body colour as far as I've seen Al. Imagine how a silver or white paint job would look from the cockpit of a 109. 
And like you said, it was a major rework on the Crusader so everything would have had a chance to be painted.
And like you said, it was a major rework on the Crusader so everything would have had a chance to be painted.
AlanL
Joined: August 12, 2005
KitMaker: 14,499 posts
Armorama: 11,675 posts
Posted: Wednesday, June 22, 2011 - 09:39 AM UTC
Hi Ken,
Thanks, my thoughts too. I'd see a kt finished with a white interior which made me ask..
Cheers
Al
Thanks, my thoughts too. I'd see a kt finished with a white interior which made me ask..
Cheers
Al
barkingdigger

#013
Joined: June 20, 2008
KitMaker: 3,981 posts
Armorama: 3,403 posts
Posted: Wednesday, June 22, 2011 - 09:56 AM UTC
Hi Al,
I second the green vote. Bear in mind when you weather it that the original interior parts that remain (mostly in the driver's area) will have silver under that green paint, so any wear & tear (like around the seat frame, or the controls?) will show silver. The rest of the main fighting compartment is new-build, so won't have any silver under it.
Looking good so far!
Tom
AlanL
Joined: August 12, 2005
KitMaker: 14,499 posts
Armorama: 11,675 posts
Posted: Wednesday, June 22, 2011 - 04:29 PM UTC
Thanks Tom.
Al
Al
Firefly74

Joined: April 15, 2010
KitMaker: 224 posts
Armorama: 205 posts

Posted: Wednesday, June 22, 2011 - 09:53 PM UTC
Hi Alan, nice work, it's looking great!
I remember that tired old Crusader kit from when I was a young lad, great to see it being put to good use.
I've being wanting to do one of these in Braille scale, it's a good looking vehicle and an interesting subject.
Looking forward to seeing more progress.
Cheers,
Tim

I remember that tired old Crusader kit from when I was a young lad, great to see it being put to good use.
I've being wanting to do one of these in Braille scale, it's a good looking vehicle and an interesting subject.
Looking forward to seeing more progress.
Cheers,
Tim
AlanL
Joined: August 12, 2005
KitMaker: 14,499 posts
Armorama: 11,675 posts
Posted: Thursday, June 23, 2011 - 05:28 AM UTC
Hi Tim,
Thanks for looking in, glad you enjoying the build. By the time I get this one complete a plastic version should have arrived on the market
Al
Thanks for looking in, glad you enjoying the build. By the time I get this one complete a plastic version should have arrived on the market
Al
AlanL
Joined: August 12, 2005
KitMaker: 14,499 posts
Armorama: 11,675 posts
Posted: Friday, June 24, 2011 - 09:25 PM UTC
Hi folks,
I fitted the tracks on Thursday evening. These were the AA set which has 5 lengths per side, plus some individual links that can be used as stowage.
I joined 3 sections for the top and used the hair dryer to shape them in, adding the other two sections when done. If I was using them again I'd join 4 sections which would be easier in the long run. There are 5 small joint pins and grovers on each section. These were a bit difficult to clean up, so you'll need patience. Overall the detail is OK but I think I'd go plastic if I were doing this again.


Al
I fitted the tracks on Thursday evening. These were the AA set which has 5 lengths per side, plus some individual links that can be used as stowage.
I joined 3 sections for the top and used the hair dryer to shape them in, adding the other two sections when done. If I was using them again I'd join 4 sections which would be easier in the long run. There are 5 small joint pins and grovers on each section. These were a bit difficult to clean up, so you'll need patience. Overall the detail is OK but I think I'd go plastic if I were doing this again.
Al

Plasticbattle
#003

Joined: May 14, 2002
KitMaker: 9,763 posts
Armorama: 7,444 posts

Posted: Friday, June 24, 2011 - 10:41 PM UTC
Hi Alan. Very nice conversion. Much more interesting than the base Crusader IMO. One of my first models was the Mk.II Crusader, and I have the Mk.I which I was considering selling, but seeing this conversion taking shape, its not half tempting. Could this conversion be used on a Mk.I? Don´t Friul do Crusader tracks? Although I´ve never done resin tracks, I don´t intend to start either! 


AlanL
Joined: August 12, 2005
KitMaker: 14,499 posts
Armorama: 11,675 posts
Posted: Saturday, June 25, 2011 - 12:24 AM UTC
Hi Frank,
I dont know that much about the specific layout of the Mk I to give you an accurate answer.
As you'd be removing everything from the turret ring forward to the front plate it's quite possible.
Drop Derek a email at AA and he would be able to tell you, or they may be a Crusader expert around who would know.
Cheers
Al
Dutchy3RTR
Joined: June 28, 2009
KitMaker: 340 posts
Armorama: 337 posts
Posted: Saturday, June 25, 2011 - 06:00 AM UTC
Frank, as far as I'm aware the base kits are the same for all the Italeri Crusaders. For example, the Mk1 kit still has the Mk2/3 headlight guard slots on the front plate that they couldn't be bothered to remould. Just about everything bar the hull, front glacis plate and rear decks is replaced in the conversion.
To be honest though, I'd be more inclined to get an Ebay cheapie Mk3 to play with and either build the Mk1 or sell it to someone who'd appreciate the rarity.
To be honest though, I'd be more inclined to get an Ebay cheapie Mk3 to play with and either build the Mk1 or sell it to someone who'd appreciate the rarity.
AlanL
Joined: August 12, 2005
KitMaker: 14,499 posts
Armorama: 11,675 posts
Posted: Saturday, June 25, 2011 - 06:58 AM UTC
Thanks Ken,
I haven't built ant Crusaders yet so couldn't really say..
Some more porgress, added the towing hook, some fittinge to the rear deck and a bit more painting. I also made some home made straps so that they can be lying across the boxes rather than tied down. I picked up a set of the Bronco 17pdr ammo that has ammo, boxes and decals so that will be useful.


Al
I haven't built ant Crusaders yet so couldn't really say..
Some more porgress, added the towing hook, some fittinge to the rear deck and a bit more painting. I also made some home made straps so that they can be lying across the boxes rather than tied down. I picked up a set of the Bronco 17pdr ammo that has ammo, boxes and decals so that will be useful.
Al
AlanL
Joined: August 12, 2005
KitMaker: 14,499 posts
Armorama: 11,675 posts
Posted: Saturday, June 25, 2011 - 10:28 PM UTC
Hi folks,
I did a bit more work on the load so here's where we're at now.
Bits to go - unfortunately one of the Thompsons came off the spur minus a barrel. I'm not sure where parts 4 are meant to fit (crowbars) as I can't see them on the instructions, but perhaps they lived on top of the bins and as you get camo nets for these and they are not required?

I added a couple of the Bronco decals tothe load to brighten it up a bit.

I've a bit more painting to do on the interior front plate but things are close to getting fitted at this stage.

There were individual links in the track set so some of these can populate the front plate.

I picked up a set of the Bronco 17pdr Ammo. Looks a nice set 4 spurs of parts, 4 decal sheets and 4 small spurs of PE. Must be 16 boxes or some plus the shells and markings.


Al
I did a bit more work on the load so here's where we're at now.
Bits to go - unfortunately one of the Thompsons came off the spur minus a barrel. I'm not sure where parts 4 are meant to fit (crowbars) as I can't see them on the instructions, but perhaps they lived on top of the bins and as you get camo nets for these and they are not required?
I added a couple of the Bronco decals tothe load to brighten it up a bit.
I've a bit more painting to do on the interior front plate but things are close to getting fitted at this stage.
There were individual links in the track set so some of these can populate the front plate.
I picked up a set of the Bronco 17pdr Ammo. Looks a nice set 4 spurs of parts, 4 decal sheets and 4 small spurs of PE. Must be 16 boxes or some plus the shells and markings.
Al
AlanL
Joined: August 12, 2005
KitMaker: 14,499 posts
Armorama: 11,675 posts
Posted: Sunday, June 26, 2011 - 05:43 AM UTC
Hi folks,
A bit more porgress.
Took the plunge and fitted the drivers compartment and load.


at this point I was feeling pretty pleased with myself
Then I fitted the front plate and rear section aligning the slightly warped seating.

Then
One of the reasons I dislike working with resin, apart form the obvious dust issue is super glue, it either doesn't stick when you want it to or sticks like a rock when you don't.
After fitting the drivers compartment I then added the load. I was sure I had shoved it forward as far as it would go but it must have bonded PDQ. I should have noticed at that point but ........ Anyway after I'd fitted the rear section I noticed the distinct absence of a gap large enough to add the rifles behind. In the scheme of thigns this is maybe 0.5mm or 1mm but enough to casue an issue.
I'll have to live with it at this point as I'm not about to try and correct it now, but doesn't it just make you sick when something like that happens.
The remainder I'm please to say looks good to go.
Anyway here's how thing look now:


Al

I'm not sure how the sunshine face got into the post maybe it was to cheer me up after the cock up!!
A bit more porgress.
Took the plunge and fitted the drivers compartment and load.
at this point I was feeling pretty pleased with myself
Then I fitted the front plate and rear section aligning the slightly warped seating.
Then
One of the reasons I dislike working with resin, apart form the obvious dust issue is super glue, it either doesn't stick when you want it to or sticks like a rock when you don't.
After fitting the drivers compartment I then added the load. I was sure I had shoved it forward as far as it would go but it must have bonded PDQ. I should have noticed at that point but ........ Anyway after I'd fitted the rear section I noticed the distinct absence of a gap large enough to add the rifles behind. In the scheme of thigns this is maybe 0.5mm or 1mm but enough to casue an issue.
I'll have to live with it at this point as I'm not about to try and correct it now, but doesn't it just make you sick when something like that happens.
The remainder I'm please to say looks good to go.
Anyway here's how thing look now:
Al
I'm not sure how the sunshine face got into the post maybe it was to cheer me up after the cock up!!
Dutchy3RTR
Joined: June 28, 2009
KitMaker: 340 posts
Armorama: 337 posts
Posted: Sunday, June 26, 2011 - 07:34 AM UTC
The gap at the back on mine wasn't big enough to get the rifles in either and the cargo is all the way forward.
I just left the rifles off - you can see the mount OK, just not get anything in there, so it passes muster IMO.
I just left the rifles off - you can see the mount OK, just not get anything in there, so it passes muster IMO.
AlanL
Joined: August 12, 2005
KitMaker: 14,499 posts
Armorama: 11,675 posts
Posted: Sunday, June 26, 2011 - 08:33 AM UTC
Hi Ken,
Thanks, I feel better lol, lol. I should be able to mount the Bren to the side. I was checking with Derek Barton and it appears these were only issued at Corps level. I was going to do a Guards Armoured or 11th Armoured Dvision vehicle, but may have to amend that now.
I was using a build by Phil Greenwood as a reference and I don't see any rifles in there either, so perhaps it's a common fault.
This has a fair weight when full .
Cheers
Al
Thanks, I feel better lol, lol. I should be able to mount the Bren to the side. I was checking with Derek Barton and it appears these were only issued at Corps level. I was going to do a Guards Armoured or 11th Armoured Dvision vehicle, but may have to amend that now.
I was using a build by Phil Greenwood as a reference and I don't see any rifles in there either, so perhaps it's a common fault.
This has a fair weight when full
.Cheers
Al
bigmal

Joined: February 21, 2011
KitMaker: 211 posts
Armorama: 176 posts
Posted: Sunday, June 26, 2011 - 08:38 AM UTC
Quoted Text
Hi Alan. Very nice conversion. Much more interesting than the base Crusader IMO. One of my first models was the Mk.II Crusader, and I have the Mk.I which I was considering selling, but seeing this conversion taking shape, its not half tempting. Could this conversion be used on a Mk.I? Don´t Friul do Crusader tracks? Although I´ve never done resin tracks, I don´t intend to start either!
Looking at this conversion i don`t see any reason why the mk1 kit shouldn`t be used as a donor as the main difference between Crusaders is the turret and the hull top where the driver/co driver sit which are not used on the gun tractor, nor are the rear kit air cleaners used.
I would say go for it
Malcolm
AlanL
Joined: August 12, 2005
KitMaker: 14,499 posts
Armorama: 11,675 posts
Posted: Sunday, June 26, 2011 - 09:16 AM UTC
Hi Frank,
Looking over on the AA site the conversion can be used for the Mk I to Mk III versions so should be OK for what you've got.
Al
Looking over on the AA site the conversion can be used for the Mk I to Mk III versions so should be OK for what you've got.
Al

KEVINT

Joined: August 29, 2005
KitMaker: 191 posts
Armorama: 176 posts
Posted: Sunday, June 26, 2011 - 10:32 AM UTC
Al,
These are from 62nd Anti - Tank Regiment. 1st Corps
T124225, T125708, T126680 and T127029.
Sorry now those are all of the matched ones I have. Now if you are talking Canadian I have several from 5th, 6th and 7th Anti - Tank Regiment.
Cheers
Kevin
These are from 62nd Anti - Tank Regiment. 1st Corps
T124225, T125708, T126680 and T127029.
Sorry now those are all of the matched ones I have. Now if you are talking Canadian I have several from 5th, 6th and 7th Anti - Tank Regiment.
Cheers
Kevin
 |

WEB HOSTING BY


Copyright ©2021 Armorama and Kitmaker Network, a subsidiary of Silver Star Enterprises
All Rights Reserved. Please read our Conditions of Use and Privacy Policy.
All Rights Reserved. Please read our Conditions of Use and Privacy Policy.