_GOTOBOTTOM
Constructive Feedback
For in-progress or completed build photos. Give and get contructive feedback!
Tamiya 1/35 Pz Kpfw II Ausf F
cheeley
Visit this Community
New Zealand
Joined: June 12, 2011
KitMaker: 3 posts
Armorama: 3 posts
Posted: Sunday, June 12, 2011 - 11:25 AM UTC
Hello everyone,

This is the classic Tamya kit, which possibly has a longer pedigree than I do! This is the first armour model that I've ever attempted, I have only recently come back into the hobby, having been away from it since my teens.

The internet is a great resource, and it helped me pick up lots of tips on making models which I could have only dreamed of twenty-odd years ago!

Anyway, please let me know what you think - constructive criticism is welcomed. As I'm used to building things with wings, I apologise in advance for any glaring errors!


thanks

Chris
Krieg-Hammer
Visit this Community
Scotland, United Kingdom
Joined: May 17, 2011
KitMaker: 106 posts
Armorama: 92 posts
Posted: Monday, June 13, 2011 - 06:57 AM UTC
Some MIG pigments, Europe dust on that will finish it off nicely.
Nito74
Visit this Community
Lisboa, Portugal
Joined: March 04, 2008
KitMaker: 5,386 posts
Armorama: 4,727 posts
Posted: Monday, June 13, 2011 - 08:47 AM UTC
Yep that's an old kit.
It's a nice kit, easy clean build.
I agree with Rob, some dust/sand pigments or Tamyia powder sets.

Keep that armour coming...
retiredyank
Visit this Community
Arkansas, United States
Joined: June 29, 2009
KitMaker: 11,610 posts
Armorama: 7,843 posts
Posted: Monday, June 13, 2011 - 09:28 AM UTC
You can pick up some much cheaper pigments on Ebay. Search for "dr bens".
Tojo72
Visit this Community
North Carolina, United States
Joined: June 06, 2006
KitMaker: 4,691 posts
Armorama: 3,509 posts
Posted: Monday, June 13, 2011 - 10:19 AM UTC
chipping looks real good,I like the way you scratched up the decals also
cheeley
Visit this Community
New Zealand
Joined: June 12, 2011
KitMaker: 3 posts
Armorama: 3 posts
Posted: Sunday, June 19, 2011 - 02:30 PM UTC
Thanks guys. Are there any tutorials you can point me to for using pigments to add dust effects? I've got some pastels that I've ground up, I tried rubbing some on with a soft brush but the effect doesn't look right to me. You can use white spirits to fix pigments can't you? Could you make a sort of wash from the pigments and lay dust down that way?

Chris
Bigmek
Visit this Community
Sweden
Joined: February 16, 2011
KitMaker: 3 posts
Armorama: 3 posts
Posted: Sunday, June 26, 2011 - 07:56 AM UTC
Very good job indeed, this looks great!

I really like that dark brown colour! I dont know particularly much about german tanks (or any tanks really) but i never had seen this colour until last weekend when i was at a military museum here in Sweden. They had one of these tanks there and it looked exactly as yours! Im just curious where this colour was used and how common it was?
Plasticbattle
#003
Visit this Community
Donegal, Ireland
Joined: May 14, 2002
KitMaker: 9,763 posts
Armorama: 7,444 posts
Posted: Sunday, June 26, 2011 - 08:46 AM UTC
Hi Chris
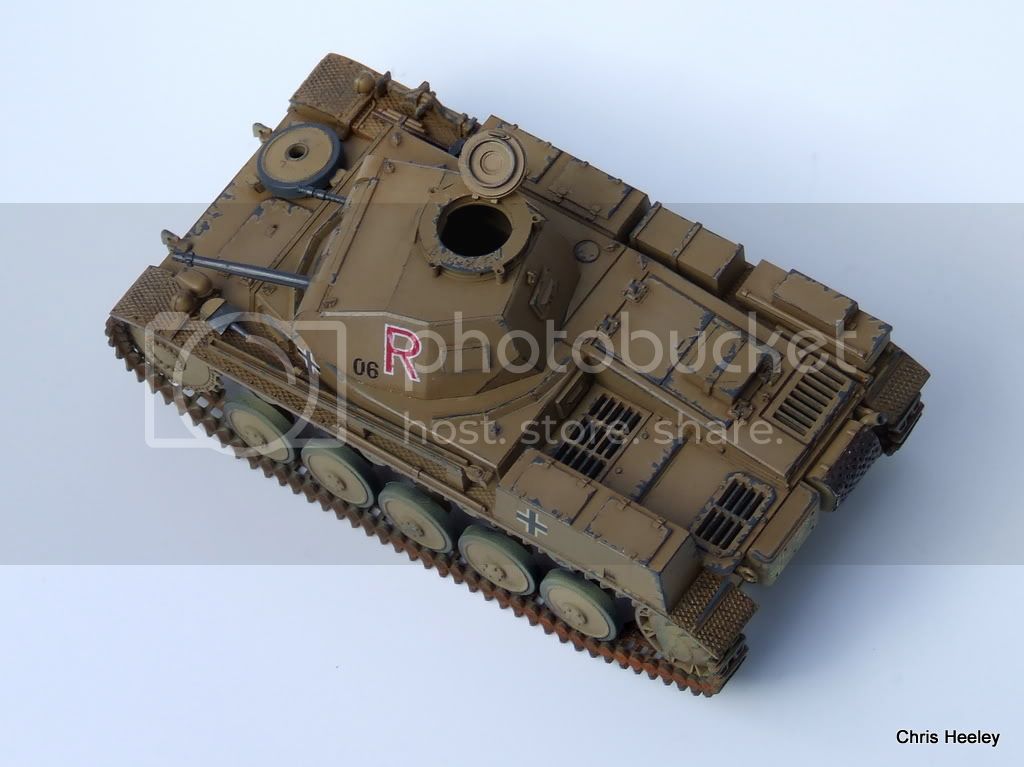
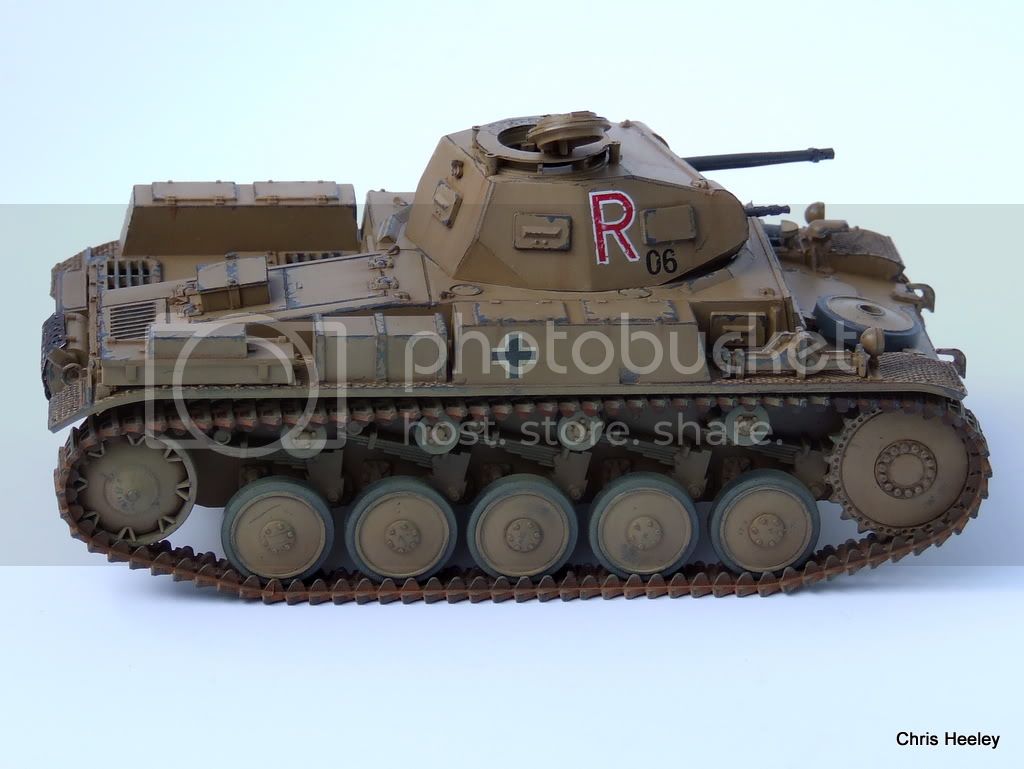
An excellent model as a comeback model. Theres nothing actually wrong with your model as is. But .....
Today, modelling "heavy metal" has become more about the painting and weathering stages than the actual build. Modern kits have top detail straight from the box, so all the work needed earlier with scratch-building and etch is rarely needed. The emphasis is on the paint job. But perfect paint jobs are not the "in thing" with armor modelers.
Your model is heavily scratched/chipped, but for a DAK vehicle, the base paint has zero fading, collected zero dust and no signs of life. So where and how did it get scratched? If you talk yourself through the hows, whys, when and where youŽll start to see how "unexplained" you scratches/chips are.
Fading the larger panels (using a lighter version of the base colour) by spraying in the middles not only gives the faded paint impression, it also adds depth to the details. For a vehicle that has received so much wear, there should be signs of life. Personal gear, stowage, rags, found stuff, anything and everything basically. It adds life, but using "strategic" colours also add contrast to the base colour as well as ... most importantly ... interest! Probably the best single item is a figure ... adds scale, contrast, life and colour all in one.
Pigments are often touted to be a easy fix for weathering, but its not as easy as it sounds. Using pigments alone on a flat paint finish is quite boring. There are so many techniques used today, this post could go on forever. Instead IŽll make some suggestions and links.
If you are interested in taking this further buy or borrow AK InteractiveŽs enamel weathering DVD. Its a great step by step guide to weathering. YouŽll hear about a lot of the terms used and see them being done at the same time. Then you can make up your mind on how you want to weather and how much you want to weather, as well as what media you want to use. Its possible to do it completely in enamels or acrlyics without pigments. With a bit of experience and practise youŽll find many ways to do the same things. Check out the dust job David Parker does on his Mekava IV on Missing Links. Pastels are only used on the running gear, yet he has made one of the most effective dust layers I have seen on a model.
Another great weathering link is MIGŽs rarity world, again on Missing Links. Read through this ... really useful. Adam Wilder has also some great articles here on Armorama; Effective Pigments and Colour Moduclation.
All of these methods plus those that you brought with you from your previous modeling history add interest to the base paint job, but any of them overdone starts to look false. Some food for thought on this subject is Paul OwenŽs Weathering Heresies.
Its obvious you can build and paint a model, but with some effort in the weathering effects, youŽll have a model thatŽll turn heads. Its always cool to get more guys into armor ... hopefully weŽll see more of your work here!
cheeley
Visit this Community
New Zealand
Joined: June 12, 2011
KitMaker: 3 posts
Armorama: 3 posts
Posted: Tuesday, June 28, 2011 - 02:17 PM UTC
Thanks Frank, plenty of food for thought there. Thansk you for the links, many of them I haven't seen before. I'll see if I can get my next armour build to have a more lived in look!

Slimedog1
Visit this Community
Wisconsin, United States
Joined: March 18, 2010
KitMaker: 637 posts
Armorama: 68 posts
Posted: Tuesday, June 28, 2011 - 06:07 PM UTC
Very nice job Chris,yes I agree this build could use some pigments.
I have DOA pigments in my store www.slimdedogmodels.com,$3.00 per bottle
Slimedog1
Visit this Community
Wisconsin, United States
Joined: March 18, 2010
KitMaker: 637 posts
Armorama: 68 posts
Posted: Tuesday, June 28, 2011 - 06:20 PM UTC
Here are some reviews for the DOA pigments
http://trackpads.co.uk/smf/index.php?topic=227.0
http://trackpads.co.uk/smf/index.php?topic=69.msg341#msg341
A review for DOA Paints
http://inscale.org/pub/index.php?topic=1307.0
I also carry DOA paints
 _GOTOTOP