Mason (my eldest son) and I are in a semi-competition building Panzer MK IV's. From the start, he wanted to keep a blog (which he has been doing) and has been asking that I do the same. His build is the Dragon Ausf. F1 that he won with his entry in the Next Generation campaign (thanks to MilVehFan's donation). My build is the Dragon (kit #6264) Ausf. E that I am building into the DAK version.
I ordered my kit with the Verlinden Interior. When it arrived, Mason asked for an interior kit as well to keep the competition on a fair basis....I ordered one for him.
Here are some pics that are of my kit alone and some side-by-side pics that I took of our two builds so Mason could post on his build blog.
Hosted by Darren Baker
Dragon Pz. Kpfw. IV Ausf. E Build
HipKitty
Pennsylvania, United States
Joined: February 14, 2011
KitMaker: 390 posts
Armorama: 387 posts
Joined: February 14, 2011
KitMaker: 390 posts
Armorama: 387 posts
Posted: Saturday, June 25, 2011 - 03:44 PM UTC
HipKitty
Pennsylvania, United States
Joined: February 14, 2011
KitMaker: 390 posts
Armorama: 387 posts
Joined: February 14, 2011
KitMaker: 390 posts
Armorama: 387 posts
Posted: Saturday, June 25, 2011 - 03:46 PM UTC
Our interior advancement....
My build is on the left (with grey primer) and Mason's is on the right. Note that his interior is just set inside for the sake of testing the hull trim-outs.
WARDUKWNZ
Auckland, New Zealand
Joined: June 01, 2011
KitMaker: 1,716 posts
Armorama: 1,638 posts
Joined: June 01, 2011
KitMaker: 1,716 posts
Armorama: 1,638 posts
Posted: Saturday, June 25, 2011 - 03:54 PM UTC
Oh the race is on lol ,,can't wait to see how this ends
HipKitty
Pennsylvania, United States
Joined: February 14, 2011
KitMaker: 390 posts
Armorama: 387 posts
Joined: February 14, 2011
KitMaker: 390 posts
Armorama: 387 posts
Posted: Saturday, June 25, 2011 - 04:33 PM UTC
Quoted Text
Oh the race is on lol ,,can't wait to see how this ends
Lol! It is....he is ahead of me following a short vacation, but is now bogged down hand painting the rubber of the road wheels. I, on the other hand, just primer-ed mine and will shoot the dark yellow over the grey primer before I get to the rubber....
Posted: Saturday, June 25, 2011 - 05:39 PM UTC
It is good to see you building Neal and keeping Mason on his toes. By shooting the paint over I assume you mean you have an airbrush, if you do then paint the wheels with your preferred rubber colour and then use a circle template as a mask to paint the centre portion of the wheel.
Tojo72
North Carolina, United States
Joined: June 06, 2006
KitMaker: 4,691 posts
Armorama: 3,509 posts
Joined: June 06, 2006
KitMaker: 4,691 posts
Armorama: 3,509 posts
Posted: Sunday, June 26, 2011 - 12:50 AM UTC
Just picked up the Vorpanzer from Greatmodels on sale #6301 so I will have to keep an eye on yours,looks good.
TankSmith
Florida, United States
Joined: August 17, 2010
KitMaker: 87 posts
Armorama: 87 posts
Joined: August 17, 2010
KitMaker: 87 posts
Armorama: 87 posts
Posted: Sunday, June 26, 2011 - 01:50 AM UTC
This is great. I'm prepping fit the exact same build, interior and all. I'm also adding voyager finders. Not looking forward to those. judging frOm the paint, I guess you're not going to modify the interior? It is a good base, but very simplified if you're gonna open hatches (I'm thinking espcially of the break drums and driver/radio seats). Details on the fit of the resin and any modifications will be great. Thanks.
HipKitty
Pennsylvania, United States
Joined: February 14, 2011
KitMaker: 390 posts
Armorama: 387 posts
Joined: February 14, 2011
KitMaker: 390 posts
Armorama: 387 posts
Posted: Sunday, June 26, 2011 - 03:42 AM UTC
Quoted Text
It is good to see you building Neal and keeping Mason on his toes. By shooting the paint over I assume you mean you have an airbrush, if you do then paint the wheels with your preferred rubber colour and then use a circle template as a mask to paint the centre portion of the wheel.
Yes, I have a fairly decent airbrush...but am thinking of upgrading after Mason's frustrations over not getting thin enough camo lines on his Tiger 1.
I've never tried a circular mask and used to (in the old days) just paint the rubber after shooting the wheel and rim colors. This is how Mason did his SAS Jeep and the Tiger 1...and is in the midst of doing on his Ausf. F1. Do you have a recommendation?
HipKitty
Pennsylvania, United States
Joined: February 14, 2011
KitMaker: 390 posts
Armorama: 387 posts
Joined: February 14, 2011
KitMaker: 390 posts
Armorama: 387 posts
Posted: Sunday, June 26, 2011 - 03:52 AM UTC
Quoted Text
This is great. I'm prepping fit the exact same build, interior and all. I'm also adding voyager finders. Not looking forward to those. judging frOm the paint, I guess you're not going to modify the interior? It is a good base, but very simplified if you're gonna open hatches (I'm thinking espcially of the break drums and driver/radio seats). Details on the fit of the resin and any modifications will be great. Thanks.
I'm not done with the interior. In fact, the interior was set aside to get the wheels and wheel mounts out of the way....though I'm not attaching wheels until near the end of the build. From my point of view, getting the wheel mounts and drive sprockets installed onto the hull allows me to make sure that the inside of the hull walls are sanded flush to accommodate the interior "blocks".
As for detailing past what the Verlinden kit offers, I plan on taking Mason's lead and example on his Tiger 1 build (with wall-mounted control panels, medical boxes, etc.) and up the ante with wire cable runs.
Posted: Sunday, June 26, 2011 - 05:46 AM UTC
Quoted Text
Quoted TextIt is good to see you building Neal and keeping Mason on his toes. By shooting the paint over I assume you mean you have an airbrush, if you do then paint the wheels with your preferred rubber colour and then use a circle template as a mask to paint the centre portion of the wheel.
Yes, I have a fairly decent airbrush...but am thinking of upgrading after Mason's frustrations over not getting thin enough camo lines on his Tiger 1.
I've never tried a circular mask and used to (in the old days) just paint the rubber after shooting the wheel and rim colors. This is how Mason did his SAS Jeep and the Tiger 1...and is in the midst of doing on his Ausf. F1. Do you have a recommendation?
You can go to the expense of buying specific masks for the wheels which work in reverse, by this I mean you paint the wheel centre and then the outer after applying the self adhesive masks. This works well but adds to the expense. The other way is to buy a simple plastic circle template as used for drawing circles. You find the circle that fits the wheels best and cover the holes around it with masking tape, then after having painted the wheels with your preferred colour to represent the rubber portion of the wheel place the circle template over the wheels and spray the centre colour. Job done.
Regarding the lines issue that could all be down to getting the correct pressure for the task you want to do.
SdAufKla
South Carolina, United States
Joined: May 07, 2010
KitMaker: 2,238 posts
Armorama: 2,158 posts
Joined: May 07, 2010
KitMaker: 2,238 posts
Armorama: 2,158 posts
Posted: Sunday, June 26, 2011 - 06:17 AM UTC
Quoted Text
... I've never tried a circular mask and used to (in the old days) just paint the rubber after shooting the wheel and rim colors. This is how Mason did his SAS Jeep and the Tiger 1...and is in the midst of doing on his Ausf. F1. Do you have a recommendation?
Put the road wheels on toothpicks with a small bit of reversed masking tape for ease of handling.
Then run a line of black ink wash (I use Citadel minatures Black Ink Wash) around the tire-rim separation lines. This will establish a nice sharp line around the tires. As you put the ink wash on, you can load the brush and flow the wash around the rim almost like a regular wash using capillary action to follow sharply along the line.
After the ink wash dries, you can then easily paint the rubber with your favorite scale rubber color following the wider black line already there. (I use medium gray color mixed from black and white with a touch of flesh or tan.)
For even more detail, before you paint the tires, run a silver pencil between the wheels to highlight the steel "wear rims" between the each pair of road wheels.
Painting Pz IV road wheels is an armor-builders "right of passage"
Serously, though, mounting the wheels on toothpicks does make them much easier to handle and paint, Using the toothpick, with some practice, you can "roll" the wheel a little as you brush and get nice, precise results fairly quickly. Besides, the wheel masks won't help you with the inside tire lines if you've already glued the wheel pairs together.
Anyways, this is how I do 'em.
"Wheel masks? Wheel masks!? We don't need no stinkin' wheel masks..."
integraguy95
Tennessee, United States
Joined: October 02, 2008
KitMaker: 308 posts
Armorama: 304 posts
Joined: October 02, 2008
KitMaker: 308 posts
Armorama: 304 posts
Posted: Monday, June 27, 2011 - 02:24 PM UTC
This is going to be fun to watch.
panzerbob01
Louisiana, United States
Joined: March 06, 2010
KitMaker: 3,128 posts
Armorama: 2,959 posts
Joined: March 06, 2010
KitMaker: 3,128 posts
Armorama: 2,959 posts
Posted: Monday, June 27, 2011 - 03:54 PM UTC
Neal;
Hi!
"Move over, Sam Colt!". The wheel mask is the "Great Equalizer" in the Panzer IV (and any other) model wheel wars, IMHO!
The thing I have is an actual purpose-made stainless steel wheel template but it's really just like the circle template posted on above.
I mount the single Pz IV wheels on wood skewers (toothpicks, whatever) and airbrush them in my current rubber color mix (generally now use Floquil RR grimy black or oily black - really sort of warm grays). Next, I spin those wheels while they are still on the skewers and pencil - lead the inner edges, assemble the pairs, and go to the mask. Pop each wheel in, spray outside face with base coat, pop it out and go to the next. Almost as fast as I can type this (OK, I'm a really slow typist, but not very long to paint the whole set and spares.) IF you are doing camo on wheels, a second pass for the 2cd color, etc. It's fun and easy.
But yes, BTW, the spin-on-skewers and paint rubber also works; done that, too, but I find I'm much more consistent with the mask.
FWIW, here's my old Tamiya Wirbelwind for mask-xample...
Cheers!
Bob
gibbs_
Haut-Rhin, France
Joined: June 27, 2011
KitMaker: 8 posts
Armorama: 6 posts
Joined: June 27, 2011
KitMaker: 8 posts
Armorama: 6 posts
Posted: Monday, June 27, 2011 - 07:09 PM UTC
competition between you and your son....Go mason you can win! ;-)
nice work on the two models...
HipKitty
Pennsylvania, United States
Joined: February 14, 2011
KitMaker: 390 posts
Armorama: 387 posts
Joined: February 14, 2011
KitMaker: 390 posts
Armorama: 387 posts
Posted: Tuesday, June 28, 2011 - 08:04 AM UTC
Thanks guys for the input! Mason and I already use the toothpick method...along with some helping hands holders.
HipKitty
Pennsylvania, United States
Joined: February 14, 2011
KitMaker: 390 posts
Armorama: 387 posts
Joined: February 14, 2011
KitMaker: 390 posts
Armorama: 387 posts
Posted: Wednesday, June 29, 2011 - 12:09 AM UTC
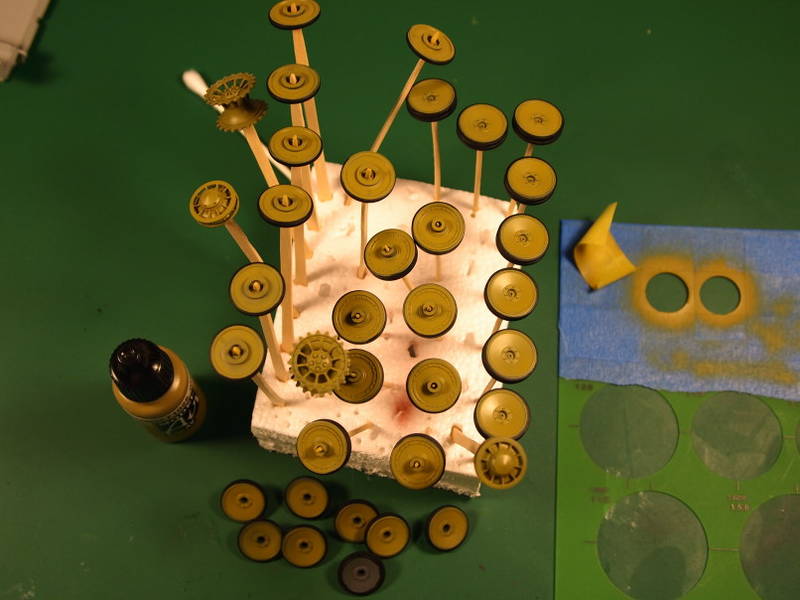
Here are most of the wheels after shooting the yellow over the primer grey:
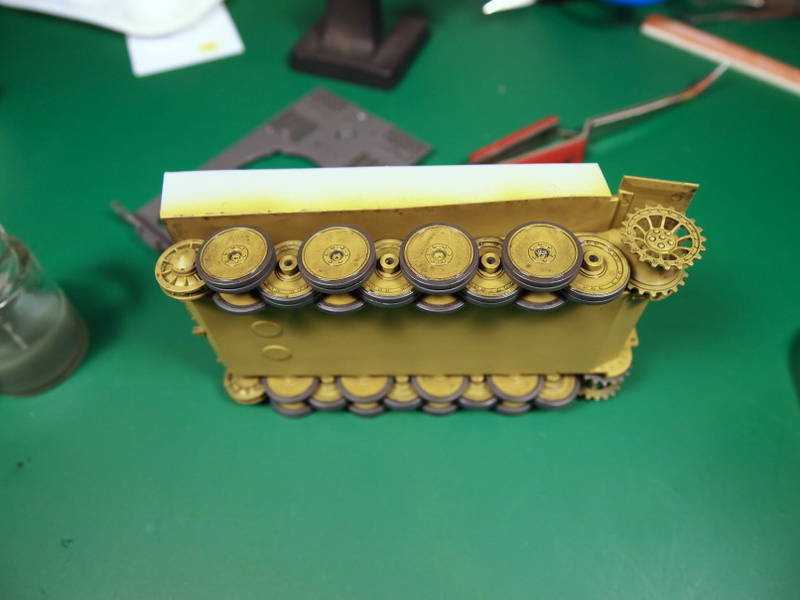
And a shot of inside the hull after placing the road wheel mounts...notice that the nibs stick through the hull wall and will need to be filed down to allow for the interior "block" inserts to be placed in:
HipKitty
Pennsylvania, United States
Joined: February 14, 2011
KitMaker: 390 posts
Armorama: 387 posts
Joined: February 14, 2011
KitMaker: 390 posts
Armorama: 387 posts
Posted: Saturday, July 02, 2011 - 03:02 PM UTC
I came up with a wheel mask of my own after not wanting to wait for an order of a commercially made mask set to be delivered. Some over-spray occurred which I plan to touch up by hand. Not knowing how everyone keeps their masks in place, I opted to keep the mask in place (for each and every wheel) with a long fine-tip screwdriver. This worked better than I imagined. I'll get some pics tomorrow when the sun is up.
Mason, forged forth without any mask. I think his look less likely to require any touchups.....
HipKitty
Pennsylvania, United States
Joined: February 14, 2011
KitMaker: 390 posts
Armorama: 387 posts
Joined: February 14, 2011
KitMaker: 390 posts
Armorama: 387 posts
Posted: Sunday, July 03, 2011 - 07:37 AM UTC
Some cloud cover that seems to have affected my natural lighting...however, here's a few pics..
retiredyank
Arkansas, United States
Joined: June 29, 2009
KitMaker: 11,610 posts
Armorama: 7,843 posts
Joined: June 29, 2009
KitMaker: 11,610 posts
Armorama: 7,843 posts
Posted: Sunday, July 03, 2011 - 07:48 AM UTC
It's a great feeling when your child surpasses you. For wheel masks, I use a circle cutter and masking tape. The cutter cost me about $8 from Michael's and it has more than paid for itself.
HipKitty
Pennsylvania, United States
Joined: February 14, 2011
KitMaker: 390 posts
Armorama: 387 posts
Joined: February 14, 2011
KitMaker: 390 posts
Armorama: 387 posts
Posted: Sunday, July 03, 2011 - 09:42 AM UTC
Quoted Text
It's a great feeling when your child surpasses you. For wheel masks, I use a circle cutter and masking tape. The cutter cost me about $8 from Michael's and it has more than paid for itself.
+1 Great idea!
Posted: Sunday, July 03, 2011 - 10:06 AM UTC
Neal have you used black for the tyres on your model? I ask as I have switched to dark greys of late after seeing a reading the advice of a lot of members here, and it does provide a more realistic finish.
HipKitty
Pennsylvania, United States
Joined: February 14, 2011
KitMaker: 390 posts
Armorama: 387 posts
Joined: February 14, 2011
KitMaker: 390 posts
Armorama: 387 posts
Posted: Sunday, July 03, 2011 - 11:21 AM UTC
Quoted Text
Neal have you used black for the tyres on your model? I ask as I have switched to dark greys of late after seeing a reading the advice of a lot of members here, and it does provide a more realistic finish.
Yes, they're black. In fact, I'm using the same flat black that Mason used on his models and what I used on the 8-RAD.
How dark of grey do you go with? Is this to simulate the fading of the rubber?
milvehfan
North Carolina, United States
Joined: June 26, 2007
KitMaker: 2,116 posts
Armorama: 1,080 posts
Joined: June 26, 2007
KitMaker: 2,116 posts
Armorama: 1,080 posts
Posted: Sunday, July 03, 2011 - 05:42 PM UTC
Hi Neal,
I have also switched to Dark Grays for the tires, Glad to see Mason is still motivated.
Hi Mason,
Glad to see you starting on the Panzer IV, Have Fun !!!!!
milvehfan
I have also switched to Dark Grays for the tires, Glad to see Mason is still motivated.
Hi Mason,
Glad to see you starting on the Panzer IV, Have Fun !!!!!
milvehfan
BigSmitty
Minnesota, United States
Joined: October 01, 2008
KitMaker: 597 posts
Armorama: 439 posts
Joined: October 01, 2008
KitMaker: 597 posts
Armorama: 439 posts
Posted: Sunday, July 03, 2011 - 05:55 PM UTC
Neal,
The dark rubber on the tires can be made several different ways. Vallejo's Panzer Aces makes a specific "Dark Rubber" which is a very close approximation to the Tamiya XF-63 German Gray. Sometimes I will use a Polly Scale color "Tarnished Black" which is again just a very very dark gray.
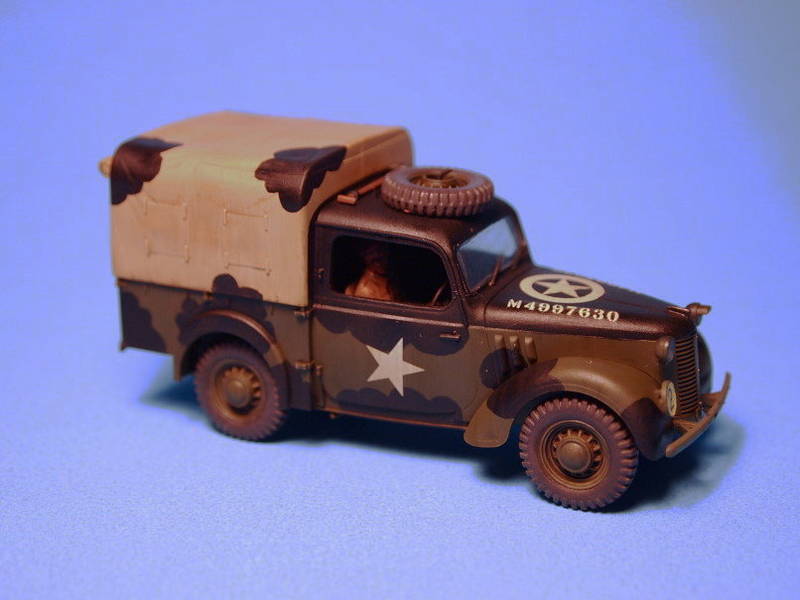
Here is the "Tarnished Black" on Tamiya's 1/48 10HP "Tilly". The normal Dark Rubber was too light with the dark green and black.
Here is the same "Tarnished Black" on Tamiya's 1/48 Tiger I Early. See how black it looks with the Dark Yellow compared to above:
Here are the same wheels repainted with the "Dark Rubber" which I chose for the final color:
As they say where I grew up, "There's more than one way to skin a cat."
The dark rubber on the tires can be made several different ways. Vallejo's Panzer Aces makes a specific "Dark Rubber" which is a very close approximation to the Tamiya XF-63 German Gray. Sometimes I will use a Polly Scale color "Tarnished Black" which is again just a very very dark gray.
Here is the "Tarnished Black" on Tamiya's 1/48 10HP "Tilly". The normal Dark Rubber was too light with the dark green and black.
Here is the same "Tarnished Black" on Tamiya's 1/48 Tiger I Early. See how black it looks with the Dark Yellow compared to above:
Here are the same wheels repainted with the "Dark Rubber" which I chose for the final color:
As they say where I grew up, "There's more than one way to skin a cat."