_GOTOBOTTOM
Constructive Feedback
For in-progress or completed build photos. Give and get contructive feedback!
restore 1st armor model - Taymia M3A1 HT-
skyhawk
Visit this Community
Florida, United States
Joined: June 03, 2003
KitMaker: 1,095 posts
Armorama: 743 posts
Posted: Monday, July 25, 2011 - 10:56 AM UTC
Well, its been a while since ive been posting on a regular basis so I thought I would come back with build log of the restoration of my first Armor model, the Tamyia M3 Halftrack. I build this back when I was still in highschool (18 years ago!) and held onto it. Over the years, before Dragon came out with thier new HT series, I collected various aftermarket items with the idea of eventully rebuilding this thing, restoring it to "current" standards so it can share a place of honor among my more recent builds. I had brush painted it, followed by a heavy drybrush for "mud"...didnt look bad at the time...
Here is the starting condition of the kit, after I had removed the figures, gear, and dis-assembled as much as possible...
Photobucket

Several months ago I picked up the Verlinden update, and recently aquired the Legends stowage set (made for Dragon kit but fits Taymia just fine). That, along with:
Tank Workshop track/sprocket/idler set
Tank Workshop snow chain wheels
Eduard PE (older smaller set)
leftovers from Dragon HT
Photobucket

So onward I went..

To get the paint off I used Super Clean..24 hours in that and it worked perfectly!
Some parts came loose in process, which was fine.
Photobucket
skyhawk
Visit this Community
Florida, United States
Joined: June 03, 2003
KitMaker: 1,095 posts
Armorama: 743 posts
Posted: Monday, July 25, 2011 - 11:07 AM UTC
Replaced the idler and sprocket wheel with old Tank Workshop items. That old yellow resin stinks! A bit of time to clean up, but well worth it. Not as detailed as the new Dragon parts, but still a VAST improvement!
Photobucket

My origional build had used the roller, but I wanted a wrench for the restoration. The dragon parts fit perfectly with only a very minor modification to the Taymia frame (remove about 1/8" of frame directly above spring mount)
Photobucket

Photobucket

Here are some overall shots after quite a bit of work done over the weekend. The tracks were a pain to soften and wrap around, but worked and look much better than the kit rubber tracks. The resin track teeth dont fit well around the sprocket and idler, nor do they fit at all between the road wheels, so I cheated and removed all the teeth that contacted these areas after some careful measurement. Only a VERY close inspection can you tell that the teeth dont go between the roadwheels.

After removing all the interior boxes (M3A2 parts) I secured the troop compartment and fitted the Dragon MG mount. A little tweaking and some fitting-cutting-fitting-cutting eventully got it to fit to the Taymia kit. I went ahead and removed the other MG mounts for the 30 cal and replaced them with Dragon parts also. Legends Stowage is starting to be added. Easier to paint with the model than try to attach later.

Photobucket
Photobucket

Now working on detailing the doors and will be adding stowage on sides next!

Thanks for looking
Andy
retiredyank
Visit this Community
Arkansas, United States
Joined: June 29, 2009
KitMaker: 11,610 posts
Armorama: 7,843 posts
Posted: Monday, July 25, 2011 - 11:30 AM UTC
Looking good Andy. The front wheels and winch addition show real improvement. You may want to try doped tissue paper for rolled canvases and packs. This makes me want to tear down my old Revell GMC White scout car and rebuild it with as much am as it can hold. Looking forward to seeing the improvements on and painted.
stooga
Visit this Community
Wellington, New Zealand
Joined: March 19, 2007
KitMaker: 40 posts
Armorama: 35 posts
Posted: Monday, July 25, 2011 - 03:54 PM UTC
Hey Andy,

Looking good, but then I thought it looked pretty good as it was! (compared with the models I was producing when I was in high school anyway!)

Aaron
Joel_W
Staff MemberAssociate Editor
AUTOMODELER
Visit this Community
New York, United States
Joined: December 04, 2010
KitMaker: 11,666 posts
Armorama: 1,143 posts
Posted: Tuesday, July 26, 2011 - 01:36 AM UTC
Andy, just a great rebuild. The new level of detail and quality is amazing. But nothings more amazing then your effort to upgrade and rebuild your 1st armor model. Me being me, would have eventually just tossed it when I built the Dragon model.

Looking forward to your pictures of the completed rebuild.
skyhawk
Visit this Community
Florida, United States
Joined: June 03, 2003
KitMaker: 1,095 posts
Armorama: 743 posts
Posted: Tuesday, July 26, 2011 - 03:22 AM UTC
Thanks guys for the comments. Ive actully been inspired to "dress up" some older builds. I have a box of models that I built well, but my painting and finishing techniques were not up to what I can do now. So instead of spending more $$ and time to build the kit all over, I can strip it down, detail it up a bit, and repaint /weather using improved techniques.

This HT is probally the most involved project I have...some others (done after I purchaced an airbrush) just need some improved stowage and weathering to bring up to current standards.

Didnt get home till late last night, so no work done... but hopefully tonight Ill get some more done. Working on detailing the doors, and will add some plastic strip along top edge of troop compartment to improve that detail, plus add the side stowage (Legends) along with some Apoxie Sculpt items and other bits to the interior.

Cheers,
Andy
The3rdPlacer
Visit this Community
Florida, United States
Joined: July 29, 2008
KitMaker: 430 posts
Armorama: 407 posts
Posted: Tuesday, July 26, 2011 - 06:34 AM UTC
Great stuff Andy, glad I will get to see it in person eventaully!

I need to break out my first one...a original Tamiya Tiger I and re-finish, good idea.

Ryan
skyhawk
Visit this Community
Florida, United States
Joined: June 03, 2003
KitMaker: 1,095 posts
Armorama: 743 posts
Posted: Thursday, July 28, 2011 - 04:02 AM UTC
Its been a busy week, but managed to scrape in a little time last night..

added some strip around the top edge of the troop compartment. I will go back and drill small holes (as seen in photos...probally for mounting various equipment), plus add mounts for the canopy bows. Havent decided if Im going to add a couple and roll back the tarp, or have them un-mounted and stowed along side..but ill cross that when the time comes!

Photobucket

Also detailing up the doors. When I first did this I cut all the upper portions and had them mounted folded down. After looking through lots of photos it seems that is was standard practice in NW Europe to keep them up (more protection from snipers I imagine). So, I am re-mounting the upper portions "up", which meant new hidges. Ill also be adding new door handles and some other details.
Photobucket

In the meantime, picked up a couple of items from Archer to use...
M2/M3 HT transfers (made for Dragon kits, but should work fine with this one as well)
Pin-ups (for a few "crew embellishments" as finishing touches)
Photobucket

more later!
Andy
skyhawk
Visit this Community
Florida, United States
Joined: June 03, 2003
KitMaker: 1,095 posts
Armorama: 743 posts
Posted: Monday, August 01, 2011 - 05:04 AM UTC
Well got a little bit done over the weekend...not as much as I wanted but still progress.

Mainly was able to get the doors mounted and the OVM gear stashed on the sides. The shovel, axe and pick axe are from the Verlinden update set. Of course after I did this I realized that there is an extra set of these items on the spare Dragon HT sprues ive been stealing bits from. Oh well...save the plastic ones for another project!
Brackets are from the eduard set and the straps are from Voyager (leftovers from Stryker build)
Photobucket

I went ahead and made new hindges from plastic to replace the "slot hinge" Taymia molded on for the doors. I have a little more work to do on those. Door handle is plastic rod, slightly stretched after heating to get a taper, and bent.

Photobucket

You can catch a peak at the mine racks...starting to load up with a bunch of ammo cans as ive seen in most photos of NW europe HT's. More gear will hopefully go on tonight!
The3rdPlacer
Visit this Community
Florida, United States
Joined: July 29, 2008
KitMaker: 430 posts
Armorama: 407 posts
Posted: Monday, August 01, 2011 - 07:15 AM UTC
Still watching Andy, you gonna have it done for the meeting?

Nice trick on the door handles.

Ryan
skyhawk
Visit this Community
Florida, United States
Joined: June 03, 2003
KitMaker: 1,095 posts
Armorama: 743 posts
Posted: Monday, August 01, 2011 - 08:08 AM UTC

Quoted Text

Still watching Andy, you gonna have it done for the meeting?

Nice trick on the door handles.

Ryan


It will be darn close by then...maybe not totaly complete but pretty close.

see ya around
The3rdPlacer
Visit this Community
Florida, United States
Joined: July 29, 2008
KitMaker: 430 posts
Armorama: 407 posts
Posted: Monday, August 01, 2011 - 09:27 AM UTC
Sounds good sir speedy.

I started a therapy build...details to come.

Ryan
skyhawk
Visit this Community
Florida, United States
Joined: June 03, 2003
KitMaker: 1,095 posts
Armorama: 743 posts
Posted: Saturday, August 06, 2011 - 11:07 AM UTC
Still bumping along on this baby..

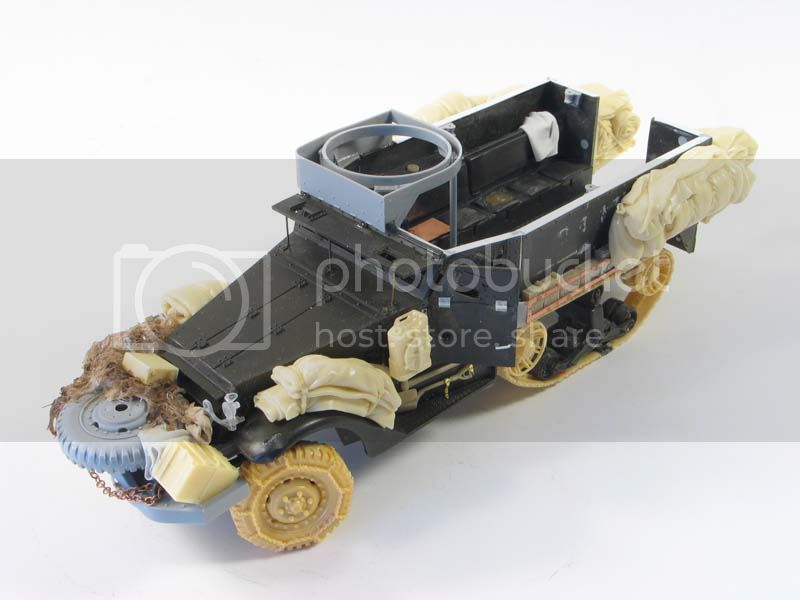
Got most of the external stowage on, at least the big stuff..

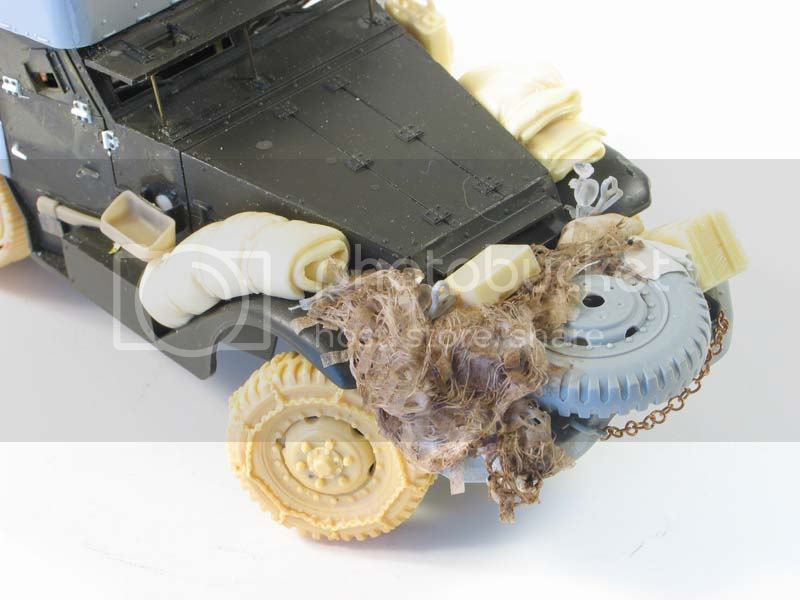
Started with the wrench area. Thought for a while how I wanted to fill this space up and decided on a base of a spare wheel (modified Dragon wheel), a crate, and a camo net. The wheel was modified by carefully slicing off the bolts and hub (I saved the bolts for later projects), then just drilled appropriate holes. The crate is a resin item from the spares box.

For the net, I used a couple of sections of medical gauze and thought I would "experiment" and use tea bag for the cloth strips.
Photobucket

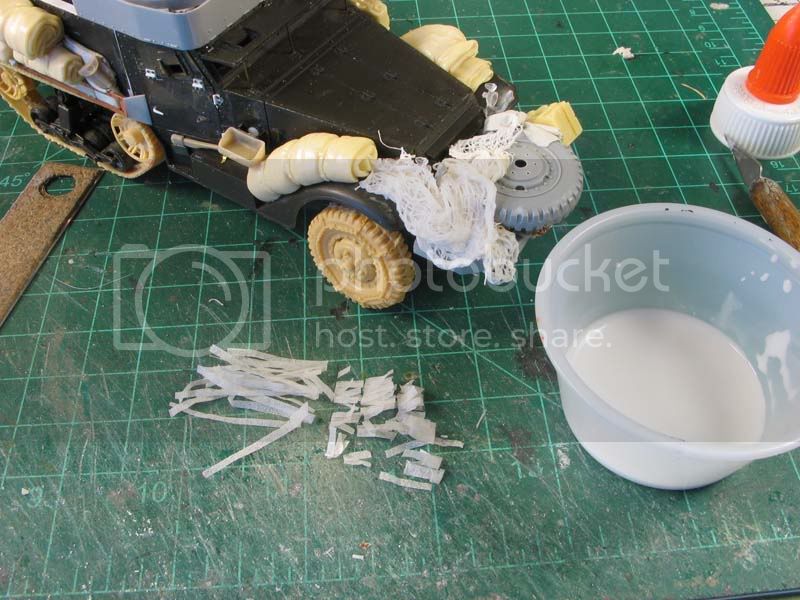
The gauze was dipped in white glue, and little strips of the tea bag was tucked in randomly into the gauze. Use different lengths as that give the illusion that some are more wrapped and tucked into the net than others. Well the tea bag tended to totally disappear once wet from the glue. Some remained definable, but im going to go back with some strips of taymia tape and add more. Here it is after a brown oil paint wash to try to get a better feel of what it looked like.
Photobucket

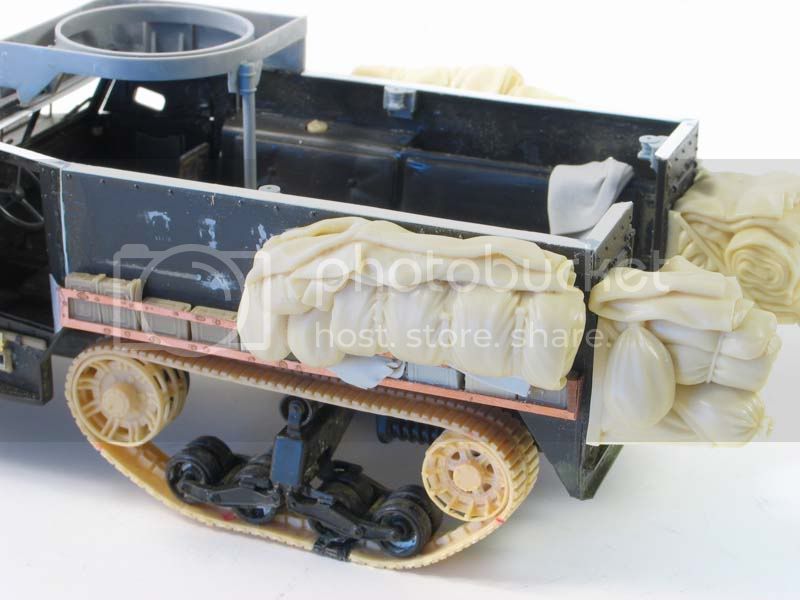
For the start on the side stowage, I am again using the items included in the Legends set. The resin parts are designed to fit over the scaling ladders that are on the Dragon M3 kit, but I choose not to have them on my model and went to great pains to remove them off the taymia parts. So, to make them fit up against the side of the halftrack, I rolled out some putty, rolled it into some long rolls of sorts, and put them behind the resin to fill the gap. I let a bit of the edge hang down to add some variety in a few spots. Note the ammo cans loaded up instead of mines.
Photobucket
Photobucket

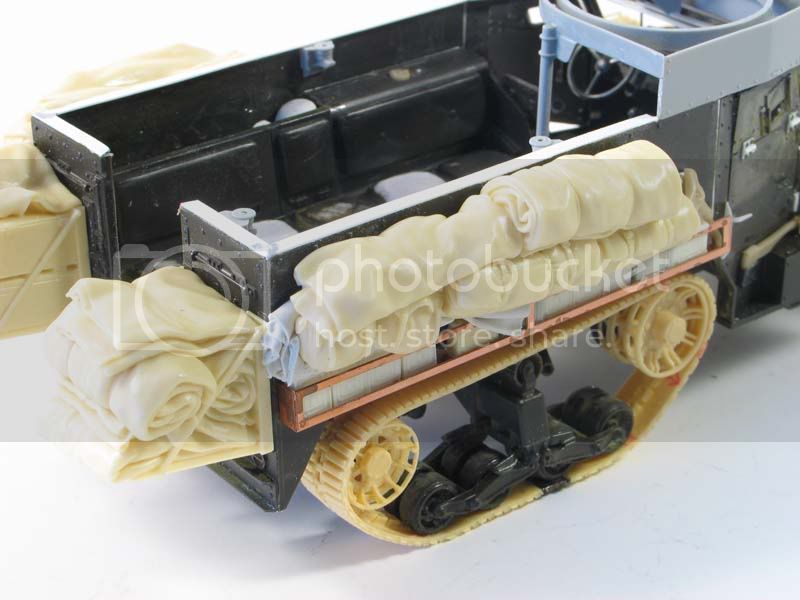
heres an overall shot of where Im at so far...now to turn some attention to the interior...
Photobucket
skyhawk
Visit this Community
Florida, United States
Joined: June 03, 2003
KitMaker: 1,095 posts
Armorama: 743 posts
Posted: Monday, August 08, 2011 - 04:01 AM UTC
Got a little more done yesterday...

Added the rifle racks and braces to the interior, and also started adding footman loops to the exterior, plus detailed the rear door a bit. Footman loops are great products from Tiger Models. I will be adding some more in areas they can be seen.

Photobucket

Photobucket
Photobucket

My wife came in and saw what I was working on. She requested that I do it in some kind of snow scheme, which would go with the snow chains.
So im looking at doing a worn winter whitewash effect, late winter. We will see how that goes...and it will be something a bit different than the standard OD green.

Next up will be adding some gear to the inside, a radio, and working on the MG's.
Berlin45
Visit this Community
Washington, United States
Joined: June 25, 2009
KitMaker: 96 posts
Armorama: 74 posts
Posted: Monday, August 15, 2011 - 03:25 AM UTC
Just stumbled on this thread- fantastic! I love these restoration/recycling projects. I still have my old Tamiya Tiger I E from high school (almost 30 years old!) that I'm going to restore with the help of the more recent issue Fruhe Tiger.

You've done a bang up job so far. Congrats!
skyhawk
Visit this Community
Florida, United States
Joined: June 03, 2003
KitMaker: 1,095 posts
Armorama: 743 posts
Posted: Monday, August 22, 2011 - 06:22 AM UTC
Time for an update! the month was slipping by.

I finished up work in the interior, installed the radio and antenna mast, as well as some crew equipment. I loaded the side bins a bit with some of the original stowage on the model as well as some more stuff. More will be added after painting is done.

Painting started with Floquil "Brunswick Green" for a primer/shading, then Model Master "green drab", and a little fading with "faded olive drab". Once the camo net got some paint on it, I can see it turned out pretty nice.

so now this week will be painting details and decals. Comments welcome!
Andy

Photobucket
Photobucket
skyhawk
Visit this Community
Florida, United States
Joined: June 03, 2003
KitMaker: 1,095 posts
Armorama: 743 posts
Posted: Monday, August 22, 2011 - 06:25 AM UTC

Quoted Text

Just stumbled on this thread- fantastic! I love these restoration/recycling projects. I still have my old Tamiya Tiger I E from high school (almost 30 years old!) that I'm going to restore with the help of the more recent issue Fruhe Tiger.

You've done a bang up job so far. Congrats!


thanks JDM! Glad your enjoying this project, as Im having a great time working on this. It will be nice to see this model take a place of honor among my other more recent works.

thanks for following!
Andy
skyhawk
Visit this Community
Florida, United States
Joined: June 03, 2003
KitMaker: 1,095 posts
Armorama: 743 posts
Posted: Wednesday, August 31, 2011 - 02:58 AM UTC
Been getting quite a bit done on this the past weeks. And I have to wrap this up within the next week to have it ready for an article in SMMI...

So here she is at the moment, before any flat coat. Markings are pulled from various sources. The serial numbers are from the origional kit (leftovers), the star is from a Dragon M4A1 76mm Sherman, and the bumper codes are done using an old Microscale sheet for US Army tac codes. I decided on one from the 6th AD, as my wife encouraged me to do a winter scheme...so I needed to choose from a unit that was around for the winter of 44-45, and used whitewash, and used M3A1s! Luckly I found a photo in Concords "US Halftracks" book by Zaloga of a shot of a large group of M3A1 halftracks from the 6th AD parked in a field, all with various degrees of whitewash. I decided to try modeling it toward the end of winter as the white was getting worn and scrubbed off.

so, after all the markings were done, I did a coat of Future and alowed it to dry for a day. Then used the hairspray technique and a 3/8" brush in white Lifecolor paint, slightly thinned on a pallette. It dries fairly fast, so using a stiff brush and warm tap water I scrubbed the whitewash till I was satisfied with the look.

Another coat of Future sealed it, then a controlled wash of dark green around the various details. Gear has been worked on, using various Vallejo, Model Master, and whatever else looked right. More gear to add later (ration boxes, hanging packs, etc).

comments welcome!

Photobucket

Photobucket
Coolaznkid
Visit this Community
Texas, United States
Joined: August 11, 2006
KitMaker: 74 posts
Armorama: 44 posts
Posted: Sunday, September 04, 2011 - 11:18 AM UTC
amazing restoration!!
skyhawk
Visit this Community
Florida, United States
Joined: June 03, 2003
KitMaker: 1,095 posts
Armorama: 743 posts
Posted: Sunday, September 04, 2011 - 11:59 AM UTC

Quoted Text

amazing restoration!!


Thanks Christopher! Working on a lot of detail painting and adding finishing touches this weekend. Should have some finished photos tomorrow or Tuesday!
Thanks again for you comment!
skyhawk
Visit this Community
Florida, United States
Joined: June 03, 2003
KitMaker: 1,095 posts
Armorama: 743 posts
Posted: Tuesday, September 06, 2011 - 06:53 AM UTC
All right, about 90% done! I still have some other bits I want to add, but this is the condition she is in for the magizine article. Guns are all from the verlinden update set. Im not totaly satisfied with the weathering, but its comming along. Id like to add a bit more weathering to the sides (rain marks and such), along with some ration boxes and hanging packs.

comments welcome!

Photobucket
Photobucket
Photobucket
Photobucket
 _GOTOTOP