

Jan, good eye. They "were" revearsed. Shortly after taking those and reviewing those photos I noticed something odd and that was that my tracks were towing in severly at the rear (you can kinda see it on the second pic, it was more noticable on pics I didn't post). I discovered that the idler sticks out to far and doesn't line up with the road wheels so I had to take the tracks off, sand down the housing where the idler mounts too, put the idlers back on and then put the tracks on. I put them on correctly the second time. I am building a base for it right now and when finished I will probably update the photos. I took photos of my Dragon Type 95 last night and while reviewing them noticed some things I need to fix. I have found that taking photos of my builds are a very good tool in noticing things that can be fixed and I have been using this to my advantage. Model on.
Roy
Hosted by Darren Baker
Type 97 Chi Ha

rolf

Joined: August 17, 2004
KitMaker: 301 posts
Armorama: 250 posts

Posted: Tuesday, November 08, 2011 - 06:07 AM UTC
tread_geek

Joined: March 23, 2008
KitMaker: 2,847 posts
Armorama: 2,667 posts
Posted: Tuesday, November 08, 2011 - 07:00 AM UTC
Roy,
Since I got back into the hobby and joined this site, I've become an avid "picture-taker," thanks to the "instant gratification" of digital photography. When I started doing reviews for this site, the photos became even more important. It is surprising, NO, shocking, what digital images can reveal. That seam that you were sure was perfect even under optical magnification, ain't! When I "graduated" to a DSLR from a "point 'n shoot," things got worse. Then my SWMBO bought me a set of macro filters for XMas and things got worse still.
  I try to take pictures at each stage of a build and then review them before the next step. I can't count the number of times they've revealed an anomaly that I was often able to correct before the glue dried. Modelling and digital photography, highly recommended!
I am curious to see whatever images you have of the Type 95. The Type 97 still isn't in local hobby shops so I doubt I'll see the Type 95 around here for a while. Now if only Dragon would do a Japanese Type 1 Ho Ki fully tracked APC.
Cheers,
Jan
Since I got back into the hobby and joined this site, I've become an avid "picture-taker," thanks to the "instant gratification" of digital photography.
When I started doing reviews for this site, the photos became even more important. It is surprising, NO, shocking, what digital images can reveal. That seam that you were sure was perfect even under optical magnification, ain't! When I "graduated" to a DSLR from a "point 'n shoot," things got worse. Then my SWMBO bought me a set of macro filters for XMas and things got worse still. I try to take pictures at each stage of a build and then review them before the next step. I can't count the number of times they've revealed an anomaly that I was often able to correct before the glue dried. Modelling and digital photography, highly recommended! I am curious to see whatever images you have of the Type 95. The Type 97 still isn't in local hobby shops so I doubt I'll see the Type 95 around here for a while. Now if only Dragon would do a Japanese Type 1 Ho Ki fully tracked APC.
Cheers,
Jan
rolf
Joined: August 17, 2004
KitMaker: 301 posts
Armorama: 250 posts
Posted: Tuesday, November 08, 2011 - 08:42 AM UTC
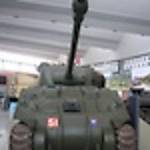
The Dragon Type 97s are all over the Hobby Shops down here. They run about $15.00 per. I just ordered the new Dragon Type 97 "early hull". The one thing I did not do on my Type 95 that I wish I had was hollow out the lights and fill them with white glue. I still may but I am not to thrilled about doing it now that they are mounted. I will take more pictures tonight of my Type 95 now that I have hopefully fixed all the issues that I discovered last night. I too use a DLRS camera and really love the pics it take. I am still learning it though so. I don't use any filters or photo editing on my pictures except the crop feature.
Roy
Roy
rolf
Joined: August 17, 2004
KitMaker: 301 posts
Armorama: 250 posts
Posted: Wednesday, November 09, 2011 - 04:38 AM UTC
tread_geek
Joined: March 23, 2008
KitMaker: 2,847 posts
Armorama: 2,667 posts
Posted: Wednesday, November 09, 2011 - 05:41 AM UTC
@ rolf - Other than the macro filters, I don't do much to my photos, other than cropping and some exposure modification. I usually shoot in aperture priority mode with a -.3 to -1 exposure modification, depending on light source. With a negative modification you can change exposure upwards to get proper colours without losing any detail. Overexposed images can't be corrected without loss of detail. However, I am often experimenting with various camera settings and especially lighting.
Your Ha Go is looking good and you should post them in a thread here in the Braille forum. Trying to work on the lights at this point might be problematic as they are set quite far back and I would imagine, are on the delicate side. I always remind myself and suggest to others that they study their build well before cutting and gluing. It's better to correct something at the early stages rather than later and risk doing harm to an otherwise good build.
My Chi Ha road wheels are more or less done but I need to do a bit of touch-up here and there. The one negative point of the Type 97 kit is that there is no external detail on the front and rear most inner road wheels. It'll require a touch of ingenuity to disguise this oversight.
Cheers,
Jan
Your Ha Go is looking good and you should post them in a thread here in the Braille forum. Trying to work on the lights at this point might be problematic as they are set quite far back and I would imagine, are on the delicate side. I always remind myself and suggest to others that they study their build well before cutting and gluing.
It's better to correct something at the early stages rather than later and risk doing harm to an otherwise good build. My Chi Ha road wheels are more or less done but I need to do a bit of touch-up here and there. The one negative point of the Type 97 kit is that there is no external detail on the front and rear most inner road wheels. It'll require a touch of ingenuity to disguise this oversight.
Cheers,
Jan
rolf
Joined: August 17, 2004
KitMaker: 301 posts
Armorama: 250 posts
Posted: Wednesday, November 09, 2011 - 06:50 AM UTC
Jan, I was also pretty let down by the lack of detail on the inner side of the Chi Ha's idlers. Hopefully Dragon fixed that problem with their newest Chi Ha release. The Ha Go's idlers are detailed on both sides. I thought about drilling holes on the Chi Ha's idlers but decided I would just ignore it as it would negate the kits OOB eligibility if I enter it in a contest (which I did and took second).
Roy
Roy
tread_geek
Joined: March 23, 2008
KitMaker: 2,847 posts
Armorama: 2,667 posts
Posted: Wednesday, November 09, 2011 - 07:55 AM UTC
Roy, I'm kind of in the same spot as you as I did this build for the "Out Of the Box" campaign, so there wasn't too much that I could do. For those that might not grasp what we were discussing, I tried to see if I had any pictures of the wheels.
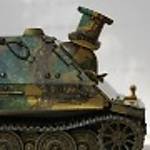
Here's a cropped and blown up shot from the review. One can fairly make out how plain that inside wheel is.

Here's a shot taken the other day while painting the suspension with my attempt at camouflage. Still needed a bit of work.

While I'm at it, here's the wheels mostly done.

Unfortunately, if Dragon follows their normal process of creating variants of kits, I strongly doubt that they will have corrected these wheels. The only major difference in the early Chi Ha is to the hull and those pieces come separate. All the wheels and such are all on the one large 'A' sprue. A builders best bet might be to chuck these wheels into a hand drill and try to at least scribe some form of dividing line between metal and rubber.
Cheers,
Jan
Here's a cropped and blown up shot from the review. One can fairly make out how plain that inside wheel is.
Here's a shot taken the other day while painting the suspension with my attempt at camouflage. Still needed a bit of work.
While I'm at it, here's the wheels mostly done.
Unfortunately, if Dragon follows their normal process of creating variants of kits, I strongly doubt that they will have corrected these wheels. The only major difference in the early Chi Ha is to the hull and those pieces come separate. All the wheels and such are all on the one large 'A' sprue. A builders best bet might be to chuck these wheels into a hand drill and try to at least scribe some form of dividing line between metal and rubber.
Cheers,
Jan
rolf
Joined: August 17, 2004
KitMaker: 301 posts
Armorama: 250 posts
Posted: Wednesday, November 09, 2011 - 09:38 AM UTC
Oh yeah, I forgot about the first and last station road wheels having a lack of detail which is very disappointing, I was referring to the idlers. I agree that Dragon probably will not fix this but we could hope they do.
Roy
Roy
Firefly74

Joined: April 15, 2010
KitMaker: 224 posts
Armorama: 205 posts

Posted: Wednesday, November 09, 2011 - 01:01 PM UTC
Hi Jan. Good to see your progress on this build. Its looking good! Looking forward to seeng it finished. What were they thinking when they designed those inner wheels? Dissapointing.
Roy: Your Ha Go looks great. I'll have to pick one of those up.
Japanese armour is an interesting subject that is rarely covered. I was quite impressed when Dragon released these new kits, now if they would only release some more British/allied subjects!
Cheers,
Tim
Roy: Your Ha Go looks great. I'll have to pick one of those up.
Japanese armour is an interesting subject that is rarely covered. I was quite impressed when Dragon released these new kits, now if they would only release some more British/allied subjects!
Cheers,
Tim

Dirkpitt289
Joined: May 24, 2008
KitMaker: 346 posts
Armorama: 38 posts
Posted: Wednesday, November 09, 2011 - 01:18 PM UTC
Nice work on this one. I saw this kit last week at my LHS and came real close to picking it up. I might have to go back and get it now.

weathering_one
Joined: April 04, 2009
KitMaker: 458 posts
Armorama: 456 posts

Posted: Thursday, November 10, 2011 - 05:37 AM UTC
I totally forgot that you were doing this blog! Nice to see that you are making some progress and congrats on repairing the broken track. It got me dig up and take a look at the Airfix one that I have.
Regards,
AJ
Regards,
AJ
tread_geek
Joined: March 23, 2008
KitMaker: 2,847 posts
Armorama: 2,667 posts
Posted: Thursday, November 10, 2011 - 09:27 AM UTC
@ rolf - I never really was too concerned about the idlers as they are so small and pretty much out of the way. The position and lack of inner detail on the end road wheels is a lot more visible.
@ Firefly74 - TIm, these Japanese releases are a nice change of pace. The total lack of detail on the first and last inner road wheels on each side may make some (judges) consider that you made a mistake in assembly and count against an otherwise very nice build/kit.
Another omission that I noted in the review is that there is no real semblance of internal turret detail. While you can built the beast with the turret hatch open, I don't believe that anyone makes figures of Japanese tank crew at this time in this scale to "plug" the opening. Now the real kicker, The main gun has rather impressive internal detail. Despite this, the turret rear machinegun, which would be more visible through the hatch, has nothing other than a pin. What were they thinking! Here's the main gun.

@ Dirkpitt289 - If they are available and you are interested, give the kit a whirl. When available in my area I certainly will look at getting the "early" Type 97 and the Type 95.
@ AJB - Thanks AJ, by all means give the Airfix version a try. Detail might be a bit soft but considering its age it isn't too bad.
Not too much progress to report as I am currently touching up the paint and started a bit of the detail painting. Once that's done I'll coat it with Future and apply the decals. I am splitting time between this one and the Kfz 70 and the second Sd KfZz 223.
Thanks to all for looking and commenting. I hope that this exercise might have helped a few with some issues they might have.
Cheers,
Jan
@ Firefly74 - TIm, these Japanese releases are a nice change of pace.
The total lack of detail on the first and last inner road wheels on each side may make some (judges) consider that you made a mistake in assembly and count against an otherwise very nice build/kit. Another omission that I noted in the review is that there is no real semblance of internal turret detail. While you can built the beast with the turret hatch open, I don't believe that anyone makes figures of Japanese tank crew at this time in this scale to "plug" the opening. Now the real kicker, The main gun has rather impressive internal detail. Despite this, the turret rear machinegun, which would be more visible through the hatch, has nothing other than a pin.
What were they thinking! Here's the main gun.@ Dirkpitt289 - If they are available and you are interested, give the kit a whirl.
When available in my area I certainly will look at getting the "early" Type 97 and the Type 95. @ AJB - Thanks AJ, by all means give the Airfix version a try.
Detail might be a bit soft but considering its age it isn't too bad. Not too much progress to report as I am currently touching up the paint and started a bit of the detail painting. Once that's done I'll coat it with Future and apply the decals. I am splitting time between this one and the Kfz 70 and the second Sd KfZz 223.
Thanks to all for looking and commenting.
I hope that this exercise might have helped a few with some issues they might have.Cheers,
Jan
rolf
Joined: August 17, 2004
KitMaker: 301 posts
Armorama: 250 posts
Posted: Thursday, November 10, 2011 - 06:55 PM UTC
Quoted Text
@ rolf - I never really was too concerned about the idlers as they are so small and pretty much out of the way. The position and lack of inner detail on the end road wheels is a lot more visible.
Jan
Jan, I think you are confusing the return rollers for the Idlers. The Idlers are the two very large wheels at the very end of the vehicle (you may be referring to them as "the end road wheels". Those should have holes on the inner face just like the outer face. I'm just about done with the base for mine. Once that is finished I will take more pics to compliment the ones I've already taken. One thing I forgot to mention on mine and it is something to look out for is the decals for the hull side. They are very small and care should be taken when placing them on the vehicle. I placed my last character upside down. When some one pointed this out to me it was too late. I agree with the lack of internal detail on the turret. Got to leave something for the AM guys to do or for us to really use our modelling skills. It would have been nice if Dragon would have given us a complete MG so that we could see it inside the turret or use it in the AA mount.
Roy
tread_geek
Joined: March 23, 2008
KitMaker: 2,847 posts
Armorama: 2,667 posts
Posted: Friday, November 11, 2011 - 04:14 AM UTC
Quoted Text
Jan, I think you are confusing the return rollers for the Idlers. The Idlers are the two very large wheels at the very end of the vehicle (you may be referring to them as "the end road wheels".
It was a slip of the brain phenomenon.
I was thinking of the return rollers but wrote idler. Actually, I never thought about the "idlers" because I was so distracted about the road wheels. IT's good that you pointed this omission about the idlers lacking those inner lightening holes. After reading your comment I did an image search to see if I could find a picture to support the fact. I can understand how we missed it as most pictures are of full side or front 3/4 views of the tank. I finally found a couple that support this feature so it's something for everyone to note. Therefore:Note: The idler wheels, Part A27, are moulded as a joined pair. The outer disk has lightening holes in it but the inner disc does not. To be accurate, the builder should drill out lightening holes on the inner disk. As the idler is a one piece part, just use the holes present in the outer disk as a guide for drilling holes in the inner one.
Thanks for the warning about the decals.
I read that in your thread on the other site and intended to mention it once I got to their application.Cheers,
Jan
tread_geek
Joined: March 23, 2008
KitMaker: 2,847 posts
Armorama: 2,667 posts
Posted: Wednesday, December 14, 2011 - 05:40 AM UTC
More progress but I don't have pictures of every stage. I've been applying some of the techniques described in Alex Clarks " Small=Scale Armour Modelling" during this and another build. Partly it was his pre-shading methods. I've applied something similar in the past but not to the extent he describes. After that, I started some initial "distressing" (weathering?), also from the book.
With those steps done, it was time for some Future and then the decals. I mix the Future with Tamiya X-21 Flat Base to give it a bit less shine. The decals weren't too bad except for the small Japanese characters on the sides of the hull below the turret. Rather than one log strip with the three characters on it, each is an individual decal. Crazy!
Warning - Those little characters are a nightmare to position. I used a sharpened toothpick for the process. Also, make sure that you get their orientation correct!
I applied a top coat of Future mix after the decals were dry so further weathering can proceed. The tracks have also received a preliminary weathering which is a variations of a method Clark outlines in his book.


Next up will be the final weathering and any needed touch-ups.
Cheers,
Jan 
With those steps done, it was time for some Future and then the decals. I mix the Future with Tamiya X-21 Flat Base to give it a bit less shine. The decals weren't too bad except for the small Japanese characters on the sides of the hull below the turret. Rather than one log strip with the three characters on it, each is an individual decal. Crazy!
Warning - Those little characters are a nightmare to position. I used a sharpened toothpick for the process. Also, make sure that you get their orientation correct!
I applied a top coat of Future mix after the decals were dry so further weathering can proceed. The tracks have also received a preliminary weathering which is a variations of a method Clark outlines in his book.
Next up will be the final weathering and any needed touch-ups.
Cheers,
Jan
erhntly

Joined: June 11, 2004
KitMaker: 1,426 posts
Armorama: 464 posts

Posted: Wednesday, December 14, 2011 - 06:44 AM UTC
Hi Jan,
Very nice progress, I follow with interest.. Have a realistic colors.
Greetings.
Very nice progress, I follow with interest.. Have a realistic colors.
Greetings.
tread_geek
Joined: March 23, 2008
KitMaker: 2,847 posts
Armorama: 2,667 posts
Posted: Wednesday, December 14, 2011 - 07:46 AM UTC
Quoted Text
Very nice progress, I follow with interest.. Have a realistic colors.
Thanks for commenting, Erhan.
I tried to find the base colours based on photos at the at Yasukuni Shrine Museum in Japan. The brown and dark green are Tamiya and the other is ModelMaster Acryl. The yellow colour is Tamiya but dulled out to make it look more worn. To those I either lighten or darken them to change the shade and make them less uniform. :-)Cheers,
Jan
tread_geek
Joined: March 23, 2008
KitMaker: 2,847 posts
Armorama: 2,667 posts
Posted: Saturday, December 17, 2011 - 08:50 AM UTC
Back again! The first two pictures are of the Chi Ha after preliminary weathering and decals that were followed by a sealant coat of Future and then after dry, a first coat of Model Master Matt Clear Acryl. I have made some changes to my camera settings and also changed the backdrop based on some suggestions from the book I mentioned in an earlier post.


The next pictures are after several stages of weathering using various colours and consistencies of Tamiya acrylic paints. Many of these that I have seen built seem to me to be a bit too clean.


I am somewhat happy with the way it's turning out but it's not where I want it yet. I'd say with the last photos it's about 95% done. I'll touch up a few detail spots, try some pin washes and then the final applications of weathering and sealant coats.
Comments or suggestions as to how to proceed are always appreciated.
Cheers,
Jan
The first two pictures are of the Chi Ha after preliminary weathering and decals that were followed by a sealant coat of Future and then after dry, a first coat of Model Master Matt Clear Acryl. I have made some changes to my camera settings and also changed the backdrop based on some suggestions from the book I mentioned in an earlier post.The next pictures are after several stages of weathering using various colours and consistencies of Tamiya acrylic paints. Many of these that I have seen built seem to me to be a bit too clean.
I am somewhat happy with the way it's turning out but it's not where I want it yet. I'd say with the last photos it's about 95% done. I'll touch up a few detail spots, try some pin washes and then the final applications of weathering and sealant coats.
Comments or suggestions as to how to proceed are always appreciated.
Cheers,
Jan
weathering_one
Joined: April 04, 2009
KitMaker: 458 posts
Armorama: 456 posts
Posted: Sunday, December 18, 2011 - 04:16 AM UTC
Jan,
Missed these last couple of updates. That little tank is really coming along. I know you said that you have some minor details to touch up so I won't comment on the headlight or the tow cable. The weathering to this point looks quite good and in certain areas it's hard to believe that it's not a pigment of some kind.
Regards,
AJ
Missed these last couple of updates. That little tank is really coming along. I know you said that you have some minor details to touch up so I won't comment on the headlight or the tow cable.
The weathering to this point looks quite good and in certain areas it's hard to believe that it's not a pigment of some kind. Regards,
AJ
tread_geek
Joined: March 23, 2008
KitMaker: 2,847 posts
Armorama: 2,667 posts
Posted: Monday, December 19, 2011 - 04:22 AM UTC
@AJB - Thanks for commenting, AJ. You are correct, there are a couple of things that I need to touch up. The tow cable has some camo colours where it shouldn't and I wasn't sure about what to do with the headlight. Either paint it or drill it out and make it look like it was shot out. I think that I'll also try to "define" a few areas or items such as vision slits and the like. Shouldn't be too long now.
Cheers,
Jan
Cheers,
Jan
sabredog
Joined: July 22, 2007
KitMaker: 607 posts
Armorama: 599 posts
Posted: Monday, December 19, 2011 - 11:38 AM UTC
Jan
That is looking mighty fine so far. Are you going to base it at all?
That is looking mighty fine so far. Are you going to base it at all?
Firefly74
Joined: April 15, 2010
KitMaker: 224 posts
Armorama: 205 posts
Posted: Thursday, December 22, 2011 - 08:42 PM UTC
Looking good Jan!
Cheers,
Tim
Cheers,
Tim
tread_geek
Joined: March 23, 2008
KitMaker: 2,847 posts
Armorama: 2,667 posts
Posted: Friday, December 23, 2011 - 04:21 AM UTC
Thanks Michael and Tim, I always appreciate a comment.
A tiny bit more weathering and I still haven't touched up the last few details. To answer the question about a base, I am seriously considering it. My SWMBO got an acrylic texture medium by DecoArt called Fierro. After looking at it after an experimental application, I couldn't help but be reminded of dried lava. Since Iwo Jima was a volcanic island and had dark sand beaches and areas of dried lava, I thought that it might have some potential. As this is partially an experiment, I didn't want to risk a nice wood base so I took a page from Sabredog's bag of tricks and tried it on a cocktail coaster. Here's the coaster with the stuff applied to represent the potential


With the Chi Ha posed.


The medium is shown in it's natural state after drying. This is only a start and will still need some amount of work. There could be great potential for modellers and I envision using it for all kinds of surfaces. The base material is rather thick and somewhat sculpt-able but can be thinned with plain water. Other uses will be up to a users imagination.
Thanks for looking.
Cheers,
Jan
A tiny bit more weathering and I still haven't touched up the last few details. To answer the question about a base, I am seriously considering it. My SWMBO got an acrylic texture medium by DecoArt called Fierro. After looking at it after an experimental application, I couldn't help but be reminded of dried lava. Since Iwo Jima was a volcanic island and had dark sand beaches and areas of dried lava, I thought that it might have some potential. As this is partially an experiment, I didn't want to risk a nice wood base so I took a page from Sabredog's bag of tricks and tried it on a cocktail coaster. Here's the coaster with the stuff applied to represent the potential
With the Chi Ha posed.
The medium is shown in it's natural state after drying. This is only a start and will still need some amount of work. There could be great potential for modellers and I envision using it for all kinds of surfaces. The base material is rather thick and somewhat sculpt-able but can be thinned with plain water. Other uses will be up to a users imagination.
Thanks for looking.
Cheers,
Jan
sabredog
Joined: July 22, 2007
KitMaker: 607 posts
Armorama: 599 posts
Posted: Friday, December 23, 2011 - 05:05 AM UTC
Jan
excellent!
Now the little machine has a home all of its own
Bases in my opinion, really finish the build.
excellent!
Now the little machine has a home all of its own
Bases in my opinion, really finish the build.
PanzerAlexander

Joined: February 17, 2010
KitMaker: 625 posts
Armorama: 608 posts
Posted: Friday, December 23, 2011 - 06:54 AM UTC
Hi Jan,
Nice approach on this little model. It almost makes me want to try something other than German Panzers .
.
As for the weathering I suggest that you start experimenting with oils (if you don't use them already that is) to get that ''faded'' or ''used'' look on your models.
You'll find out that it's quite easy and that you get striking results with little effort.
Oils have that particular ability to give depth to a color.
Good luck with the base.
P.A.
Nice approach on this little model. It almost makes me want to try something other than German Panzers
.As for the weathering I suggest that you start experimenting with oils (if you don't use them already that is) to get that ''faded'' or ''used'' look on your models.
You'll find out that it's quite easy and that you get striking results with little effort.
Oils have that particular ability to give depth to a color.
Good luck with the base.
P.A.
 |

WEB HOSTING BY


Copyright ©2021 Armorama and Kitmaker Network, a subsidiary of Silver Star Enterprises
All Rights Reserved. Please read our Conditions of Use and Privacy Policy.
All Rights Reserved. Please read our Conditions of Use and Privacy Policy.