_GOTOBOTTOM
Armor/AFV: Braille Scale
1/72 and 1/76 Scale Armor and AFVs.
Hosted by Darren Baker
Type 97 Chi Ha
PedroA
Visit this Community
Valencia, Spain / España
Joined: December 27, 2010
KitMaker: 324 posts
Armorama: 322 posts
Posted: Friday, December 23, 2011 - 10:00 AM UTC
Nice model Jan . I think like Alexander. With oils you will see your models with another perspective .

Regards.

Pedro.
Braille
#135
Visit this Community
California, United States
Joined: August 05, 2007
KitMaker: 1,501 posts
Armorama: 1,485 posts
Posted: Friday, December 23, 2011 - 01:56 PM UTC
@tread_geek – Jan,

Well you’ve gone and did it! Trying your hand at a base again. Looks fantastic. Your base is kind’a warped. And I’m sure that you’ll wish to had, placed it on a not so experimental cocktail coaster and gone with the wood base. Thanks for letting us know about the terrain medium and for giving it a try and posting the results here. I do think it looks the part. Like how the tank turned out.

About using oils on your builds, well I think that you should give this medium a try. They can be expensive but they do last a lifetime and brings life to the base colors. I’ll be posting a paint step-by-step on the Russian Tiger as soon as I get back to that build, and of course I will be using oils. Anyhow think about it, OK!

Happy Holidays,
~ Eddy
erhntly
Visit this Community
Izmir, Turkey / Türkçe
Joined: June 11, 2004
KitMaker: 1,426 posts
Armorama: 464 posts
Posted: Tuesday, December 27, 2011 - 10:54 AM UTC
Hi Jan,
Was a beatiful Japanese. Good finish.
cheers..
tread_geek
Visit this Community
Ontario, Canada
Joined: March 23, 2008
KitMaker: 2,847 posts
Armorama: 2,667 posts
Posted: Tuesday, January 03, 2012 - 05:49 AM UTC
@PanzerAlexander

Quoted Text


Nice approach on this little model. It almost makes me want to try something other than German Panzers .


Thanks and for a difference you might find a non-German subject more intriguing than you might expect. While I did the Airfix Type 97 years ago, I didn't have the advantage of the Internet to research my subject so the colouring is quite wrong. Researching this tanks was quite a learning experience as I'd had very little knowledge about Japanese armour.


Quoted Text


As for the weathering I suggest that you start experimenting with oils (if you don't use them already that is) to get that ''faded'' or ''used'' look on your models.


@PanzerAlexander, PedroA and Braille - Guys, I appreciate your suggestion and endorsement of the use of artist oils but I just don't see adding a new complication or twist while still trying to refine the methods that I am currently using and learning. My wife is an extremely talented and accomplished acrylic painter with an impressive selection of paints and also teaches methods and techniques of the art form. From taking various seminars and classes she has passed on valuable hints, tricks and information on various things, including but not limited to the use of various mediums (Sno-Tex, Fierro, Acrylic Glaze Base, Canvas Gel...). On top of everything else, I've recently been experimenting with various techniques outlined in Alex Clark's book and trying to achieve similar results to his with acrylics as opposed to enamels.

@Braille - Eddy, as the cork cocktail coaster was an experiment to explore the Fierro medium, I am in no way disappointed. The warping was mostly eliminated by painting the reverse side but it is obvious that the coaster should be thicker and perhaps made of a different material. As Santa brought me a large tub of the medium I probably now have enough to do dozens of larger bases. BTW, DecoArt makes several other texture mediums like Terra Cotta, Stucco, Stone, Glass (making water?) and these are available at the Michael's franchise stores or similar places that sell craft material. The large jar/tub (10 oz.) is available from most online dealers for $7.99.

@erhntly - Thanks for dropping by and commenting. I must say that it has been a fun experience building this little tank.

-----------------------------------------------------------------------------------

While learning all these new things about acrylics, mediums and such, I've also been reading about small subject (Macro) photography. There was also a hint or two about photographing models in the Clark book. I normally shoot work in progress pictures using camera settings of ISO 100, Aperture Priority (for larger depth of field), F18-F20 and with a 4X macro filter. As one might guess, this is great for seeing all the flaws that the naked eye or even with magnification devices are not noticeable. Digital cameras are both a blessing and a curse.

Anyway, I've changed a number of settings on the camera and tried some experimental shots on a build that I am doing for a campaign. The main ones were changing the exposure metering from wide area to centre weighted, pre-setting the white balance based on a sheet of white paper and changed the aperture to F11. Below you'll find two images taken of the Chi Ha with the new settings. I have touched up several little detail pieces on the tank and applied some pin washes with the glaze base added to them. The colours used are similar to what many use with artists oils for the same purpose. I think that between these points I can see a subtle but definite difference that hopefully improves the overall effect.


Thanks for looking.

Jan
lespauljames
Visit this Community
England - South West, United Kingdom
Joined: January 06, 2007
KitMaker: 3,661 posts
Armorama: 2,764 posts
Posted: Tuesday, January 03, 2012 - 06:37 AM UTC
nice work, I like the little Japanese Tanks. nice camo too.
I tried using exclusively acrylics but ended up feeling too restricted.
tread_geek
Visit this Community
Ontario, Canada
Joined: March 23, 2008
KitMaker: 2,847 posts
Armorama: 2,667 posts
Posted: Tuesday, January 03, 2012 - 12:26 PM UTC
@James,

Thanks for dropping in and leaving you thoughts. It's quite fascinating that these Japanese tanks are so different from their western contemporaries. I guess it had something to do with their perception of what threats they might face. Their colouring and markings are also an interesting change.

As for the potential of acrylics, at this point I think that the surface has been barely scratched. However, my having a resident "expert" does help in determining what might apply to our hobby.

Cheers,
Jan
c4willy
#305
Visit this Community
Christchurch, New Zealand
Joined: February 01, 2006
KitMaker: 1,673 posts
Armorama: 120 posts
Posted: Friday, January 13, 2012 - 03:40 PM UTC
Yes Jan having an expert in residence does help (I have two almost three LOL) I do find however it's up to us, the modeller, to actually figure out if it'll work for us. Acrylics and plastics being what they are some experimentation is obviously needed. But I know personally I wouldn't have had any contact with acrylic texture mediums if not for my wife's and eldest daughters journey exploring their artistic sides. LOL and being the guy holding the purse strings so to speak I got to see quite a number of art supply shops! So while the girls were off looking at art supplies I was looking at them going how can I apply this to my hobby. I got a lot of great ideas and am now working out the method of application and to me that's the most fun you can legally have with this hobby! I'm looking forward to seeing where you go with the Chi Ha! Good luck buddy!
PanzerAlexander
Visit this Community
Attica, Greece / Ελλάδα
Joined: February 17, 2010
KitMaker: 625 posts
Armorama: 608 posts
Posted: Friday, January 13, 2012 - 07:17 PM UTC
I have watched a video by Mig Hemenez advertizing Vallejo products where he weathers a Pz II tank exclusively using vallejo acrylic mediums (washes included) with excellent results. The video is called
Mig Jimenez - AFV Acrylic Techniques (2010)
So it's proven that it's definetely plausible to make very nice models without using oils if you have the skills and the will to try. In fact onE who is continuously working with acrylics could discover properties of these mediums that the rest ignore or don;t need to know.

Just my 2 cents in, P.A.
tread_geek
Visit this Community
Ontario, Canada
Joined: March 23, 2008
KitMaker: 2,847 posts
Armorama: 2,667 posts
Posted: Tuesday, January 17, 2012 - 06:42 AM UTC
@c4willy - Chris, your thoughts about acrylic usage and various other "art" supplies appear similar to mine. I have often accompanied my wife to where she purchases her supplies and browsed around looking for potentials that apply to our hobby. I am also blessed with a spouse that is not averse to inquiring as to what I am doing and suggesting or discussing a possible easier way. She is also quite imaginative and from time to time shows me a technique or medium that I might consider using.

One interesting thing that I have discovered is that it pays to use the manufacturers thinners associated with their paint. Alex Clark notes this in his book and I have had good success doing likewise. I primarily use Tamiya acrylics but will also use the Model Master variety where appropriate. Many here suggest that distilled water or isopropyl alcohol are equal and cheaper alternatives but I have found this not to work as well. For final weathering I use my wife's acrylics (Ceramcoat or Americana) with an appropriate additive (extender, glaze etc) that will add particular properties to the paint and the way it applies. These rather inexpensive paints are generally almost the consistency of some toothpaste but thin out beautifully with plain water.

@PanzerAlexander - You are absolutely correct is saying that one can achieve equal results to oils with the development of the necessary skills and some experimentation. Looking back at my previous attempts to weather previous builds I can now see a definite positive improvement. I still have more to learn but at least there has been progress. From what I have read the Vallejo paints are supposedly quite good. Unfortunately, they are quite rare in Canada and somewhat more expensive than other brands. The Ceramcoat is almost one third less in cost and you get 2 oz. (59 ml) as opposed to 17 ml for Vallejo. However, if I could find it at a local supplier I would give it a try.

---------------------------------------------------------------------------

While I was fairly satisfied with the Chi Ha at the point that it was, my SWMBO offered to show me how I might improve it further. We had a tutorial or training session using an ancient Airfix Chi Ha that she used as a demonstrator and then I tried the same techniques with the Dragon version. Here are a couple of pictures of the results.


I don't feel that I want to go any further so may leave the tank as is. Next up will be concentrating on a base for the beast as I'd like to enter it in an upcoming show in February.

Thanks for looking and commenting.

Cheers,
Jan
Korpse
Visit this Community
Queensland, Australia
Joined: October 06, 2009
KitMaker: 382 posts
Armorama: 378 posts
Posted: Tuesday, January 17, 2012 - 11:18 AM UTC
Hi Jan

I somehow missed looking at this one for awhile, interesting to read the diverse comments and opinions about oils that were offered over the last page or so.

Its good that people offer opinions and suggestions. I've never joined any modelling club, & dont know any others who model, so can't source ideas from others in person.

I read many magazine articles on paints & finishes and techniques. I try some and some I don't. I look at pictures of very high standard 1/35th scale models for inspiration & ideas of finshes to try on my own models. When in my local hobby stores I look at the pre-built & painted Dragon vehicles, to see what looks good and not so good on the paint finishes, which can be useful for my own paint jobs & finishes.

At the end of the day you have to be happy with your own model, and how it looks. If well satisfied, no need to do any more. I have a bad habit of trying to make a good finish better, having a paint job & finish that I'm 98% happy with, but wanting to improve it by just that little bit more and can continue to tweak it to the point that the effect I wanted is gone, then have to strip paint and start again. . Knowing when to stop is a strength too, sometimes less is more.

Trying new techniques is a good idea as it adds to your skill set, and is another 'weapon in your armoury' that you can use as appropriate to create improved or differing effects on models. Some people are happy to make each model in the same way, using the same painting & finishing & weathering techniques on each. At the end of the day its what makes you happiest that counts.

I like the most recent pictures of the tank which seem to show a bit of 'highlighting' of edges, which I think helps to make small scale angles appear more 3 dimensional.

all the best

cheers
Neil
tread_geek
Visit this Community
Ontario, Canada
Joined: March 23, 2008
KitMaker: 2,847 posts
Armorama: 2,667 posts
Posted: Sunday, January 22, 2012 - 05:32 AM UTC
@Korpse Neil,

Thanks for dropping by and sharing your thoughts. :-) You've shared your comment pertaining to knowing when to stop with me a couple of times in the past but I am still often guilty of not doing so. As far as finding new techniques goes, at some point I feel one must commit at least to a general direction.

I find my local club has some good ideas but all too often they are pertinent to the larger scales. Conversely, on more than on a few occasions I've shown these LEGO builders a few things that can easily be applied to their scale. A few have even tried using inexpensive craft acrylic paints for not only weathering but in some cases overall painting. I must say that as for myself, I still have a ways to go to uncover all the potential of the medium but at least I am fortunate to have a resident expert to assist me.

As for the Chi Ha in the last images, I think that the stop point has been reached for this build. As you mentioned, looking to improve it that 1-2% may end up having to start again from scratch when it doesn't work out. As for the edge hi-lighting, I have used this before but under the direction of my "expert" I tried different colour variations with this build.

____________________________________________________________

This next bit does and doesn't pertain to the Chi Ha build. I mentioned about texture mediums earlier and have been experimenting with them as well as some techniques from Alex Clark's book.

Here's the Fierro medium that I mentioned.


What's inside.


I used the medium as the base groundwork for a base constructed from a trimmed sheet of natural cork available from a local Dollar Store. As the case may be, I thinned the medium with plain water depending on the effect I was trying to achieve. A segment here and there was coloured/tinted Sno-Tex by the same company and clay cat litter was employed to simulate rocks and clumps.

The base with initial washes applied. All painting was done with the Ceramcoat craft acrylics.


THe base as it currently looks.


I took the Fierro down along the sides as they were quite rough after cutting the shape. There are a few clumps of it projecting below the bottom that will need to be trimmed off.

Cheers,
Jan
weathering_one
Visit this Community
Ontario, Canada
Joined: April 04, 2009
KitMaker: 458 posts
Armorama: 456 posts
Posted: Friday, January 27, 2012 - 06:34 AM UTC
Jan, I haven't been on much lately and I obviously missed quite a bit about this build. I can't thank people like you enough that inhabit this forum and offer so much information to us. You are really getting quite accomplished with using acrylics and it shows. I stared at the last picture in your Jan. 17 post and found it mesmerizing. I love the weathering as it makes the tank look used but not abused and the tracks and suspension really catch the eye. Plus you've given me another reason to not build the Airfix version.

Regards,
AJ
tread_geek
Visit this Community
Ontario, Canada
Joined: March 23, 2008
KitMaker: 2,847 posts
Armorama: 2,667 posts
Posted: Tuesday, April 17, 2012 - 05:29 AM UTC
Greetings all!

I can with certainly say that with this post the Type 97 "Chi Ha" Late Production is for all intents and purposes finished. In it's current form it was entered in the BuffCon model show and all I'll say is that it did extremely well. My thanks to all who followed this protracted thread and especially those who offered comments and suggestions.

One last point that I'd like to make is that this tank was not present on Iwo Jima as I originally posted here. Therefore I had to revise my intentions as to a base and as I intended to enter it in competition, simplify it. This particular tank actually saw action on Tarawa in 1944. My apologies for this mistake.

Some general shots.


A few closer images.


Again, thanks for having followed this build. It was definitely a learning experience but also fun.

Cheers,
Jan
weathering_one
Visit this Community
Ontario, Canada
Joined: April 04, 2009
KitMaker: 458 posts
Armorama: 456 posts
Posted: Tuesday, April 17, 2012 - 02:38 PM UTC
Jan,

It's very nice to see you finally see this build as complete. The base is rather simple but not so the tank. The enlargements are absolutely superb in showing some of the remarkable detail on the model. The headlight in the fifth picture looks like it is actually internally illuminated? Is it my monitor or a paint type or something other? The exhaust staining and various areas of wear and tear are super on several areas. All and all the closer shots look like a larger scale.

Regards,
AJ
tread_geek
Visit this Community
Ontario, Canada
Joined: March 23, 2008
KitMaker: 2,847 posts
Armorama: 2,667 posts
Posted: Wednesday, April 18, 2012 - 05:16 AM UTC

Quoted Text

Jan,

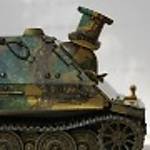
...The enlargements are absolutely superb in showing some of the remarkable detail on the model. The headlight in the fifth picture looks like it is actually internally illuminated? Is it my monitor or a paint type or something other? ... All and all the closer shots look like a larger scale.


Thanks AJ. it's nice to see somebody comment for a change. As for the headlight, that's a secret! Seriously though, it's some sparkle glitter stuff from the Michael's craft store called Recollection (stationary section?). It is like a metal flake and comes in a variety of metal effects. I drilled out the headlight a bit, put a spread of clear coat in there and then dusted the interior with the stuff. After that dried I put a dab of Testors' Window Maker over top. Turned out quite nice and I'll try it in the future.

Cheers,
Jan
njtp80
Visit this Community
Ontario, Canada
Joined: February 12, 2012
KitMaker: 89 posts
Armorama: 89 posts
Posted: Wednesday, April 18, 2012 - 05:24 AM UTC
Looks very nice, did we meet at show recently? BUFFCON or Wellington county?
tread_geek
Visit this Community
Ontario, Canada
Joined: March 23, 2008
KitMaker: 2,847 posts
Armorama: 2,667 posts
Posted: Wednesday, April 18, 2012 - 07:05 AM UTC
@njtp80 - Thanks for the compliment, it is appreciated.


Quoted Text

...did we meet at show recently? BUFFCON or Wellington county?


I wasn't at Wellington County so if I was there, it was an impostor. I did manage to get to Buffcon with a number of people from a local club and I saw your Maz w/ BMP but wasn't sure who you might be (so many people milling around) so I guess we didn't actually meet. I was also rather preoccupied taking pictures of show entries for a possible future Photo Feature for Armorama. If you have further questions along these lines, please PM (Private Message) me here.

Cheers,
Jan
 _GOTOTOP