Campaigns
Where Armorama group builds can be discussed, organized, and updates posted.
Dragon OOB Campaign
tread_geek
Visit this Community
Ontario, Canada
Joined: March 23, 2008
KitMaker: 2,847 posts
Armorama: 2,667 posts
Posted: Saturday, April 07, 2012 - 05:23 AM UTC
Hey Guys,

Thanks for the comments but I can't see why you all would think it's that small. Now a Jeep or a Pak 36 in this scale is getting on the small side so relatively speaking, this is a modest size. Now if you want to talk about small, check out this picture of the PE vision port cover.


As for running out of paint, my airbrush has a built-in cup that needs at least 10 drops (.5 ml) to function and cover a 1/72 WW II medium tank. Double that for two coats. I use Tamiya paints which come in 1/3 OZ(10 ml) bottles. So doing simple arithmetic, two coats requires a total of 1 ml of paint so one bottle can cover 10 medium tanks. Depending on how many builds I do and their base colour, I can go through a colour in a matter of a couple of months. Just so happened that I ran out of three colours at the same time doing this build. All perfectly logical, captain!

@Jesper - Nice looking Stug. I have one of these in a more appropriate scale.

Cheers,
Jan
Tojo72
Visit this Community
North Carolina, United States
Joined: June 06, 2006
KitMaker: 4,691 posts
Armorama: 3,509 posts
Posted: Saturday, April 07, 2012 - 05:36 AM UTC
Great painting on your Stug Jesper,looking forward to the weathering
Nito74
Visit this Community
Lisboa, Portugal
Joined: March 04, 2008
KitMaker: 5,386 posts
Armorama: 4,727 posts
Posted: Saturday, April 07, 2012 - 05:52 AM UTC
This afternoon, the Panther F suspension... what a nightmare those instructions...geez
It's so easy to make a mistake..


JonDicks
Visit this Community
Queensland, Australia
Joined: October 13, 2009
KitMaker: 223 posts
Armorama: 224 posts
Posted: Saturday, April 07, 2012 - 07:52 PM UTC
Well it's been a great long weekend so far and I have made some decent progress.
Chips, followed by some filters (AK Nato Camo Filter and Mig Grey for Sand Coloured Vehicles Filter) to blend the camo, followed by a very light wash (Mig Neutral Wash).
I want the wear and tear to be a lot more subtle than I normally do as I think I normally overdo it slightly.

I still have to complete painting to some of the tools, exhausts, and to install the jack block and jack.
The tracks (DS) have been coated with different shades of brown to create a mottled base, and I will use the AK Track Wash and some pigments next.
Joel_W
Staff MemberAssociate Editor
AUTOMODELER
Visit this Community
New York, United States
Joined: December 04, 2010
KitMaker: 11,666 posts
Armorama: 1,143 posts
Posted: Sunday, April 08, 2012 - 05:37 AM UTC
Jon, really like your camo and weathering.
JonDicks
Visit this Community
Queensland, Australia
Joined: October 13, 2009
KitMaker: 223 posts
Armorama: 224 posts
Posted: Sunday, April 08, 2012 - 09:43 AM UTC
Thanks Joel.
It was an extreme case of self control to not go heavier on the weathering.
Jon
SaxonTheShiba
Visit this Community
United States
Joined: February 01, 2009
KitMaker: 1,233 posts
Armorama: 557 posts
Posted: Sunday, April 08, 2012 - 11:56 AM UTC
Hey everybody...................hope you are all doing well. Going to crack open a Dragon Smart-Kit 1/35th OT-34 Flame Tank. Looks like a pretty nice kit.....has a photo-etch fret included in the kit and Magic Tracks as well. Should be a good candidate for OOB since the Red Army wasn't big on stowage and all those peskie amenities in the field.

Regards, Ian

SaxonTheShiba
Visit this Community
United States
Joined: February 01, 2009
KitMaker: 1,233 posts
Armorama: 557 posts
Posted: Sunday, April 08, 2012 - 11:58 AM UTC

Quoted Text

Thanks Joel.
It was an extreme case of self control to not go heavier on the weathering.
Jon


Jon, beautiful Jagdpanther.......good-looking camo. Nice, tight pattern.

spacewolfdad
Visit this Community
England - West Midlands, United Kingdom
Joined: May 23, 2010
KitMaker: 642 posts
Armorama: 593 posts
Posted: Sunday, April 08, 2012 - 12:20 PM UTC
Hi Folks,

Firstly compliments...

@ DRAGON164...Rob, that is a really nice model, good job you spotted the deliberate mistake in the instructions. I like the Nashorn/Hornisse as a vehicle and will be interested in how you finish this one...

@ TOJO72...Anthony, that sounds an awesome kit, so many parts, should be good fun.

@ SGTJKJ...Jesper, that Stug is looking really stunning, very nice finish.

@ eMAN...LapMan, an unusual vehicle, should make a nice addition to your collection. Look forward to seeing how it turns out.

@ Tread_Geek... Hi there Jan, that is a nice little tank, I have been toying with the idea of getting some of the Dragon Japanese stuff, it looks really nicely done.

@ NITO 74...John, nice Panther F, looks a nice kit...

@Jon Dicks...Jon, I like the finish on your Jagdpanther, nicely done....

The progress on my Jagdpanzer IV is detailed below....


The engine deck fitted and the tracks are ready....


The tracks are superglued to the bottom of the roadwheels...


Then taken around the drive sprocket...


The tracks fully fitted....


The engine deck in place and the superstructure fitted..


The superstructure from the front....


The gun mantlet...


The two halves temporarily fitted...

I will post more when I have got it finished...

All the best,

Paul
Nito74
Visit this Community
Lisboa, Portugal
Joined: March 04, 2008
KitMaker: 5,386 posts
Armorama: 4,727 posts
Posted: Sunday, April 08, 2012 - 01:59 PM UTC
Thanks Paul,
That's a great kit, too many options, 2 different suspensions, 2 types of road wheels, 2 different hulls, I mean the box is full of plastic for almost 2 different kits.
Magic tracks, PE fret, metal gun.
It's an amazing little Panther, too bad those Dragon instructions, when I think I have some bench time... I know I won't get past one step of those instructions...

Good work on that Jagdpanzer Paul, what scheme are you planning ? 3 tone camo ?
SgtRam
Staff MemberContributing Writer
AEROSCALE
#197
Visit this Community
Ontario, Canada
Joined: March 06, 2011
KitMaker: 3,971 posts
Armorama: 2,859 posts
Posted: Monday, April 09, 2012 - 01:08 AM UTC
Nice work so far by everyone, here is where I am at. All the zimmerit is added, time for the detail and primer next.


Joel_W
Staff MemberAssociate Editor
AUTOMODELER
Visit this Community
New York, United States
Joined: December 04, 2010
KitMaker: 11,666 posts
Armorama: 1,143 posts
Posted: Monday, April 09, 2012 - 09:42 AM UTC
Kevin, I'm really impressed with your Zimmerit.
SGTJKJ
#041
Visit this Community
Kobenhavn, Denmark
Joined: July 20, 2006
KitMaker: 10,069 posts
Armorama: 4,677 posts
Posted: Tuesday, April 10, 2012 - 12:58 AM UTC
Nice work on the zimmerit, kevin.

Nice looking Jagdpanther, Jon. It will be excellent when finished.

Here is my finished StuG IIIG. It is going into a Normandy pre-invasion diorama, so I kept weatering to a heavy coat of dust with rain streaks on the side armor plates.

I will tone down the dust a bit with a coat of matt varnish. That helps seal in the pastels and tone them down and blend in with the base camouflage.

Comments welcome.


Tojo72
Visit this Community
North Carolina, United States
Joined: June 06, 2006
KitMaker: 4,691 posts
Armorama: 3,509 posts
Posted: Tuesday, April 10, 2012 - 06:04 AM UTC
Some slow and deliberate progress,no fit issues yet.I am enjoying this build despite the number of parts.If I can pull it off,it should make an impressive build.I am going to try out the AK modulation painting set.


Petro
Visit this Community
Connecticut, United States
Joined: November 02, 2003
KitMaker: 984 posts
Armorama: 846 posts
Posted: Wednesday, April 11, 2012 - 10:24 AM UTC
Well, i have had some progress.
i have had a few small parts go flying.
I scratched a small piece here, and had to grab some things from the spares box to have matching items.
Not much of a photo,but i'll add it anyways.


Tojo72
Visit this Community
North Carolina, United States
Joined: June 06, 2006
KitMaker: 4,691 posts
Armorama: 3,509 posts
Posted: Wednesday, April 11, 2012 - 10:35 AM UTC
Looks good Paul,I didn't realize that they had Mark IV DS tracks.Did they come with the kit or did you order them seperate ? At least if my magic tracks fail,I can fallback on the DS ones.
MikeM670
#020
Visit this Community
Illinois, United States
Joined: December 28, 2006
KitMaker: 278 posts
Armorama: 231 posts
Posted: Thursday, April 12, 2012 - 01:12 AM UTC
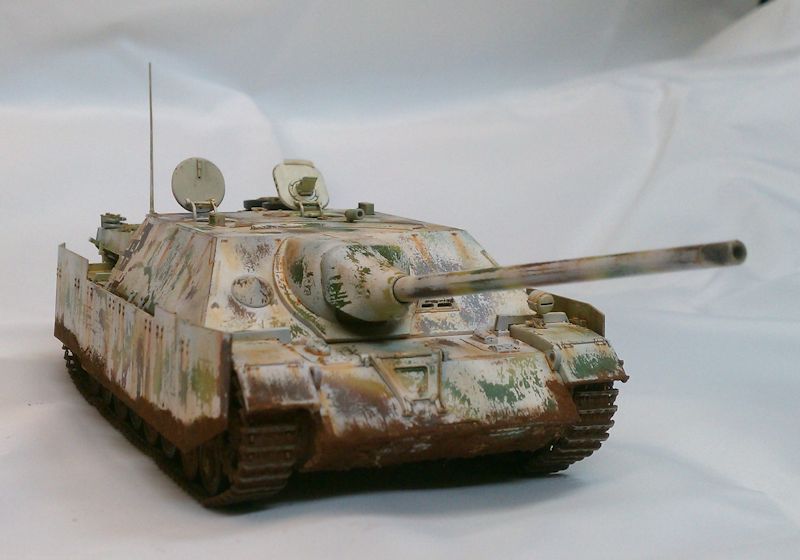
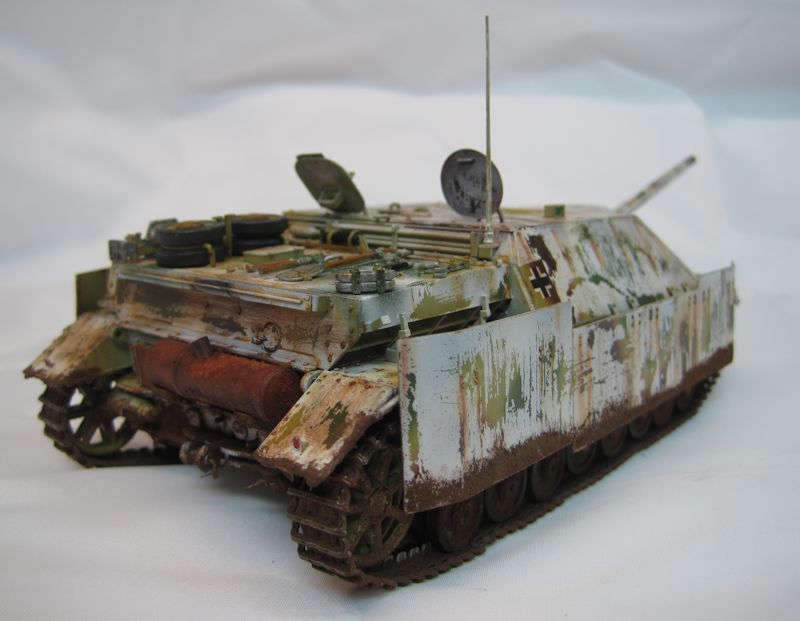
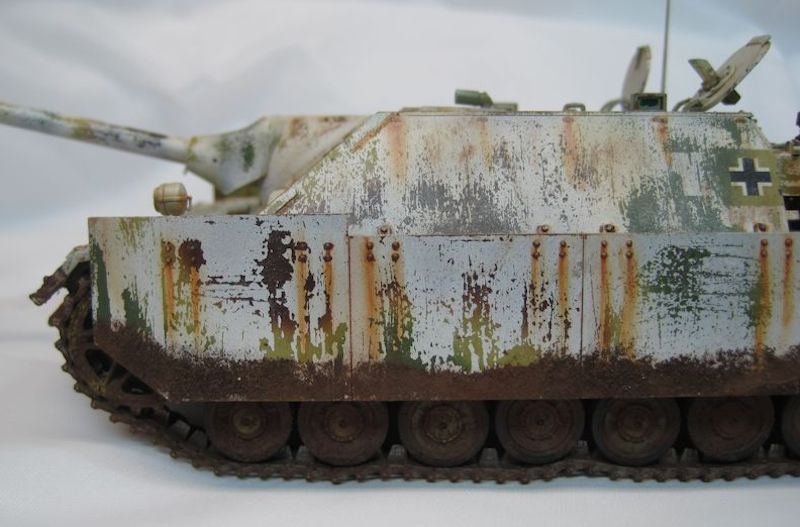
I'm calling this one finished. Here are a few images of the Jagpanzer IV.


I have a bunch more images in my gallery.

http://gallery.kitmaker.net/showgallery.php/cat/27293
Joel_W
Staff MemberAssociate Editor
AUTOMODELER
Visit this Community
New York, United States
Joined: December 04, 2010
KitMaker: 11,666 posts
Armorama: 1,143 posts
Posted: Friday, April 13, 2012 - 08:14 AM UTC
Michael, Great weathering job on your Jagpanther LV.
SgtRam
Staff MemberContributing Writer
AEROSCALE
#197
Visit this Community
Ontario, Canada
Joined: March 06, 2011
KitMaker: 3,971 posts
Armorama: 2,859 posts
Posted: Friday, April 13, 2012 - 11:48 AM UTC
Michael

Very impressive painting and weathering. Looks awesome.

Kevin
JonDicks
Visit this Community
Queensland, Australia
Joined: October 13, 2009
KitMaker: 223 posts
Armorama: 224 posts
Posted: Friday, April 13, 2012 - 07:33 PM UTC
Well it's been a productive weekend on the modelling front (and less productive on the gardening front!) so here are the completed shots. I had a great time building this one. Any crits appreciated.


Tojo72
Visit this Community
North Carolina, United States
Joined: June 06, 2006
KitMaker: 4,691 posts
Armorama: 3,509 posts
Posted: Friday, April 13, 2012 - 11:29 PM UTC
Nice job Jon,that camo pattern is perfect
ltb073
Visit this Community
New York, United States
Joined: March 08, 2010
KitMaker: 3,662 posts
Armorama: 3,078 posts
Posted: Saturday, April 14, 2012 - 12:35 AM UTC
WOW you guys are really producing some great work here
@ Jon, great looking camo pattern, dont forget to post in the gallery
@ Michael, white wash and weathering is outstanding making for a really well used vehicle
@ Marc, looking good so far dont dip to deep in to the spare parts box remember this is an OOB Campaign
@ Tony nice progress as well slow and steady and you wont lose and parts
@ Jasper congratulations on your finish looking forward to seeing that in the Atlantic Wall
@ Kevin the zimm is coming along nicely
@ Paul lice progress as well keep it up
@ Ian, welcome to the party
@ John, yeah that part was a little tricky Dragon really needs to do something about there instruction, the kit I'm building now has all the part #'s wrong

Ok guys I'm stepping out for the weekend hope to see lots of progress when I return
MikeM670
#020
Visit this Community
Illinois, United States
Joined: December 28, 2006
KitMaker: 278 posts
Armorama: 231 posts
Posted: Saturday, April 14, 2012 - 12:43 PM UTC
Jon - That sure is a beautiful camo job. I like how it is faded just a bit to take the bit out of the intense new paint job.

Joel, Kevin and Sal - Thank you for the kind comments. This was my first attempt at a winter whitewash and I'm pleased with the results. It was a lot of fun doing the weathering on this subject. I concentrated on the weathering for this build since it was a OOB. Everything went fairly well until I broke the top inch off the antenna taking pictures.
Petro
Visit this Community
Connecticut, United States
Joined: November 02, 2003
KitMaker: 984 posts
Armorama: 846 posts
Posted: Saturday, April 14, 2012 - 05:04 PM UTC

Quoted Text

@ Marc, looking good so far dont dip to deep in to the spare parts box remember this is an OOB Campaign


In case we i wasn't clear with my last post, any spare parts used are for parts lost or thati cannot replicate myself.
oldtimer
Visit this Community
England - South West, United Kingdom
Joined: May 11, 2007
KitMaker: 210 posts
Armorama: 110 posts
Posted: Saturday, April 14, 2012 - 09:39 PM UTC
Some brilliant modelling going on gentlemen.

Here's the firefly partially weathered and just the figures to do.


Martin