

Armor/AFV: What If?
For those who like to build hypothetical or alternate history versions of armor/AFVs.
For those who like to build hypothetical or alternate history versions of armor/AFVs.
Hosted by Darren Baker
My "Twilight Zone" Panther

bosscat

Joined: April 19, 2012
KitMaker: 119 posts
Armorama: 116 posts

Posted: Wednesday, April 25, 2012 - 08:09 PM UTC
Thx callmehobbes!
bosscat
Joined: April 19, 2012
KitMaker: 119 posts
Armorama: 116 posts
Posted: Thursday, April 26, 2012 - 06:26 AM UTC
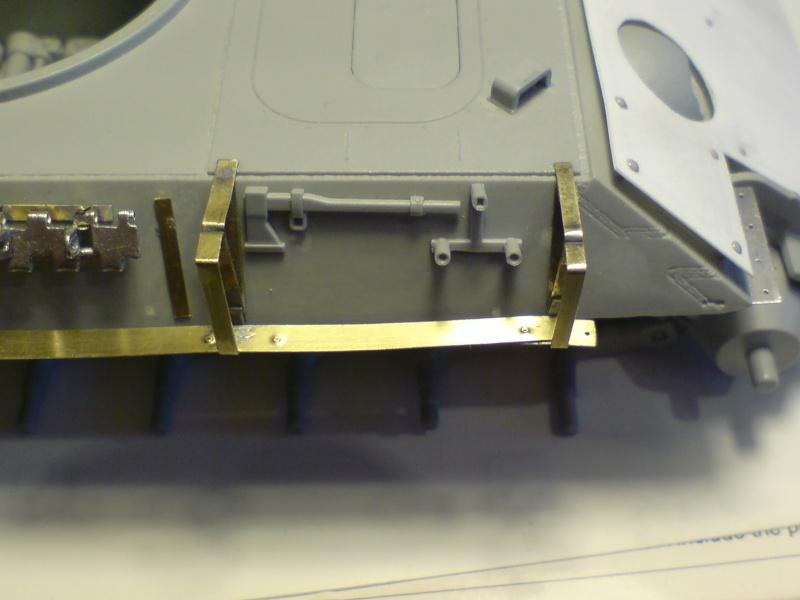
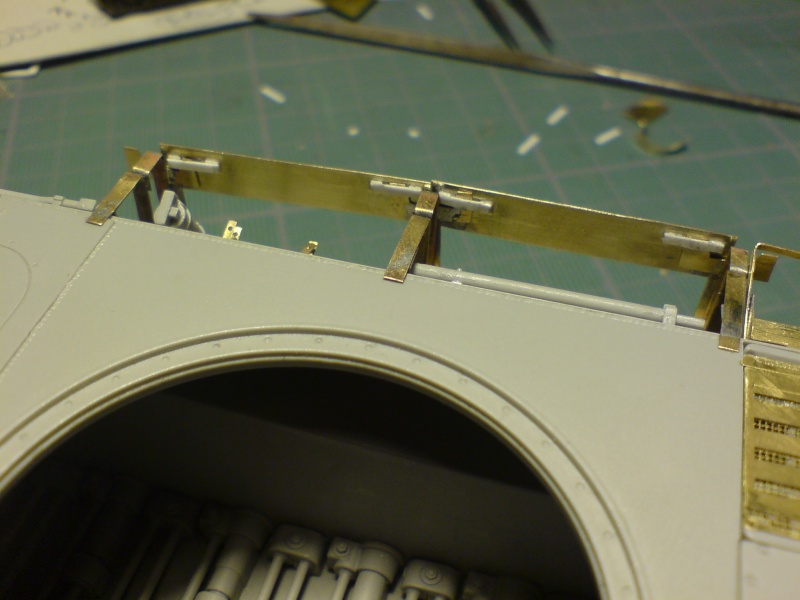
Now, the thoma brackets on the hull!
Nothing is paste (is it the right word?)


Brackets are difficult to build and to design them with correct dimensions and angles...
I made an wip thoma with aluminium sheet and mesh. I used cyano to paste them. I'm not satisfied about result so I'll resume later another one with brass .
As you can see, Friulmodel tracks are mount.
Nothing is paste (is it the right word?)
Brackets are difficult to build and to design them with correct dimensions and angles...
I made an wip thoma with aluminium sheet and mesh. I used cyano to paste them. I'm not satisfied about result so I'll resume later another one with brass .
As you can see, Friulmodel tracks are mount.
bosscat
Joined: April 19, 2012
KitMaker: 119 posts
Armorama: 116 posts
Posted: Friday, April 27, 2012 - 05:24 AM UTC
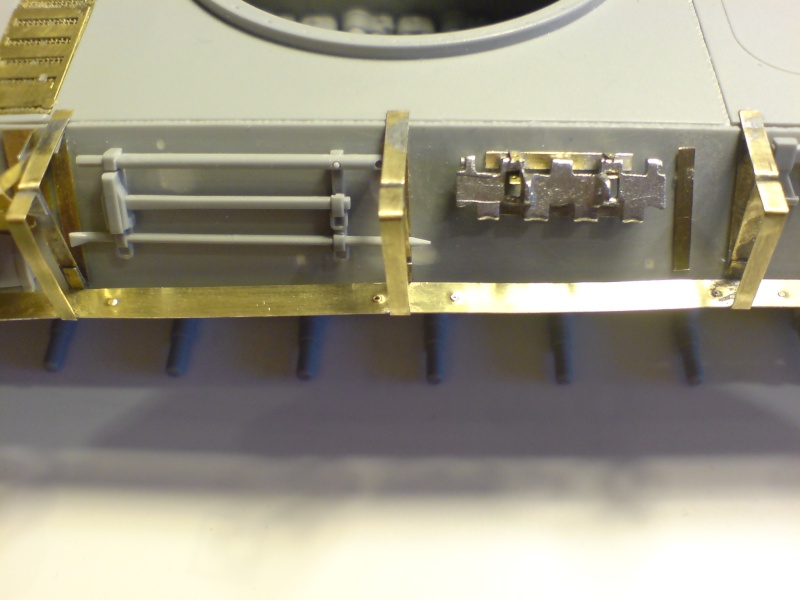
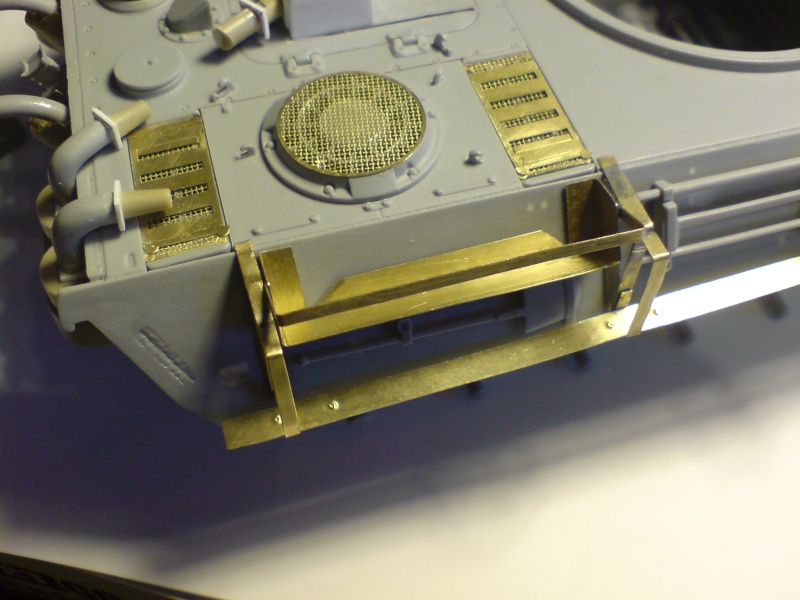
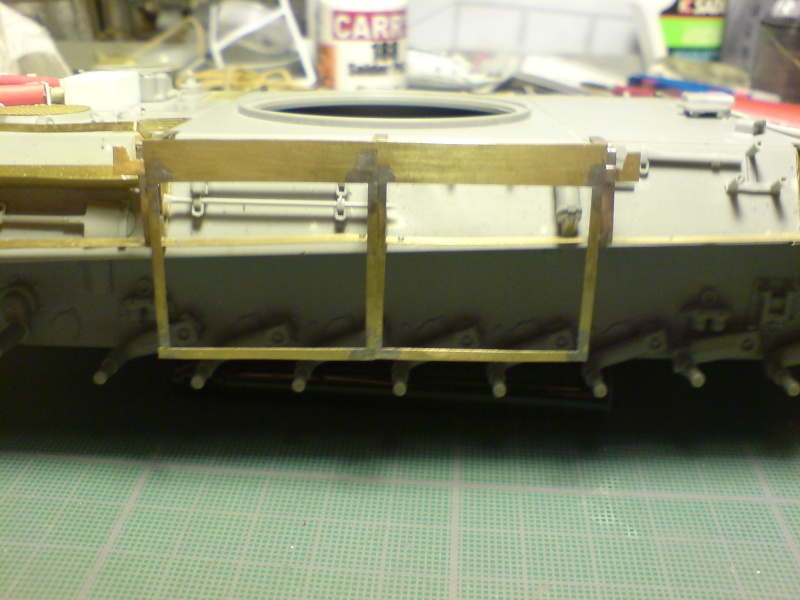
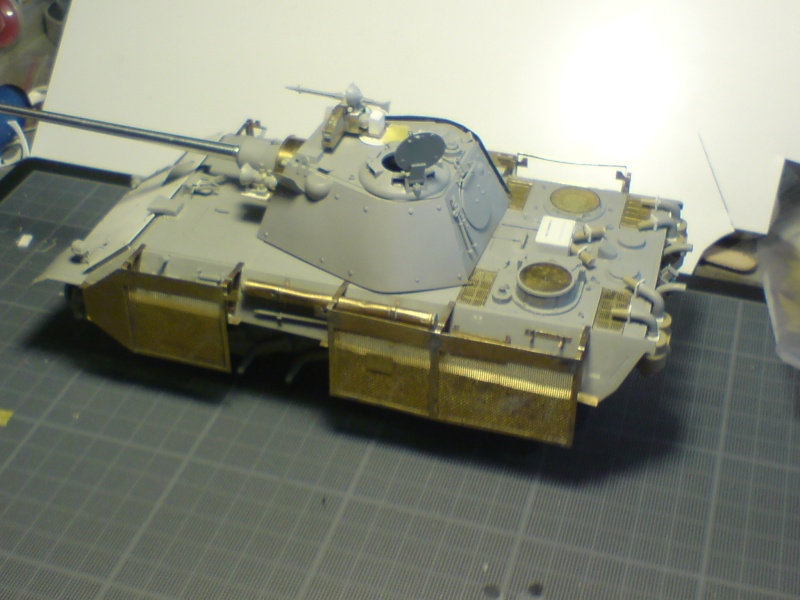
Now the result, the brackets fixed to the hull. 
As you cas see, I made mudgards along the hull. I haven't put the front mudgard to show that it' was destroy. I have build a rack for jerricans, don't forget that I want to place my panther in North Africa.
Because of that, I must put another devices to other places. Tracks supports, piece of wood etc...

caryl576

Joined: April 23, 2011
KitMaker: 173 posts
Armorama: 165 posts
Posted: Friday, April 27, 2012 - 05:49 AM UTC
Great work on the home made Schurzen hangers,
(note to self, learn to solder etch, it works fsr better than glue)
(note to self, learn to solder etch, it works fsr better than glue)

retiredyank

Joined: June 29, 2009
KitMaker: 11,610 posts
Armorama: 7,843 posts
Posted: Friday, April 27, 2012 - 07:42 AM UTC
Quoted Text
Great work on the home made Schurzen hangers,
(note to self, learn to solder etch, it works fsr better than glue)
 Extra-thin ca glue works very well.
I see, now, why you can't use the fenders. BTW, "paste"="glue".

bosscat
Joined: April 19, 2012
KitMaker: 119 posts
Armorama: 116 posts
Posted: Friday, April 27, 2012 - 08:45 AM UTC
tkx Anthony!
Solder is stronger than glue and we can modify many time without damaging differents parts.
The solder paint help me, it's a great product.
And learn to solder, this is practice makes perfect. All parts of my panther are the firt parts I welded, I've never weld before, then, it's not so difficult.
cool for the vocabulary Matt
Removed by original poster on 04/28/12 - 22:21:37 (GMT).
bosscat
Joined: April 19, 2012
KitMaker: 119 posts
Armorama: 116 posts
Posted: Tuesday, May 01, 2012 - 04:30 AM UTC
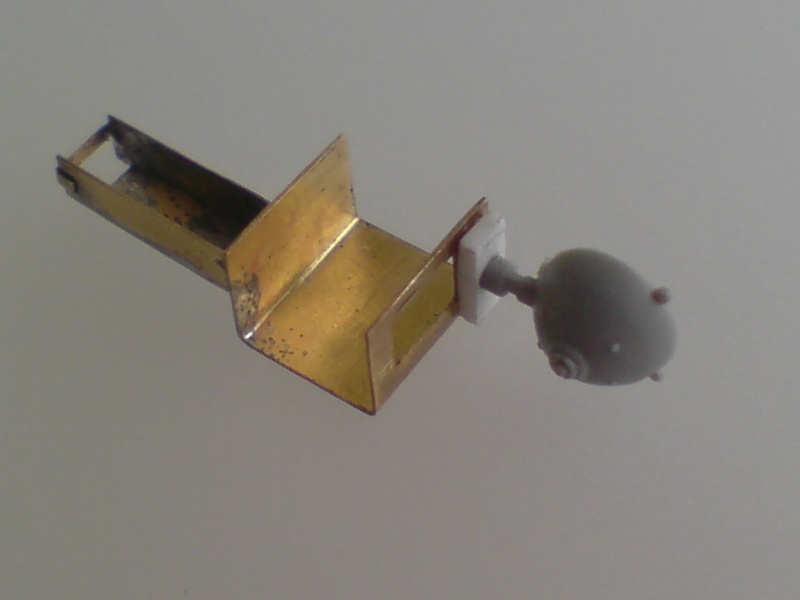
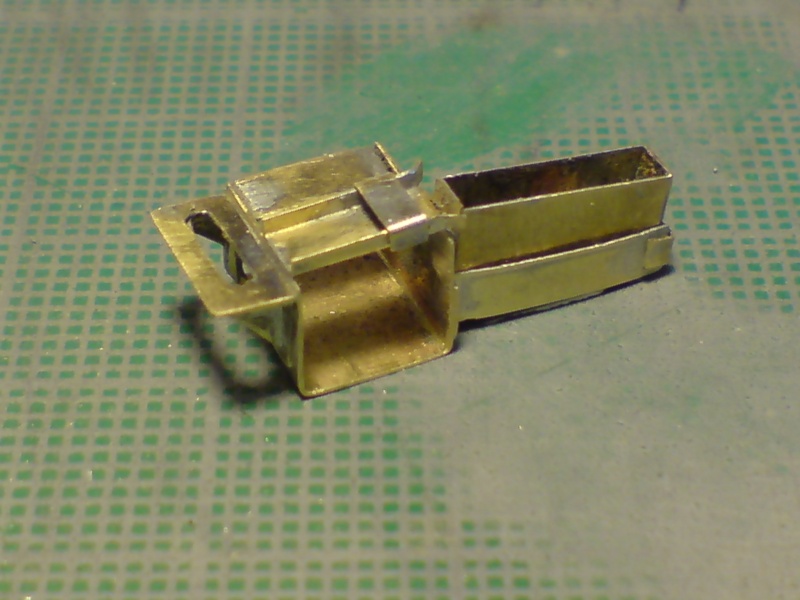
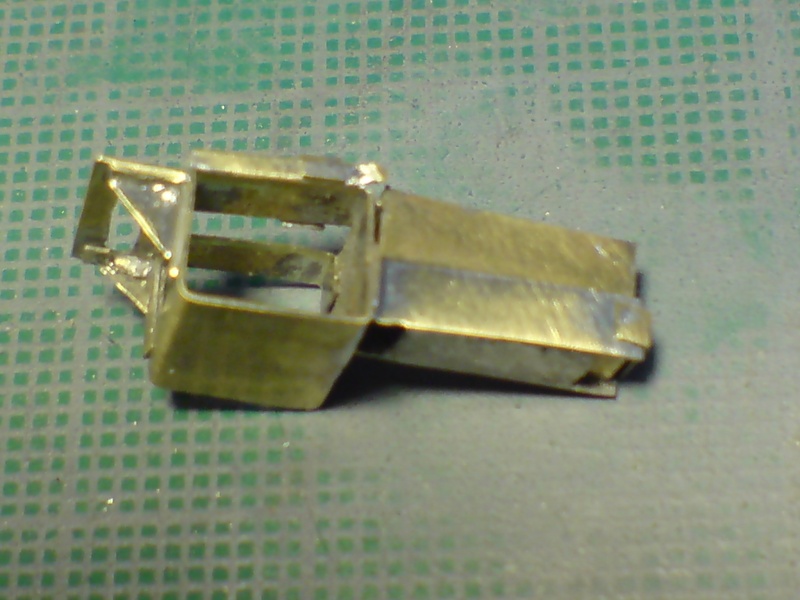
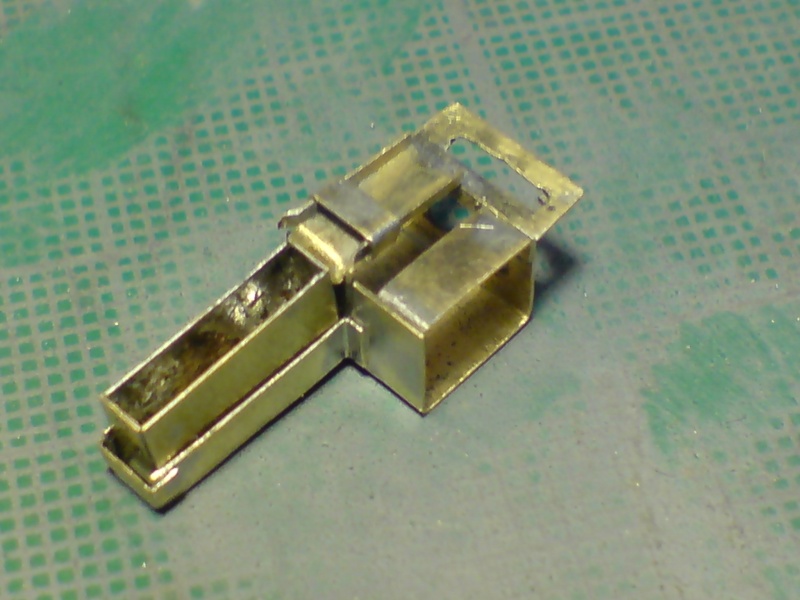
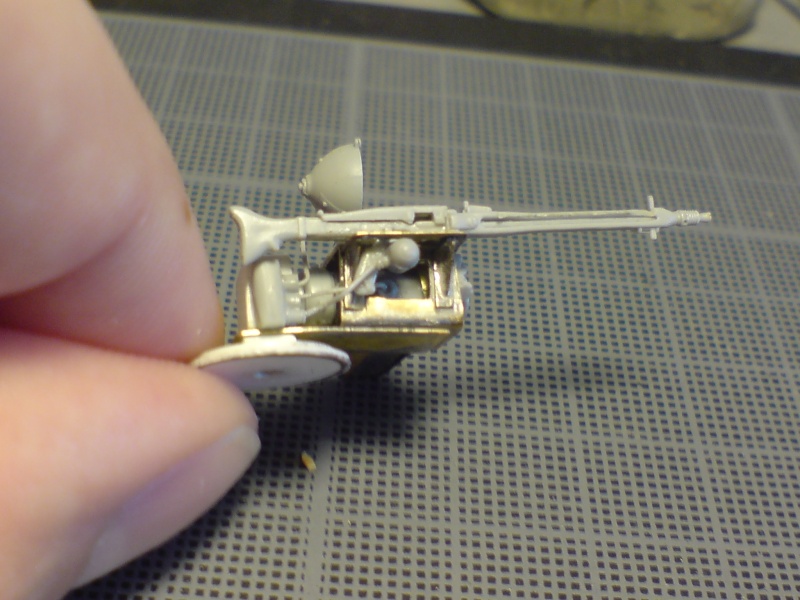
3 small uggly pictures of one of the supports of IR devices. 
As you cas see, 5 tiny parts for a tiny result... Once again, I use the CAARS, very useful here. Must do not weld a place for it to be desoldered next ... With tin, it's very strong reported on the size to the parts. Given the size of parts, it is difficult to get a better finish.


As you cas see, 5 tiny parts for a tiny result... Once again, I use the CAARS, very useful here. Must do not weld a place for it to be desoldered next ... With tin, it's very strong reported on the size to the parts. Given the size of parts, it is difficult to get a better finish.
bosscat
Joined: April 19, 2012
KitMaker: 119 posts
Armorama: 116 posts
Posted: Wednesday, May 02, 2012 - 09:49 PM UTC
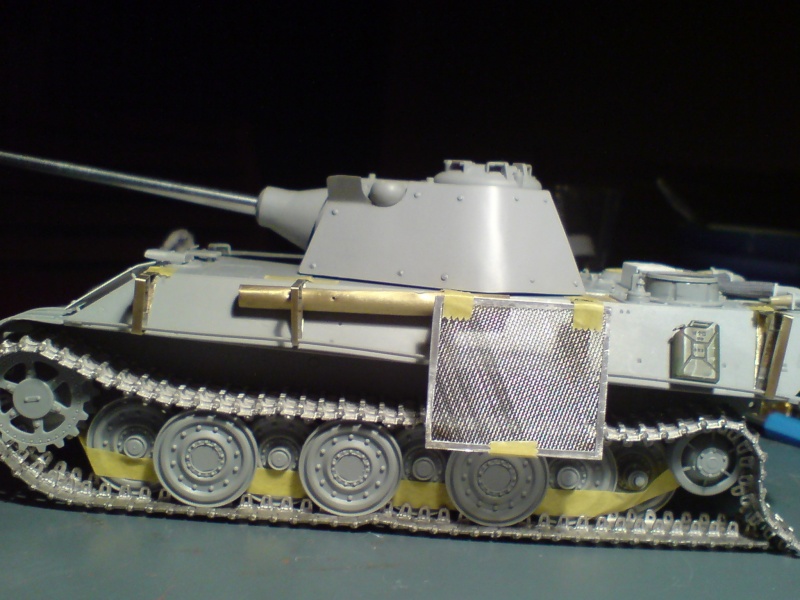
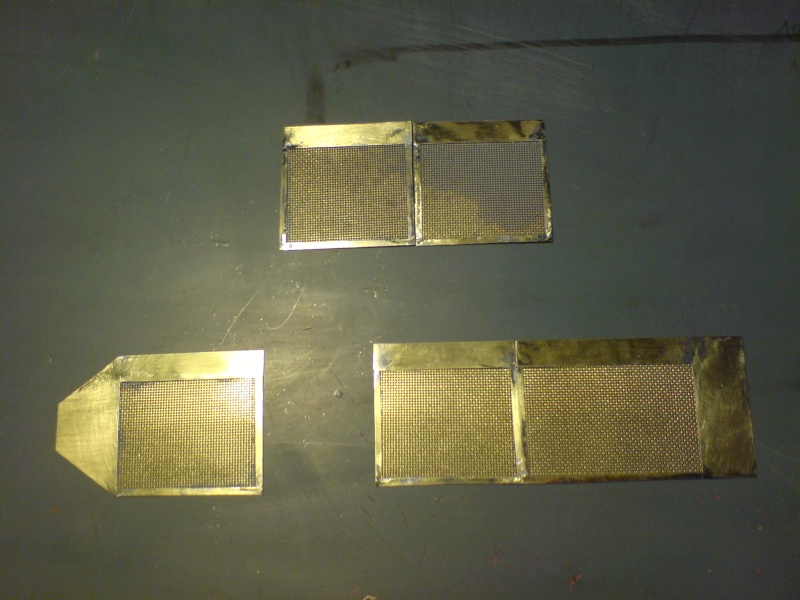
Now, the schurzen!
I have not managed to produce the parts in which I hoped to achieve but I think not succeed to do better but here's the result. As usually, I take a sheet brass of 0.2mm. Different parts are soldering in the thickness. It is very fragile but the grating (not sure about the right word..) will consolidate it later. For the large bracket; I adapted and "invented" the system of real panzer 4. The small parts in U-shaped and small parts behind the Thoma. All parts are not very nice ...
To make nicer parts, I should use HM photo-etched but it's too expensive and too difficult to do.
pictures!!!!!!!!!
bosscat
Joined: April 19, 2012
KitMaker: 119 posts
Armorama: 116 posts
Posted: Friday, May 04, 2012 - 10:01 PM UTC
hello to all on Saturday morning! 
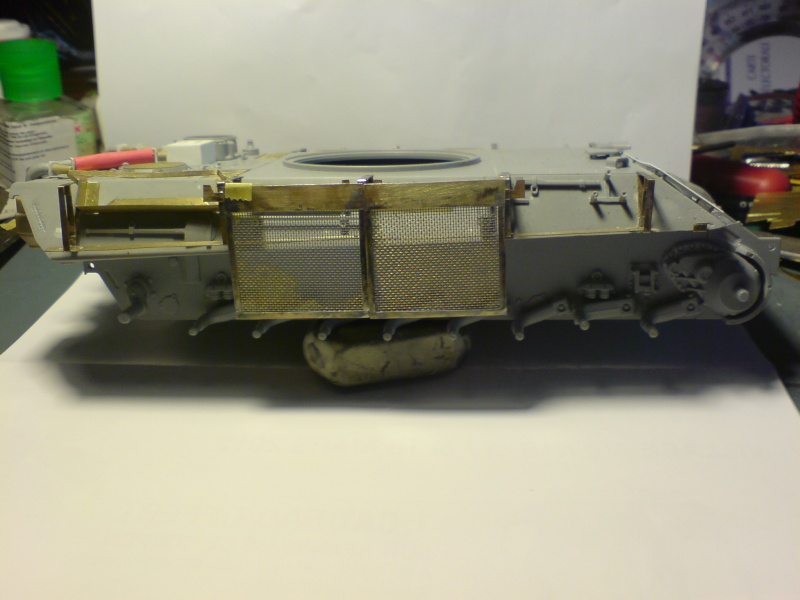
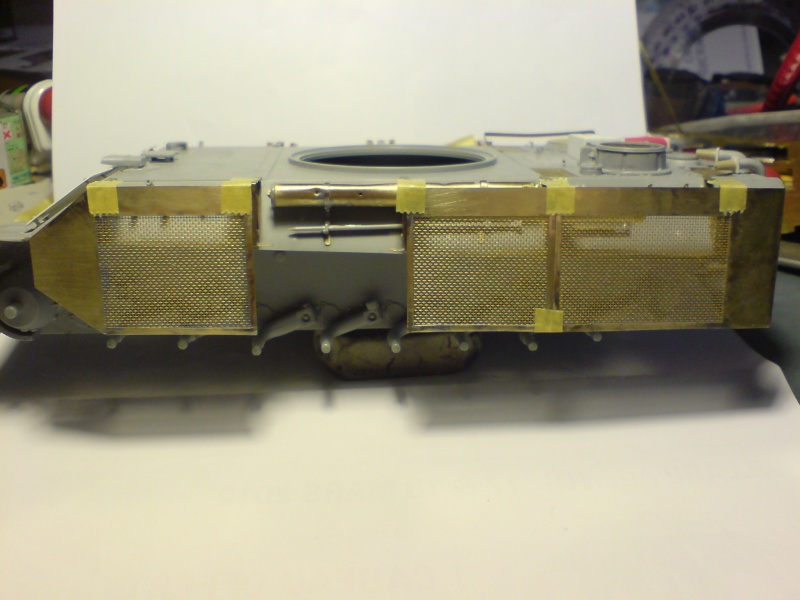
I bought a drilled mesh from Royal Brass Model to finish my Thoma. This is as thick as the classic PE and it is especially weldable.
In the photos, you can see the result of all the drilled mesh on the hull. I did not do it all of theme. On the right side, I have'nt put all thoma to show that the hull received a projectile. At the rear, I did not put to admire my rack jerry. Left flank side, I did not put the thoma eo show the tube.
bosscat
Joined: April 19, 2012
KitMaker: 119 posts
Armorama: 116 posts
Posted: Monday, May 07, 2012 - 01:42 AM UTC
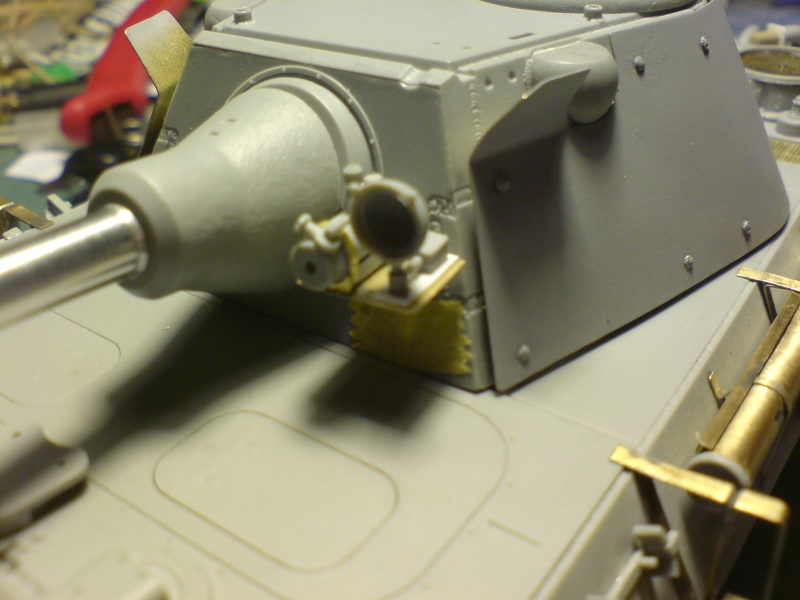
We approche of the end friends, since a week I've worked on my remote control machine gun. I'll show the building in few steps. Here the first!
I've used an MG42. I've made a mix with the remote control of the Hetzer/stug and the IR device which equiped least panther G and 251.
The MG of the hezter/stug:
http://www.lonesentry.com/articles/remotemg/fig3_panzer_mg_interior.jpg
the IR device:
http://www.blitz72.com/wp-content/uploads/2011/10/panther-FG-1250-600x450.jpg
For the IR device, I bought that:
http://militarymodels.co.nz/wp-content/uploads/100_8518.jpg
My big problem was to make a bracket to put all parts on the turret. The only way, improvise!!
I wanted too make a support to put a support for a ammo box. As usually, I used brass! Very difficult to solder these 5 very small parts...
The pictures!!!!!!!!!!!
bosscat
Joined: April 19, 2012
KitMaker: 119 posts
Armorama: 116 posts
Posted: Monday, May 07, 2012 - 10:14 PM UTC
yop
I've worked about the bracket 10h... I had to solder parts very fast to avoid to desolder others parts around. You can imagine I have not succeeded and I had to try several times
very boring and demotiving! The CAARS helps me happily.
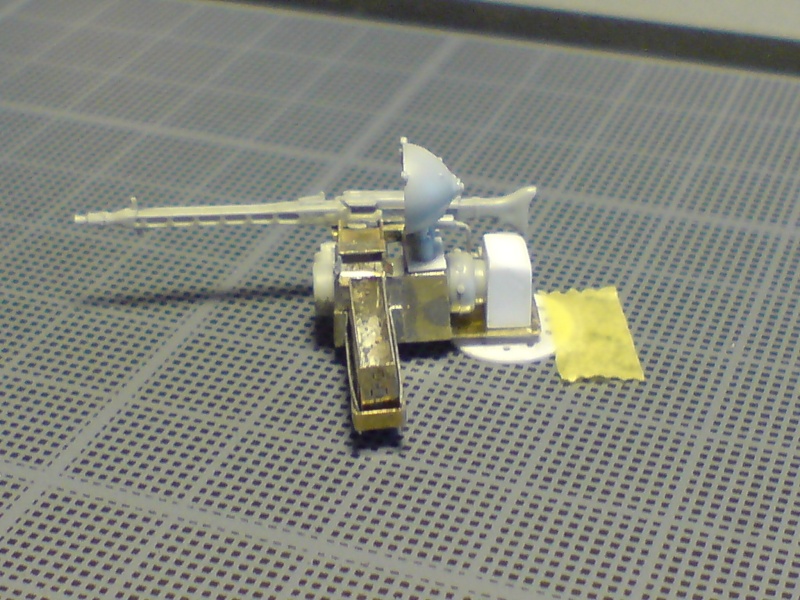
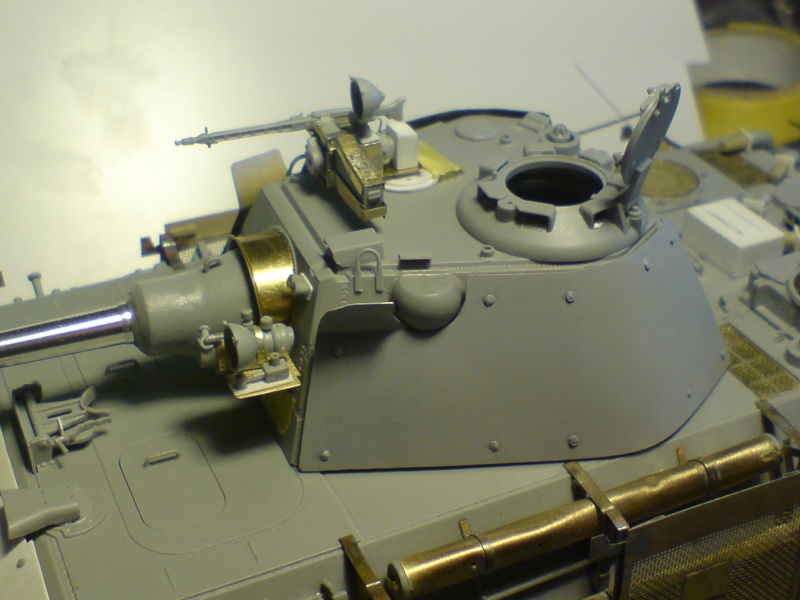
My little presentation of this small set. I just changed what I did previously. I put the Patrokasten (ammo box) in his basket without the cover. I've removed the light because this does not suit me and the evergreen part was not realist. Instead, I put a bracket supported by two small triangular braces underneath. The MG42 will be here. The small U-shaped part is the guide of the ammunition belt with a small U-shaped part to prevent it wanders too much during his fast scrolling when shooting. The U-shaped piece at the back will be the support of light.
The small set that you see is made up of 15 parts.
I am desperate for quality macro pictures and finish parts. Fortunately, there will be painting and we will not see the panther ready to also


I've worked about the bracket 10h... I had to solder parts very fast to avoid to desolder others parts around. You can imagine I have not succeeded and I had to try several times
very boring and demotiving! The CAARS helps me happily.My little presentation of this small set. I just changed what I did previously. I put the Patrokasten (ammo box) in his basket without the cover. I've removed the light because this does not suit me and the evergreen part was not realist. Instead, I put a bracket supported by two small triangular braces underneath. The MG42 will be here. The small U-shaped part is the guide of the ammunition belt with a small U-shaped part to prevent it wanders too much during his fast scrolling when shooting. The U-shaped piece at the back will be the support of light.
The small set that you see is made up of 15 parts.
I am desperate for quality macro pictures and finish parts. Fortunately, there will be painting and we will not see the panther ready to also
bosscat
Joined: April 19, 2012
KitMaker: 119 posts
Armorama: 116 posts
Posted: Friday, May 11, 2012 - 09:41 PM UTC
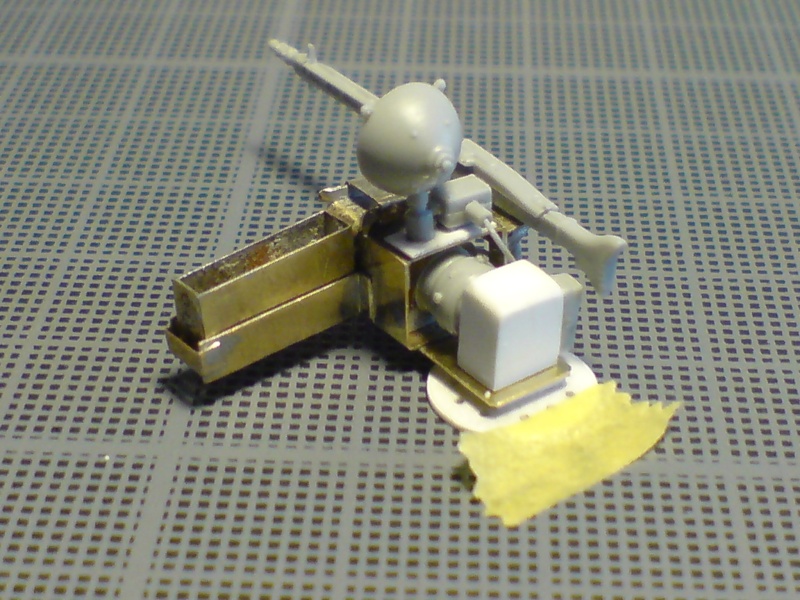
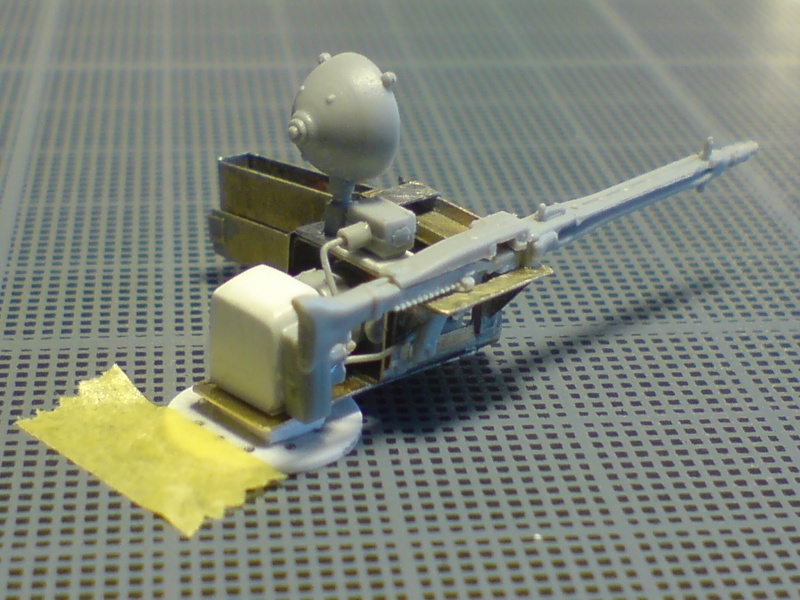
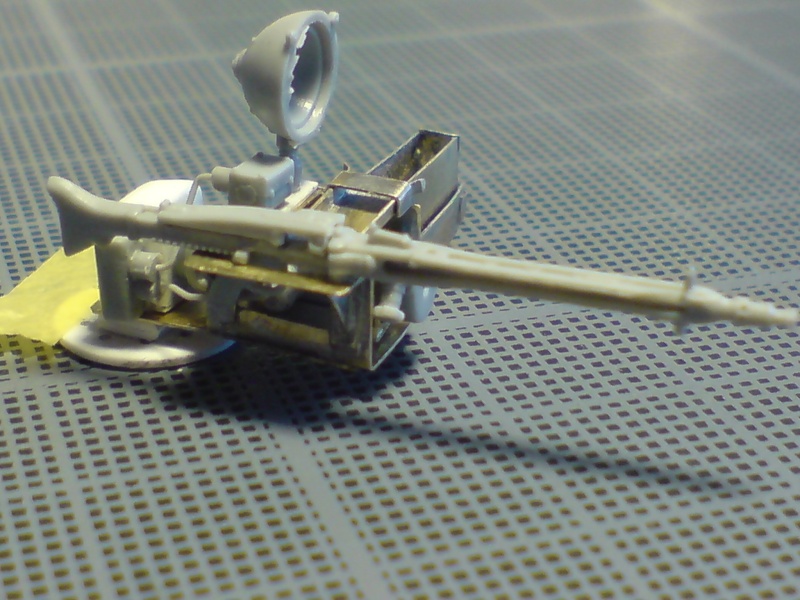
I finally finished, I just have to finish the Patrokasten with cover etc. and put a belt of ammunition. I'll stick the lens when it's all painted. In addition to the main frame of my previous post, I added a plate to carry it all parts. I mounted the light with its box and bezel. The white part in Evergreen represents the output of the periscope. I put together a small box that the cables entering the tank. New accounting of the number of parts out Patrokasten: 36 that will need to use the ammo belt and the two lenses!
here are the pictures, sorry for quality ...


here are the pictures, sorry for quality ...
bosscat
Joined: April 19, 2012
KitMaker: 119 posts
Armorama: 116 posts
Posted: Tuesday, May 15, 2012 - 05:31 AM UTC
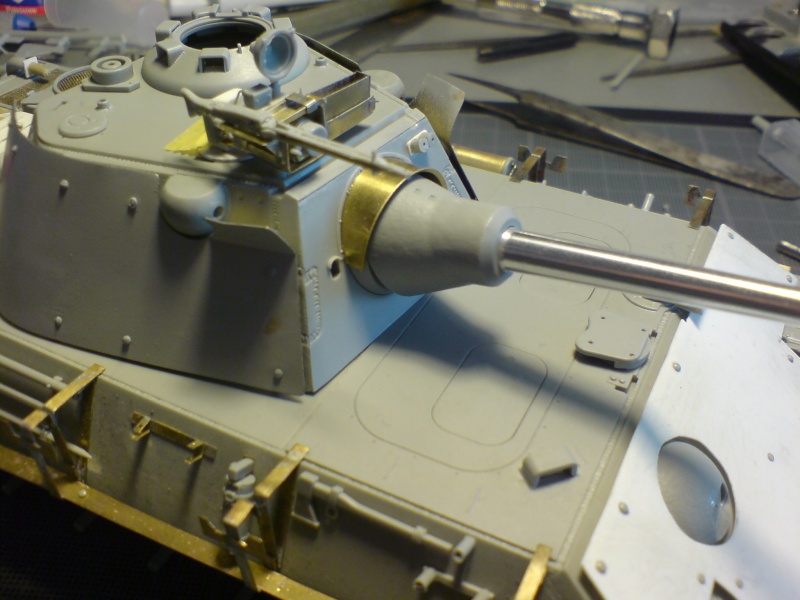
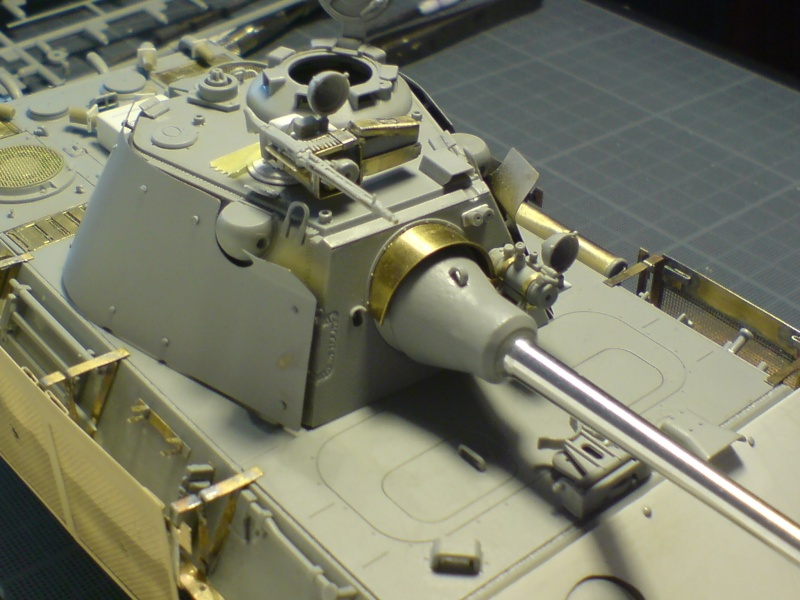
I completed the MG by adding the ammunition belt and patrokasten and I put everything in position on the turret.
I put the photos also mounting the panther over!
The two IR systems are not stuck, I think the paint aside. I set up a single tow rope (not the photos) I would put on the left side.
the pictures!


Also my latest additions, comments when you have to change I could bring? And your opinion? Finally anyway?
I put the photos also mounting the panther over!
The two IR systems are not stuck, I think the paint aside. I set up a single tow rope (not the photos) I would put on the left side.
the pictures!
Also my latest additions, comments when you have to change I could bring? And your opinion? Finally anyway?
retiredyank
Joined: June 29, 2009
KitMaker: 11,610 posts
Armorama: 7,843 posts
Posted: Tuesday, May 15, 2012 - 05:37 AM UTC
I like it! Do you know what paint scheme you are going with?
ElCapitan
Joined: May 14, 2007
KitMaker: 219 posts
Armorama: 217 posts
Posted: Tuesday, May 15, 2012 - 07:19 AM UTC
Frederic,
Well done! Your brass work is impressive; I'm looking forward to seeing more progress.
thanks.
Kevin
Well done! Your brass work is impressive; I'm looking forward to seeing more progress.
thanks.
Kevin

seb43
Joined: August 30, 2005
KitMaker: 2,315 posts
Armorama: 2,158 posts

Posted: Tuesday, May 15, 2012 - 08:26 AM UTC
P***** j'adore.
So cool project. Outstanding PE SKILLS
Now the paint job
Good luck
Seb
So cool project. Outstanding PE SKILLS
Now the paint job
Good luck
Seb

zontar
Joined: August 27, 2006
KitMaker: 1,646 posts
Armorama: 1,557 posts
Posted: Tuesday, May 15, 2012 - 09:12 AM UTC
Frederic: very nice gun mount!!
Happy Modeling, -zon
Happy Modeling, -zon
bosscat
Joined: April 19, 2012
KitMaker: 119 posts
Armorama: 116 posts
Posted: Tuesday, May 15, 2012 - 10:08 PM UTC
Retiredyank,Elcapitan, Seb43 and Zontar --> thank you!
Seb43 -> ho un français sur ARMORAMA!
For the color sheme, I think use colors like that with
modification:
linkname
I will not do that exactly. No sharp edge and probably only two colors. Just Dunkelgelb and brown for example.
No sharp edge because it's too difficult to put tape or maskol with all brackets etc... I'll use for the first time a airbrush so I hope do a good paint. I think I do weathering, chipping, filters,oils... and pigments for the first time.
Removed by original poster on 06/24/12 - 14:21:14 (GMT).
Removed by original poster on 06/24/12 - 14:20:43 (GMT).
bosscat
Joined: April 19, 2012
KitMaker: 119 posts
Armorama: 116 posts
Posted: Sunday, June 24, 2012 - 02:24 AM UTC
Just to make you wait, I set up the jerry cans that I put in their rack. I would paint in order to have jerry cans of fuel and water.

I added a tow rope


Finally, I made a firing mechanism of the MG42. I took the principle of a system based on cable in a duct that connects my little box where the cables are already connected the IR system. A bit like a bicycle brake control. I put a piece of plastic to represent the party which actuates the trigger. I could imagine a system based Lafette rods like the look, but too complicated to do.
MG, sorry for the quality of the picture...
I added a tow rope
Finally, I made a firing mechanism of the MG42. I took the principle of a system based on cable in a duct that connects my little box where the cables are already connected the IR system. A bit like a bicycle brake control. I put a piece of plastic to represent the party which actuates the trigger. I could imagine a system based Lafette rods like the look, but too complicated to do.
MG, sorry for the quality of the picture...
muchachos

Joined: May 21, 2008
KitMaker: 537 posts
Armorama: 439 posts

Posted: Sunday, June 24, 2012 - 06:02 AM UTC
Very impressive scratch work!

bosscat
Joined: April 19, 2012
KitMaker: 119 posts
Armorama: 116 posts
Posted: Sunday, June 24, 2012 - 06:31 AM UTC
thanks Scott!
bosscat
Joined: April 19, 2012
KitMaker: 119 posts
Armorama: 116 posts
Posted: Saturday, June 30, 2012 - 11:04 PM UTC
I have a problem with the beginning of paint so I decided to make a figurine.
Some time ago, I bought this kit from Masterbox for a sfkfz 222. But it didn't know to use them with the 222 or with my Panther.

I have no inspiration regarding the dio take place where the panther. I therefore decided to do something simple and I got a figurine in resin Tank:

But I haven't managed to put it in the cupolla as I wanted.
So I resolved to make a cocktail!
Mais je ne vois pas comment l'utiliser avec le panther, je n'ai pas d'inspiration en ce qui concerne le dio où prendra place le panther.
J'ai donc pris le parti de faire quelque chose de simple et je me suis procuré une figurine en résine de chez Tank:
So I took the figurine torso with arms from the center of the picture with binoculars. Finally, I took the head of the Tank Fig. I found it original and the fact that we can neither see the face or eyes suits me well! But I wanted to do a little more original than the tanker looking through binoculars.
I have this result, nothing is finished.


What do you think?
Some time ago, I bought this kit from Masterbox for a sfkfz 222. But it didn't know to use them with the 222 or with my Panther.
I have no inspiration regarding the dio take place where the panther. I therefore decided to do something simple and I got a figurine in resin Tank:
But I haven't managed to put it in the cupolla as I wanted.
So I resolved to make a cocktail!
Mais je ne vois pas comment l'utiliser avec le panther, je n'ai pas d'inspiration en ce qui concerne le dio où prendra place le panther.
J'ai donc pris le parti de faire quelque chose de simple et je me suis procuré une figurine en résine de chez Tank:
So I took the figurine torso with arms from the center of the picture with binoculars. Finally, I took the head of the Tank Fig. I found it original and the fact that we can neither see the face or eyes suits me well! But I wanted to do a little more original than the tanker looking through binoculars.
I have this result, nothing is finished.
What do you think?
 |

WEB HOSTING BY


Copyright ©2021 Armorama and Kitmaker Network, a subsidiary of Silver Star Enterprises
All Rights Reserved. Please read our Conditions of Use and Privacy Policy.
All Rights Reserved. Please read our Conditions of Use and Privacy Policy.