Campaigns
Where Armorama group builds can be discussed, organized, and updates posted.
Tank Destroyer/SPG Campaign
PantherF
Visit this Community
Indiana, United States
Joined: June 10, 2005
KitMaker: 6,188 posts
Armorama: 5,960 posts
Posted: Tuesday, August 07, 2012 - 11:32 PM UTC
Yeah! Nice work so far Sal and Phill beat me to it... those first row of steel rimmed wheels should be a greyish/silver look just like the steel wheels on a Late Tiger I or Tiger II.

BUT, the camo work so far I love man and you're well on your way to another good looking tank!


~ Jeff
ltb073
Visit this Community
New York, United States
Joined: March 08, 2010
KitMaker: 3,662 posts
Armorama: 3,078 posts
Posted: Tuesday, August 07, 2012 - 11:39 PM UTC

Quoted Text

Yeah! Nice work so far Sal and Phill beat me to it... those first row of steel rimmed wheels should be a greyish/silver look just like the steel wheels on a Late Tiger I or Tiger II.

BUT, the camo work so far I love man and you're well on your way to another good looking tank!
~ Jeff


Thanks Guys the front wheels are painted this a gunmetal silver I guess i should lighten them up a bit with some steel
WARDUKWNZ
Visit this Community
Auckland, New Zealand
Joined: June 01, 2011
KitMaker: 1,716 posts
Armorama: 1,638 posts
Posted: Tuesday, August 07, 2012 - 11:47 PM UTC

Quoted Text


Quoted Text

Yeah! Nice work so far Sal and Phill beat me to it... those first row of steel rimmed wheels should be a greyish/silver look just like the steel wheels on a Late Tiger I or Tiger II.

BUT, the camo work so far I love man and you're well on your way to another good looking tank!
~ Jeff


Thanks Guys the front wheels are painted this a gunmetal silver I guess i should lighten them up a bit with some steel


Yeah mate lighten it up ,,in the pics it looks black ,,gun metal is pretty dark so yep lighten it up with some steel

Phill
1721Lancers
Visit this Community
England - East Anglia, United Kingdom
Joined: March 21, 2012
KitMaker: 1,673 posts
Armorama: 1,640 posts
Posted: Wednesday, August 08, 2012 - 04:11 AM UTC
Hi all,
@Jeff, listen to what Phil has said, the E100 Jagdpanzer
is fantastic. It´s big, easy and looks good.
@Phill, Tamiya, Tamiya what would we do without them. Looking good mate nice to see things going together
without a hitch. Hope these 2 pics don´t affend you, its my E100 StuG which I built in January 2012, I used the kit tracks and managed to get them to be a reasonable sight and tweeked the kit a bit too.(I love Scratch):


@Sal, it´s turning out good, just hit the front "Steelwheels"
with steel paint and a good polish with a graphite stick.
@Nate, nice to see another new kit, watch the tracks though
apparently they´re to long(Model Military International).
@Eddy, cool choice and like Phill said I have also built the ancient version from Dragon, so I´m looking forward to seeing your newer kit.
Paul
Nito74
Visit this Community
Lisboa, Portugal
Joined: March 04, 2008
KitMaker: 5,386 posts
Armorama: 4,727 posts
Posted: Wednesday, August 08, 2012 - 04:50 AM UTC
Some progress on the Emil


Also started painting the rubber part of the wheels, and started on the equipment too.

Dragon164
#226
Visit this Community
British Columbia, Canada
Joined: February 20, 2012
KitMaker: 1,909 posts
Armorama: 1,066 posts
Posted: Wednesday, August 08, 2012 - 10:32 AM UTC
Got some of the PE started and a pic showing the left over gun mantlet (on the left) that will replace the one on the SU-100.

Cheers Rob.

PantherF
Visit this Community
Indiana, United States
Joined: June 10, 2005
KitMaker: 6,188 posts
Armorama: 5,960 posts
Posted: Wednesday, August 08, 2012 - 11:56 AM UTC

Quoted Text


2 questions Jeff,
What will be your sequence for this build ? I mean do you build the whole thing at paint it or do you will get the gun and lower hull built and painted separatly ?

I'm not familiar with wax paper..


Sorry I missed this but wax paper is a paper lined with a non-stick coating generally used in serving food so that it won't stick to the pan. Also, as kids we polished the slides with it and made them very fast!

On the Emil? I'm painting all sub-assemblies separate (still no AB ready yet) and then will assemble after the paint has dried. I don't think I can mask off the interior effectively enough to protect it.

Speaking of:


Ain't she a beauty?


~ Jeff
SHAKY962
Visit this Community
Buenos Aires, Argentina
Joined: May 21, 2012
KitMaker: 765 posts
Armorama: 438 posts
Posted: Wednesday, August 08, 2012 - 12:22 PM UTC
Jeff,
The Sturer itsnt have the "Fresh Paint" signal !!!!!
Here two pictures of the Sturer wich I make last year

Nito74
Visit this Community
Lisboa, Portugal
Joined: March 04, 2008
KitMaker: 5,386 posts
Armorama: 4,727 posts
Posted: Wednesday, August 08, 2012 - 01:29 PM UTC
@Rob

Nice progress on the Su-100.
Is that a half-track just behind ?

@Jeff
A beauty. Damn, that's a huge gun.
I wonder if they just left all the Marder's as paper projects and produced this baby... I'm glad they didn't.

@Jose
Good work on that Emil Jose !!
Love the look on those tracks !
SHAKY962
Visit this Community
Buenos Aires, Argentina
Joined: May 21, 2012
KitMaker: 765 posts
Armorama: 438 posts
Posted: Wednesday, August 08, 2012 - 01:45 PM UTC
@John, thanks for your comment. The tracks are from Hobby BOss, a world of difference from the vinyl tracks of the kit
Braille
#135
Visit this Community
California, United States
Joined: August 05, 2007
KitMaker: 1,501 posts
Armorama: 1,485 posts
Posted: Wednesday, August 08, 2012 - 03:52 PM UTC
Tank Destroyer and SPG geeks,

I don’t know how some of you people manage the time to post updates just about everyday? I’m envious! Anyhow here is my latest update. As I had mentioned on my last posting this won’t be a step-by-step build but I will point out deficiencies with this kit as I move along hopefully to help anyone else interested in putting one of these kits together. I somehow managed one of those wild brain farts and forgot to mention Rick ‘CLOVIS899’ Cooper’s excellent and inspiring review of this kit. You can click on the LINKY here if you’re interested in checking out the review. Well, here’s where I’m at on the kit.


I had forgotten to mention on my last posting that step 4 in the assembly instructions will have you remove all of the muffler brackets and guide pins (circled in red), don’t even think about doing that! Just leave this part (V33) as it comes in the box and fix it to your model. As Matt ‘BigSmitty’ Smith, mentions that you won’t be able to shoehorn the rear idler shaft assemblies on the model if you fix this part to the hull first. He is correct if you do happen to fix all of the rear idler shaft parts together and are building your kit as per the steps. You could however fit this part to the hull first, as I have done, provided the idler shaft assemblies are still unassembled.


I did run into a bit of a scuffle when I went to test fit the fenders to the hull. I had previously fixed both parts (V38 & V39) from step 3 to the hull and discovered that the fenders already had a similar set molded to them; I think these fenders came from a Stug III kit? Anyhow, the photograph pretty much covers what I did to remedy that issue. There are also wrong part number call-outs for the fenders on the assembly instructions; I have here included the correct part number call-outs.


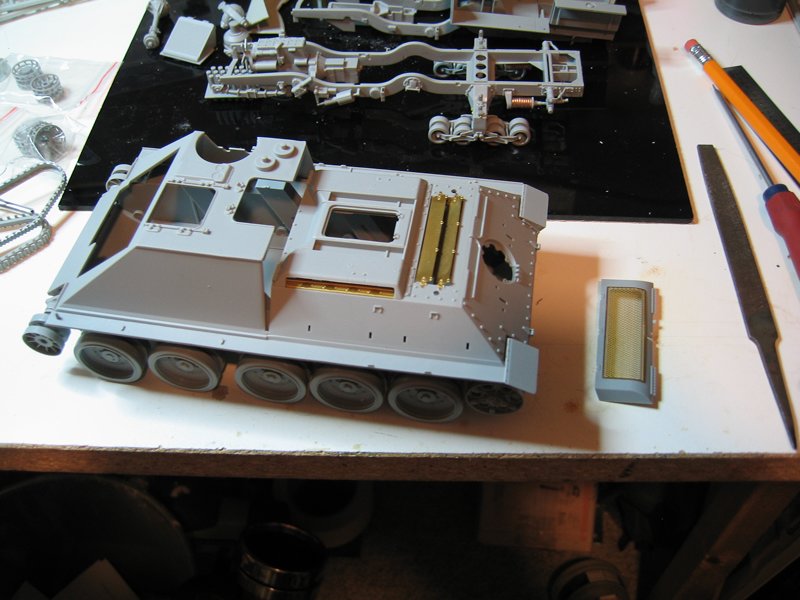
Oh me, oh my! When I went to test fit the casemate housing (T21) and front casemate armor plate (T3) to the fenders and hull I discovered that two of the four locating dowel pins needed to be removed on the front casemate armor plate and one of them fixed to a new location. I had previously drilled out the location holes on the fenders for the casemate as per step 8 and again to my surprise, or not, the locating dowel pins on the casemate could only mate up to either the right or left fender but not both at the same time (hope this is making sense).

Long story short (no such thing when trying to explain Dragon instructions) , two of the four dowel pins on the front casemate armor plate were removed (red arrows at bottom of photograph). When I fitted the casemate over the left fender (B25) the casemate sat asymmetrical on the chassis and when fitted to the right fender (B26) the casemate sat symmetrical over the chassis. To determine how the casemate is actually suppose to sit I needed to test fit part T16 (see proceeding photograph) to the hull to check where the front armor plates large location flat peg rested on part T16. After seeing that the casemate is suppose to be symmetrical to the chassis I went ahead and used the left fender as a template for relocating the left large dowel pin on the front casemate armor plate (red circle on inset photograph). I also needed to file material away from the bottom of the front casemate armor plate (red arrows on inset photograph) to get the casemate to come down even without any gaps on the fenders and part T16. A small pin vise and drill were used to open the Driver’s periscope holes on the front casemate armor plate (red circle on small inset photograph).


Part T16 didn’t actually sit flat enough on the front transmission housing and I needed to do some sanding (red arrows) in that area to keep from removing more material from the casemates front armor plate (sort of like sharing and dishing out some pain to both parts – yeah that’s it!). I also had a rather conspicuous gap (red arrow on inset photograph) to contend with and I filled that with some thin super glue. Using a small drill bit as a file, the same diameter as the holes on the fenders for receiving the casemates dowel pins, I elongated the openings just enough to accept the casemate. Problem solved! Of course you could just skip the drama and remove all of the dowel pins and glue the casemate directly down to the fenders and Part 16. But would anyone want to run the risk of destroying the fine detail on the fenders with soft or liquid cement if you didn’t have too!


Rear view of the major parts fitted together. The casemate and rear deck are just sitting in place for the photographs.


Front view. Now that I have all of the major parts fixed together and test fitted I can move on to the smaller detailed parts. Lets see how much stuff I can install without running into more assembly issues? Don’t get me wrong this is really a nice detailed kit, all it needs is a little tender loving care.

@Hangelafette – Nathan, thanks for the tip on the DEF Model photo-etch, hadn’t heard of them before. Looking forward to seeing how the Academy kit builds up!

@BigSmitty – Matt, I’m following your build as the lower hull on my kit is very similar to yours kits hull and suspension. Nice catch on the forged or casting seam on the swing arms, they could easily be mistaken for heavy casting flash.

@Tailor – Guido, from the looks of your avatar you may actually have some experience with Acetone, or have you been moonlighting with some Braille scale builds like me?

@Nito – John, I think I have you beat on the slow building part, but you do have a nice start. Should there not be another cable for the front lamp too?

@jkb_sprint – John, good to see you’ll still be here participating in this campaign, good on you for not allowing something beyond your control to get the better of you! Will be most interesting to see how the Zaveda PanzerJager – 1 will build up.

@Tojo72 – Anthony, thanks for the welcome. I hope to see some of your work here too! I’m just here to have fun and hopefully kick-start myself back to the workbench.

@WARDUKWNZ – Phill, that is one big fellow with a big gun to boot and already for paint, nice commander too. Are those the kit supplied tracks or what? Holy-molly dude, you actually already put together that brass PE set on the half-track, lets see some close ups!!!

@Itb073 – Sal, your camouflage is nice and bright just right for the weathering process which will tone it down a lot. Good progress on your build.

@1721Lancers – Paul, that is an awesome looking beasty!!! I like the camouflage pattern and added furniture, good idea on the fuel drum, these things probably ate enough fuel for a whole platoon of Panthers or a complete company of Panzer I’s – LOL! You sure wouldn’t catch one of these idling at a fast food port to grab a burrito! Paul, back when Dragon first released the s.IG 33 I wanted to get one but my LHS was always short in supply and I just didn’t bother with trying to get a copy, besides it looked kind’a dumb too, I mean why would anyone in their right mind want to climb aboard a vehicle that advertises such a wonderful target opportunity from any angle or range. But that guns destructiveness is most impressive against erected structures. Personally would not want to be on the receiving end of that gun, there’s no ‘I almost got you’ about it!

@Dragon164 – Rob, you look like you’ve got quite a few projects on the workbench all going at the same time, terrific! Good progress on the SU-100, nice clean PE work too!

@PantherF – Jeff, thanks for posting that photograph depicting the Emil at the museum. Seriously that is one ugly looking vehicle but that gun and manlet just dwarfs the Ferdinand’s menacing 88 and that places this one on the top of my list! Opposing crews facing that weapon probably felt like they were in a paper tank.

@SHAKY962 – Jose, excellent build, thanks for sharing. I like the added tarp on the rear of the vehicle and water bucket, good track sag too.

~ Eddy
WARDUKWNZ
Visit this Community
Auckland, New Zealand
Joined: June 01, 2011
KitMaker: 1,716 posts
Armorama: 1,638 posts
Posted: Wednesday, August 08, 2012 - 04:41 PM UTC

@WARDUKWNZ – Phill, that is one big fellow with a big gun to boot and already for paint, nice commander too. Are those the kit supplied tracks or what? Holy-molly dude, you actually already put together that brass PE set on the half-track, lets see some close ups!!!

Hey dude .. i undercoated that beast last night and gave it a detail coat this morning ,,i am at the moment making up PE .50 cal links for the half track ,,and yep you read right ,,1/35th scale .50 cal links .
Check out the US halftracks campaign ,,theres heaps of pics on there of this thing

Phill
PantherF
Visit this Community
Indiana, United States
Joined: June 10, 2005
KitMaker: 6,188 posts
Armorama: 5,960 posts
Posted: Wednesday, August 08, 2012 - 06:33 PM UTC
Looks great Jose! If mine looks half as nice as that I'll be happy!

Looks like I choose the wrong color though.


~ Jeff
Tojo72
Visit this Community
North Carolina, United States
Joined: June 06, 2006
KitMaker: 4,691 posts
Armorama: 3,509 posts
Posted: Wednesday, August 08, 2012 - 10:05 PM UTC
Greetings,great work happening here,and great discussion.Got my SU-100 primed and ready for paint,roadwheels done and Magic Tracks assembled.Thats a metal bareel from RB got it on Ebay for about $5.00 it even has rifling inside the barrel,a real nice addition.


Dragon164
#226
Visit this Community
British Columbia, Canada
Joined: February 20, 2012
KitMaker: 1,909 posts
Armorama: 1,066 posts
Posted: Wednesday, August 08, 2012 - 10:50 PM UTC
John,Eddy,
That is two halftracks for the halftrack campaign. you could say I have some projects going I'm in 9 active campaigns and have multiple builds going on for 4 of them.

Cheers Rob.
airborne1
Visit this Community
Queensland, Australia
Joined: April 15, 2006
KitMaker: 915 posts
Armorama: 797 posts
Posted: Wednesday, August 08, 2012 - 11:09 PM UTC
Wow,

There is some excellent builds here.

The reference pics and build images are great.

keep them coming .

Thanks
Michael
PantherF
Visit this Community
Indiana, United States
Joined: June 10, 2005
KitMaker: 6,188 posts
Armorama: 5,960 posts
Posted: Wednesday, August 08, 2012 - 11:36 PM UTC
Yeah, nice SU-100 tank Anthony and all the TD's and SPG's are looking very good!

Now it's my turn to melt some plastic today so pics should follow a little later on.


~ Jeff
ltb073
Visit this Community
New York, United States
Joined: March 08, 2010
KitMaker: 3,662 posts
Armorama: 3,078 posts
Posted: Thursday, August 09, 2012 - 12:03 AM UTC
Anthony nice looking build there will you be putting that bullseye decal on the side looking forward to seeing it with some paint
SHAKY962
Visit this Community
Buenos Aires, Argentina
Joined: May 21, 2012
KitMaker: 765 posts
Armorama: 438 posts
Posted: Thursday, August 09, 2012 - 12:53 AM UTC
@Jeff, the Sturer is a great kit and provided me a lot of fun. Take it easy. For me the most complicated part is the finish, not the building....

@Eddy, you are doing an amazing work in this kit. Congratulations. The Sig 33 is one wich I want to buy. And too, thanks for your comments

@Anthony: Your Su is beautiful..... You are in the final steps. Go on!!!!!

Nito74
Visit this Community
Lisboa, Portugal
Joined: March 04, 2008
KitMaker: 5,386 posts
Armorama: 4,727 posts
Posted: Thursday, August 09, 2012 - 02:37 AM UTC
Tiny update

Some equipment & wooden floor


Nito74
Visit this Community
Lisboa, Portugal
Joined: March 04, 2008
KitMaker: 5,386 posts
Armorama: 4,727 posts
Posted: Thursday, August 09, 2012 - 03:11 AM UTC
The rest of the wiring too... thanks Eddy !

1721Lancers
Visit this Community
England - East Anglia, United Kingdom
Joined: March 21, 2012
KitMaker: 1,673 posts
Armorama: 1,640 posts
Posted: Thursday, August 09, 2012 - 03:59 AM UTC
Hello all of you,
some good things happening here, I just hope the freaky
disasters are now all done with.
@ Eddy: lovely SiG33, I can´t wait to see that babe painted.
Are you going to do the green stripes paint scheme that everyone knows or something else?
@ Anthony: great looking SU 100,and those RB barrels are just the bees knees, you cannot beat `em
@ John: going real good, just get that running gear on before
you addd the upper hull, otherwise its a nightmare getting the tracks on and the sag added.
Well I primed my monster yesterday evening, and added the first camo colour today:
Revell 09 Anthracite as a primer
Revell 68 Dark green as first camo coat
Tamiya XF55 Deck tan for the inside (acrylic)
Tamiya XF63 German grey Radio housing (acrylic)
A dirty rusty mix of alsorts of Humbrols for the tracks

cheers all
Paul
PantherF
Visit this Community
Indiana, United States
Joined: June 10, 2005
KitMaker: 6,188 posts
Armorama: 5,960 posts
Posted: Thursday, August 09, 2012 - 04:08 AM UTC
Brilliant minds


think alike John for I too plan to make the wood look real.

And Paul... awesome looking tank, might have to get me one too!

Well the wifey unit left me a hidden message of which had a few "Honey-Do" things she wanted accomplished before 2-nite, and since I have a doctors appointment in 2 hours I rushed through the list to make the day 'jive'... sort of speak.

Afterwards the day is MINE and all mine too! I won't even let the dogs out when they ask!!!! (just kiddin')

So Phill, may not get too far into the start of the dual builds but I have a feeling once started I won't easily walk-away from it.

Man... the things I have to do around here to keep the peace. And while being sick too!!


~ Jeff
Nito74
Visit this Community
Lisboa, Portugal
Joined: March 04, 2008
KitMaker: 5,386 posts
Armorama: 4,727 posts
Posted: Thursday, August 09, 2012 - 04:24 AM UTC
Thanks Paul, I was planning the tackle the wheels & tracks next.

@Jeff
I used Vallejo Old Wood 310, a wash of flat brown & a MIG neutral wash too.
PantherF
Visit this Community
Indiana, United States
Joined: June 10, 2005
KitMaker: 6,188 posts
Armorama: 5,960 posts
Posted: Thursday, August 09, 2012 - 04:33 AM UTC
Wow... so technical in your approach!

I'm just going to paint it one color and dry brush a darker shade over it. Can't wait to see your results though!


~ Jeff