Dioramas: Making Bases
Discuss all aspects of making bases.
Hosted by Darren Baker
Diorama in 1/16 - building the 1st module
lappes
Visit this Community
Baden-Württemberg, Germany
Joined: July 29, 2012
KitMaker: 133 posts
Armorama: 133 posts
Posted: Tuesday, September 04, 2012 - 06:38 AM UTC
Thank you very much, Greg.

I guess it will slowly get bored.
Nevertheless I do continue to present a possible detailed report of the building of the diorama.
Since my last post, the following was done:
I built parts of the destroyed roof.
First I cut boards from balsa wood and pasted these parallel on square rods.


The wood was treated with oil paint burnt umbra and spotted off.
I glued emery paper (100 grit) onto this construction and ripped the paper partially.
Then the paper was painted grey. Now washing in black. After that treatment with pigments African Earth and brick dust Mig pigments). Most recently, a Drybrushing of wood and sand paper with light grey.
At last a Drybrushing of wood and sand paper with light grey.
This was made with Revell aquacolor.
Then, boards and bars from a balsa wood Board were cut. These were broken in various lengths.
After that treatment with heavily diluted oil paint burned umbra and as always spotted off with a cloth.

A longer brass L profile and 2 shorter U-profiles have been painted with gunnery grey. Then washing in black, spotted with a soft cloth after a short exposure time.
The profiles and the wooden boards / bars were fixed at the destroyed part of the walkway and irregularly on the walkway and the rubble.
Al last I treated the boards and bars witl a drybrushing and pigments.

Here the photos:


lappes
Visit this Community
Baden-Württemberg, Germany
Joined: July 29, 2012
KitMaker: 133 posts
Armorama: 133 posts
Posted: Tuesday, September 04, 2012 - 07:50 AM UTC
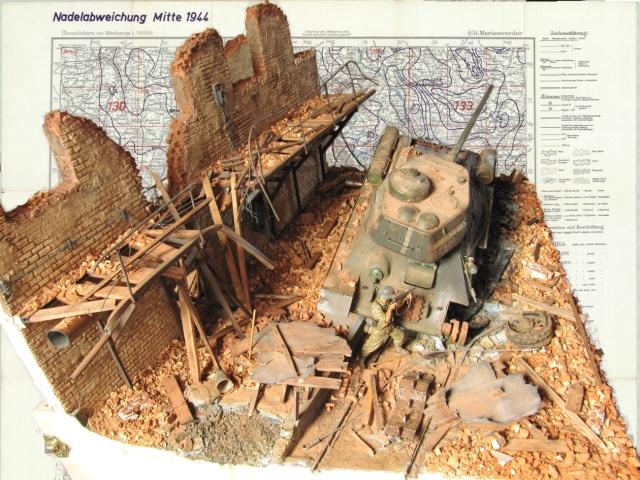
the continuation of the small pipeline on the short side of the gangway has been created yet.
Once again, a view of the current state.

Some details, such as wires on the ground and the wires of the left walkway were added yet.
Because the images were all quite small and confusing, I would like to post here a picture with a neutral background and a bigger format.
Click on the link, you can see the picture in a higher resolution.


Click here for a larger view
lappes
Visit this Community
Baden-Württemberg, Germany
Joined: July 29, 2012
KitMaker: 133 posts
Armorama: 133 posts
Posted: Wednesday, September 05, 2012 - 08:11 AM UTC
Then I continued on the back.
At first I've molded fte ground with self hardened clay.
Clay is easier to handle than plaster.
I did not want to mess up the painting of the wall.


Then I have treated with the wooden wall of the trench.
At first a drybrushing with light gray, then here and there with black.
The nails were painted in Revell Aquacolor rust and oil colours english red.


Now I've built several details:
Some pieces of wood were painted and glued to the Dio and a cable was added at the framework.
Then I painted the clay on the other side of the wall in gray and brown wood.


Now the other side:
First, I sprinkled on the ground surface between the stairs and digging a thick layer of fine sand.
This was soaked with a mixture of white glue / water.
Gravel and forest floor of Woodland Scenics (modell railway accessoires) and finer gravel was scattered on the wet layer of sand.
Then some sea foam branches were glued on it. Some bright bristles (Noch model railway accessoires) were set as tuft of grass.


Now a lot of debris was spread over this part of the diorama with a teaspoon.


I took a pipette to drizzle with water diluted casein glue over the rubble. After drying it fixes the rubble unvisible among each other and with the ground.


The whole must dry for at least one, better two days.

Today I stuck a few roots on the Dio.
Then grass was set. This is from some soft pine, which is already dried.
Finally came the wood debris that has been previously treated with diluted oil paint burnt umber.


lappes
Visit this Community
Baden-Württemberg, Germany
Joined: July 29, 2012
KitMaker: 133 posts
Armorama: 133 posts
Posted: Thursday, September 06, 2012 - 06:00 AM UTC
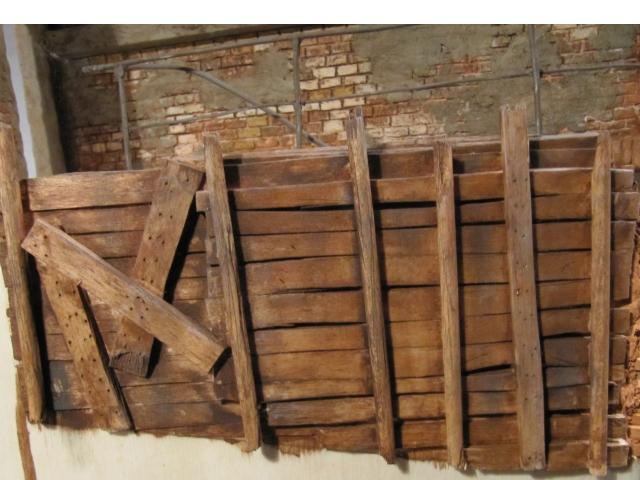
Small bricolage - the door to the extension.
I have just finished the door for the extension of the house as little tinkering.

First I cut the lamella of a wooden blinds to narrow strips.
Do not use balsa wood, as this will strongly absorb the color of subsequent treatment.
Then I glued them on 2 cross bars, and provided with a diagonal reinforcing bar. You see .... I know how everything is clearly explained.

Afterwards came a Washing burned umber oil paint. Then this dabbed and painted dark green after a few minutes with Revell Aqua Color. During the drying phase, I pushed the nail holes with screws. These things I have forgotten before the Washing unfortunately.
After the green paint had dried on the surface, I took duct tape and taped it to the surface (press hard). When the tape was removed it removes partial the paint. This procedure I repeated several times. Then I brushed the door with a hard bristle brush.
Then a washing with diluted oil paint burnt umbra.
This accentuates the deeper spots.


A rail connector of LGB rails (which I used for the Dio) was flexed with the Dremel and bent into shape with pliers. A hole for the pawl and one elongated drilled as keyhole.

Cut a wire, bent at 90 degrees, and bonded as a pawl in the hole.
Now all painted in rust. Then black. The Black swabbed so that "rust" came to light.
The whole thing then glued with UHU Hart on the door.


Supplementing it again with larger chunks of debris, such as parts of the roof and a few branches.

I have described before the creation of the roof remains. Roofing felt from 100 Schmirgelpapier...usw.

The branches are remnants of roots.


lappes
Visit this Community
Baden-Württemberg, Germany
Joined: July 29, 2012
KitMaker: 133 posts
Armorama: 133 posts
Posted: Thursday, September 06, 2012 - 08:38 AM UTC
Since the grass did not look so good, they were refined with khaki and brown and with some natural colored bristles.


Then I added further details.
Once a bucket that I have left from my RC Tiger and then I have tinkered an old broom.
For this I cut a small boards out of a strip of wood and drilled in the bottom half of a lot of small holes (not pierce!).
In the middle of the top half I drilled a hole and glued a skewer into it.
After a short time of drying, I brushed the bottom side of the small plank with wood glue and pressed tufts of bristles into the glue. The whole was placed in the form, and then a few minutes to dry laid aside. After drying, the bristles were cut.
The whole thing was treated with diluted oil paint burnt umber.

Thereafter, the "old broom" glued to the Dio.


lappes
Visit this Community
Baden-Württemberg, Germany
Joined: July 29, 2012
KitMaker: 133 posts
Armorama: 133 posts
Posted: Thursday, September 06, 2012 - 09:18 AM UTC
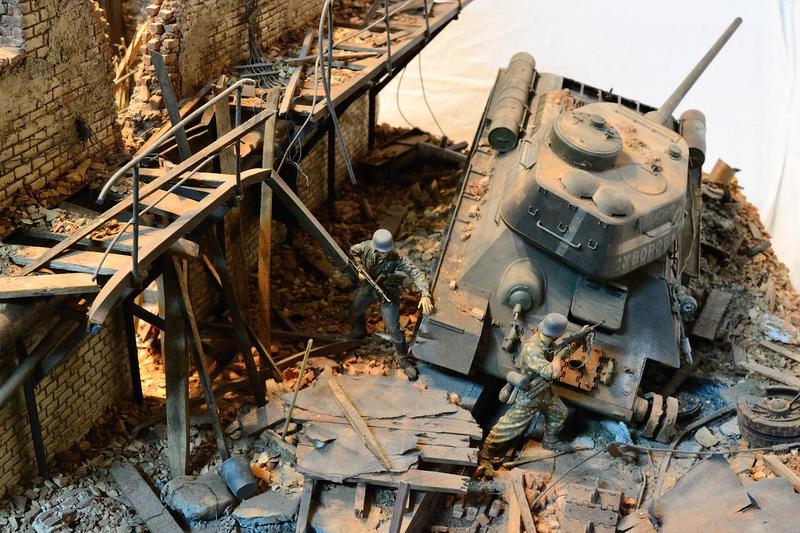
From the thin aluminum sheet from a candle of a teapot warmer I cut shoulder straps for guns, fixed it and then painted brown with oil paint. The soldiers were further treated with diluted oil paint burnt umber and dust heavily with pigments Europe Dust from Mig . They were then fixed in the final position on the Dio.
In addition, I built from aluminium sheet an open tin can, which I also fixed on the floor next to the soldiers.
It was tinkered as follows. The sheet was bent around a brush handle and glued together. On this, the underside of the tin can was glued and fitted after dryingwith a scissors. The cover had been cut out, and a small corner thereon allowed to fix it to the seam. After that treatment with matte clear coat.


And here a complete sight of the diorama from different prospects:


lappes
Visit this Community
Baden-Württemberg, Germany
Joined: July 29, 2012
KitMaker: 133 posts
Armorama: 133 posts
Posted: Saturday, September 08, 2012 - 01:36 AM UTC
The last picture of the post before shows it –

the right part beside the front door had to be completed.

I created a support wall from little balsa wood bars. On this vertical slats for support were fixed. Then horizontal slats were glued as ladder rungs.

With a screw tip again nail holes were punched and two crooked "nails"were added.
The how to do was described in one of the posts before.
This was painted with diluted oil paint burnt umber again and fixed to the Dio.

With self hardened clay I moulded the ground.
Before this was dried I pressed a root coated with adhesive in the soft clay.
After hardening of the clay this was painted with Revell Aqua Color dark earth.
Then everything was covered with fine sand. Then came the diluted casein glue.
Natural grass was re-created with the pine needles and bristles from Noch. Various root fragments were glued. Then debris (Crushed flower pot) was spread with a teaspoon and fixed with diluted casein glue. Finally, a rope was moved as little detail behind the stump along to the figure of soldier. The rope is Graupner rigging thread and has a very nice scale structure.
Except for the one or other little thing the first module of my great diorama should be completed now.
One figure and the rats were added later.....but this in the report of the second module.


lappes
Visit this Community
Baden-Württemberg, Germany
Joined: July 29, 2012
KitMaker: 133 posts
Armorama: 133 posts
Posted: Saturday, September 08, 2012 - 02:28 AM UTC
I hope that now was not too stressful.

This is a summary of the entire report with a description of my practices.

There are certainly other ways .... all roads lead to Rome.

The first report was written on 6.12.2009, the last on 28.3.2010.

If anyone has any questions .... go ahead. I'm willing to answer anything about my options.

Greetings

Frank
jrutman
Visit this Community
Pennsylvania, United States
Joined: April 10, 2011
KitMaker: 7,941 posts
Armorama: 7,934 posts
Posted: Saturday, September 08, 2012 - 02:32 AM UTC
WOW!!! Very very nice my friend. That is some of the most convincing rubble,etc that I have ever seen. The walls,goundwork details,etc are all super nice.
I like the fact that I could see some of my old friends from Germany like Heki and Kleber as well! Best country in the world for model railroaders.
Voer in Duetschland kommst due?
J
lappes
Visit this Community
Baden-Württemberg, Germany
Joined: July 29, 2012
KitMaker: 133 posts
Armorama: 133 posts
Posted: Saturday, September 08, 2012 - 02:56 AM UTC
Hi Jerry,
Thank you for your nice comment and the compliments.
I come from Hagen near Dortmund. Since 1987 I live in Reutlingen, 40 km south of Stuttgart.
Where did you live in Germany?


Now the report of the building of the second modul

At first I wanted to start a new thread about the building of the second module.
I've decided to continue this thread, not to loose the connection.
The base of the 2nd module was completed before.
Now I present the first kit.
The Kit of the Kingtiger in 1/16 containes a lot of packages for many many parts.
These packages were distributed on the base to prepare the assembly and to get an overview.
At last the kit contains more than 1200 parts.
As I said above in the construction - the base is 60 x 70 cm and well-stocked with single boxes.


jrutman
Visit this Community
Pennsylvania, United States
Joined: April 10, 2011
KitMaker: 7,941 posts
Armorama: 7,934 posts
Posted: Saturday, September 08, 2012 - 03:56 AM UTC
I have been to that area of Germany around 1986. I was stationed in Baumholder from 77 to 80 and in Mainz from 84 to 87. I also visited in 94 for a few weeks. Lovely place.
My country has wonderful scenery but Europe has scenery AND nice old buildings,etc.
Good luck on that giant PzVI. It would take me 4 years to build it.
J
lappes
Visit this Community
Baden-Württemberg, Germany
Joined: July 29, 2012
KitMaker: 133 posts
Armorama: 133 posts
Posted: Saturday, September 08, 2012 - 04:17 AM UTC
@Jerry: Baumholder and Mainz. Unfortunately I wasn't there. In my military service I was in Boostedt/Neumünster Schleswig-Holstein. In manoeuvre I was in Bergen and Munster. This was in 1983/84.
In my job I was in Wiesbaden near Mainz for a few weeks.
It's very nice of you to wish me good luck for the Kingtiger but it is too late. The diorama is completed and I do publish a report of the building in English (very bad English I believe).
If you're interested here's the link to the completed diorama:

http://armorama.com/forums/195485&page=1


Now I've started the construction of the armoured hull.
The armoured hull itself - 1 part.
The inner flanks right and left - each 1 part
4 Shock absorbers - 4 parts.
Front Interior panels with pedal and 2 bearings.
The inner flanks and the front plate beautifully simulates the original diameter.

The brake cover - 3 parts.

Various small parts, 2 cable channels 7 cross and 2 longitudinal rakes.

The very thin rakes - both transverse and longitudinal - should be fixed very carefully.

These buckles very quickly and needs attention to fix correct.

Here the images:


Shock absorbers and brakes were only plugged and not attached

So far, I have assembled the torsion bars and the swing arms, deburred and loosely placed in the armoured hull (for easier painting).


Chassis works are always so longsome.


The Interior was primed black and then the armoured hull was coated with Zimmerit.
I used Apoxie sculpt, a modelling clay with extra hardener for the Zimmerit. This is applied "by hand" and smooth coated with the finger and water as possible and distributed. .... I think a not very simple business. Then I have "stamped" the structure with an "Zimmerit"stamp from Imerial Modellbau. The stamp had to be cleaned again and again!!!


Here again a small update, to show the dimensions.


lappes
Visit this Community
Baden-Württemberg, Germany
Joined: July 29, 2012
KitMaker: 133 posts
Armorama: 133 posts
Posted: Saturday, September 08, 2012 - 07:02 AM UTC
Now I have put together 2 "kits" from the kit. These now waiting to be painted.
Firstly, the gear box with the case , on the other the motor.
Unfortunately you can't see anything from the gearbox after assembling.
Otherwise, there's nothing wrong with the parts ... but see for yourself.


Then I had added some cables and tubes.
I'm quite unnerved, because these are made ​​of soft plastic and did not want to stick.
With UHU Hart and for safety superglue it seems to be ok.
In my opinion it looks good.


lappes
Visit this Community
Baden-Württemberg, Germany
Joined: July 29, 2012
KitMaker: 133 posts
Armorama: 133 posts
Posted: Saturday, September 08, 2012 - 07:44 AM UTC
Now I've built the wheels and the bulkhead.
Then I've continued the painting.
Different places inside the armoured hull were sprickled with water and these were sprickled with salt.
Then the engine and transmission were sprayed metal Color Dark Iron. This is an almost black iron color, you can polish it. This gives a super metallic effect.
Then the inside was sprayed with Metallcolor rustred flat.
This looks like anticorrosion paint.
Now I sprayed with the airbrush flat rust onto the exhaust manifold and the heat shields of the motor.
This was made with a fine airbrush nozzle with little color and close range.
Then the track covers on the inside of the hull were sprayed white. Of course, after I had covered the interior.
Similarly, the housing of the transmission.
The engine bulkhead was first painted black, then some places sprickled with salt, then rust and at last white.
Now the motor was painted chimney black. This was made very thin.
Recently I brushed with a hard brush the salt of the components and the engine at the edges.
This polished the metallic colour at the edges. It seems like drybrushing but the effect is a little glossy.
The exterior of the tank I've painted in rust red.
On the photos the parts were sticked together provisional.


jrutman
Visit this Community
Pennsylvania, United States
Joined: April 10, 2011
KitMaker: 7,941 posts
Armorama: 7,934 posts
Posted: Saturday, September 08, 2012 - 09:20 AM UTC
Wonderful work on the Tiger. So you never got to see the garden spots of Germany like Grafenwehr ot Hohenfels or Wildflicken? You just trained up north in the hiede?
My apartment was right on the Rhine in Mainz-Gonsenhiem and Wiesbaden was in sight across the river. Beautiful town. Badly bombed in the war 2 times and the only area where they still had the fachwerk buildings was in the former red light district,which was not touched by bombs. Now it is very up scale and has a wonderful fussgangerplatz. Don't mean to hijack your thread,I just miss Germany.
J
lappes
Visit this Community
Baden-Württemberg, Germany
Joined: July 29, 2012
KitMaker: 133 posts
Armorama: 133 posts
Posted: Sunday, September 09, 2012 - 02:41 AM UTC
Hi Jerry,
thank you for the post. You don't "hijack" this.
There are many wonderful places in Germany just as in the USA.

Here a picture from Tübingen, distance 15 km from my home.


Many greetings
Frank
jrutman
Visit this Community
Pennsylvania, United States
Joined: April 10, 2011
KitMaker: 7,941 posts
Armorama: 7,934 posts
Posted: Sunday, September 09, 2012 - 02:56 AM UTC

Quoted Text

Hi Jerry,
thank you for the post. You don't "hijack" this.
There are many wonderful places in Germany just as in the USA.

Here a picture from Tübingen, distance 15 km from my home.


Many greetings
Frank


Gut!! Alles klar. Thanks for posting that wonderful pic. I have seen pictures of Tubingen before but not in color.
J
lappes
Visit this Community
Baden-Württemberg, Germany
Joined: July 29, 2012
KitMaker: 133 posts
Armorama: 133 posts
Posted: Sunday, September 09, 2012 - 03:50 AM UTC
Meanwhile the Interior was treated again with a mixture of flat auburn and flat rust.
With the airbrush I sprayed irregular this mixture on the edges and corners to receive a brindled appearance.
Then followed a micro painting with dark iron (Hobbycolor).
In addition a light rubbing with pigments.
The torsion bars were painted in dark iron and after drying polished with a soft cloth.
On the photos below, I have inserted the torsion bars to show the effect.
In addition, the red mixture was applied cloudy outside the armourde hull.
A Zimmerit coating was added at the not treated places.


Now I have built a few assemblies and these were placed loosely in the model.
I've covered the seats with candy wrappers as the seat cover was not enough structured.
Also, the springs of the driver seat were bent of thin wire and fixed with superglue.
Then the painting began.
First everything with black.
Then all "metal" parts unevenly with rust.
Then with a mixture of Red Brown and rust also unevenly.
The seat covers were painted in black, then washing in grey and drybrushing of the strained points with white.
The radio was painted in German grey from Valejo.
The framework and the dashboard
in white.
Details of the radio had to be painted.


HONEYCUT
Visit this Community
Victoria, Australia
Joined: May 07, 2003
KitMaker: 4,002 posts
Armorama: 2,947 posts
Posted: Saturday, September 22, 2012 - 12:01 AM UTC
Amazing work Frank. A real labour of love! I think sometimes the hardest part of diorama scenes is showing the organised chaos of destruction, and not making it appear too contrived. You have well achieved this!
I do think the addition of a scratchbuilt bucket would give you a more to-scale representation than the one used?
Once again, amazing work
Cheers
Brad
lappes
Visit this Community
Baden-Württemberg, Germany
Joined: July 29, 2012
KitMaker: 133 posts
Armorama: 133 posts
Posted: Monday, October 01, 2012 - 08:01 AM UTC
Thank you for the nice comment Brad.
The bucket is really a little off the scale.
This disturbed me too.
I 've turned the bucket. So it looks better.
Look this picture.


lappes
Visit this Community
Baden-Württemberg, Germany
Joined: July 29, 2012
KitMaker: 133 posts
Armorama: 133 posts
Posted: Sunday, March 31, 2013 - 02:05 AM UTC
It's time to continue.
The following modules were fixed:

-The gearbox
-The driver's seat
-Radio Operator seat
-The bulkhead of the engine compartment
As the bulkhead was fixed, hose connections were still glued.
It has been proved that the torsion bars are not glued. (Since I have not followed the instructions, but to the experience of other reports)
Then I built the radio and the dashboard.
This consists of only 4 parts and it is too simple of the detailing.
Since I build no cut model , I just "pimped" the parts a little.
The radios normally hang in a frame, which is fixed at the top not at the gearbox.
I added the rear vertical frame from the parts box.
In addition, a small control panel beside the dashboard.
Then I copied a photo of the instruments, scaled them on my PC, printed, cut out and glued onto the dashboard.
The instruments were painted with gloss clear paint, to imitate a glas cover. You can use plastic of a blister packaging, if you want.
Color treatment in white and german grey.
Then I fixed a few wires, how I saw it on a photo on the internet.
That should be enough, and looks more sophisticated than originally part of model.
Now again different paint damages have been created throughout the interior with a sponge and black paint (do this with an almost dry sponge). I just pulled a piece of sponge and worked with tweezers and only a little bit color.
Last still was a treatment of the interior space with pigments, especially of the bottom.
The engine and the air filter have also been treated with pigments.
The heat shields and exhaust pipes of the engine were treated with rust-colored pigments.
Last but not least I put together more assemblies and put them temporarily into the interior:

- Batteries
- fighting compartment floor panel, battery cover
-Water can
-Transmission fluid container

Only a small step forward, but very time consuming.


Best regards

Frank
lappes
Visit this Community
Baden-Württemberg, Germany
Joined: July 29, 2012
KitMaker: 133 posts
Armorama: 133 posts
Posted: Sunday, March 31, 2013 - 09:50 PM UTC
Now I "airbrushed" the grenades in gold.
For this I used the color Mr. Metal Color color polished gold. I can not recommend this metal color highly enough ..... absolutely fine pigmented and a very realistic metallic luster.
Then I built up the petrol tanks.
Then came the story that caused me the most headaches - the "wedding" of chassis and the engine.
Forewarned by various construction reports the torsion bars are not glued.
After the torsion bars had been removed, I fixed the side walls of the engine compartment.
After that it was surprisingly easy to fix the engine. The flywheel hadn't to be shortened in order to be slid over the torsion bars.
The only problem - the connections do not fit to the respective openings of the side walls.
But I will correct it after the drying of the parts.
Here are the pictures:


Greetings from Reutlingen

Frank (Lappes)

lappes
Visit this Community
Baden-Württemberg, Germany
Joined: July 29, 2012
KitMaker: 133 posts
Armorama: 133 posts
Posted: Sunday, March 31, 2013 - 10:36 PM UTC
Today I painted the modules I have assembled the last days.
The modules are:
-Fans and coolers
-the petrol tanks
-the transmission fluid tank
-the batteries
-rear petrol tank
-the bottom plate on the batteries
-the hoses
First, the parts were airbrushed black.
Then painted in Hobby Color anti-rust color (except radiator and batteries)
After that partial airbrushed a mixture Hobby Color anti-rust and reddish brown in the ratio of 1 (rust) to 2 (reddish brown)
Then I applied with a sponge black and silver to imitate paint damage.
Especially the wings of the cooler fans and the and the edges of the petrol tanks.
At last fans and coolers were treated intensive with color pigments Europe dust from Mig .
I show the parts separately and then placed loosely, since the hoses have to be installed.


lappes
Visit this Community
Baden-Württemberg, Germany
Joined: July 29, 2012
KitMaker: 133 posts
Armorama: 133 posts
Posted: Sunday, March 31, 2013 - 11:07 PM UTC
The rear tank was glued and hoses fixed with superglue.
Then I tested the fit of the 3-piece engine cover.
The engine cover is made of three panels. I glue these panels together. So I must not fix the cover and remove it any time.
Unfortunately you can't see anything...but better than nothing.


roudeleiw
Visit this Community
Luxembourg
Joined: January 19, 2004
KitMaker: 2,406 posts
Armorama: 2,224 posts
Posted: Sunday, March 31, 2013 - 11:07 PM UTC
What a superb job!

Claude