Then all of the openings of the hull were covered with tape or paper. Also the fighting compartment of the turret. The ventilation grids were covered from inside.
Then it was time to paint.
First, a preshading with Hobbycolor brown black was applied.
When this had dried it followed a masking with mustard at the edges, covers and hatches and various metal surfaces.
In this way I masked the base color.
Then followed the painting in Hobbycolor yellow brown.
Then I airbrushed with dark yellow and then dark yellow mixed with a little bit of white. The second stepp was applied cloudy and irregular.
The next step was the camouflage.
Now I have created the camouflage with Hobbycolor chocolate brown and olive.
For this I took the airbrush with the small nozzle.
The chocolate brown is extremely dark, so I covered the whole tank easily with matte clear coat with a drop of beige.
Then I removed the mustard for a first job "chipping".
In addition, I dabbed various points with a sponge in brown black color to imitate paint damage.
Last but not least I have painted several places on the Zimmerits chipped in "rust paint".
The small tank is in scale 1/72
Hosted by Darren Baker
Diorama in 1/16 - building the 1st module
lappes
Baden-Württemberg, Germany
Joined: July 29, 2012
KitMaker: 133 posts
Armorama: 133 posts
Joined: July 29, 2012
KitMaker: 133 posts
Armorama: 133 posts
Posted: Friday, April 05, 2013 - 03:12 AM UTC
lappes
Baden-Württemberg, Germany
Joined: July 29, 2012
KitMaker: 133 posts
Armorama: 133 posts
Joined: July 29, 2012
KitMaker: 133 posts
Armorama: 133 posts
Posted: Friday, April 05, 2013 - 06:04 AM UTC
Some tools, handles, mine guards and the headlight were mounted.
Then there was a micro-painting. minor paint damages and scratches were painted.
This Method is called chipping. At first a little spot of the lightened primary color (example dark yellow lightened with white) and therein a smaller spot of brown black color. This gives a 3d effect. But use this only with smallest damages of the paint in this scale (1:16)
Then the grids were dented or damaged to imitate the rough use.
Recently I have overlaid the whole model with fine scratches that I scratched very careful with a knife.
Ensure always scratch the top coat only - never possible to plastic.
Then I have built from balsa wood, wire and sheet metal Ätzteilrahmens a wooden block, because the plastic part in the kit did not like.
Then a large building phase had been completed.
The decals were fixed.
At first glossy clearcoat, then fixing of the decals. Treating of the decals with softener to adapt the decals to the rough ground.
After a short time the decals were spotted with a soft brush into the surface structure.
After drying, the decals were painted with gloss clear lacquer.
On the following day, a washing was done with thinned oil paint burnt umber.
For this, the wheels were removed and treated separately.
After Washing the hull behind the wheels had been heavily treated with pigments.
This was done as follows:
First, the area was smeared with Pigment fixer.
Then pigments were dabbed with a hard brush.
The process was repeated several times to get a heavy pollution.
Thereafter the wheels were locked.
The hubs and wheels got a washing with thinned oil paint burnt umber.
In the wet oil paint pigments were spotted.
Then came a drybrushing with white oil paint. This very very discretely!!!!!
The exhaust pipes were painted with oil paint English Red light and spotted with rust-colored pigments (or chalk in orange color)
The exhaust ports were treated with carbon black pigments.
Then the whole Kit was treated with pigments Europe Dust from Mig.
These are photos on the terrace. The lighting conditions were not optimal, because of the color of the awning.
Then there was a micro-painting. minor paint damages and scratches were painted.
This Method is called chipping. At first a little spot of the lightened primary color (example dark yellow lightened with white) and therein a smaller spot of brown black color. This gives a 3d effect. But use this only with smallest damages of the paint in this scale (1:16)
Then the grids were dented or damaged to imitate the rough use.
Recently I have overlaid the whole model with fine scratches that I scratched very careful with a knife.
Ensure always scratch the top coat only - never possible to plastic.
Then I have built from balsa wood, wire and sheet metal Ätzteilrahmens a wooden block, because the plastic part in the kit did not like.
Then a large building phase had been completed.
The decals were fixed.
At first glossy clearcoat, then fixing of the decals. Treating of the decals with softener to adapt the decals to the rough ground.
After a short time the decals were spotted with a soft brush into the surface structure.
After drying, the decals were painted with gloss clear lacquer.
On the following day, a washing was done with thinned oil paint burnt umber.
For this, the wheels were removed and treated separately.
After Washing the hull behind the wheels had been heavily treated with pigments.
This was done as follows:
First, the area was smeared with Pigment fixer.
Then pigments were dabbed with a hard brush.
The process was repeated several times to get a heavy pollution.
Thereafter the wheels were locked.
The hubs and wheels got a washing with thinned oil paint burnt umber.
In the wet oil paint pigments were spotted.
Then came a drybrushing with white oil paint. This very very discretely!!!!!
The exhaust pipes were painted with oil paint English Red light and spotted with rust-colored pigments (or chalk in orange color)
The exhaust ports were treated with carbon black pigments.
Then the whole Kit was treated with pigments Europe Dust from Mig.
These are photos on the terrace. The lighting conditions were not optimal, because of the color of the awning.
lappes
Baden-Württemberg, Germany
Joined: July 29, 2012
KitMaker: 133 posts
Armorama: 133 posts
Joined: July 29, 2012
KitMaker: 133 posts
Armorama: 133 posts
Posted: Friday, April 05, 2013 - 06:27 AM UTC
Meanwhile, the model is painted with mat clear coat and the tracks were treated.
For this purpose the tracks were airbrushed with brown dust by Hobby Color. Then treated with pigments Europe Dust from Mig.
This as follows:
- Spraying of small sections of the tracks with Pigmentfixer.
-Dusting of the wet places with pigments
-distribute of the pigments with a brush.
-After coating with clear coat, which was mixed with a drop of beige.
The raised areas of the track drybrushed with Mr. Metal Color iron and polished with a cloth
The contact surfaces of the wheels on the tracks and the wheels painted with Mr. Metal Color iron and polished.
lappes
Baden-Württemberg, Germany
Joined: July 29, 2012
KitMaker: 133 posts
Armorama: 133 posts
Joined: July 29, 2012
KitMaker: 133 posts
Armorama: 133 posts
Posted: Friday, April 05, 2013 - 08:21 AM UTC
Now some equipment was fixed to the vehicle.
I think that affects optically very strongly.
The wooden handles of tools were painted in brown wood and dusted with pigments Mig Europe Dust. The metal parts in Mr. Metal Color painted, polished and dusted.
The brackets were additionally provided with scratches.
The tow ropes were painted in Mr. Metal Color black iron, iron, Hobby Color gray and Revell light gray.
The ropes were fixed with superglue on the vehicle.
lappes
Baden-Württemberg, Germany
Joined: July 29, 2012
KitMaker: 133 posts
Armorama: 133 posts
Joined: July 29, 2012
KitMaker: 133 posts
Armorama: 133 posts
Posted: Friday, April 05, 2013 - 08:45 AM UTC
Now I have glued the other little things:
-Jack
-shackles
-Mounting of the gun barrel cleaning linkage and the tow ropes
-C-hooks
-Rear reflector or taillight
-Column lights
The jack was painted in dark yellow with a chipping in a brighter yellow and dark brown.
I also have "oiled" the jack, different wheels and the fuel filler cap on the rear cover with a mixture of gloss black and gloss clear paint
For this I took a fine brush and painted thin webs of running oil from the hubs of the wheels and the fuel filler cap.
lappes
Baden-Württemberg, Germany
Joined: July 29, 2012
KitMaker: 133 posts
Armorama: 133 posts
Joined: July 29, 2012
KitMaker: 133 posts
Armorama: 133 posts
Posted: Friday, April 05, 2013 - 10:25 PM UTC
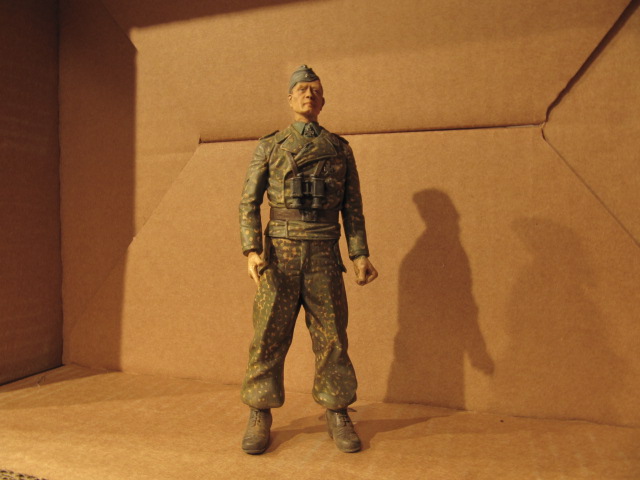
In recent days, I continued to build and paint the figures.
The faces were painted with oil paints.
The camouflage with acrylics.
First in Hobby Color khaki gray, then larger camouflage stripes in Revell skin color , Hobby Color chocolate brown, Hobbycolor olive green.
Then on each stripe I dabbed little spots of the other color,
i.e.: on skin color olive and brown spots etc.
For test two figures had received a filter of thinned oil paint green.
Here the pictures:
Now all camouflage uniforms had received a washing in oil colors green, the grey uniforms of dark grey oil paints.
Many details were painted ... hand grenades, belts and buckles etc.
By washing the figures shone quite strong, After dryingthe figures were airbrushed in clear coat mat.
Furthermore, I have painted the rear fenders of the tank, first anti-rust red, then dark yellow, then partial brightened dark yellow. Then a chipping with light yellow and brown black.
Washing in thinned oil paint burnt umber.
Finally, a treatment with pigments from Mig Europe Dust.
Then the fenders were fixed to the rear.
lappes
Baden-Württemberg, Germany
Joined: July 29, 2012
KitMaker: 133 posts
Armorama: 133 posts
Joined: July 29, 2012
KitMaker: 133 posts
Armorama: 133 posts
Posted: Friday, April 05, 2013 - 10:51 PM UTC
Then some details were added and detail paintings were done.
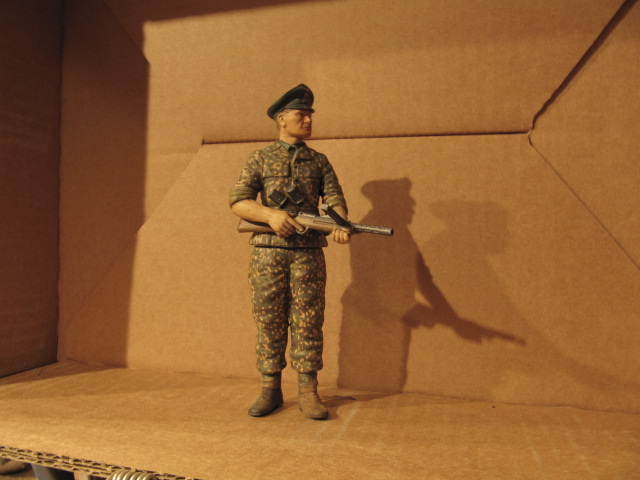
The SS soldier with helmet still got his eating utensils, a blanket, the MP 40
The painting was completed, for example: the lenses painted in black and silver and painted with glossy clearcoat.
The thirsty tank driver got his microphone, headphones and wiring. The copper cable was simply painted with matt varnish to take away the shine.
The bottle was painted in green and painted with gloss clear coat.
The "boss" got his MP and the missing arm.
The figures were given a dry brushing with white oil paint.
All figures received a treating with pigments Europe Dust.
The shoulder straps of the guns are still attached.
Here are the pictures:
The SS soldier with helmet still got his eating utensils, a blanket, the MP 40
The painting was completed, for example: the lenses painted in black and silver and painted with glossy clearcoat.
The thirsty tank driver got his microphone, headphones and wiring. The copper cable was simply painted with matt varnish to take away the shine.
The bottle was painted in green and painted with gloss clear coat.
The "boss" got his MP and the missing arm.
The figures were given a dry brushing with white oil paint.
All figures received a treating with pigments Europe Dust.
The shoulder straps of the guns are still attached.
Here are the pictures:
lappes
Baden-Württemberg, Germany
Joined: July 29, 2012
KitMaker: 133 posts
Armorama: 133 posts
Joined: July 29, 2012
KitMaker: 133 posts
Armorama: 133 posts
Posted: Saturday, April 06, 2013 - 07:23 AM UTC
The figures were not completely finished yet, but I turned to the last section now:
the construction of the diorama part 2.
At first I started with the destroyed building.
Analogous to the first module I build the basic structure of grey cardboard and balsa wood.
In addition a sheet of grey cardboard (2.1 mm thick) was cutted a piece of 30x50 cm.
The windows and basement windows were drawn and cut out.
This was reinforced with a balsa square wood (15x15 mm). Balsa can be worked fantastic with a sharp knife.
Since it is a corner of a house, the other Wall was built in the same way.
In the basement there is a breakthrough to enter the dig.
the construction of the diorama part 2.
At first I started with the destroyed building.
Analogous to the first module I build the basic structure of grey cardboard and balsa wood.
In addition a sheet of grey cardboard (2.1 mm thick) was cutted a piece of 30x50 cm.
The windows and basement windows were drawn and cut out.
This was reinforced with a balsa square wood (15x15 mm). Balsa can be worked fantastic with a sharp knife.
Since it is a corner of a house, the other Wall was built in the same way.
In the basement there is a breakthrough to enter the dig.