Yeah! The garden stuff is done now that the first frost has hit, so I can get back to the Panzer II !

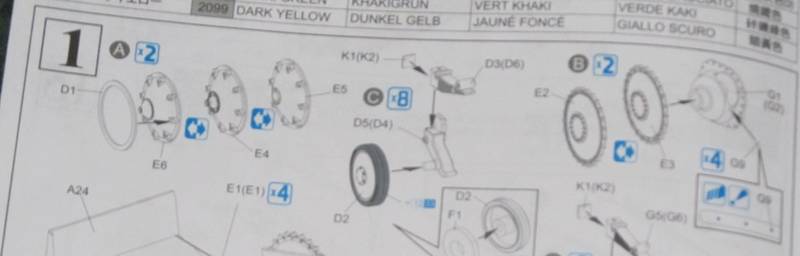
There are these little tiny bolt heads that go on the drive shaft cover. Part J9 is supposed to be shaved off the flat part of the sprue and then glued on to this flat spot on the housing, four per side. It would have been nice to have a really thin saw blade, but what I have is an x-acto knife. I made do and managed. Then I had to figure out how to get these tiny parts glued in place. What finally worked for me was wrapping a piece of sticky tape around a modelling spatula. With a tiny dab of glue on the spot on the housing, I then picked up the bolt head by touching the tape to the top of it. I was then able to set the part down on the glue, hold it there for about ten seconds, and then pull the sticky-tape-tool away when the glue had more "hold" than the tape. Now that I think about it, I'm pretty sure this is officially the tiniest piece for a model that I've ever worked with!

Here I'm picking up the bolt head with the sticky tape. This is also what it looks like when I let my thumb get in the way of the flash. I'm glad Dragon included a bunch extra of those bolt heads. I only had two remaining on the sprue when I was done. At the time I was ready to swear they evaporate into thin air if you so much as blink. Either that or they're like those statues from that Dr.Who episode where they move when you're not looking at them!

One side of bolt heads finished! Most of them came out pretty good. I'm hoping a layer of primer will take care of the little flaws on some of the others. But then again, they're so small, I'm not sure any one would ever notice.

The next major step in the instructions is working on the rear of the vehicle. I'm really pleased with the quality of the details on all the little parts. The two right-hand holes and the small gap next to the tow ring need to be filled in yet.
The muffler gave me a little problem though. I wasn't sure what I'd done wrong at first, but the pin on the exhaust pipe would not match up with the hole in the side of the muffler. I ended up shaving the pin off. With the muffler in place however, the hole that pin on the pipe was supposed to go in showed clearly. Checking the walk-around video I have, it really looked like the muffler was sitting too high. In the end, I shaved the pins off the backside of the muffler, filled in the holes, and positioned the muffler in what looked to be (from the video) the right position. The hole in the muffler for the pin from the exhaust pipe then matched up just right... or rather it would have if I hadn't already shaved it off!

Here I have the parts just sitting in position checking the placement and fitting. They're not glued down yet, and only the outer shell of the smoke candle box is in place (upper left).
For the first time I got out the little set of metal dowels that I bought from a vendor at a model contest last year. It really made bending the photo etch heat shield a lot easier. I still can't figure out a good method for getting the very ends to curve though. At least I managed to get it to sit flat. At first I tried to just bend it around the muffler part itself. I'm glad I quickly gave that up. I couldn't bend and hold it all together at the same time. Using the metal dowels and the length of my thumb to get an even pressure, I was able to bend it a little at a time. I just kept at it until I had the bend I wanted, frequently holding the piece in position on the muffler to figure where and how much more to keep bending it. I've heard and read the trick is to only bend in one direction and not end up going too far and having to unbend it. Apparently unbending it can cause the brass to crack and break. Fortunately I did the bending in small enough increments I got it were I wanted it and stopped.
The little brass bracket for the rear light was easy as pie. Of course, I used a bending table for it. I could have done it with tweezers and modelling pliers, but the little bending table with its clamp and folding blade is totally worth it. It makes the job ~so~ much easier. The only trick was getting the alignment just right before clamping it down, and making sure the line on the photo etch piece was on the inside of the bend.

Here the major parts are in place. The piece for the smoke candles and the box lid will follow, along with the brass shield and the rear light. There's a photo-etch chain for the tow pin, but I've already marked it to come back to later. It's such a tiny piece, I just know it'll get knocked off and lost if I put it on now.