_GOTOBOTTOM
Armor/AFV: British Armor
Discuss all types of British Armor of all eras.
Hosted by Darren Baker
Tasca Sherman Hybrid Ic Firefly
clovis899
#155
Visit this Community
California, United States
Joined: May 05, 2002
KitMaker: 774 posts
Armorama: 605 posts
Posted: Wednesday, October 10, 2012 - 06:31 PM UTC
This is a follow-up to Jim's recent "Cracking the Box" episode featuring the new Tasca Sherman Firefly hybrid hull Ic, reference number 35-027. Rather than do a traditional build review I wanted to change things up a bit; I hope you will indulge me in this journey. When I am done with this I will package it up and submit it as a build feature if James is so inclined at that point.

First, the disclaimer; I have been building for many years but am not really what you would call a Sherman expert, maybe more of an aficionado but that's about it. Well, lets see where this takes us.


Okay, the obligatory box top photo. If you want to see the contents before being disturbed check out Jim's video, besides I never took a picture of the contents!


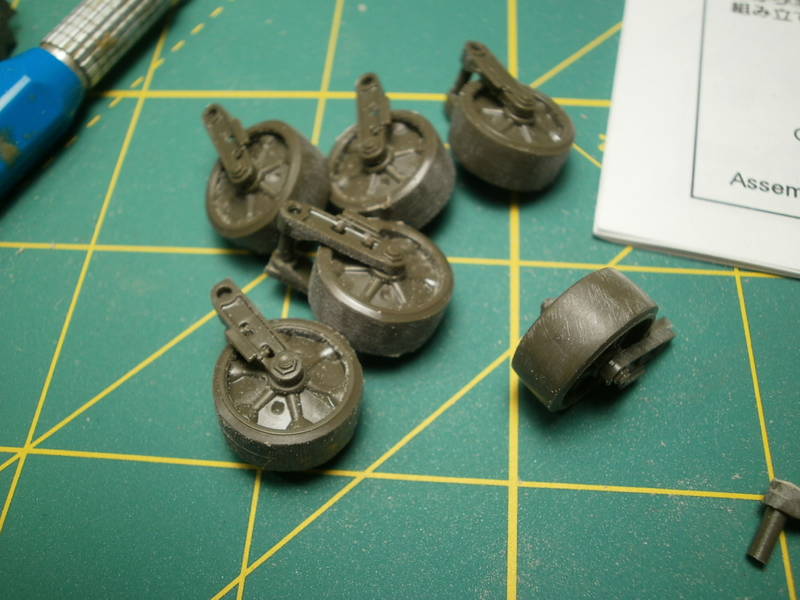
Here is a bit of the bogie assembly before it has been actually assembled. The kit provides three styles of road wheel (complete sets of each!) pressed steel solid spoke(the option I took), open 5 spoke, and pressed steel dish. Along with this you get three choices of drive sprocket; two styles of fancy smooth and plain (sounds like an order at a bad roadside diner!)


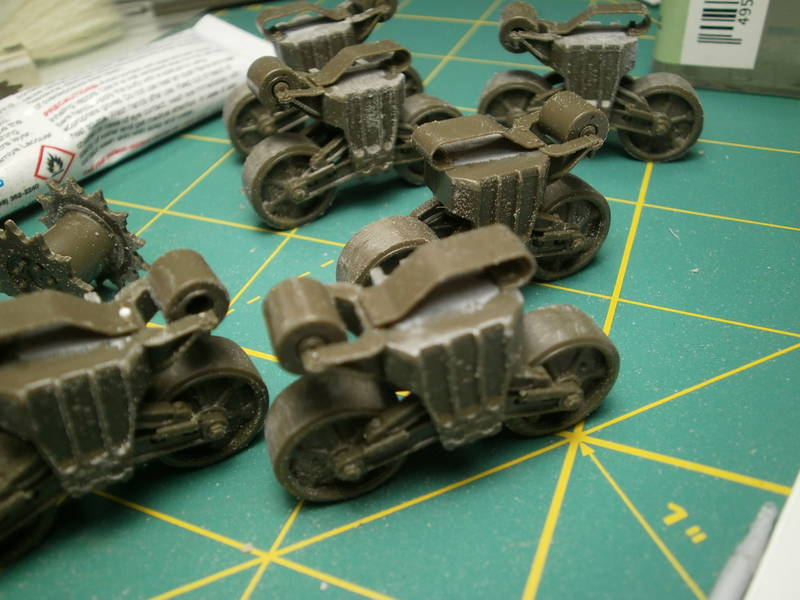
Sorry for the sanding dust, it really shows up in the photos. Here are the bogie units after assembly. If you have never built Tasca Sherman bogies they can be a bit tricky with the first one or two. To achieve the correct height they have a couple of options available; first, and easiest is done by inserting a spacer up inside the bogie truck which holds the volute spring at the proper position, the other option is cutting three pieces of a foam rubber material and pushing it into the area where the spacer would go. The foam rubber acts as a 'spring' which allows the bogie to truly articulate, not just pivot the road wheels up and down like other manufacturers. I opted for a combo, I thought the spacer left the bogie sitting a bit short, so after one I tried the foam rubber option. Then I had the bright idea of a sanded down spacer and one foam rubber piece. Doing that gave me the height I was looking for as well as a little bit of 'bounce' from the foam rubber. We shall see how it all works out!

Rick
clovis899
#155
Visit this Community
California, United States
Joined: May 05, 2002
KitMaker: 774 posts
Armorama: 605 posts
Posted: Thursday, October 11, 2012 - 05:53 PM UTC
Before I move on from the bogie assemblies I wanted to mention a few things, first, the fit on these is superb. I gave a quick hit with some Tamiya filler but really mostly only because sometimes I go a bit overboard, most of the spots didn't really need a thing. A couple of things that they do need, the four holes drilled in the front end of the bogie assembly.

The other thing is that the track skids should have three bolts on the inner front, Tasca only molds one in place. I added the other outer bolt assuming that the middle bolt will be pretty much hidden.


One other minor issue, this is a real nitpick so be forewarned. The inner face of each of the road wheels are missing the pop rivets on the inside of the wheel rim. Tasca provides the rivets molded on the sprue, they aren't marked but that is what they are for. I left them off, some of yo may wish to add this extra level of detail. I wish they were just molded on but maybe it is a question of mold cutting technology not quite being able to handle this level of detail?

Be aware that you do have a few moving parts inside the bogie assemblies so it may take the construction of one or two before you really get the hang of it. Or, you could be a much better modeler than I am and have no trouble whatsoever, if this is you I tip my hat to you.

Finished of the tranny cover. The kit provides the narrow, or pointy, version of the one piece cast cover. Being a late model Sherman it includes the crew steps and looks really nice when done. No issues at all with the construction, it is really as easy as it looks like it would be.


Well, that's about it tonight. I will try and get up the bottom hull tomorrow night, good Lord willing and the creek don't rise!

Rick
AlanL
Visit this Community
England - East Anglia, United Kingdom
Joined: August 12, 2005
KitMaker: 14,499 posts
Armorama: 11,675 posts
Posted: Thursday, October 11, 2012 - 09:46 PM UTC
Hi Rick,

Off to a good start, look forward to the build.

Cheers

Al
barkingdigger
Staff MemberAssociate Editor
ARMORAMA
#013
Visit this Community
England - East Anglia, United Kingdom
Joined: June 20, 2008
KitMaker: 3,981 posts
Armorama: 3,403 posts
Posted: Friday, October 12, 2012 - 03:27 AM UTC
Hi Rick,

Pretty good start - I love the way Tasca kits fall together! Just wish I could grow all the extra fingers needed to assemble those bogies...

You're right about those rivets - they'd need some funky slide-moulding to avoid looking like ribs instead of descrete rivets. I've left them off builds in the past (good thing tanks accumulate mud!) but I'm waiting for Archer to take the hint and give us some resin decal strips to do the job.

Does the transmission housing have casting marks? If not, Archer does them...

Tom
clovis899
#155
Visit this Community
California, United States
Joined: May 05, 2002
KitMaker: 774 posts
Armorama: 605 posts
Posted: Friday, October 12, 2012 - 06:30 PM UTC
Tom,

No casting numbers on the transmission cover, I have an Archer set around here somewhere that I can use. (if I can find them!)

Got the flat panels of the lower hull together. Fits like a glove, beautifully engineered.
clovis899
#155
Visit this Community
California, United States
Joined: May 05, 2002
KitMaker: 774 posts
Armorama: 605 posts
Posted: Sunday, October 14, 2012 - 04:04 PM UTC
Woe, if I thought that the lower hull fit well it was nothing compared to how the upper and lower hulls mated together. It is about as close to perfect as you could get, I am very impressed. This is my first full build of a Tasca Sherman kit and if everything continues to fit this well to the end I may not ever build another manufacturers M4 ever again.

When I say no issues here I really mean no issues, I have got through the first third or so of the build and here is my progress thus far.


clovis899
#155
Visit this Community
California, United States
Joined: May 05, 2002
KitMaker: 774 posts
Armorama: 605 posts
Posted: Tuesday, October 30, 2012 - 06:30 PM UTC
Been awhile since my last post. Thought we were moving so I spent some time packing up the old hobby room. Then we decided the house was not really what we were looking for so we backed out of the deal. Then because the hobby room was pretty much cleaned out decided to put a new floor in, paint the walls, update the windows, and build a 7ft bookshelf just for fun. Now that's all done and I can slowly start to unpack all of the fun stuff.
As far as the Firefly, managed to sneak in an hour or so of building so I do have some progress to report.

Here was how things stood when the build slowed down. Everything still proceeding smoothly.

Added most of the bits for the front lights and horn along with the brush guards. Really nice detail, never have seen a kit that included the light plug on the side of the brush guard. Decided to stick with the plastic for a complete out of the box build rather than aftermarket PE brush guards.
Will try to get the upper rear hull details finished off and posted tomorrow night.

Rick
clovis899
#155
Visit this Community
California, United States
Joined: May 05, 2002
KitMaker: 774 posts
Armorama: 605 posts
Posted: Wednesday, October 31, 2012 - 05:02 PM UTC
Okay, here is the back end as well as a couple of questions for the rest of you. 
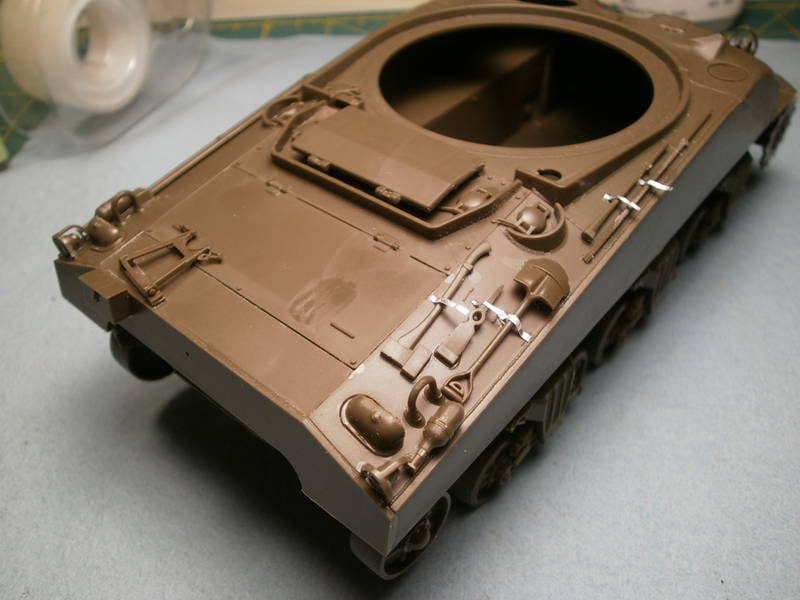
One thing to be careful about, the three panels for the rear deck need to be added in a back to front order. If you don't the exhausts will not fit through in the way they were intended.
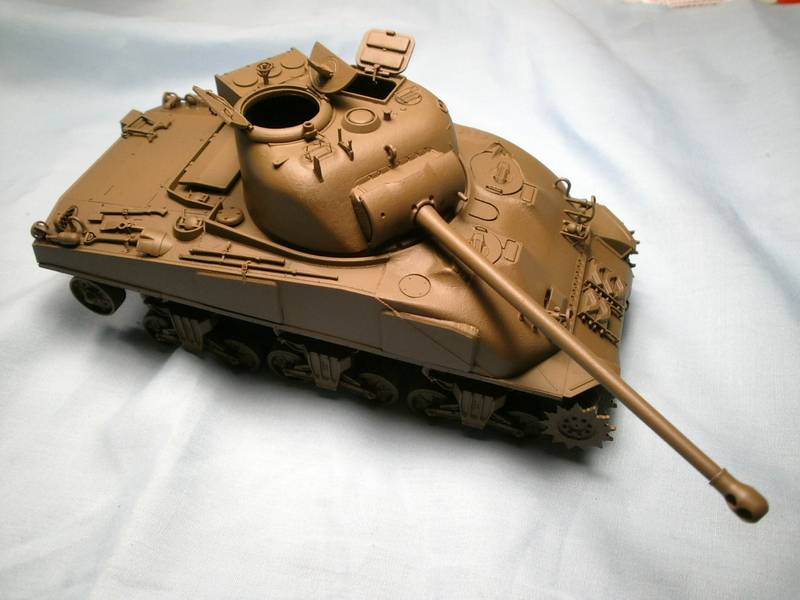
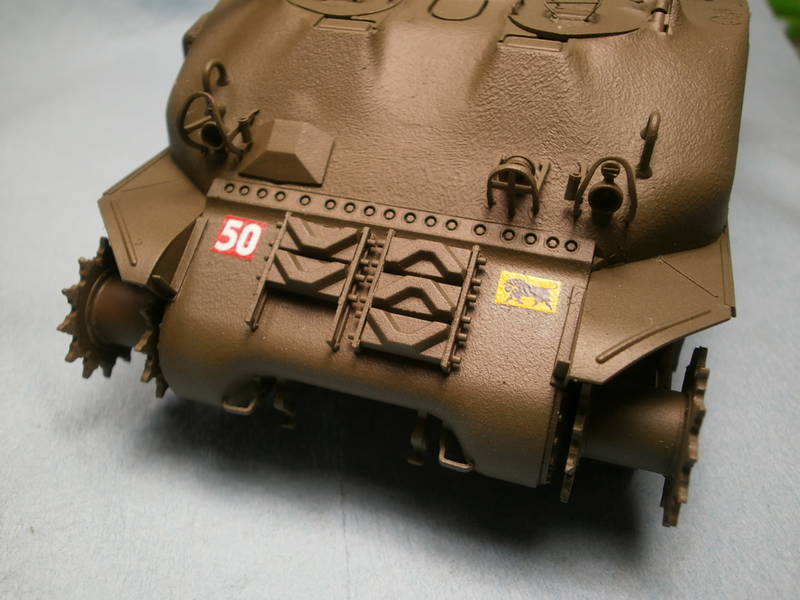
You have got to love the level of detail that Tasca puts into the kit, different configurations for the rear lights, something most manufacturers either miss or just gloss over.
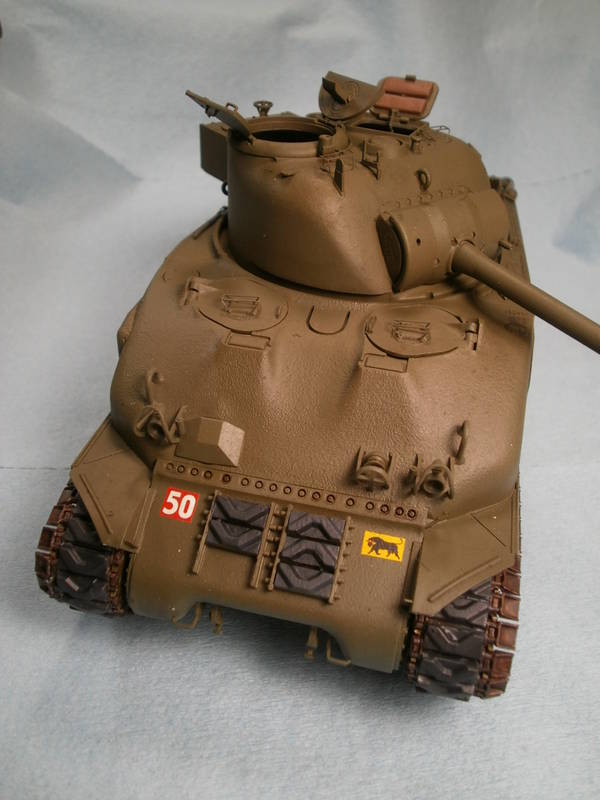
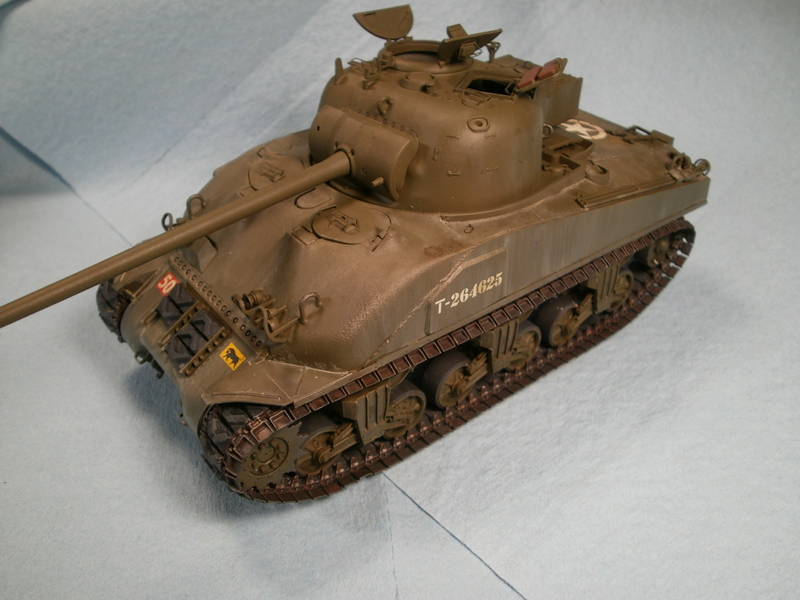
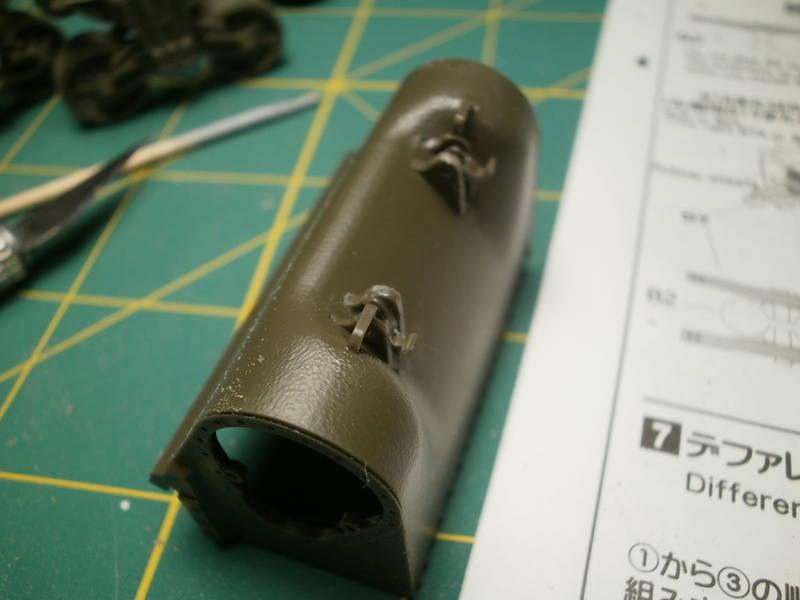
Check out the armored cover for the bow MG position. Is that in the correct location? It almost seems a bit undersized as it doesn't quite cover like I think it should. Opinions?
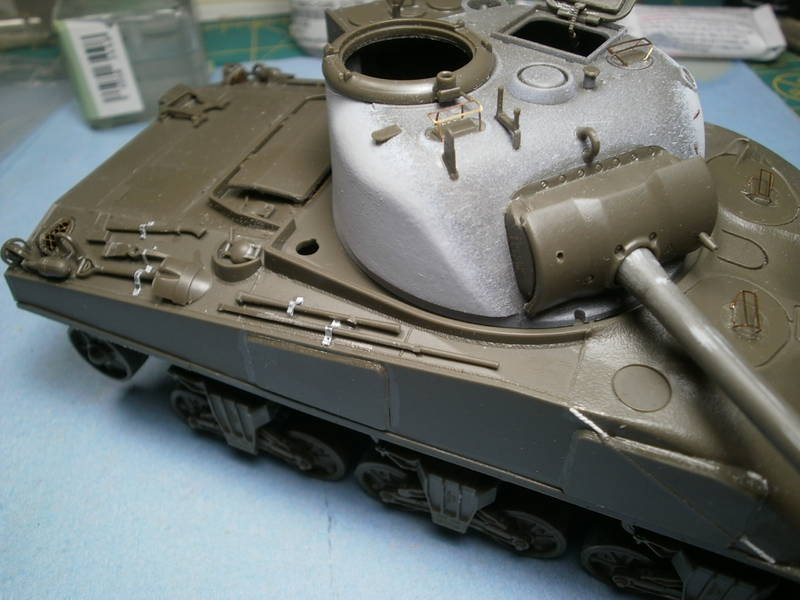
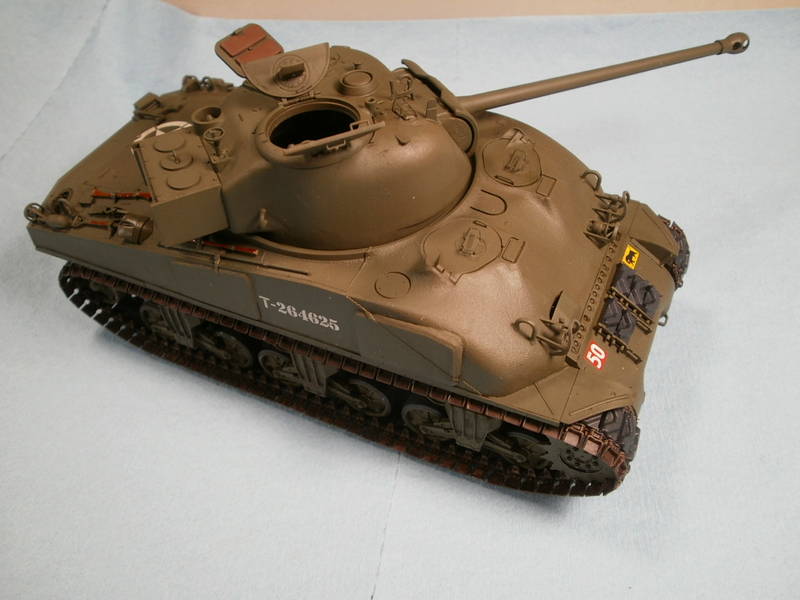
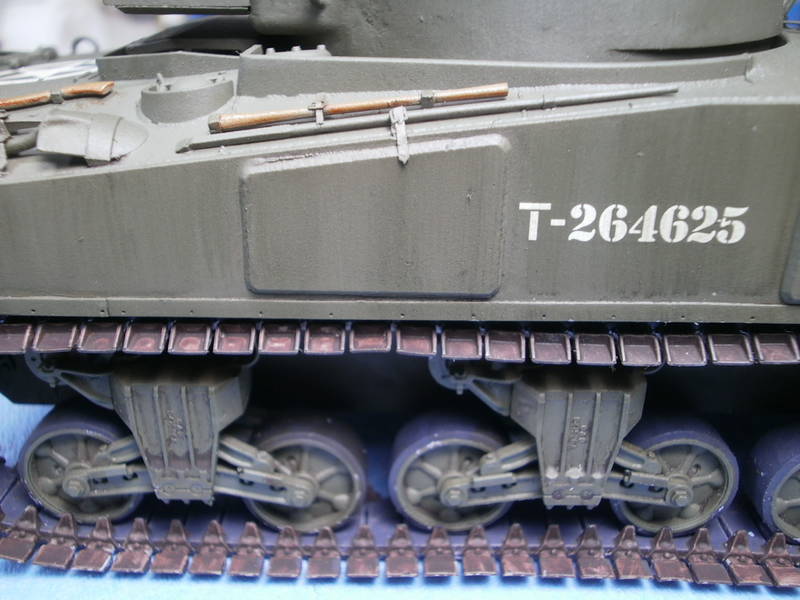
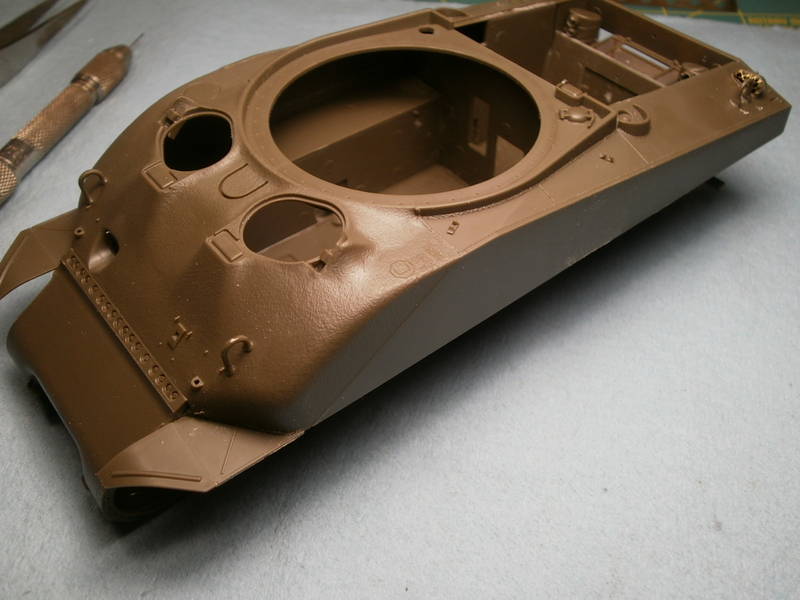
Next question; is the weld seam on the hull side a little on the light side? It appears to be a bit to understated, what does anyone else think?

That's all for now!
Rick
ericadeane
Visit this Community
Michigan, United States
Joined: October 28, 2002
KitMaker: 4,021 posts
Armorama: 3,947 posts
Posted: Thursday, November 01, 2012 - 03:37 AM UTC
I would agree -- I think the weld seam could use some beefing up. But there are also some that are rather sublime.

Thick weld http://www.toadmanstankpictures.com/m4_07.jpg

More discreet weldhttp://www.toadmanstankpictures.com/m4e9composite_47.jpg

http://www.toadmanstankpictures.com/m4e9composite_46.jpg
clovis899
#155
Visit this Community
California, United States
Joined: May 05, 2002
KitMaker: 774 posts
Armorama: 605 posts
Posted: Thursday, November 01, 2012 - 04:23 PM UTC
Thanks Roy; I will add a bit to the weld seam in order to dress it up a bit.

I've added the pioneer tools and the beginnings of the tie down straps as you can see here.
One small problem, after packing and unpacking I seem to have lost the ventilator cover that sits near the turret race. If anyone has a spare...
I followed the errata sheet that Tasca provides telling you to turn the fire extinguisher bottles around from what they originally instructed in step 18. Be aware that the locating holes/pins will no longer correspond to the correct location, wing it with the old eyeball.


Rick
clovis899
#155
Visit this Community
California, United States
Joined: May 05, 2002
KitMaker: 774 posts
Armorama: 605 posts
Posted: Monday, November 19, 2012 - 05:12 PM UTC
Been to long since my last post! Hopefully I can gain a little steam over the Thanksgiving weekend and close this one out.

Here are the parts for the main gun assembly, again nothing but the very best. I added a bit of Tamiya putty to the main gun tube just to satisfy some strange need to add putty somewhere to the build!


No sooner had I finished the gun assembly when I started on the hatches for the commander's cupola, and lo and behold look I found actual knockout pin marks! Now I really do need to add some putty if I want these open (yes). A bit blurry, but it does appear that the folks at Tasca are human after all
Joel_W
Staff MemberAssociate Editor
AUTOMODELER
Visit this Community
New York, United States
Joined: December 04, 2010
KitMaker: 11,666 posts
Armorama: 1,143 posts
Posted: Tuesday, November 20, 2012 - 05:21 AM UTC
Rich, I'm really enjoying your 1st tasca build, as I purchased the Tascas M32B2 for the upcoming Sherman Campaign. It's my 1st Tasca kit too, and I'm not sure I'm up to it as yet.

Joel
clovis899
#155
Visit this Community
California, United States
Joined: May 05, 2002
KitMaker: 774 posts
Armorama: 605 posts
Posted: Tuesday, November 20, 2012 - 07:28 AM UTC
Joel,
I wouldn't wait; Tasca kits are so well done and the fit is so nice that the construction is easier than some others on the market. The M32 certainly has a lot more parts, small ones at that, but I would guess that with a bit of patience you won't have any problem at all. And of course, the rest of us would love to watch your progress here in the forum!

Cheers,
Rick
clovis899
#155
Visit this Community
California, United States
Joined: May 05, 2002
KitMaker: 774 posts
Armorama: 605 posts
Posted: Wednesday, November 21, 2012 - 07:49 PM UTC
Had some time of my own here in the last day or two so I had a nice opportunity to finish up the Firefly.

Here is the main gun assembly installed in the mantlet with the cover added. Very nice co-ax MG with perfect fit.

Here is another shot of the main gun in its assembly, it elevates easily thanks to the silicon bushing that Tasca provides.


Here is the commanders hatch/cupola assembly. The hatches will not be permanently attached until after the commander figure is installed. (any suggestion?)

Here is the inside of the hatches; still need to clean up the attachment point on the handle. I find it easier to install the part and clean-up attachment points later in the build.


And now the inside of the gunner's hatch, again very well detailed.I don't believe any other manufacturer provides quite this level of consistent detail that is evident in the Firefly.


Used Mr Surfacer 500 for the turret sides, I have always wanted to get a good rendition of the casting imperfections often seen in Sherman turrets. Did this with an initial shot of Tamiya putty rolled out and smoothed with a toothpick. My question to everyone else is do you think it is effective or should it be toned down a bit?


With that and a few other bits and pieces I looked up and found that I was pretty much done. Can't remember a more trouble free build; at least to this point. Everything went together just as advertised. Now on to the last little bits, a couple of hatch handles, find a new ventilator cover, add the buckles for the pioneer tools and I can start painting.


panzerman1
Visit this Community
Maryland, United States
Joined: September 30, 2010
KitMaker: 430 posts
Armorama: 291 posts
Posted: Wednesday, November 28, 2012 - 04:47 AM UTC
Looking Good. I like the texturizing of the turret and the hull weld seam. Gives it that extra detailing. My friend is building this very same tank, It'll be neat to compare the two when done. Good luck. Bill
clovis899
#155
Visit this Community
California, United States
Joined: May 05, 2002
KitMaker: 774 posts
Armorama: 605 posts
Posted: Wednesday, November 28, 2012 - 06:15 PM UTC
Bill,
I'm sure that your friend will find this kit to be as nice as I have, truly one of the best, if not the best, kit that I have ever built.

Slowed down a bit as I had a couple of reviews for the site that I just finished up. Even with that I am calling the basic build finished. Next up is the painting and weathering. I want to add some hessian tape netting as often seen on British vehicles in particular. I also want to add a couple of figures, may use the kit commander figure unless something else pops up here quickly.

Here is what she looks like now with everything (except tracks) in place.


And one more view


Now on to the paint rack!
Geegad
Visit this Community
United Kingdom
Joined: June 02, 2011
KitMaker: 1 posts
Armorama: 1 posts
Posted: Thursday, November 29, 2012 - 02:22 AM UTC
never built a tasca before nice clean build look forward to seein more
clovis899
#155
Visit this Community
California, United States
Joined: May 05, 2002
KitMaker: 774 posts
Armorama: 605 posts
Posted: Saturday, December 01, 2012 - 08:05 AM UTC
Here we are all primered up and ready to go. Next step I'm going to paint a base coat of SCC 15 from a 50-50 ratio of Vallejo 888 Olive Grey, 924 Russian Uniform, and 524 thinner (man, I love math!). Once that has a couple of hours to dry I will hit it with a Vallejo satin varnish and some Future for decals.

Here is what we look like in the primer coat (Vallejo US Olive Drab surface primer)

And the other side of the Firefly

Hope to check in later tonight with a bit more done.

Cheers,
Rick

panzerman1
Visit this Community
Maryland, United States
Joined: September 30, 2010
KitMaker: 430 posts
Armorama: 291 posts
Posted: Saturday, December 01, 2012 - 03:41 PM UTC
Rick, She's looking good with the primer coat on. My friend, who's building the same Firefly, has encountered a couple of issues during the painting phase. 1st, the super soft tracks don't seem to take paint very well....several attempts and the paint keeps flaking off. He also had trouble with the counter shading barrel decal...kinda thick and didn't want to wrap around easily. Just some bumps in the road to be aware of. I'm looking forward to your next installment.....she's gonna be a beauty. Bill
clovis899
#155
Visit this Community
California, United States
Joined: May 05, 2002
KitMaker: 774 posts
Armorama: 605 posts
Posted: Tuesday, December 04, 2012 - 03:51 PM UTC
Bill,
I should have it a little easier; no counter-shaded barrel for the 11th Armoured Div Firefly. Got the base coat on, the pictures give it more of a brown look than it really has; probably my high quality $75.00 digital camera at work! I will try and get some better shots before it is all done.


Ready for decals now, should have them on and up in an hour or so!
clovis899
#155
Visit this Community
California, United States
Joined: May 05, 2002
KitMaker: 774 posts
Armorama: 605 posts
Posted: Wednesday, December 05, 2012 - 03:35 PM UTC
Decals added, 29th Armoured Brigade, 11th Armoured Division, NW Europe. Decals all went on as easy as could be, absolutely no problems.


And another view.


And the front end

clovis899
#155
Visit this Community
California, United States
Joined: May 05, 2002
KitMaker: 774 posts
Armorama: 605 posts
Posted: Friday, December 07, 2012 - 04:39 PM UTC
Now comes my favorite part, the weathering and the detail painting where the model really starts to 'pop'. Here is the first wash, AK Dark Brown for green vehicles, not to heavy just enough to start to accent the highlights. Started some of the detail painting, tools, straps, rubber track blocks, etc.

I also installed the tracks and started the weathering on them as well. Was not as impressed with the tracks as I am with the rest of the kit, the Tasca tracks don't hold paint well. I primed the tracks with Mr Surfacer 1000 before paining with a combination of Tamiya paint for the metal portion and Vallejo for the rubber blocks. Didn't seem to matter as I lost paint whenever I needed to flex the tracks to get them installed. I would replace them with something else if you are planning on building this kit. This is the only place where Tasca has failed to impress.


clovis899
#155
Visit this Community
California, United States
Joined: May 05, 2002
KitMaker: 774 posts
Armorama: 605 posts
Posted: Saturday, December 08, 2012 - 06:15 AM UTC
Started the streaking process, I wanted to begin with a darker layer of color before I start with any dust or earth materials. The two photos are using the AK Interactive Dark Streaking Grime. The first photo is with the grime applied and the second is after I have backed most of it out with some clean turpenoid and a flat brush.


And where we are now
clovis899
#155
Visit this Community
California, United States
Joined: May 05, 2002
KitMaker: 774 posts
Armorama: 605 posts
Posted: Monday, December 10, 2012 - 04:15 PM UTC
Now were really closing in on the finish line. Some light streaking and dust, metalizing the tools and the tracks a bit and we're ready to move on to the end. Below are some shots of where we are now, next up some Hessian/scrim netting to give it a bit more life.

Thanks for looking!
Rick


panzerconor
Visit this Community
Massachusetts, United States
Joined: February 08, 2012
KitMaker: 1,271 posts
Armorama: 1,253 posts
Posted: Monday, December 10, 2012 - 04:52 PM UTC
Well, sir, you've convinced me that I need to build a Firefly
 _GOTOTOP