

No problem, the T-55 is one of my favorite tanks.
How do you ensure that there's enough PE for the attachment? I've done more than a handful of kits with PE, but always wondered how to get enough surface on fenders for the glue to get a good strong grip. Looking forward to more updates.
-Seth
Яusso-Soviэt Forum: Cold War Soviet Armor
For discussions related to cold war era Russo-Soviet armor.
For discussions related to cold war era Russo-Soviet armor.
Hosted by Jacques Duquette
Soviet T-55a - miniarm conversion

Tank_builder

Joined: January 06, 2012
KitMaker: 394 posts
Armorama: 351 posts

Posted: Thursday, February 12, 2015 - 06:22 PM UTC

rfbaer
Joined: June 12, 2007
KitMaker: 1,866 posts
Armorama: 1,696 posts
Posted: Thursday, February 12, 2015 - 10:47 PM UTC
Keep posting, please. Those of us that are not familiar with the T55 may be watching with an eye towards duplicating your efforts. I know I am.....
Re "lack of interest": I get very few responses to builds I blog, just something I take as normal here. The responses I DO get tend to be very useful however, something I prefer over a quick "looks great" and nothing else.
Re "lack of interest": I get very few responses to builds I blog, just something I take as normal here. The responses I DO get tend to be very useful however, something I prefer over a quick "looks great" and nothing else.

kowalski

Joined: July 27, 2009
KitMaker: 59 posts
Armorama: 58 posts

Posted: Friday, February 13, 2015 - 12:09 AM UTC
Hi Mark. As Russel says I try not to be one of the "looks great" and "good job so far"guys although every now and then, I feel impelled to do so. I'd like to give more advise and provide help through my post and that is why I don't write much though Armorama is one of my favourite sites on internet to look for tips and reviews and to learn from other's modelling. That said I guess there's a lot of people like me out there that read your post and are interested on your build (I am, T55s in all its variants is one of my favourite tanks), so if this helps you, please, keep posting. I missed your initial post in 2012 but I was following it now. I might learn something.
Cheers.
Cheers.

markchis

Joined: February 09, 2009
KitMaker: 467 posts
Armorama: 392 posts

Posted: Saturday, February 14, 2015 - 12:28 AM UTC
Seth -good question. when using superglue use as little as possible. the more you use you end up with a very brittle joint. it should capillary into the gap of the parts your joining.
thanks gents - Russel and jasper you are both correct. I was just a bit dissapointed that the guys who hold the key knowledge seem to have left. BUT on the other hand I am just going to look and find myself the various references. Also nothing complex here just sticking AM to the kit now.
the voyager fenders proved to be quite tricky.

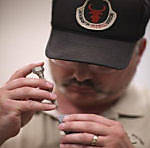
It soon came flooding back to me - my total lack of ability in soldering !
I use one of these for the long bends

I must admit it looks a bit of a dogs dinner

I had to salvage the underneath of the exhaust exit - chopped it out of the plastic tamiya fender - and glued it beneath the brass fender. The instructions dont tell you this - but it looks really odd if you dont salvage that part

thanks gents - Russel and jasper you are both correct. I was just a bit dissapointed that the guys who hold the key knowledge seem to have left. BUT on the other hand I am just going to look and find myself the various references. Also nothing complex here just sticking AM to the kit now.
the voyager fenders proved to be quite tricky.
It soon came flooding back to me - my total lack of ability in soldering !
I use one of these for the long bends
I must admit it looks a bit of a dogs dinner
I had to salvage the underneath of the exhaust exit - chopped it out of the plastic tamiya fender - and glued it beneath the brass fender. The instructions dont tell you this - but it looks really odd if you dont salvage that part

Tanksami

Joined: August 06, 2011
KitMaker: 1,314 posts
Armorama: 1,217 posts

Posted: Saturday, February 14, 2015 - 01:24 AM UTC
Hi Mark,
I will be interested to see how you find the miniarm tracks as I had an unhappy experience with the set I got.
Thanks for the info about the exhaust, I have never heard of that problem & have the same fender set to use on a future build.
As for reference Mario ( spider formers) sent me a heap of stuff when he was still on here so if I can pay it forward if you need a photo let me know & will see if I have it.
Mike

Tank_builder
Joined: January 06, 2012
KitMaker: 394 posts
Armorama: 351 posts
Posted: Saturday, February 14, 2015 - 05:13 AM UTC
Thanks Mark, I'll have to give them a go sometime. For as much trouble as you said those fenders gave you, I'd say they came out pretty spot on. Looking forward to more updates.
Jacques
Joined: March 04, 2003
KitMaker: 4,630 posts
Armorama: 4,498 posts

Posted: Saturday, February 14, 2015 - 09:10 PM UTC
Not all of us "in the know" guys have all the answers...like soldering, for instance. 
Also, I tend to let others speak up so that there are more voices providing information, and, sometimes it is ok to let someone work a little harder at doing research.
That said, I have been keeping an eye on the thread. Your method of dealing with the wading rail was one I had not thought of. Often times you will need to keep pushing and updating builds even without feedback. It is hard to have as much enthusiasm as the builder often.

markchis
Joined: February 09, 2009
KitMaker: 467 posts
Armorama: 392 posts
Posted: Saturday, February 14, 2015 - 10:55 PM UTC
Mike - im guessing the resin pins are brittle and snap off during assembly. In any case i better get to work assembling them quickly - as I will need to think of my strategy regarding fixing them on now or later.
Jaqcues - thanks - very true. Im just in the right frame of mind to get this this thing done - after two year hiatus. I have found nearly all references on armorama and fb.
best
Mark
Jaqcues - thanks - very true. Im just in the right frame of mind to get this this thing done - after two year hiatus. I have found nearly all references on armorama and fb.
best
Mark

chefchris
Joined: February 06, 2006
KitMaker: 1,544 posts
Armorama: 1,464 posts
Posted: Saturday, February 14, 2015 - 10:57 PM UTC
Mark, it looks like its coming along nicely. I would suggest lowering the retaining clips for the tow lugs. Tamiya put them a little high. I also think the idler mount area could use a liberal dose of MR surface. finally, think about re-doing the glacis plate weld seam. The Miniarm stuff is really great - I have the T-55AM set and I HOPE to get it finished at some point.
I have no less than 7 of the Tamiya T-55 kits and just about every accessory too.
Tiran 5
T-55 early
T-55 AM
T-69 Iraqi
T-55 Based Fallout/Gamma World APC (What was I thinking its been months!)
T-54B
T-55 Model 70
Keep it up...
I have no less than 7 of the Tamiya T-55 kits and just about every accessory too.
Tiran 5
T-55 early
T-55 AM
T-69 Iraqi
T-55 Based Fallout/Gamma World APC (What was I thinking its been months!)
T-54B
T-55 Model 70
Keep it up...
chefchris
Joined: February 06, 2006
KitMaker: 1,544 posts
Armorama: 1,464 posts
Posted: Saturday, February 14, 2015 - 10:57 PM UTC
Oh yeah... Love the Etch Mate man
markchis
Joined: February 09, 2009
KitMaker: 467 posts
Armorama: 392 posts
Posted: Monday, February 16, 2015 - 01:08 AM UTC
Chris Smith - big thanks - yes sir I will take that input ! as soon as I catch up with other stuff.
So I did one side of the fenders - the easy side of course. The Tamiya stowage boxes are really nicely detailed. I only added Eduard catches and some hinges. No point using some of the eduard stuff - where it replaces the handles and latches with 2d photo etch parts - well thats my take on it.

have to bash up the heat shield - seems rude not to

you get the washer water container in the miniarm upgrade set

So I did one side of the fenders - the easy side of course. The Tamiya stowage boxes are really nicely detailed. I only added Eduard catches and some hinges. No point using some of the eduard stuff - where it replaces the handles and latches with 2d photo etch parts - well thats my take on it.
have to bash up the heat shield - seems rude not to
you get the washer water container in the miniarm upgrade set
markchis
Joined: February 09, 2009
KitMaker: 467 posts
Armorama: 392 posts
Posted: Wednesday, February 18, 2015 - 01:03 PM UTC
onto the more "interesting" side of the fenders!
here is the arrangement of the fuel cells

I then drilled out the necessary holes and plumbes everything using lead wire and copper wire

I used 1mm tape to depict the connectors and dappled super-glue on the rolled on tape to secure it.

still to add are the plates and bolts that hold the cells to the fenders.
here is the arrangement of the fuel cells
I then drilled out the necessary holes and plumbes everything using lead wire and copper wire
I used 1mm tape to depict the connectors and dappled super-glue on the rolled on tape to secure it.
still to add are the plates and bolts that hold the cells to the fenders.
rfbaer
Joined: June 12, 2007
KitMaker: 1,866 posts
Armorama: 1,696 posts
Posted: Tuesday, February 24, 2015 - 02:30 AM UTC
The fuel cell plumbing is one thing that keeps me from getting back to the Tamiya T55 kit I started about two years ago. I'm almost to the point of going ahead with it anyway.
Tank_builder
Joined: January 06, 2012
KitMaker: 394 posts
Armorama: 351 posts
Posted: Tuesday, February 24, 2015 - 09:55 AM UTC
Good stuff, really like the idea of using tape for the connectors. Never thought of using that. Could we get a close up of those?
Russel: I have a diagram that shows the plumbing and it really helped me out. Let me figure out how to post pictures and I'll get it posted for you.
-Seth
Russel: I have a diagram that shows the plumbing and it really helped me out. Let me figure out how to post pictures and I'll get it posted for you.
-Seth
markchis
Joined: February 09, 2009
KitMaker: 467 posts
Armorama: 392 posts
Posted: Tuesday, February 24, 2015 - 12:12 PM UTC
Russel - I had exact same thought as your yourself- i thought the plumbing would be difficult. One thing that made it easy was to use lead wire. I was going to use electrical wire - but I just didnt have any. So I used what I had - fixing the tape onto the wire was the only difficult part.
I used this diagram for the plumbing - I think some references can be found here on armorama

Seth - thanks I think using tape worked out ok. Here is a better shot. I also detailed up the plate and bolt that fixes the fuel cell to the fender.

thanks guys.
maybe some time for a next update - I have ordered something to make this a bit different
I used this diagram for the plumbing - I think some references can be found here on armorama
Seth - thanks I think using tape worked out ok. Here is a better shot. I also detailed up the plate and bolt that fixes the fuel cell to the fender.
thanks guys.
maybe some time for a next update - I have ordered something to make this a bit different
Tank_builder
Joined: January 06, 2012
KitMaker: 394 posts
Armorama: 351 posts
Posted: Tuesday, February 24, 2015 - 09:21 PM UTC
Thanks for the close up, and the diagram. That's more or less the same one I use.
I found that using brass wire works good for me, doing the plumbing has since become one of my favorite parts about 54/55/62s.
-Seth
I found that using brass wire works good for me, doing the plumbing has since become one of my favorite parts about 54/55/62s.
-Seth
DerGeist
Joined: January 21, 2008
KitMaker: 735 posts
Armorama: 707 posts

Posted: Thursday, February 26, 2015 - 06:05 AM UTC
Great build. Shouldn't the fuel lines run through the fender support and not over top on it and along the side bulges?
markchis
Joined: February 09, 2009
KitMaker: 467 posts
Armorama: 392 posts
Posted: Saturday, February 28, 2015 - 12:29 AM UTC
Erik - thanks. yes - I initially routed the fuel lines through that cut out and then changed my mind! I will try and correct it if i can.
Does anyone have any details of how BTU dozer blade is powered and connection to the T-55?
best
Mark
Does anyone have any details of how BTU dozer blade is powered and connection to the T-55?
best
Mark

KoSprueOne

Joined: March 05, 2004
KitMaker: 4,011 posts
Armorama: 1,498 posts
Posted: Saturday, February 28, 2015 - 01:47 AM UTC
Good and detailed work on the T-55
These are the only links I could find related to the dozer blade. Hope they are useful:
http://www.jedsite.info/engineer-bravo/bravo/btu_series/btu-series.html
http://www.brdm2.estranky.cz/img/original/25809/32.-t-55a.jpg
IDF version:
http://www.primeportal.net/tanks/andre_patschke/tiran_5_bd_walk.htm
orpant

Joined: January 16, 2010
KitMaker: 139 posts
Armorama: 135 posts

Posted: Saturday, February 28, 2015 - 01:48 AM UTC
Maybe this will help:

At the point #12 the power and control cable enters the tank.
What kit of the dozer blade will you use?
At the point #12 the power and control cable enters the tank.
What kit of the dozer blade will you use?
rfbaer
Joined: June 12, 2007
KitMaker: 1,866 posts
Armorama: 1,696 posts
Posted: Monday, March 09, 2015 - 11:13 PM UTC
Very good diagram, I printed it and will put it in the kit box.
Also interested in the 'dozer install, got one of those floating around somewhere too...... and just ordered the DEF Model gun tube and mantlet, whoo hoo......
Also interested in the 'dozer install, got one of those floating around somewhere too...... and just ordered the DEF Model gun tube and mantlet, whoo hoo......

jasegreene
Joined: October 21, 2013
KitMaker: 751 posts
Armorama: 751 posts
Posted: Wednesday, March 11, 2015 - 04:28 AM UTC
I just want you to know your blog is providing such great info that it is making me feel like going ahead and really starting two unique T-55s,a Slovenian M-55 S and a Iranian T-72Z 
markchis
Joined: February 09, 2009
KitMaker: 467 posts
Armorama: 392 posts
Posted: Friday, October 30, 2015 - 11:17 PM UTC
sorry big shame... thanks for all advice and help, I bought the resin snow plough.. but it would not fit as it clashed with the light mounting. also I could not find a single picture of the snow plough fitted to a T-55. So I was on holiday in Prague and bought btu blade.. but also to late for modifications.
So here is some of the work. Its from a while ago, but I still have to start weathering soon.


here is miniarm resin rmsh tracks fitted and the resin miniarm replacement roadwheels


So here is some of the work. Its from a while ago, but I still have to start weathering soon.
here is miniarm resin rmsh tracks fitted and the resin miniarm replacement roadwheels
markchis
Joined: February 09, 2009
KitMaker: 467 posts
Armorama: 392 posts
Posted: Friday, June 03, 2016 - 10:11 PM UTC
things need to end where they start... the shelf queen cull began at about 18:00 Thursday evening.
This is how things moved...
chipping fluid followed by white camo

weathering steps


I will do the reveal shortly... AND THANKS
This is how things moved...
chipping fluid followed by white camo
weathering steps
I will do the reveal shortly... AND THANKS

GazzaS

#424
Joined: April 23, 2015
KitMaker: 4,648 posts
Armorama: 2,248 posts

Posted: Saturday, June 04, 2016 - 03:16 AM UTC
Wow, that looks great!
 |

WEB HOSTING BY


Copyright ©2021 Armorama and Kitmaker Network, a subsidiary of Silver Star Enterprises
All Rights Reserved. Please read our Conditions of Use and Privacy Policy.
All Rights Reserved. Please read our Conditions of Use and Privacy Policy.