_GOTOBOTTOM
Яusso-Soviэt Forum: Cold War Soviet Armor
For discussions related to cold war era Russo-Soviet armor.
Soviet T-55a - miniarm conversion
markchis
Visit this Community
Kuwait / لعربية
Joined: February 09, 2009
KitMaker: 467 posts
Armorama: 392 posts
Posted: Monday, November 26, 2012 - 07:31 PM UTC
Many thanks for advice and help so far on the Forum.

Objective is to build a Russian produced T-55A - using the miniarm conversion set.

I also will add Voyager fenders, miniarm road wheels, fruil tracks and metal barrel.

I was thinking of eduard etch set - but dont think its necessary for this one.

simple start -

removal of the fenders -


then in order to get the wading kit mounting rail to fit correctly.

here is problem


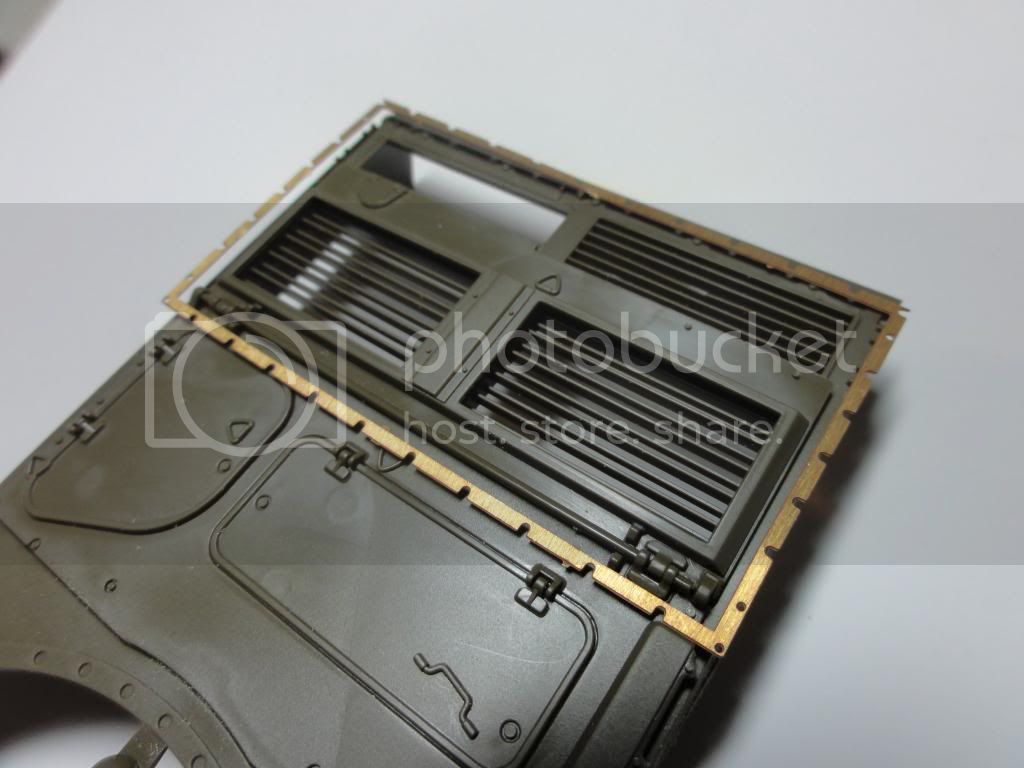
the rail ends up on top of the hatch.

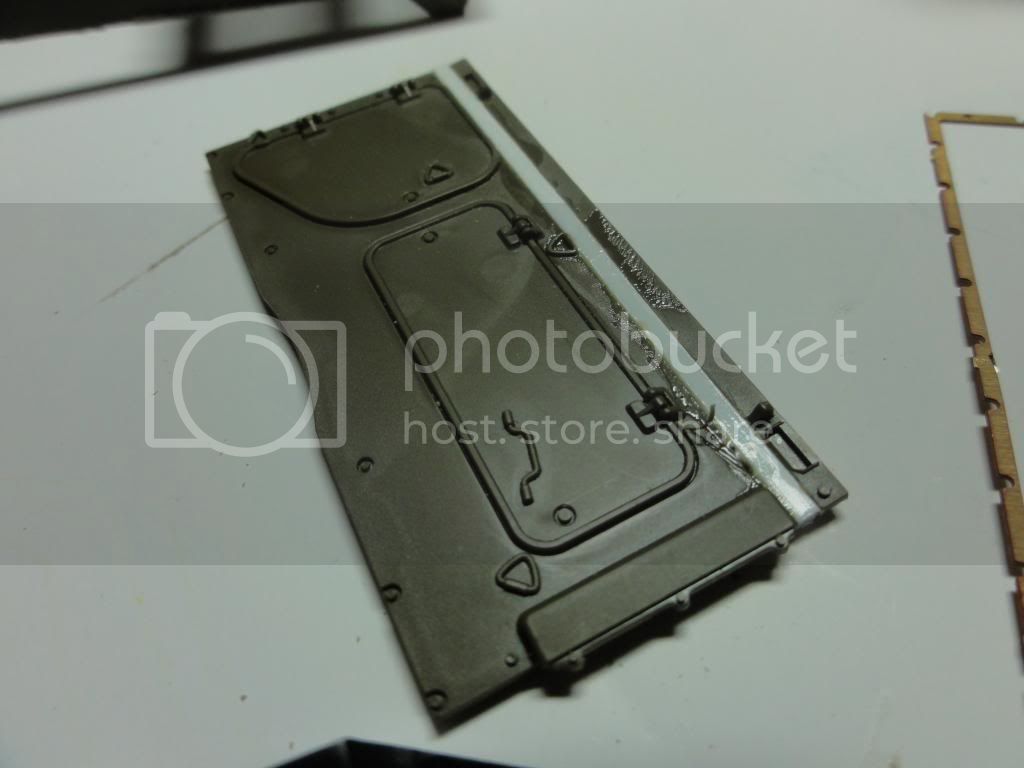
so part D41 is cut into two pieces like so -


a strip of plastic is inserted to make this part about 1.5 mm longer


and a piece of plastic from the upper hull close to turret ring is removed


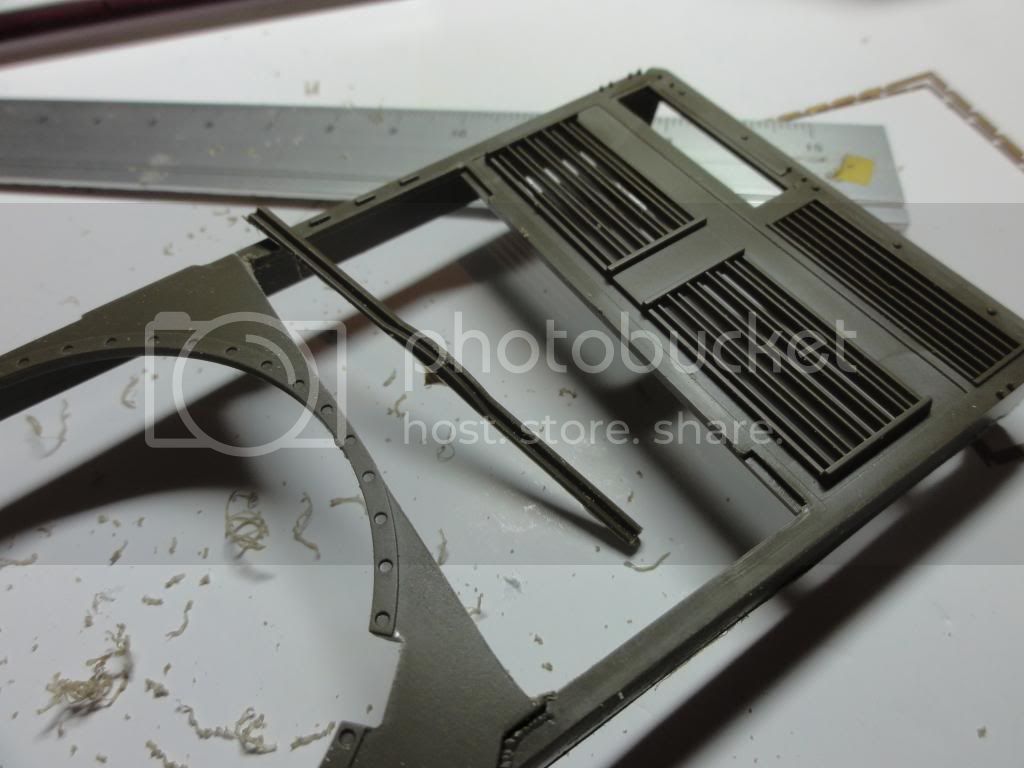
so it looks like this now -


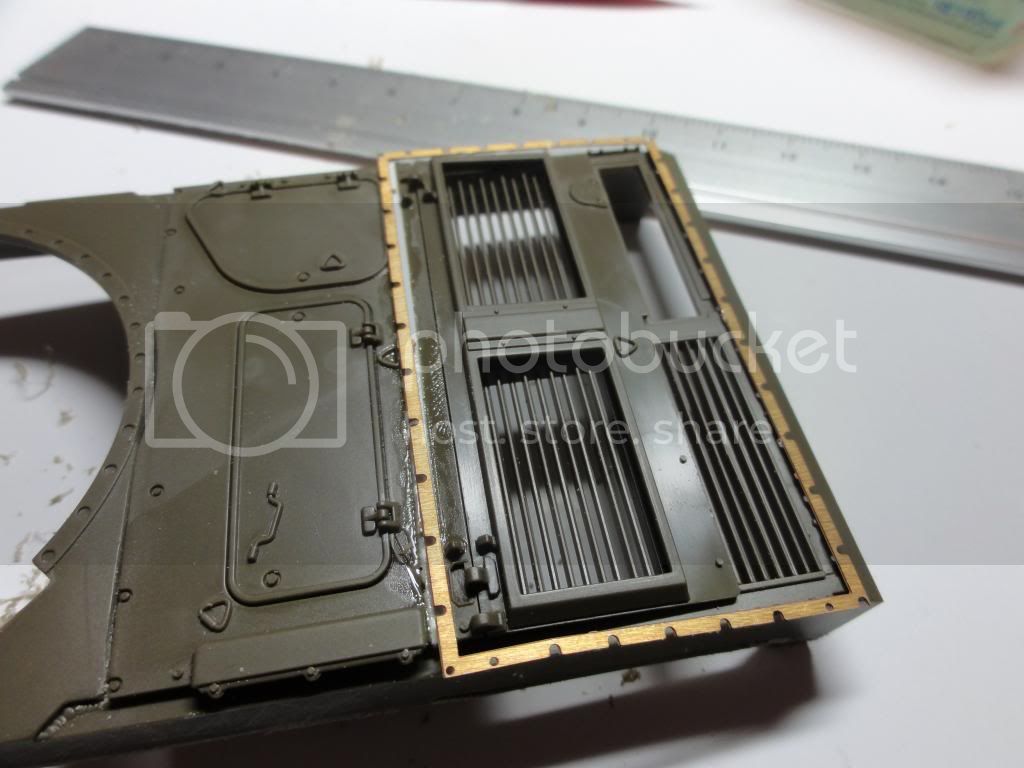
I will also need to slightly lengthen the photo etch wading rail bracket.

best
Mark

Kharkov
Joined: April 09, 2011
KitMaker: 181 posts
Armorama: 175 posts
Posted: Monday, November 26, 2012 - 09:34 PM UTC

It's nice to see someone else hacking apart a Tamiya T-55, I love this kinda thing, following with great interest.

ps can you post some pictures of the Miniarm T-55 wheels please, some close up shots, when you get to that part of the build, im looking for some good wheels.

markchis
Visit this Community
Kuwait / لعربية
Joined: February 09, 2009
KitMaker: 467 posts
Armorama: 392 posts
Posted: Tuesday, November 27, 2012 - 06:09 AM UTC
Hi Matt - i will try - but im not so good with scratch work.

BUT - im reading through your excellent blog - there is a oads to learn from that one !

cheers
Mark
afv_rob
Visit this Community
England - East Anglia, United Kingdom
Joined: October 09, 2005
KitMaker: 2,556 posts
Armorama: 2,199 posts
Posted: Tuesday, November 27, 2012 - 06:58 AM UTC
I'll look forward to following this one Mark.

The wade rail cock up is pretty inexcusable given the cost of these conversions and the fact this is a Russian company. Your fix seems reasonable, however it has now likely made the engine deck layout slightly incorrect, of course most people wouldn't notice. Personally I'd prefer to just slice up the wade rail to shorten it.
markchis
Visit this Community
Kuwait / لعربية
Joined: February 09, 2009
KitMaker: 467 posts
Armorama: 392 posts
Posted: Tuesday, November 27, 2012 - 07:06 AM UTC
Hi Rob - thanks for support.

I think thats a really good option. Im going to cut up the rail into 4 pieces and add strip to lengthen it and take out about 1mm in width.

I may lay some strip underneath it - im just looking at that ref photo of the deck and it it appears as if the frame is made up of more than one piece - im guessing its a rubber gasket underneath the metal frame to give it water tightness.

cheers
Mark
Spiderfrommars
Visit this Community
Milano, Italy
Joined: July 13, 2010
KitMaker: 3,845 posts
Armorama: 3,543 posts
Posted: Tuesday, November 27, 2012 - 06:59 PM UTC
T-55 prototype


T-55 production exemplar


T-55 manual


As far as I've understood there's an underneath frame and the wading cover is bolted on that one. My gueass is that there are no rubber seals between them
markchis
Visit this Community
Kuwait / لعربية
Joined: February 09, 2009
KitMaker: 467 posts
Armorama: 392 posts
Posted: Tuesday, November 27, 2012 - 07:07 PM UTC
Mauro - super photos ! yes for sure - then here is opportunity to laminate a frame underneath the etch part. I agree its all steel and not a rubber gasket.

Also - this width issue of the wading frame - well it looks like it should be wider the actual engine deck - and so the miniarm part is correct in this aspect.


best
Mark
zapper
Visit this Community
Skåne, Sweden
Joined: October 18, 2005
KitMaker: 745 posts
Armorama: 734 posts
Posted: Tuesday, November 27, 2012 - 07:26 PM UTC
Looking forward to follow your progress on this one. As stated the frame around the engine deck is really made up of angle iron profile rather than just a flat frame.

For what it's worth I'll add the link to my pb album with some engine deck photos:
http://s301.photobucket.com/albums/nn73/evr-zapper/T-55%20Kiev/

Cheers,
/E
markchis
Visit this Community
Kuwait / لعربية
Joined: February 09, 2009
KitMaker: 467 posts
Armorama: 392 posts
Posted: Tuesday, November 27, 2012 - 07:38 PM UTC
Many thanks Erik ! more than useful.

best
Mark
Kharkov
Joined: April 09, 2011
KitMaker: 181 posts
Armorama: 175 posts
Posted: Tuesday, November 27, 2012 - 08:09 PM UTC
In terms of width, the wading rail should be just wide enough to go from outside edge to outside edge of the hull side plates, this is because the wading sits part way down the upper rear angled back plate, this in effect lowers the back end of the wading rail, so in effect the wading rail is not sitting level with the engine deck, it is sitting with a slight downwards tilt towards the rear.

This can be seen in Spiders ref photos, the wading rail remains flat, ie it has not been bent anywhere along it's length, but at the same time it is sitting at an angle in relation to the engine deck, so in effect the wading rail has to be wide enough to allow it to sit slightly down the hull sides, which then allows the wading to sit part way down the upper rear angled plate, which in effect lowers the rear end of the wading rail.

In other words, the wading rail should never be bent along it's length in an effort to make it sit flush on the rear angled plate, it should remain flat, even though it is sitting at a slight downwards angle.

The overlap in effect allows it to do this, the wading rail along its sides is in effect an L shape bar, but upside down, with the vertical part welded to the outside face of the hull side plates.


Spiderfrommars
Visit this Community
Milano, Italy
Joined: July 13, 2010
KitMaker: 3,845 posts
Armorama: 3,543 posts
Posted: Tuesday, November 27, 2012 - 09:02 PM UTC

Quoted Text

the wading rail remains flat, ie it has not been bent anywhere along it's length, but at the same time it is sitting at an angle in relation to the engine deck, so in effect the wading rail has to be wide enough to allow it to sit slightly down the hull sides, which then allows the wading to sit part way down the upper rear angled plate, which in effect lowers the rear end of the wading rail


Yes, that's true :


(Also note these small supports under the rail which are likely to allow the junction between the rail and the deck)
spiritwalker
Visit this Community
England - North, United Kingdom
Joined: February 20, 2009
KitMaker: 99 posts
Armorama: 97 posts
Posted: Wednesday, November 28, 2012 - 12:27 AM UTC
Hi
looked over the Miniarm etch part, it fits ok, just need to alter the kit parts to allow it all to fit.

Andy
spiritwalker
Visit this Community
England - North, United Kingdom
Joined: February 20, 2009
KitMaker: 99 posts
Armorama: 97 posts
Posted: Wednesday, November 28, 2012 - 04:07 AM UTC
On further inspection, not much modelling time these days. In fact the Miniarm etch part IS TOO SMALL, even after surgery on the kit parts to allow for the wading rail. You are better off as i have said before using the Trumpeter T-62 model 62 and using the molded on part as a template. It is a perfect fit...

Andy
markchis
Visit this Community
Kuwait / لعربية
Joined: February 09, 2009
KitMaker: 467 posts
Armorama: 392 posts
Posted: Wednesday, November 28, 2012 - 04:53 AM UTC
Andy - thanks Im sure thats the case - Unfortunately I dont have the trumpeter kit - I will make do with the etch part and add some plastic card for the frame and adjustments.

We need some scale drawings of this engine deck - I could have a cad model built and we can prototype it - what do you think?

best
Mark
spiritwalker
Visit this Community
England - North, United Kingdom
Joined: February 20, 2009
KitMaker: 99 posts
Armorama: 97 posts
Posted: Thursday, November 29, 2012 - 03:04 AM UTC
Hi Mark

Yes, sounds good to me, i have started to alter the Tamiya kit. I have removed the rear engine deck part that is molded on to the upper hull, and set a few millimetre further back. The area is then built back up with plastic card. Also this allows for the sloped/angled rearmost part to be at the back of the oil cooler and fan cover to be made slightly longer. I have always thought this to be too shallow. You then need to add another rear plate made from plasticard roughly the same thickness as part D-12. I will post a few images later of my progress.

Andy
SEDimmick
Visit this Community
New Jersey, United States
Joined: March 15, 2002
KitMaker: 1,745 posts
Armorama: 1,483 posts
Posted: Thursday, November 29, 2012 - 06:03 AM UTC
Wow I saw this over on HobbyEast yesterday and it looked like a nice upgrade to the Tamiya kit...I'm shocked that the rail bracket is all jacked up...
markchis
Visit this Community
Kuwait / لعربية
Joined: February 09, 2009
KitMaker: 467 posts
Armorama: 392 posts
Posted: Thursday, November 29, 2012 - 10:46 AM UTC
Andy - really looking forward to seeing your work again !

Scott - I would not be put off at all by the deck rail. The resin parts and the conversion - are really top quality. Also its not an onerous conversion - its very "buildable" and the resin is some of the best I have seen.

So I did some easier stuff -

the kit bow plate lower hull


clip the bolts off and sand it flat


glue em on !


small problem - this is part R20 there should be 12 but I only had 6 - but already Dmitri is sending me the missing the parts.


And also resin mantlet cover (shown beside RB barrel and mantlet cover


it fits absolutely perfectly


thats all except I started to anneal the brass fenders.

also decided to get the miniarm T-55 late tracks and sprocket set and caved in and bought the Eduard PE set (so so lazy)


Spiderfrommars
Visit this Community
Milano, Italy
Joined: July 13, 2010
KitMaker: 3,845 posts
Armorama: 3,543 posts
Posted: Friday, December 14, 2012 - 12:07 AM UTC
I've done the wading rail


It hasn't finished yet, I have to add those bolts and holes on the frame.
As you can notice I've removed a strip from kit part number D-18 and I've substitued with a plasticard one. After applying some putty to even the surfaces, I've filled the rectangular housing on the engine deck, and I've glued the hinge bar a bit forward. There's enough room for the rail this way. Rail has been made with 0,3 X 0,2 mm plastic strips
Kharkov
Joined: April 09, 2011
KitMaker: 181 posts
Armorama: 175 posts
Posted: Friday, December 14, 2012 - 12:33 AM UTC
Now I know why the wading rail does not sit level, on the Russian version the rear engine hatches open sideways (flip outwards), so the wading rail has to in effect be level (flush) with the engine deck, at the back, to allow the hatches to open, if the wading rail sits higher the hatches will not open (well, they would open, but get stuck in a sorta upright posistion, and I think Russian hatches open out to flat posistion), so it sits proud at the front and flush at the back, ie not level.

markchis
Visit this Community
Kuwait / لعربية
Joined: February 09, 2009
KitMaker: 467 posts
Armorama: 392 posts
Posted: Saturday, February 07, 2015 - 09:06 PM UTC
Ok lets reignite this one after 2 plus years !

what can I say - I had to wait a few months for the missing resin parts to turn up. ~Then a heap of other stuff came along. You know how it is.

Well Im pretty keen to continue - it wont be anything fancy. Im just wanting to get a soviet t-55a at then end of this.

thanks again for all pointers and help.

at this stage im just glueing the resin parts on. also scraping off Tamiyas moulded on details for replacement with lead wire later.


markchis
Visit this Community
Kuwait / لعربية
Joined: February 09, 2009
KitMaker: 467 posts
Armorama: 392 posts
Posted: Monday, February 09, 2015 - 10:28 AM UTC
I have found it difficult to know exactly where the various resin parts fir to the turret. In particular the rearward facing convoy lamp. I found some pictures that indicated the L shaped bracket. but the actual lamp .. well i cant work out the mounting so I have left it off.

The other stuff has been attached. The hull is together now at last. In terms of that engine deck - i used the Eduard mesh for the covers which is a perfect fit. I will place that mounting for the wading screen but build up some laminations of plastic strip.

here are pics


Should be able to build up the brass fenders soon.

best Mark
markchis
Visit this Community
Kuwait / لعربية
Joined: February 09, 2009
KitMaker: 467 posts
Armorama: 392 posts
Posted: Monday, February 09, 2015 - 11:37 PM UTC
built the 12.7mm DSHK-m heavy machine gun. It does not come with the conversion but is available separately.

little jewel...


here is a view with the tamiya running gear


but i wont be using them as i have the late style RMsh tracks and drive sprocket also I have the miniarm roadwheels.

here are some comparison photos.


markchis
Visit this Community
Kuwait / لعربية
Joined: February 09, 2009
KitMaker: 467 posts
Armorama: 392 posts
Posted: Thursday, February 12, 2015 - 12:52 AM UTC
think i will discontinue this - as there is a total lack of interest.

so for reference I found a method of using the miniarm deck wading rail

I added some strips of styrene around the perimeter of the deck


then cut the rail into 4 pieces - this solves the problem of width and also of differing height of the rear deck


then simply stuck them on - it fairly much matches the reference pictures


Tank_builder
Visit this Community
Ohio, United States
Joined: January 06, 2012
KitMaker: 394 posts
Armorama: 351 posts
Posted: Thursday, February 12, 2015 - 04:50 PM UTC
Don't stop. You've got a great build going here.
I know that Miniarm is usually real nice in terms of quality, but does it match up good with the kit? Also how do you plan on attaching the PE fenders to the hull? I've always wanted to try those fenders, but have been turned off by fear of them not holding too well.
-Seth
markchis
Visit this Community
Kuwait / لعربية
Joined: February 09, 2009
KitMaker: 467 posts
Armorama: 392 posts
Posted: Thursday, February 12, 2015 - 05:48 PM UTC
Hi Seth,
I meant to continue the build but discontinue the thread. All the expert guys seem to have departed unfortunately.

I was carefully looking at the fenders last night. There are some real pitfalls - especially regarding the exhaust. I will cover that quite soon. In terms of joining them to hull - i have done this before on other builds and not had a problem using super glue. BUT im trying an experiment tonight with gorilla glue. Im going to try and solder as much as possible first though.

thanks for your interest.
best
Mark
 _GOTOTOP