_GOTOBOTTOM
Constructive Feedback
For in-progress or completed build photos. Give and get contructive feedback!
Korean War M4A3E8 Sherman
Manchu34
Visit this Community
Missouri, United States
Joined: March 08, 2002
KitMaker: 493 posts
Armorama: 361 posts
Posted: Saturday, January 12, 2013 - 05:16 AM UTC
Haven't built an armored vehicle no less a tank in years. Anyways, I decided to build one. I decided to build a Sherman tank that was assigned to the Tank Company, 17th Infantry Regiment, 7th Infantry Division. MY reasoning for this build are: 1. I served 5 years with that regiment (80's& 90's). 2. Most tanks built represent tanks assigned to armor units. 3. Is the unique symbol they painted on the side of the hull. 4. The regiment was also given credit of being the most northern deployed UN forces during the War. When the UN ended their advance just prior to China entering the war, the regiment was position on the Yalu River


Manchu34
Visit this Community
Missouri, United States
Joined: March 08, 2002
KitMaker: 493 posts
Armorama: 361 posts
Posted: Monday, January 28, 2013 - 08:20 PM UTC
Here's some photos of my work in progress. The color in the photos are slightly off. I was taking the photos indoors s oI got a mix of daylight and light bulbs


jowady
Joined: June 12, 2006
KitMaker: 1,027 posts
Armorama: 683 posts
Posted: Tuesday, January 29, 2013 - 03:12 AM UTC
Looks like its coming along quite nicely. Its always great to build a kit that you have a personal link to. This is the Tasca kit I take it?
pseudorealityx
Visit this Community
Georgia, United States
Joined: January 31, 2010
KitMaker: 2,191 posts
Armorama: 1,814 posts
Posted: Tuesday, January 29, 2013 - 03:19 AM UTC
The mantlet is on upside down. The lift rings should be on the top.

It's not the Tasca kit. Wrong turret ring.
18Bravo
Visit this Community
Colorado, United States
Joined: January 20, 2005
KitMaker: 7,219 posts
Armorama: 6,097 posts
Posted: Tuesday, January 29, 2013 - 04:48 AM UTC
Should be interesting. Any close ups of the artwork on the side of the hull?
Manchu34
Visit this Community
Missouri, United States
Joined: March 08, 2002
KitMaker: 493 posts
Armorama: 361 posts
Posted: Tuesday, January 29, 2013 - 04:22 PM UTC

Quoted Text

Looks like its coming along quite nicely. Its always great to build a kit that you have a personal link to. This is the Tasca kit I take it?


It's the old DML model.
Manchu34
Visit this Community
Missouri, United States
Joined: March 08, 2002
KitMaker: 493 posts
Armorama: 361 posts
Posted: Tuesday, January 29, 2013 - 04:25 PM UTC

Quoted Text

The mantlet is on upside down. The lift rings should be on the top.

It's not the Tasca kit. Wrong turret ring.


I noticed that as I was building the model. The instruction shows the lift rings on top, but than the 2 ports along side of the barrel would be on the bottom. I used one of the photos I have of theses tanks and it shows the ports to the top. So, I figured I'd rather have the ports correct and the lift rings wrong.
Manchu34
Visit this Community
Missouri, United States
Joined: March 08, 2002
KitMaker: 493 posts
Armorama: 361 posts
Posted: Tuesday, January 29, 2013 - 04:34 PM UTC
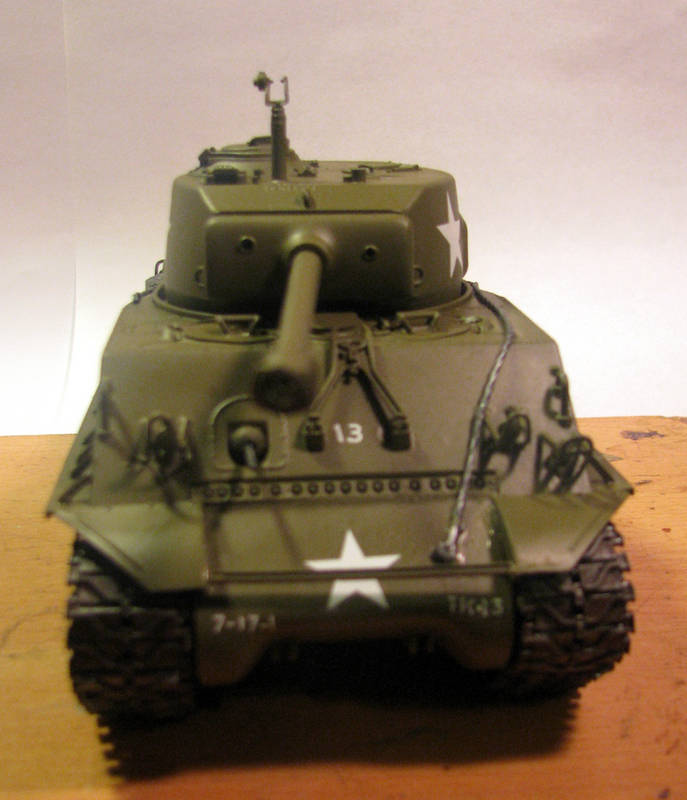
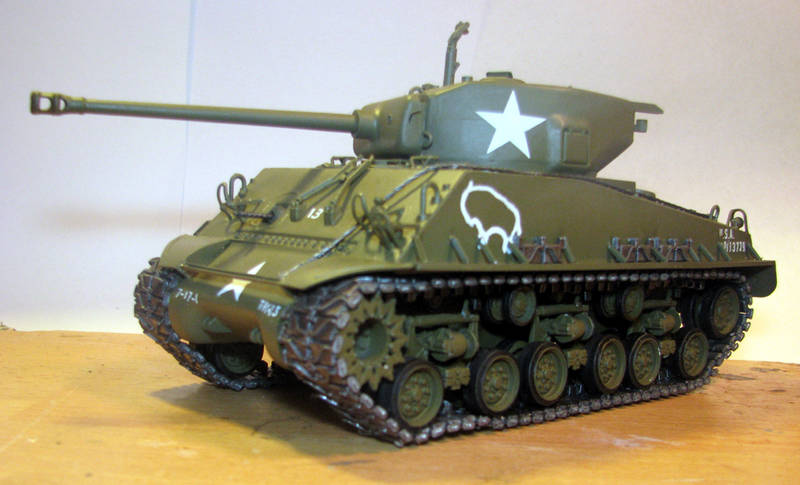
Finished applying decals and the artwork on the side of the hull. Well, I thought I was finished, but I discovered after I took the pictures I gave the tank two different vehicle numbers. I gave it the bumper number TK 34 and gave it the number 13 on the frontal glacial plated. Glad I hadn't sealed it yet.

I did the artwork by using an outline of a buffalo a friend provided me. Reduced the size to 1.5 x 2.0mm using photoshop 5.5. Printed it out, applied graphite to the back and transferred it to the hull. After that it was using a 10/0 brush and a lot of patience.


Joel_W
Staff MemberAssociate Editor
AUTOMODELER
Visit this Community
New York, United States
Joined: December 04, 2010
KitMaker: 11,666 posts
Armorama: 1,143 posts
Posted: Saturday, February 02, 2013 - 09:35 AM UTC
Edward, nice build, especially for your 1st one since coming back into the hobby. As for the issue of the lift rings, why not just cut them off, and glue them near the top of the mantlet according to your photos? A little sanding, and repainting will make short work of the cut areas.
Joel
Manchu34
Visit this Community
Missouri, United States
Joined: March 08, 2002
KitMaker: 493 posts
Armorama: 361 posts
Posted: Saturday, February 02, 2013 - 02:01 PM UTC

Quoted Text

Edward, nice build, especially for your 1st one since coming back into the hobby. As for the issue of the lift rings, why not just cut them off, and glue them near the top of the mantlet according to your photos? A little sanding, and repainting will make short work of the cut areas.
Joel


Thanks for the suggestion Joel

ed
Manchu34
Visit this Community
Missouri, United States
Joined: March 08, 2002
KitMaker: 493 posts
Armorama: 361 posts
Posted: Tuesday, February 05, 2013 - 04:52 PM UTC
Here's some of the post weathering. Not to pleased with it. But, I've haven't done this type of modeling in about 10 years.


Joel_W
Staff MemberAssociate Editor
AUTOMODELER
Visit this Community
New York, United States
Joined: December 04, 2010
KitMaker: 11,666 posts
Armorama: 1,143 posts
Posted: Tuesday, February 12, 2013 - 02:38 AM UTC
Edward, for a 1st effort after 10 years, it came out pretty well. The weathering looks ok, but all your colors are off due to how you took the pictures. Try taking the pictures outside on a cloudy day.
Joel
Manchu34
Visit this Community
Missouri, United States
Joined: March 08, 2002
KitMaker: 493 posts
Armorama: 361 posts
Posted: Tuesday, February 12, 2013 - 03:24 PM UTC

Quoted Text

Edward, for a 1st effort after 10 years, it came out pretty well. The weathering looks ok, but all your colors are off due to how you took the pictures. Try taking the pictures outside on a cloudy day.
Joel


Joel, thanks for the compliment and even the suggestion on the lighting.
 _GOTOTOP