This is my first attempt at weathering since coming back to the hobby, and I wanted to ask some qeustions.
First, how did I do? Any hints, help and comments would be great.
Constructive Feedback
For in-progress or completed build photos. Give and get contructive feedback!
Hosted by Darren Baker, Dave O'Meara
First try at weathering.
TotemWolf
Oklahoma, United States
Joined: February 11, 2013
KitMaker: 294 posts
Armorama: 196 posts
Joined: February 11, 2013
KitMaker: 294 posts
Armorama: 196 posts
Posted: Thursday, March 07, 2013 - 01:57 PM UTC
TotemWolf
Oklahoma, United States
Joined: February 11, 2013
KitMaker: 294 posts
Armorama: 196 posts
Joined: February 11, 2013
KitMaker: 294 posts
Armorama: 196 posts
Posted: Thursday, March 07, 2013 - 02:05 PM UTC
Second question....
The M21 is supposed to be in the Ardennes in mid Jan '45. It's been on the roads, hence the mud, but I want to add some snow/slush. Will white pastels mixed just like I used for the mud work?
Also what will putting a matte coat over the pigments do to them?
Thanks in advance for the help.
The M21 is supposed to be in the Ardennes in mid Jan '45. It's been on the roads, hence the mud, but I want to add some snow/slush. Will white pastels mixed just like I used for the mud work?
Also what will putting a matte coat over the pigments do to them?
Thanks in advance for the help.
panzerconor
Massachusetts, United States
Joined: February 08, 2012
KitMaker: 1,271 posts
Armorama: 1,253 posts
Joined: February 08, 2012
KitMaker: 1,271 posts
Armorama: 1,253 posts
Posted: Thursday, March 07, 2013 - 02:31 PM UTC
AK Interactive sells a few effects that might work for you here. They've got fresh mud and wet effects that would probably give it the same outcome that a matte coat would. You can also mix the mud effect with plaster to give it more volume. Never tried making slush before though, somebody with more experience would have to answer that one hahaha
http://www.ak-interactive-usa.com/product-ak079.html
http://www.ak-interactive-usa.com/product-ak016.html
-Conor
http://www.ak-interactive-usa.com/product-ak079.html
http://www.ak-interactive-usa.com/product-ak016.html
-Conor
TotemWolf
Oklahoma, United States
Joined: February 11, 2013
KitMaker: 294 posts
Armorama: 196 posts
Joined: February 11, 2013
KitMaker: 294 posts
Armorama: 196 posts
Posted: Thursday, March 07, 2013 - 02:49 PM UTC
Looking at the pictures I just realized they would not have been driving fully buttoned up. The armored shutter on the windshield would not have been splattered by the like the rest of the front of the vehicle.
I'll have to correct that.
retiredyank
Arkansas, United States
Joined: June 29, 2009
KitMaker: 11,610 posts
Armorama: 7,843 posts
Joined: June 29, 2009
KitMaker: 11,610 posts
Armorama: 7,843 posts
Posted: Thursday, March 07, 2013 - 03:01 PM UTC
I would recommend a darker pigment, for mud and slush. As is, you don't have enough color variation. However, it appears that you have the basics of where to use and in what strength to build up pigment.
Joel_W
Associate Editor
New York, United States
Joined: December 04, 2010
KitMaker: 11,666 posts
Armorama: 1,143 posts
Joined: December 04, 2010
KitMaker: 11,666 posts
Armorama: 1,143 posts
Posted: Friday, March 08, 2013 - 01:42 AM UTC
Overall, a great 1st effort. As Matt said, your mud, dirt, etc. is just a little to monotone, which looses it's impact. The outside looks likes it's taken a beating from the elements, but the bed doesn't.
Just as a side note, in your 1st picture, you can see the mold lines in both tires. Next time sand them down for a more realistic appearance.
Joel
Just as a side note, in your 1st picture, you can see the mold lines in both tires. Next time sand them down for a more realistic appearance.
Joel
TotemWolf
Oklahoma, United States
Joined: February 11, 2013
KitMaker: 294 posts
Armorama: 196 posts
Joined: February 11, 2013
KitMaker: 294 posts
Armorama: 196 posts
Posted: Friday, March 08, 2013 - 01:48 AM UTC
Quoted Text
Overall, a great 1st effort. As Matt said, your mud, dirt, etc. is just a little to monotone, which looses it's impact. The outside looks likes it's taken a beating from the elements, but the bed doesn't.
Just as a side note, in your 1st picture, you can see the mold lines in both tires. Next time sand them down for a more realistic appearance.
Joel
I noticed that too. That really bugs me. I don't know how I let that get by. I prepped the tires early on and put them aside and just left them. Oh that's one of many things that I learned/relearned building this one. 20 years is too long to stay away from the bench.
TotemWolf
Oklahoma, United States
Joined: February 11, 2013
KitMaker: 294 posts
Armorama: 196 posts
Joined: February 11, 2013
KitMaker: 294 posts
Armorama: 196 posts
Posted: Friday, March 08, 2013 - 01:50 AM UTC
One thing I did notice was that when you add the thinner to the powder it get much darker in then dries much lighter than it goes on.
Joel_W
Associate Editor
New York, United States
Joined: December 04, 2010
KitMaker: 11,666 posts
Armorama: 1,143 posts
Joined: December 04, 2010
KitMaker: 11,666 posts
Armorama: 1,143 posts
Posted: Friday, March 08, 2013 - 04:41 AM UTC
I was away from the hobby for 30 years. It was like a different
world when I returned.
As for the tires, don't sweat it. Worse case scenario is that they're new tires as the old ones just plain wore out.
Joel
world when I returned.
As for the tires, don't sweat it. Worse case scenario is that they're new tires as the old ones just plain wore out.
Joel
TotemWolf
Oklahoma, United States
Joined: February 11, 2013
KitMaker: 294 posts
Armorama: 196 posts
Joined: February 11, 2013
KitMaker: 294 posts
Armorama: 196 posts
Posted: Friday, March 08, 2013 - 05:21 AM UTC
I have the snow/slush on. ...and the tires are covered a little more. The seam has now looks just fine. I wish it wasn't there but oh well.
I'll post some more photos up after it dries so I can do any last touch-ups.
Joel_W
Associate Editor
New York, United States
Joined: December 04, 2010
KitMaker: 11,666 posts
Armorama: 1,143 posts
Joined: December 04, 2010
KitMaker: 11,666 posts
Armorama: 1,143 posts
Posted: Friday, March 08, 2013 - 11:57 AM UTC
Don't sweat the seams, it's no big deal. Like I said they're new tires. Post the new pictures.
Joel
Joel
TotemWolf
Oklahoma, United States
Joined: February 11, 2013
KitMaker: 294 posts
Armorama: 196 posts
Joined: February 11, 2013
KitMaker: 294 posts
Armorama: 196 posts
Posted: Friday, March 08, 2013 - 02:24 PM UTC
Quoted Text
Don't sweat the seams, it's no big deal. Like I said they're new tires. Post the new pictures.
Joel
I put another matte coat on. I'll take some in the morning.
Joel_W
Associate Editor
New York, United States
Joined: December 04, 2010
KitMaker: 11,666 posts
Armorama: 1,143 posts
Joined: December 04, 2010
KitMaker: 11,666 posts
Armorama: 1,143 posts
Posted: Saturday, March 09, 2013 - 04:55 AM UTC
Quoted Text
Quoted TextDon't sweat the seams, it's no big deal. Like I said they're new tires. Post the new pictures.
Joel
I put another matte coat on. I'll take some in the morning.
Looking forward to them.
Joel
TotemWolf
Oklahoma, United States
Joined: February 11, 2013
KitMaker: 294 posts
Armorama: 196 posts
Joined: February 11, 2013
KitMaker: 294 posts
Armorama: 196 posts
Posted: Saturday, March 09, 2013 - 11:21 AM UTC
Finished for now. I need to build the base and finsh the crew.
TotemWolf
Oklahoma, United States
Joined: February 11, 2013
KitMaker: 294 posts
Armorama: 196 posts
Joined: February 11, 2013
KitMaker: 294 posts
Armorama: 196 posts
Posted: Saturday, March 09, 2013 - 11:24 AM UTC
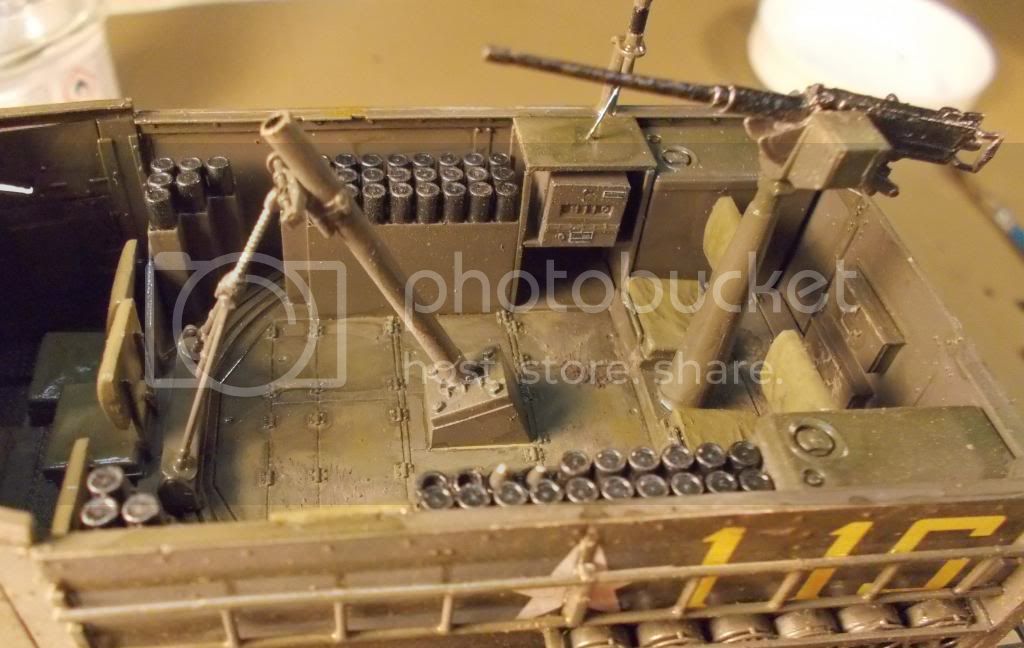
The interior.
TotemWolf
Oklahoma, United States
Joined: February 11, 2013
KitMaker: 294 posts
Armorama: 196 posts
Joined: February 11, 2013
KitMaker: 294 posts
Armorama: 196 posts
Posted: Saturday, March 09, 2013 - 11:27 AM UTC
A couple of shots with the crew in place.