Armor/AFV: Allied - WWII
Armor and ground forces of the Allied forces during World War II.
Hosted by Darren Baker
M3 Stuart
Dannyd
Visit this Community
England - North West, United Kingdom
Joined: March 27, 2007
KitMaker: 803 posts
Armorama: 793 posts
Posted: Wednesday, April 09, 2014 - 12:39 AM UTC
Cheers Rich, not sure yet on the weathering but I'm thinking maybe taking this one to heavy weathered look...

Decals are done and some detail painting has started.


Enjoy

Dan
Dannyd
Visit this Community
England - North West, United Kingdom
Joined: March 27, 2007
KitMaker: 803 posts
Armorama: 793 posts
Posted: Wednesday, April 16, 2014 - 05:20 AM UTC
Onto some detail painting now,


Enjoy

Dan
Longshanks8
Visit this Community
England - South West, United Kingdom
Joined: July 04, 2013
KitMaker: 430 posts
Armorama: 13 posts
Posted: Wednesday, April 16, 2014 - 08:06 AM UTC
That's a wicked paint job mate, your positively flying along now. . . .

Cheers Kev
Drichc
Visit this Community
England - South West, United Kingdom
Joined: April 13, 2013
KitMaker: 78 posts
Armorama: 76 posts
Posted: Wednesday, April 16, 2014 - 08:59 PM UTC
Really nice work Dan.

It's starting to develop a character with the weathering.

Keep it up fella.

Rich
Dannyd
Visit this Community
England - North West, United Kingdom
Joined: March 27, 2007
KitMaker: 803 posts
Armorama: 793 posts
Posted: Thursday, April 17, 2014 - 05:46 PM UTC
Thanks Chaps,

Onto the running gear now,


And some weathering on the inside of the commanders hatch.


Thanks for looking

Dan
Dannyd
Visit this Community
England - North West, United Kingdom
Joined: March 27, 2007
KitMaker: 803 posts
Armorama: 793 posts
Posted: Thursday, April 17, 2014 - 10:39 PM UTC
More photos of the weathered rear idler units.


Thanks for looking

Dan
Dannyd
Visit this Community
England - North West, United Kingdom
Joined: March 27, 2007
KitMaker: 803 posts
Armorama: 793 posts
Posted: Saturday, April 19, 2014 - 04:18 AM UTC
Almost done, one track on and one to go,
Commanders hatch done and flat cote done.
soon be finished.


Thanks for looking

Dan
trahe
Visit this Community
Virginia, United States
Joined: April 03, 2006
KitMaker: 1,158 posts
Armorama: 950 posts
Posted: Saturday, April 19, 2014 - 05:20 AM UTC
Very nice! Thank you for sharing!
Dannyd
Visit this Community
England - North West, United Kingdom
Joined: March 27, 2007
KitMaker: 803 posts
Armorama: 793 posts
Posted: Saturday, April 19, 2014 - 06:51 AM UTC
Thanks Thomas,

Second track on, almost done finished, a few more parts to add and it's done.


Cheers

Dan
Dannyd
Visit this Community
England - North West, United Kingdom
Joined: March 27, 2007
KitMaker: 803 posts
Armorama: 793 posts
Posted: Thursday, April 24, 2014 - 07:55 PM UTC
Hi all,

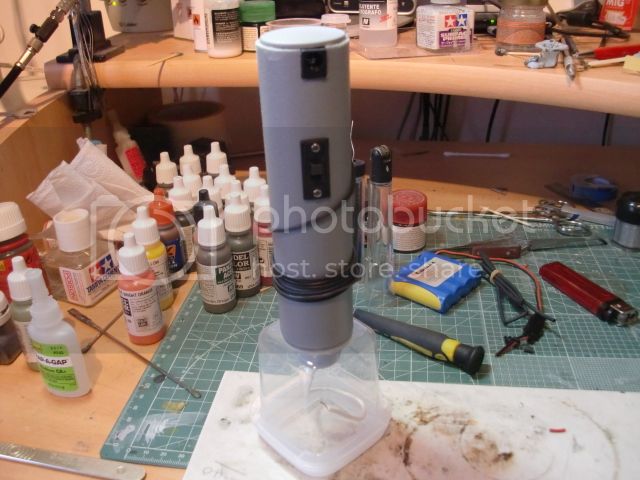
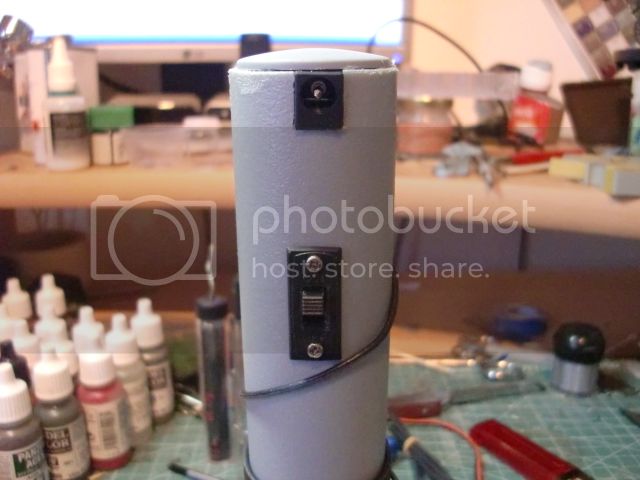
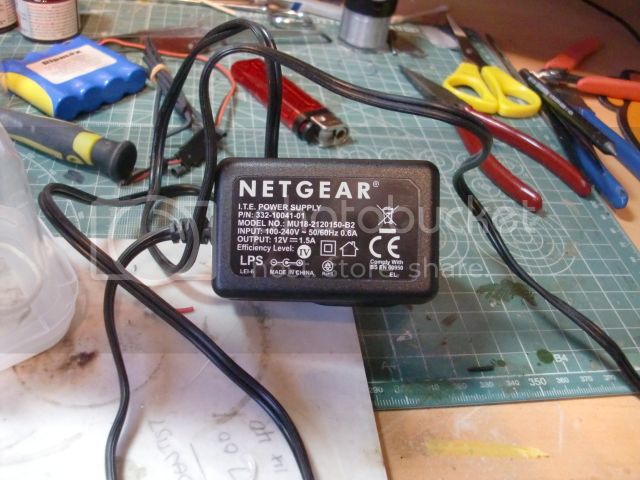
Not really done too much more on the M3 Stuart build, I've been making the base for a small diorama. First thing was to make a static grass applicator, buying a ready made one is a very expensive option so I built my own.

the main item is a 12V negative ion generator which for me was easy, a friend gave one a year or so ago. Here are a few pictures. It took about 2 hours to make and only a few £'s


I'll test it later on the base.


Thanks for looking

Dan
jrutman
Visit this Community
Pennsylvania, United States
Joined: April 10, 2011
KitMaker: 7,941 posts
Armorama: 7,934 posts
Posted: Friday, April 25, 2014 - 02:11 AM UTC
Still following this awesome build and I am better for it!
J
Dannyd
Visit this Community
England - North West, United Kingdom
Joined: March 27, 2007
KitMaker: 803 posts
Armorama: 793 posts
Posted: Friday, April 25, 2014 - 04:46 AM UTC

Quoted Text

Still following this awesome build and I am better for it!
J


Thanks Jerry, chuffed that you are liking and following fella.
The static grass machine works, so here are few photos to show where I'm currently at.


More work to be done but I'm quite happy at the moment.

Regards

Dan
PvtMutt
Visit this Community
Missouri, United States
Joined: July 01, 2006
KitMaker: 614 posts
Armorama: 601 posts
Posted: Friday, April 25, 2014 - 04:55 AM UTC
I would be too Dan

Tony lee
Dannyd
Visit this Community
England - North West, United Kingdom
Joined: March 27, 2007
KitMaker: 803 posts
Armorama: 793 posts
Posted: Friday, April 25, 2014 - 06:26 AM UTC
Thank you chaps, last photo's of the day.. beer time.


Have a great weekend folks.

Dan
SiStorey
Visit this Community
England - North East, United Kingdom
Joined: March 14, 2014
KitMaker: 242 posts
Armorama: 161 posts
Posted: Friday, April 25, 2014 - 06:35 AM UTC
Stunning work dan!! loving the shading and the small amounts of chipping effects on it. top job!!
Si
jvazquez
Visit this Community
New Jersey, United States
Joined: September 26, 2006
KitMaker: 857 posts
Armorama: 811 posts
Posted: Friday, April 25, 2014 - 06:41 AM UTC
Awesome stuff!!
You basically took a tired and old Tamiya kit and made it a splendid little miniature! Superb work!
And the base is really well done! Fits perfectly


Dannyd
Visit this Community
England - North West, United Kingdom
Joined: March 27, 2007
KitMaker: 803 posts
Armorama: 793 posts
Posted: Sunday, April 27, 2014 - 01:09 AM UTC
Thank you for the kind words chaps,
this has been a very enjoyable project from start to almost finished.

I've been working on the base over the last day or two, getting to grips with the static grass machine. It's really great.

So I made the grass tufts using PVA glue onto a tin lid. This is because I can earth the lid. Add a couple of drops of undiluted PVA and shake the grass.


looks a bit rough but when you remove them they look like this.


So here is another picture showing the set up.


one the glue is dry, overnight is best then you have these.


I made all the grass on the base with the exception of the flowers, I'll figure out what to use for those and I'll make up some batches for future projects


I've use AK's mud set for further tonal variations on the earth works.


Enjoy the pictures.

Regards

Dan
Drichc
Visit this Community
England - South West, United Kingdom
Joined: April 13, 2013
KitMaker: 78 posts
Armorama: 76 posts
Posted: Sunday, April 27, 2014 - 06:56 AM UTC
The base looks spectacular fella. I was a little concerned when you said you were wiring up a static grass dispenser, but it's certainly worth it.

Rich
Dannyd
Visit this Community
England - North West, United Kingdom
Joined: March 27, 2007
KitMaker: 803 posts
Armorama: 793 posts
Posted: Wednesday, April 30, 2014 - 10:22 PM UTC
Thanks Rich for the comments fella,

Onto the figures, I'm using one from Dragon with a hornet head, hes a radio operator carrying a manpack radio.
one arm is left off for the moment as it needs to be adjusted to fit properly.


Thanks for looking chaps.

Dan
ericadeane
Visit this Community
Michigan, United States
Joined: October 28, 2002
KitMaker: 4,021 posts
Armorama: 3,947 posts
Posted: Wednesday, April 30, 2014 - 11:32 PM UTC
Can I point out 2 things? The figure is wearing later war boots -- at a time when the M3 Stuart wouldn't have been a front line fighting vehicle. Maybe switch out? Also, make sure your co-axial .30 cal MG is co-axial to your 37mm main gun. From your pics (which are great to find minor flaws in one's own work), they are not in line with each other. Hope these help.
Dannyd
Visit this Community
England - North West, United Kingdom
Joined: March 27, 2007
KitMaker: 803 posts
Armorama: 793 posts
Posted: Wednesday, April 30, 2014 - 11:49 PM UTC

Quoted Text

Can I point out 2 things? The figure is wearing later war boots -- at a time when the M3 Stuart wouldn't have been a front line fighting vehicle. Maybe switch out? Also, make sure your co-axial .30 cal MG is co-axial to your 37mm main gun. From your pics (which are great to find minor flaws in one's own work), they are not in line with each other. Hope these help.


Cheers Roy, I'll have a look for another pair of boots now, didn't know that so thanks for pointing it out. The Co-ax is still to be glued in place and it's a little loose in the housing, hence the offset look, once I get some glue on it it should be set at the right angle.

Many thanks

Dan
AlanL
Visit this Community
England - East Anglia, United Kingdom
Joined: August 12, 2005
KitMaker: 14,499 posts
Armorama: 11,675 posts
Posted: Thursday, May 01, 2014 - 12:12 AM UTC
Just came across this one Dan, excellent work.

Al
M4A1Sherman
Visit this Community
New York, United States
Joined: May 02, 2013
KitMaker: 4,403 posts
Armorama: 4,078 posts
Posted: Thursday, May 01, 2014 - 01:27 AM UTC

Quoted Text


Quoted Text

Can I point out 2 things? The figure is wearing later war boots -- at a time when the M3 Stuart wouldn't have been a front line fighting vehicle. Maybe switch out? Also, make sure your co-axial .30 cal MG is co-axial to your 37mm main gun. From your pics (which are great to find minor flaws in one's own work), they are not in line with each other. Hope these help.


Cheers Roy, I'll have a look for another pair of boots now, didn't know that so thanks for pointing it out. The Co-ax is still to be glued in place and it's a little loose in the housing, hence the offset look, once I get some glue on it it should be set at the right angle.

Many thanks

Dan


Hi! FINE WORK!!! Looks like your "Dough-foot" is wearing the M1943 Combat Boots, which started to be issued to the infantry in the late summer of 1944... He should be wearing the M1938 Canvas Leggings in order to coincide with your M3's earlier timeline. If you have a DRAGON "US TANKERS" set, or actually, any one of the DRAGON US Army and/or USMC figure sets, you can scarf up some boots with leggings there. They're easy to cut off below the bloused trousers and graft onto your Radio Man. If worse comes to worst, you can get the boots with leggings from the resin 1/35 VERLINDEN US Infantry Conversion Set, or any of the great MASTER BOX 1/35 US Army or US Marines figure sets. MINIART also has a fine line of WWII US Infantry and MP figure sets... Good Luck!
Dannyd
Visit this Community
England - North West, United Kingdom
Joined: March 27, 2007
KitMaker: 803 posts
Armorama: 793 posts
Posted: Friday, May 02, 2014 - 09:58 AM UTC
Thank you guys for the input on the boots, I'm looking at sorting these small issues out, now be honest with me because I'm not convinced about the TC uniform.

Here is my take on it.


I'm no figure painter at all, so please excuse me, I'm trying

Cheers

Dan
Dannyd
Visit this Community
England - North West, United Kingdom
Joined: March 27, 2007
KitMaker: 803 posts
Armorama: 793 posts
Posted: Friday, May 02, 2014 - 11:03 AM UTC
This is where I'm currently at with the TC.


Thanks for looking.

Dan