Hosted by Darren Baker
SAS Green Hornet Build Log.
BobJ

Joined: October 15, 2006
KitMaker: 27 posts
Armorama: 19 posts
Posted: Sunday, April 12, 2015 - 11:32 PM UTC
This is awesome!! Looking forward to seeing it with the figures added.
Posted: Monday, April 13, 2015 - 01:03 AM UTC
Graet progress Joe, excellent work.
Al
Al

joegrafton

Joined: October 04, 2009
KitMaker: 1,209 posts
Armorama: 1,143 posts

Posted: Monday, April 13, 2015 - 02:45 PM UTC
Thanks for your comments. Nice to hear from you again, fellas!
The next step was to sort the arms & hands out.
In my opinion, this is the most difficult part of the figure conversion involving a driver because he has to interact with the steering wheel &/or gearstick, together with sitting correctly in the seat!
There are many points of contact with the model to consider; for instance: back & bum on seat, hand/s on steering wheel & hand on gearstick, if required.
You constantly have to test fit & it can take a long time before you get it right, so be patient!
I started by adding a thin plastic shim made from plasticard between the torso & the arms as I felt the original torso looked a bit puny looking.
Then I took the right arm from the original figure & cut off the SMG.
I next made a cut on the crook of the arm where the elbow flexes. Using a hair dryer on the hottest setting I softened the resin & straightened the arm quite a bit to the desired position & then immediately dunked it in cold water. This step is important as the resin has a 'memory' & will cool back to its' original shape after a while.
Repeat this step as many times as necessary until you achieve the correct position.
Once this step is done take some Aves putty & fill in at the crook of the elbow & around the shoulder, after glueing the arm in place & allow to dry for 24 hours.
This will allow you to move on to the right hand, manipulating it into shape with the hair dryer, without the worry of the arm trying to bend back to its original shape at the elbow whilst heating the resin again.
At this point I cut the steering wheel & placed it into the right hand (which I gently drilled out with the trusty rotary tool & a very small drill bit!) to allow me to test fit the figure with the vehicle & to allow the job of fitting the left arm a little easier.
The left arm was fitted using the same process.
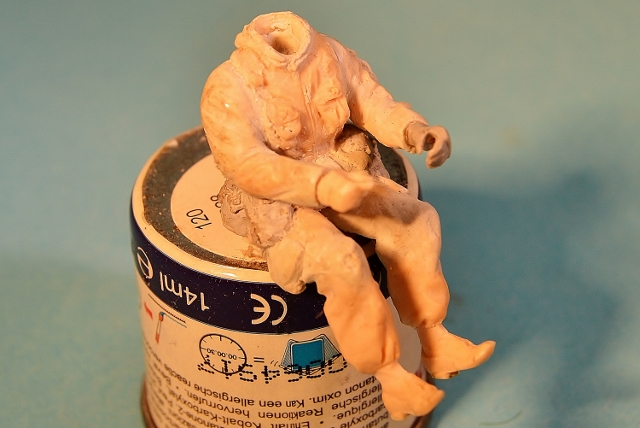
Here you can see the arms now in place. I wanted to use the hands supplied with the kit as they depict the so-called Northern Ireland issue gloves with the leather pad over the knuckles & dates the kit quite nicely to the desired time period.
Let me add here, & as you will see over the following sequence of photographs, the figure required extensive re-building around the shoulders, arms, cuffs, knees, hem & hood of the smock, pockets & back to get the most realistic sit possible. Again, this was achieved using Aves putty.
I decided to give the figure a rip in the right knee of his trousers for a little visual interest.
(Incidentally, you may be wondering why his boots are an odd shape. This is purely so he could fit into the crew cab due to the pedals & the bulkhead being in the way & is a detail that will not be seen on the final model).
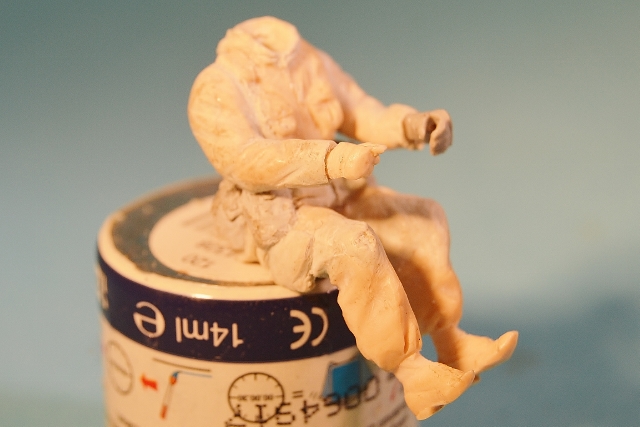
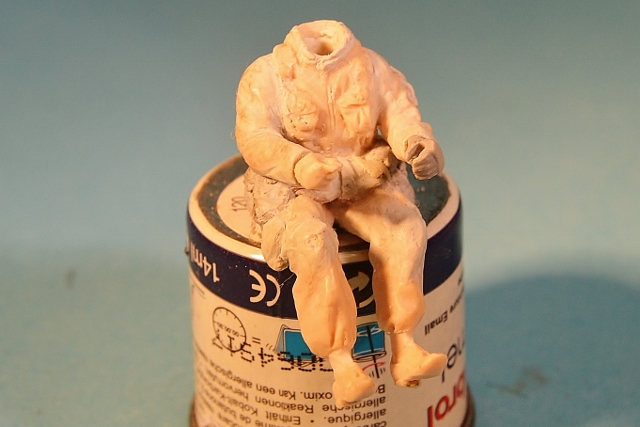
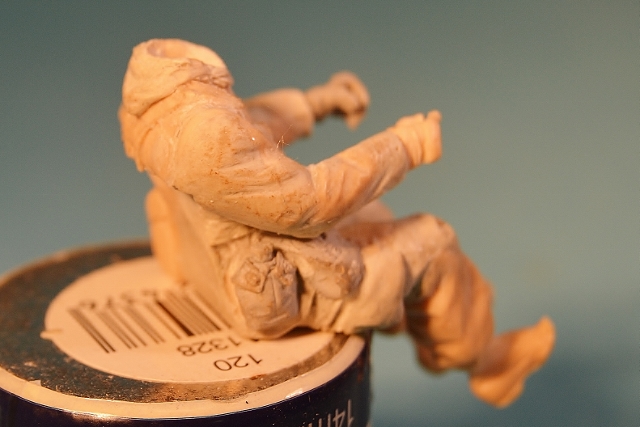
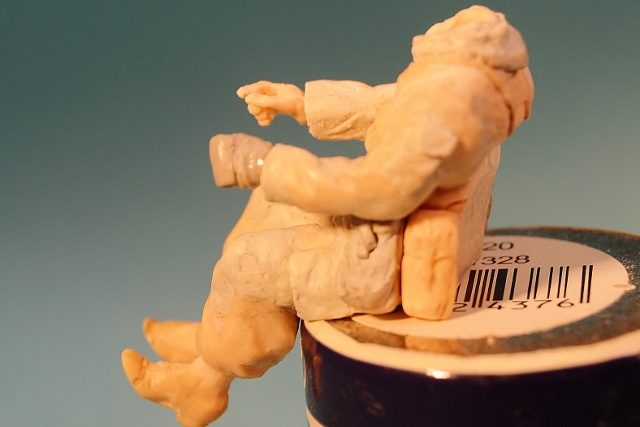
On this side I scraped off the original arm pocket & re-sculpted a better one & also bulked out the thigh pockets, both left & right.
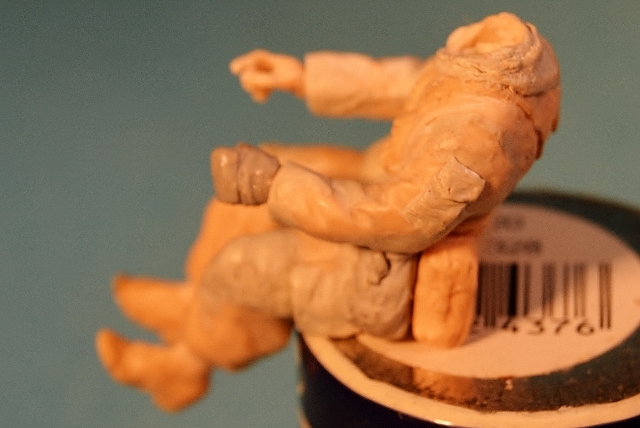

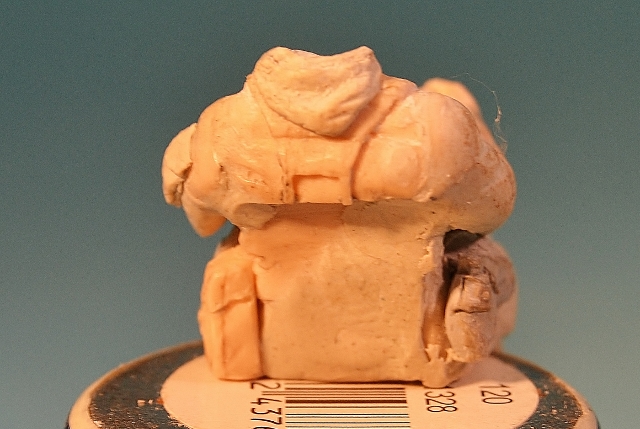
Above you can see more shaping of the hood which was built up over several days!
More soon...
The next step was to sort the arms & hands out.
In my opinion, this is the most difficult part of the figure conversion involving a driver because he has to interact with the steering wheel &/or gearstick, together with sitting correctly in the seat!
There are many points of contact with the model to consider; for instance: back & bum on seat, hand/s on steering wheel & hand on gearstick, if required.
You constantly have to test fit & it can take a long time before you get it right, so be patient!
I started by adding a thin plastic shim made from plasticard between the torso & the arms as I felt the original torso looked a bit puny looking.
Then I took the right arm from the original figure & cut off the SMG.
I next made a cut on the crook of the arm where the elbow flexes. Using a hair dryer on the hottest setting I softened the resin & straightened the arm quite a bit to the desired position & then immediately dunked it in cold water. This step is important as the resin has a 'memory' & will cool back to its' original shape after a while.
Repeat this step as many times as necessary until you achieve the correct position.
Once this step is done take some Aves putty & fill in at the crook of the elbow & around the shoulder, after glueing the arm in place & allow to dry for 24 hours.
This will allow you to move on to the right hand, manipulating it into shape with the hair dryer, without the worry of the arm trying to bend back to its original shape at the elbow whilst heating the resin again.
At this point I cut the steering wheel & placed it into the right hand (which I gently drilled out with the trusty rotary tool & a very small drill bit!) to allow me to test fit the figure with the vehicle & to allow the job of fitting the left arm a little easier.
The left arm was fitted using the same process.

Here you can see the arms now in place. I wanted to use the hands supplied with the kit as they depict the so-called Northern Ireland issue gloves with the leather pad over the knuckles & dates the kit quite nicely to the desired time period.
Let me add here, & as you will see over the following sequence of photographs, the figure required extensive re-building around the shoulders, arms, cuffs, knees, hem & hood of the smock, pockets & back to get the most realistic sit possible. Again, this was achieved using Aves putty.
I decided to give the figure a rip in the right knee of his trousers for a little visual interest.
(Incidentally, you may be wondering why his boots are an odd shape. This is purely so he could fit into the crew cab due to the pedals & the bulkhead being in the way & is a detail that will not be seen on the final model).


On this side I scraped off the original arm pocket & re-sculpted a better one & also bulked out the thigh pockets, both left & right.


Above you can see more shaping of the hood which was built up over several days!
More soon...
joegrafton

Joined: October 04, 2009
KitMaker: 1,209 posts
Armorama: 1,143 posts

Posted: Tuesday, April 14, 2015 - 02:14 PM UTC
The figure conversion is now complete.
I have cleaned the figure up in a few places; added a first aid pouch, M18 smoke grenade & a right angled torch from the Legend Pink Panther update set to his web kit; added a little more detail around the cuffs & some buttons on the chest rank slide & other pockets using the Archer Transfers rivet sets.
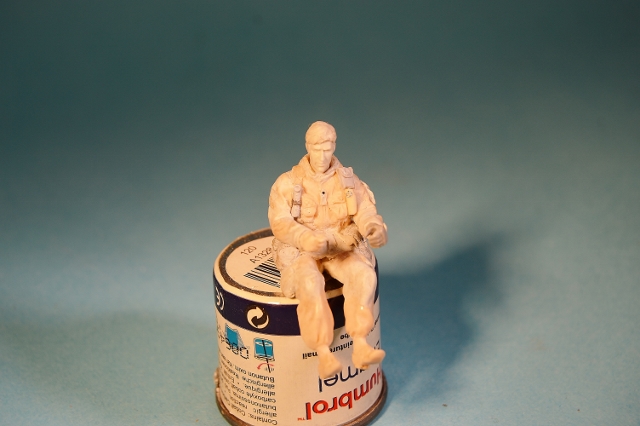
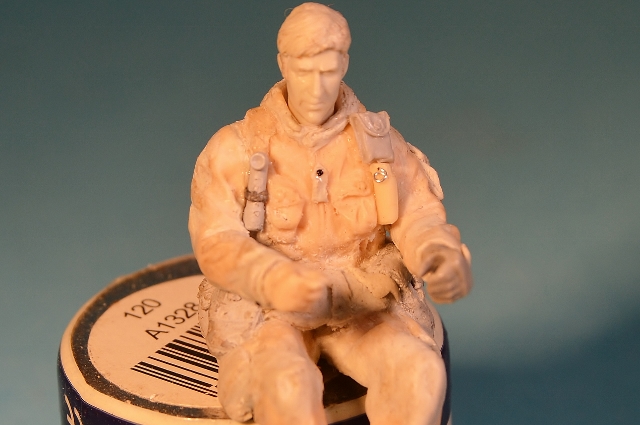
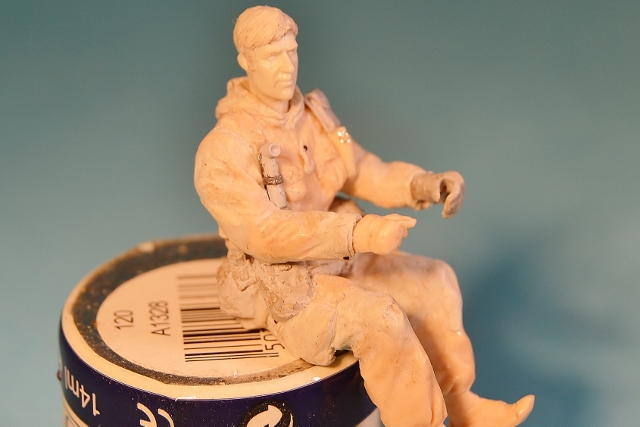
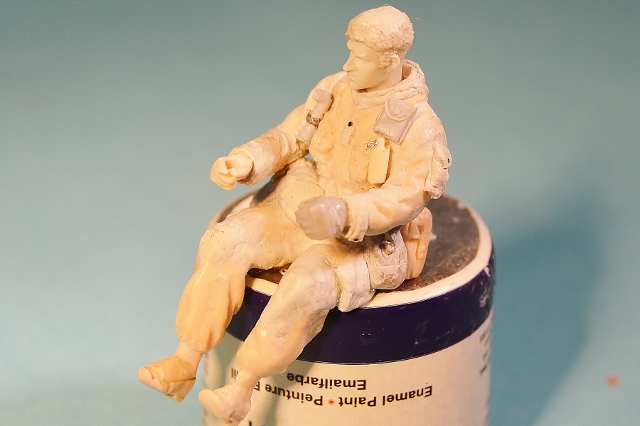
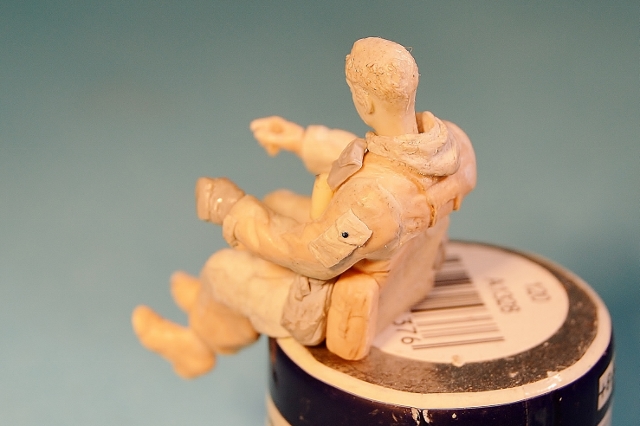
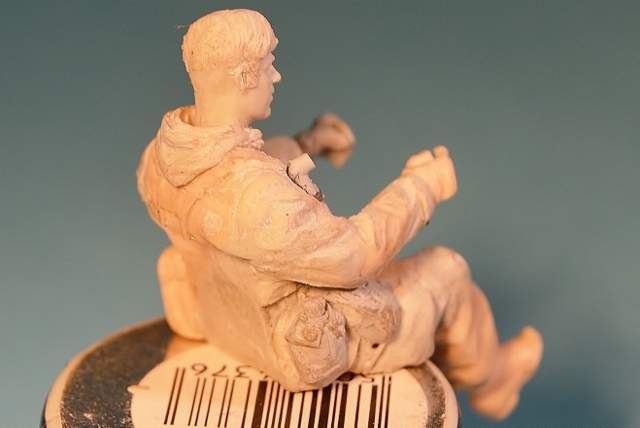
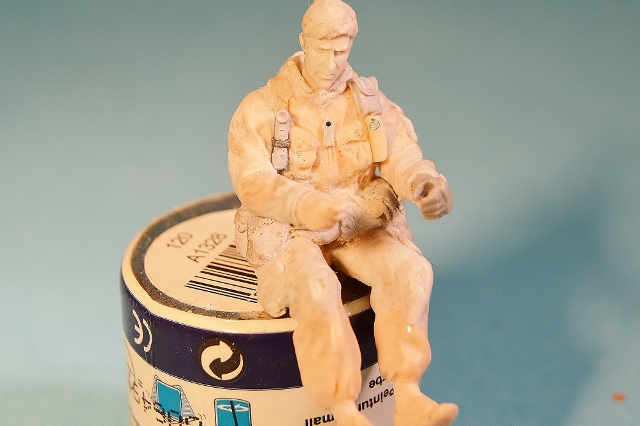
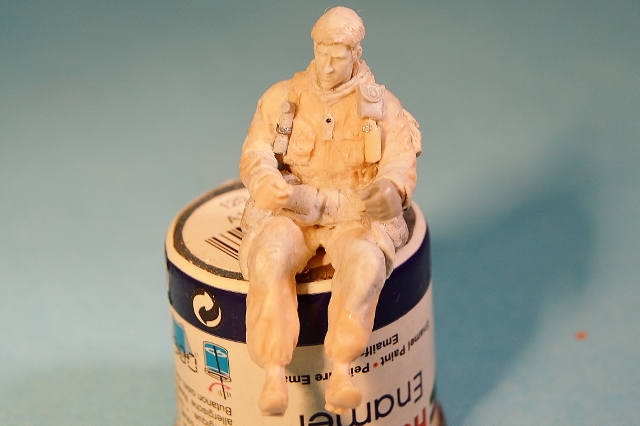
I also reshaped his boots slightly to depict the new high leg DMS boot that was beginning to be issued to the British army during the early 1980's instead of the 'ammo' boots & puttees that were on the original figure.
Okay, next step: cleaning & priming ready for paint!
Hope you like so far! More soon...
I have cleaned the figure up in a few places; added a first aid pouch, M18 smoke grenade & a right angled torch from the Legend Pink Panther update set to his web kit; added a little more detail around the cuffs & some buttons on the chest rank slide & other pockets using the Archer Transfers rivet sets.


I also reshaped his boots slightly to depict the new high leg DMS boot that was beginning to be issued to the British army during the early 1980's instead of the 'ammo' boots & puttees that were on the original figure.
Okay, next step: cleaning & priming ready for paint!
Hope you like so far! More soon...
Dannyd

Joined: March 27, 2007
KitMaker: 803 posts
Armorama: 793 posts

Posted: Tuesday, April 14, 2015 - 02:21 PM UTC
Stunning work Joe 

Keef1648

Joined: January 23, 2008
KitMaker: 1,240 posts
Armorama: 1,192 posts

Posted: Tuesday, April 14, 2015 - 04:26 PM UTC
Quoted Text
The figure conversion is now complete.
I have cleaned the figure up in a few places; added a first aid pouch, M18 smoke grenade & a right angled torch from the Legend Pink Panther update set to his web kit; added a little more detail around the cuffs & some buttons on the chest rank slide & other pockets using the Archer Transfers rivet sets.
I also reshaped his boots slightly to depict the new high leg DMS boot that was beginning to be issued to the British army during the early 1980's instead of the 'ammo' boots & puttees that were on the original figure.
Okay, next step: cleaning & priming ready for paint!
Hope you like so far! More soon...
Morning Joe, an amazing build mate and I really look forward everyday to seeing more and more as this beastie comes together.
A point of reference only and just for general info. Boots 'Ammo' were leather soled and studded (13 nails) and were withdrawn from general issue in 1965 and the Boots DMS were issued as the replacement. The exception being they were retained by some units (Guards etc.) for ceremonial duties. As you indicate they (DMS) were subsequently replace by the Boots Combat high leg, also rubbish as they were very uncomfortable and the only thing they achieved was the ability to get rid of the Puttee's
Keep the updates coming.
Keith.

joegrafton

Joined: October 04, 2009
KitMaker: 1,209 posts
Armorama: 1,143 posts

Posted: Tuesday, April 14, 2015 - 06:43 PM UTC
Good morning to you, too, Keith!
Thank you for putting me straight on the boots issue. I was never in the Army so just assumed that I had it right.
Thanks for the correction! It never ceases to amaze me the wealth of knowledge on these forums!
I'm glad you're liking the updates, buddy. Always nice to hear from you!
Incidentally, the figure took virtually a whole months work just to get it to this point!
It was a very slow process but one that I think will be worth it.
Anyway, like I said, more soon...
Joe.

joegrafton

Joined: October 04, 2009
KitMaker: 1,209 posts
Armorama: 1,143 posts

Posted: Wednesday, April 15, 2015 - 04:24 PM UTC
The next step was, of course, to get the figure primed & ready for painting.
I used Vallejo acrylic grey primer sprayed through an airbrush.
I allowed the primer coat to dry for 24 hours & then cleaned up anywhere that needed it.
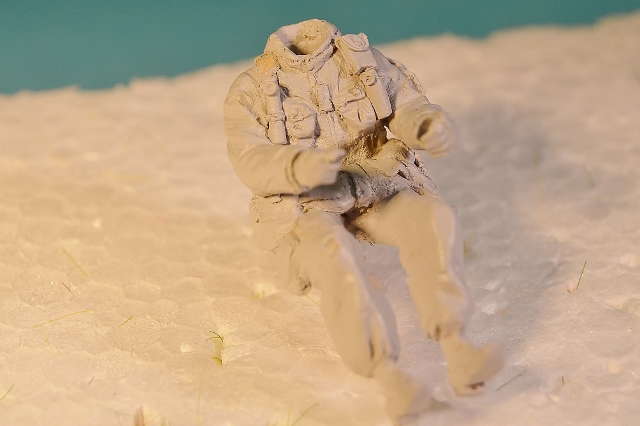
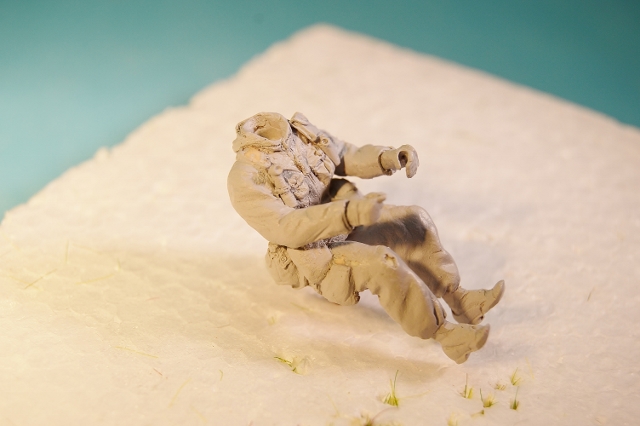
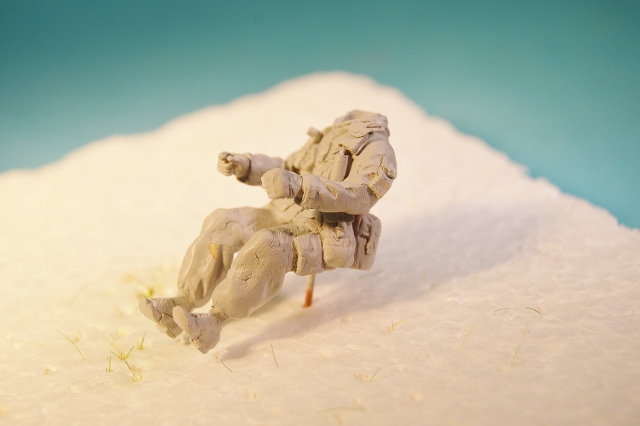
Next step: paint!
More soon...
I used Vallejo acrylic grey primer sprayed through an airbrush.
I allowed the primer coat to dry for 24 hours & then cleaned up anywhere that needed it.


Next step: paint!
More soon...
joegrafton

Joined: October 04, 2009
KitMaker: 1,209 posts
Armorama: 1,143 posts

Posted: Thursday, April 16, 2015 - 01:38 PM UTC
So to painting the figure...
All paints used in the painting procedure were from the Vallejo Model Colour acrylic range unless otherwise stated.
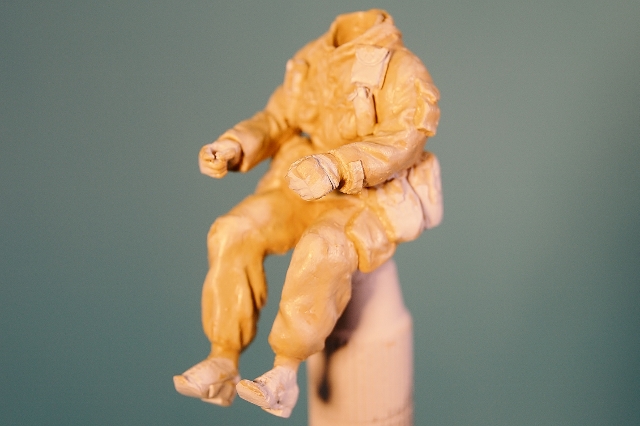
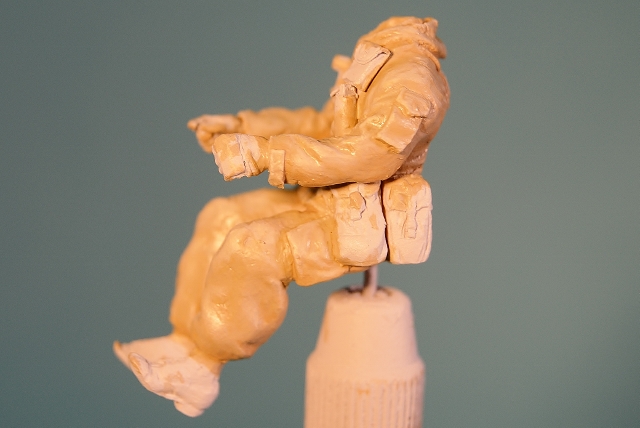
The first step was to paint the DPM smock & trousers.
Firstly, the khaki base colour was applied using a mixture of 988 Khaki, 837 Pale Sand & a little 866 Grey Green. I applied 4 thin coats until everything was evenly covered.
I applied 9 highlight coats adding a little more 837 Pale Sand to the base colour mix each time.
The shadows were laid down in 5 layers adding small amounts of 988 Khaki to the base colour for every layer of shadow.
Here are some photos of the work so far:
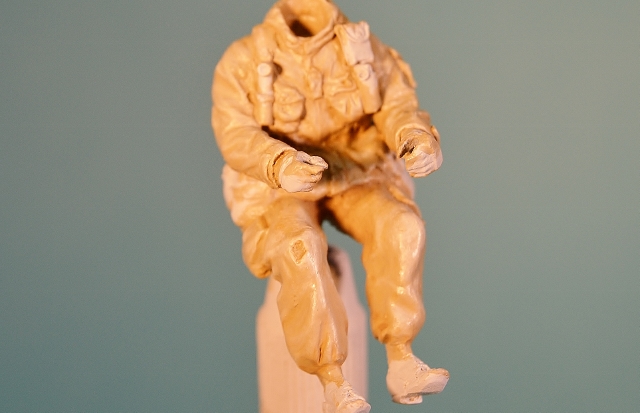
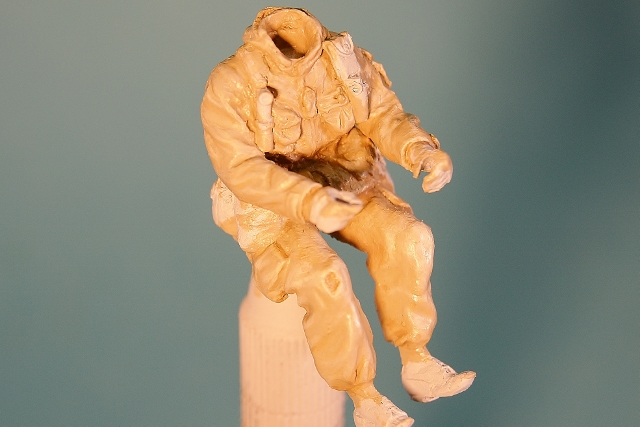
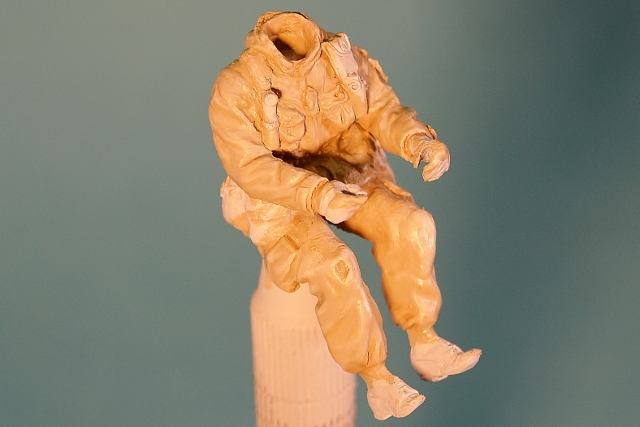
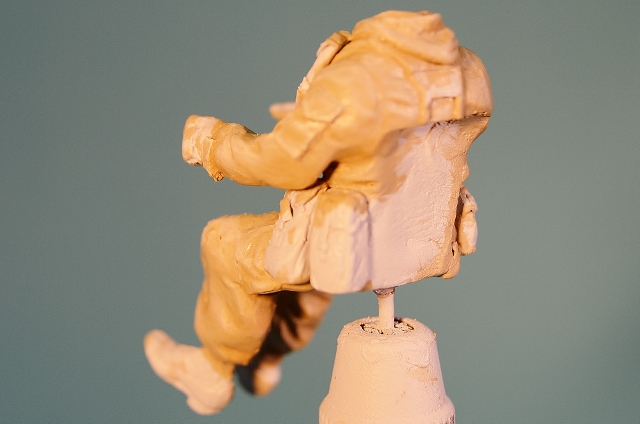
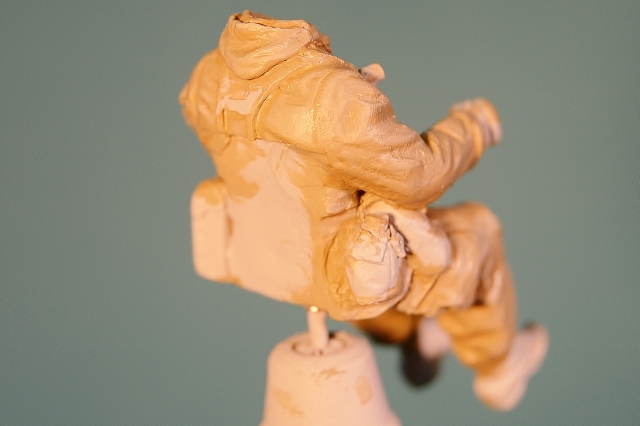
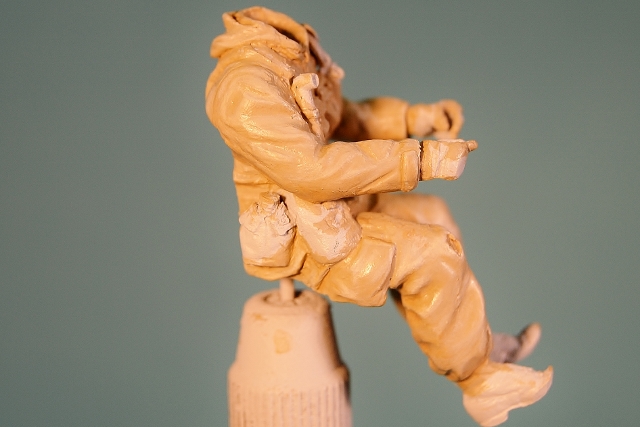
Hope you like so far...
All paints used in the painting procedure were from the Vallejo Model Colour acrylic range unless otherwise stated.
The first step was to paint the DPM smock & trousers.
Firstly, the khaki base colour was applied using a mixture of 988 Khaki, 837 Pale Sand & a little 866 Grey Green. I applied 4 thin coats until everything was evenly covered.
I applied 9 highlight coats adding a little more 837 Pale Sand to the base colour mix each time.
The shadows were laid down in 5 layers adding small amounts of 988 Khaki to the base colour for every layer of shadow.
Here are some photos of the work so far:


Hope you like so far...
erichvon

Joined: January 17, 2006
KitMaker: 1,694 posts
Armorama: 1,584 posts

Posted: Thursday, April 16, 2015 - 02:02 PM UTC
Fantastic work Joe! The attention to detail is amazing. One thing I have noticed is the rank slide on the front of his smock. SAS smocks don't have them. The arctic windproof does on the front and rear. To be honest there's not a lot between the two smocks except the arctic windproof has a wired hood and the edge of the hood sticks out further (which I removed off mine as I was never going to wear it with the hood up). The rank slides are also a bit of a pain as inevitably you'd get your bergan staps caught on the rear one or your shovel if it was attached to your webbing when you put your webbing back on. I've still got one of each so if you need any pics let me know. One modification I did make to both was to add knitted cuffs made out of old socks. Sounds odd but did the job...lol
erichvon

Joined: January 17, 2006
KitMaker: 1,694 posts
Armorama: 1,584 posts

Posted: Thursday, April 16, 2015 - 02:08 PM UTC
Almost forgot. The first field dressing pouch is on the right arm towards the rear and on the left arm is the pen pocket (or for the ever important racing spoon). It's the same for both smocks.
joegrafton

Joined: October 04, 2009
KitMaker: 1,209 posts
Armorama: 1,143 posts

Posted: Thursday, April 16, 2015 - 02:30 PM UTC
Hi Karl,
Oh dear, it looks like I've goofed!
All I did was to copy the smocks that these two guys are wearing:
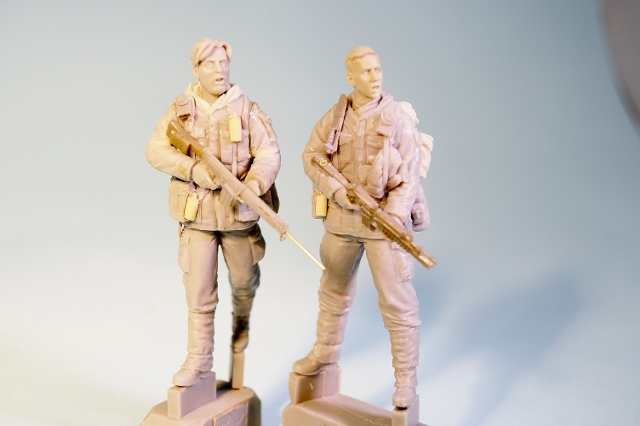
Any mistakes are mine, & mine alone so I take full responsibility for this one.
Thanks for pointing it out to me, though.
So, maybe he's wearing a customised Arctic windproof smock, eh? LOL
I'm glad you're watching & look out for the updates!
Joe.
Oh dear, it looks like I've goofed!
All I did was to copy the smocks that these two guys are wearing:

Any mistakes are mine, & mine alone so I take full responsibility for this one.
Thanks for pointing it out to me, though.
So, maybe he's wearing a customised Arctic windproof smock, eh? LOL
I'm glad you're watching & look out for the updates!
Joe.
Keef1648

Joined: January 23, 2008
KitMaker: 1,240 posts
Armorama: 1,192 posts

Posted: Thursday, April 16, 2015 - 05:05 PM UTC
Good morning Joe.
No worries mate, the ability for the SAS and SBS to pick and choose from a myriad of kit and equipment back then (and now) has always been beneficial to them and some other units.
This picture from my stash may be helpul to you and show you what I mean about mix n match.
No names, no pack drill as they say.

Great work Sir.
Keith.
No worries mate, the ability for the SAS and SBS to pick and choose from a myriad of kit and equipment back then (and now) has always been beneficial to them and some other units.
This picture from my stash may be helpul to you and show you what I mean about mix n match.
No names, no pack drill as they say.

Great work Sir.
Keith.

joegrafton

Joined: October 04, 2009
KitMaker: 1,209 posts
Armorama: 1,143 posts

Posted: Saturday, April 18, 2015 - 02:50 PM UTC
I apologise for the lack of continuity here but it would appear that I've lost some photos along the way!
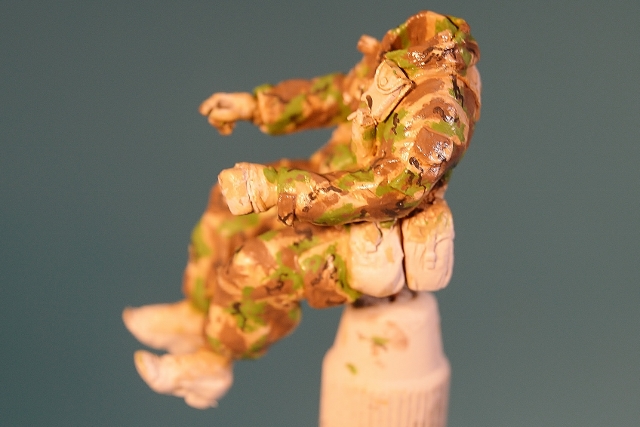
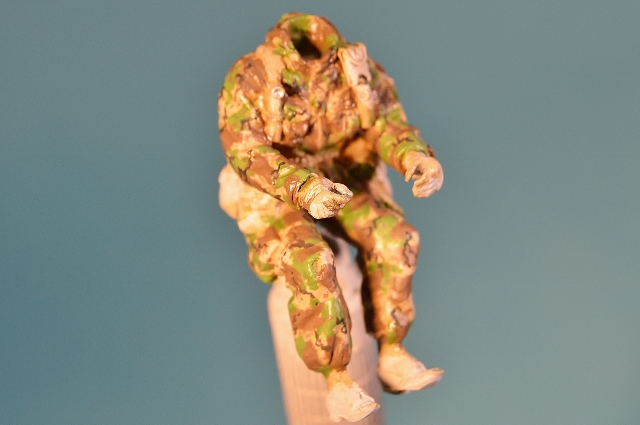
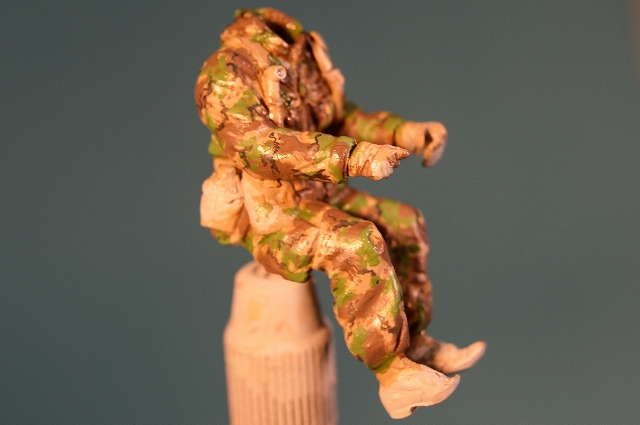
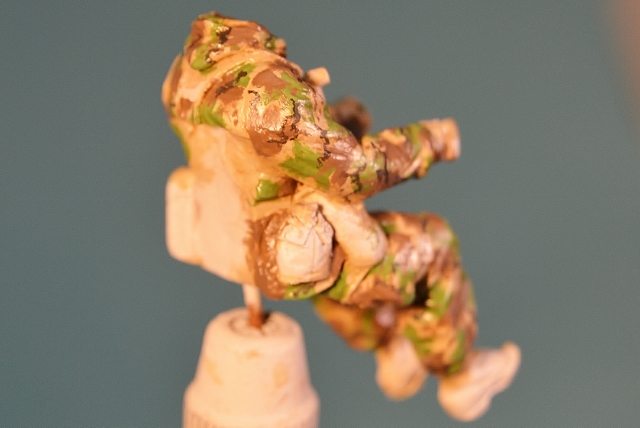
What you see in the following sequence of photographs is the completed paint job for the DPM.
I wanted to try to depict a certain type of DPM that was more prevalent in the 1970's & early '80's which is very slightly different to later patterns. Keith, maybe you can help me out here?
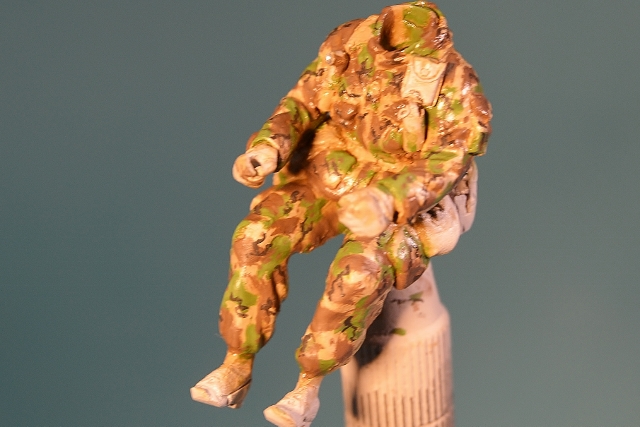
Okay, for the green swirls I used a mixture of 891 Intermediate Green, 837 Pale Sand & a little 894 Russian Green. I aimed to cover approximately 30-35% of the uniforms' surface.
For the highlights I mixed up 891 Intermediate Green, 837 Pale Sand & 881 Yellow green. I added a little more to the base colour each time & laid down 9 highlight coats.
For the shadow I added more 894 Russian Green to the base colour for a total of 5 shadow coats.
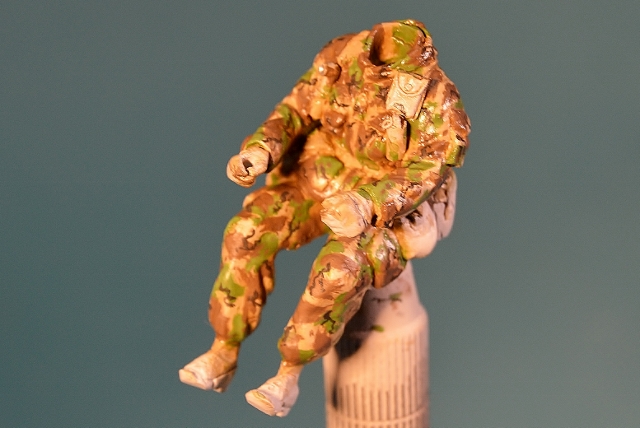
Next came the brown swirls. For this colour I mixed up some 941 Burnt Umber & 837 Pale Sand.
Again, I was looking to cover 30-35% of the clothing surface.
For the highlights I used 941 Burnt Umber, 837 Pale Sand & 818 Red Leather. I added more of this mixture to the base coat each time for a total of 9 highlight coats.
The shadows were created by mixing up 941 Burnt Umber & 950 Black laying down 5 coats of shadow.
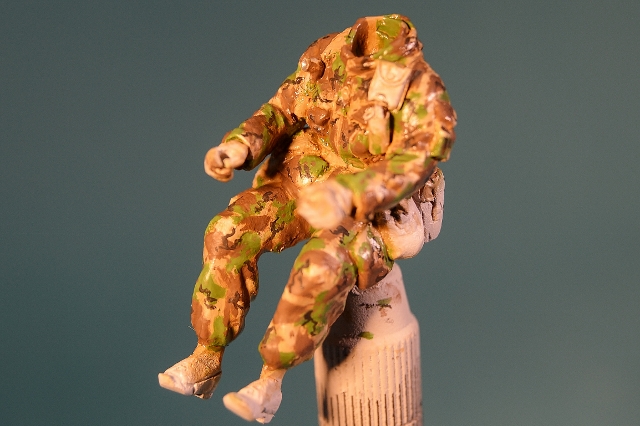
The black 'lightning bolt' streaks were added using a Winsor & Newton Series 7 size 000 brush using a mixture of 950 Black & a fair amount of 837 Pale Sand to obtain a dark grey colour. I tried very hard not to overdo the black streaks as this particular pattern of DPM seems to me to have had less black than other patterns, in my humble opinion.
I didn't highlight or shadow the black 'lightning bolt' streaks.
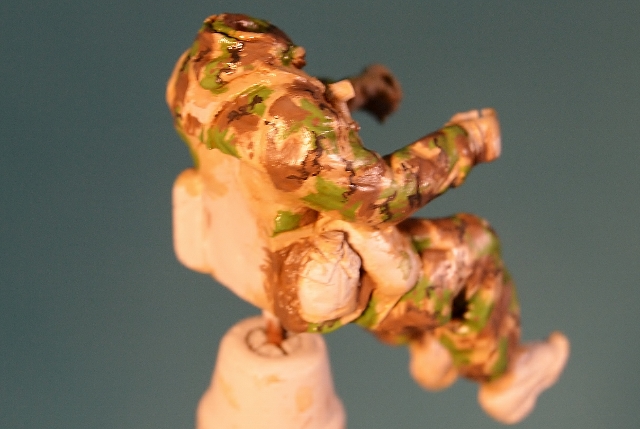
After the paint was dry the final touch was to coat the entire uniform in Mig Filter #1510 Tan for 3 Tone Camouflage.
I think this step ties it altogether.
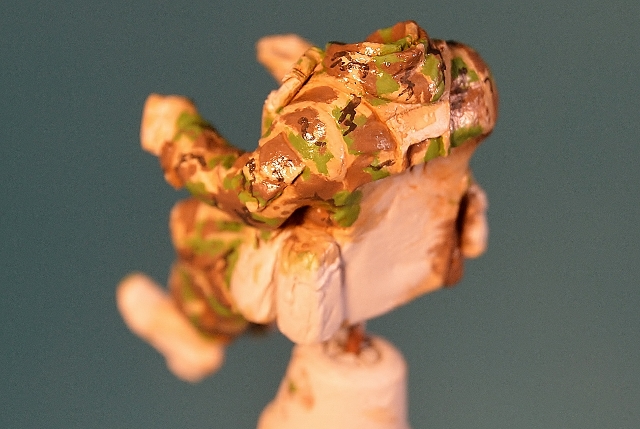
I have also tried to go for a more faded & washed out look to the uniform which is why I used 837 Pale Sand in every step of the painting process.
I would also like to add here that this is my way of painting DPM & not the 'only' way.
And I am also no expert at doing it. For me, personally, I am a little disappointed with the final result but after trying & trying & trying this is the best result I could achieve without pulling my hair out!
I know there are others out there who can paint DPM in 1/35th scale who are way better than me so I offer my total respect to them!
Anyway, I ask you to bear with me on this, please?
More updates soon...
What you see in the following sequence of photographs is the completed paint job for the DPM.
I wanted to try to depict a certain type of DPM that was more prevalent in the 1970's & early '80's which is very slightly different to later patterns. Keith, maybe you can help me out here?

Okay, for the green swirls I used a mixture of 891 Intermediate Green, 837 Pale Sand & a little 894 Russian Green. I aimed to cover approximately 30-35% of the uniforms' surface.
For the highlights I mixed up 891 Intermediate Green, 837 Pale Sand & 881 Yellow green. I added a little more to the base colour each time & laid down 9 highlight coats.
For the shadow I added more 894 Russian Green to the base colour for a total of 5 shadow coats.

Next came the brown swirls. For this colour I mixed up some 941 Burnt Umber & 837 Pale Sand.
Again, I was looking to cover 30-35% of the clothing surface.
For the highlights I used 941 Burnt Umber, 837 Pale Sand & 818 Red Leather. I added more of this mixture to the base coat each time for a total of 9 highlight coats.
The shadows were created by mixing up 941 Burnt Umber & 950 Black laying down 5 coats of shadow.

The black 'lightning bolt' streaks were added using a Winsor & Newton Series 7 size 000 brush using a mixture of 950 Black & a fair amount of 837 Pale Sand to obtain a dark grey colour. I tried very hard not to overdo the black streaks as this particular pattern of DPM seems to me to have had less black than other patterns, in my humble opinion.
I didn't highlight or shadow the black 'lightning bolt' streaks.

After the paint was dry the final touch was to coat the entire uniform in Mig Filter #1510 Tan for 3 Tone Camouflage.
I think this step ties it altogether.

I have also tried to go for a more faded & washed out look to the uniform which is why I used 837 Pale Sand in every step of the painting process.

I would also like to add here that this is my way of painting DPM & not the 'only' way.
And I am also no expert at doing it. For me, personally, I am a little disappointed with the final result but after trying & trying & trying this is the best result I could achieve without pulling my hair out!
I know there are others out there who can paint DPM in 1/35th scale who are way better than me so I offer my total respect to them!
Anyway, I ask you to bear with me on this, please?


More updates soon...
joegrafton

Joined: October 04, 2009
KitMaker: 1,209 posts
Armorama: 1,143 posts

Posted: Sunday, April 19, 2015 - 03:11 PM UTC
Obviously, the next step was to finish painting the figure & I apologise again for the lack of continuity here.
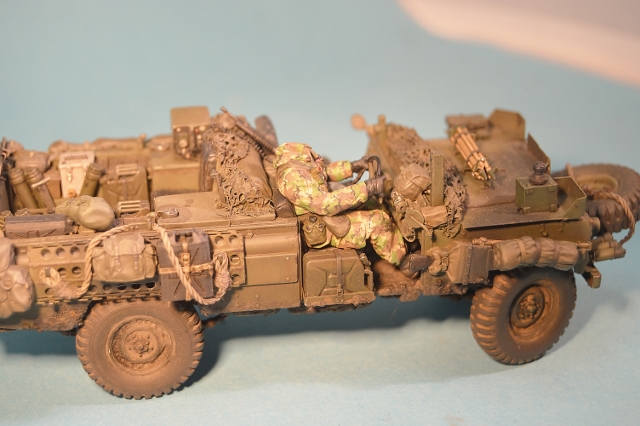
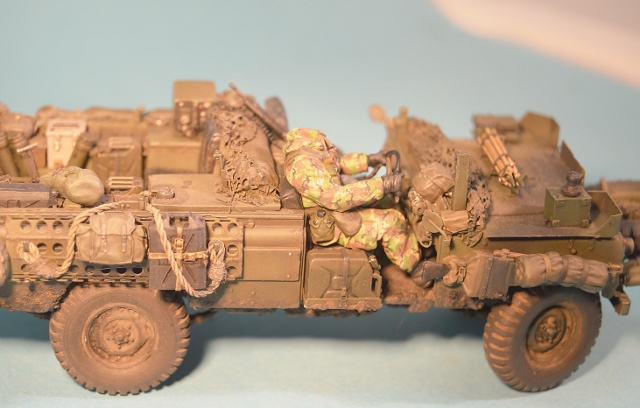
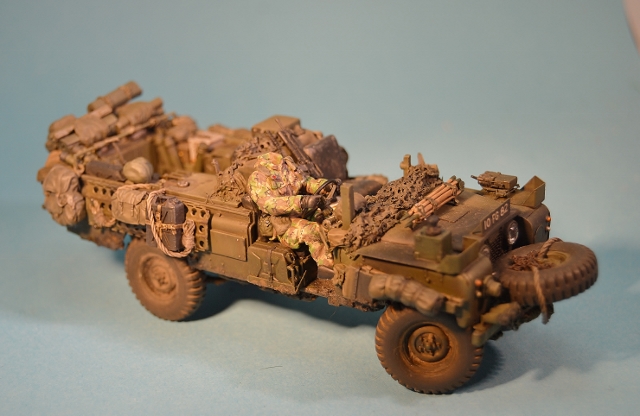
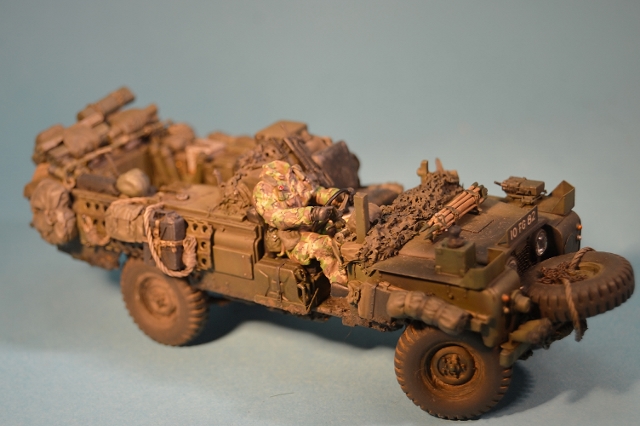
Once all the paint had dried & the decal was applied to the smoke grenade I gave him a couple of heavy coats of Vallejo matt varnish.
Once this had dried I used the satin varnish from Vallejo to cover the smoke grenade, gloves, boots & the 'plastic' body of the torch.
The lens of the torch was painted by first laying down a base of Floquil Old Silver, overlaid with Tamiya Clear Red & then some Vallejo gloss varnish on top.
The following sequence of shots shows the driver fitted into the vehicle...
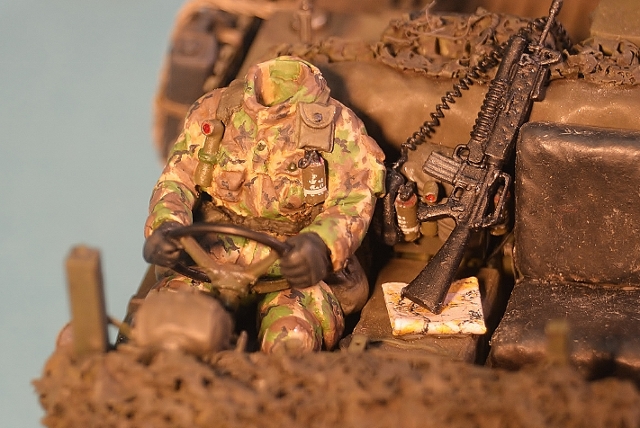
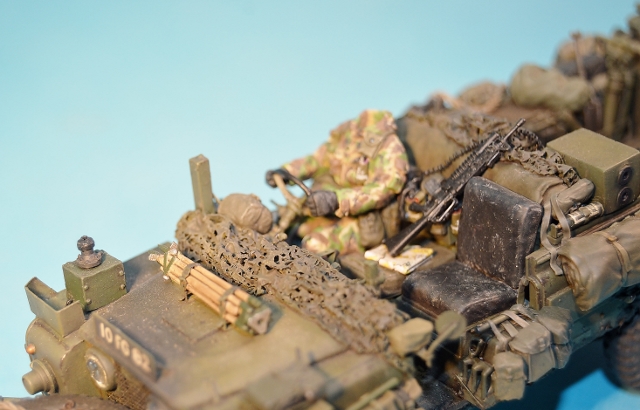
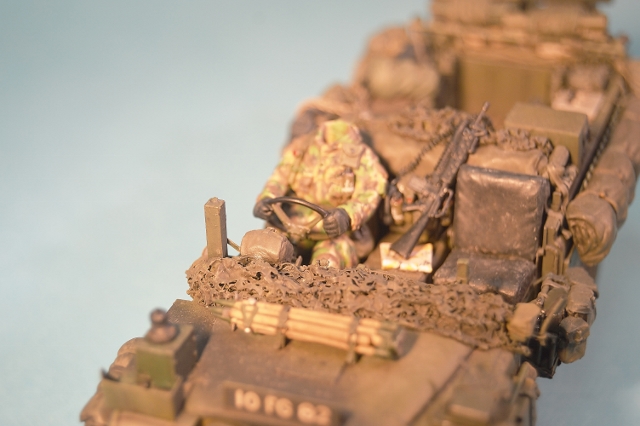
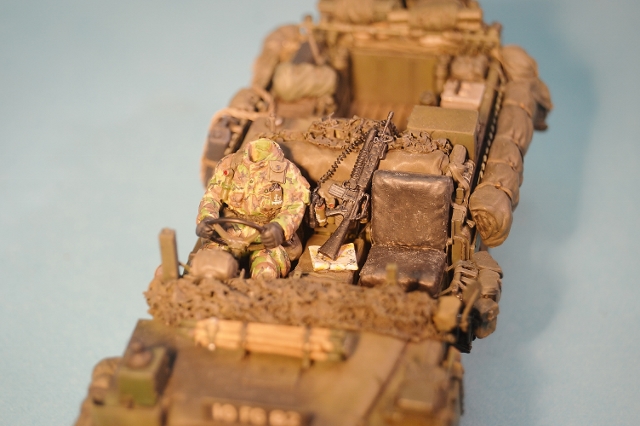
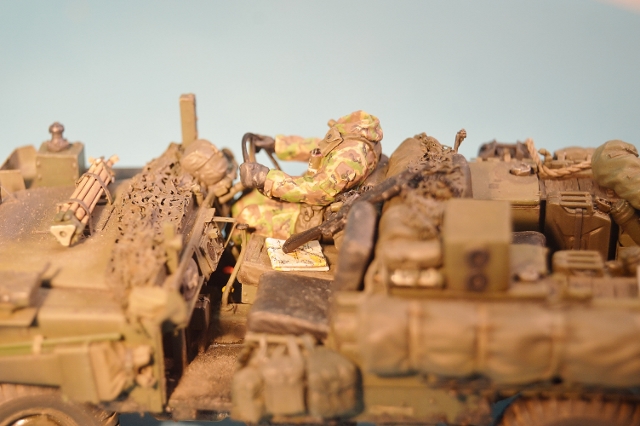
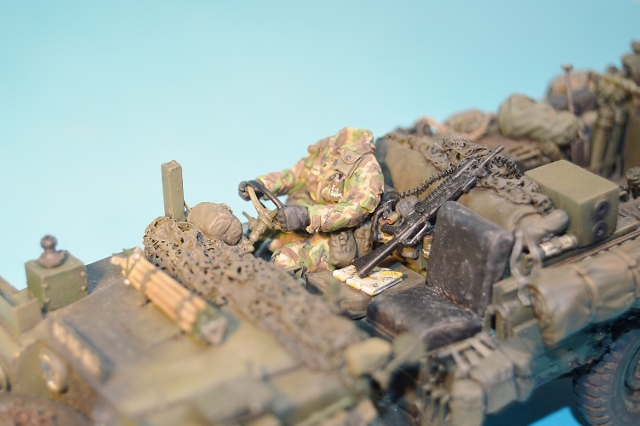
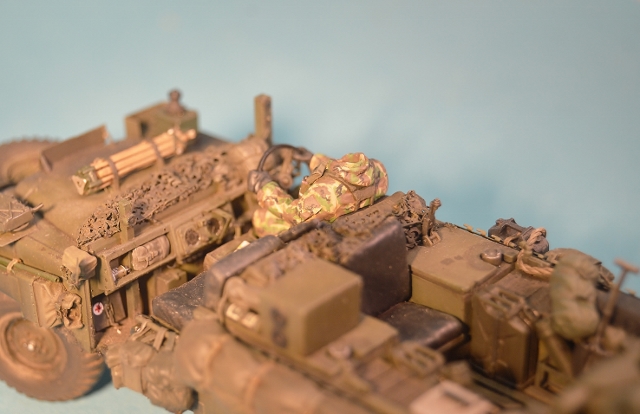
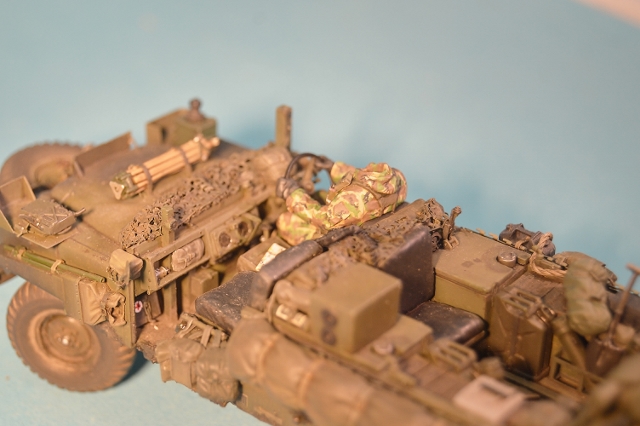
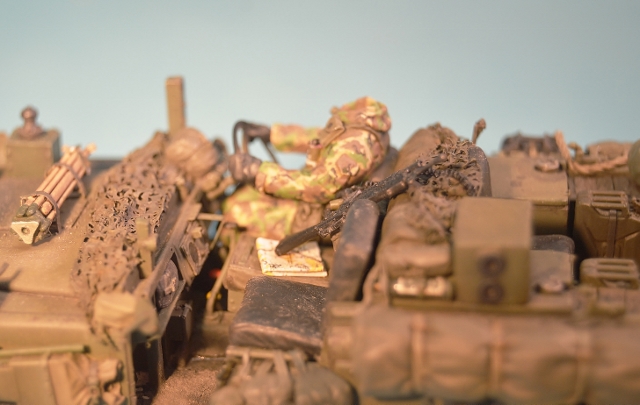
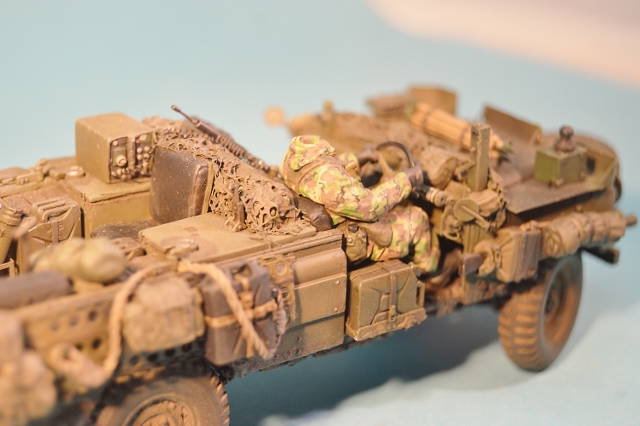
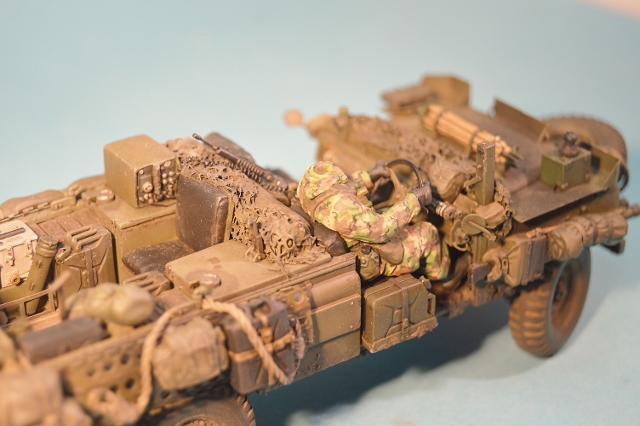
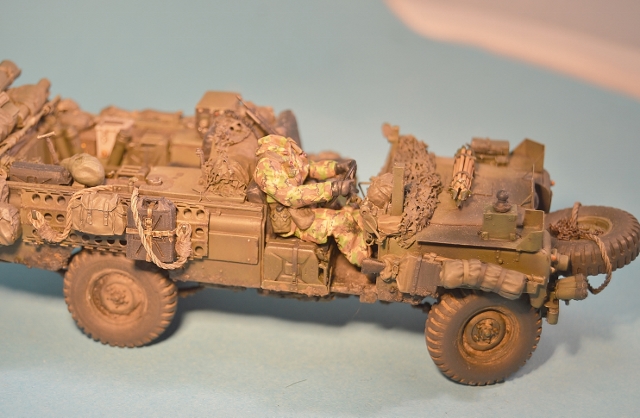
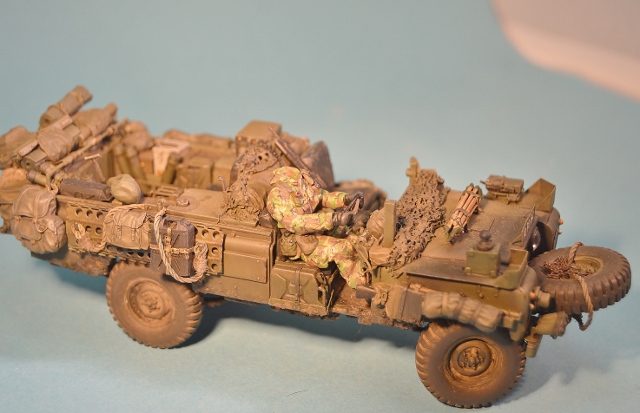
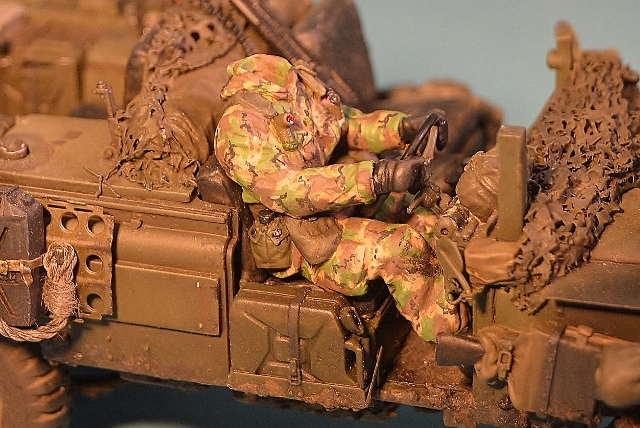
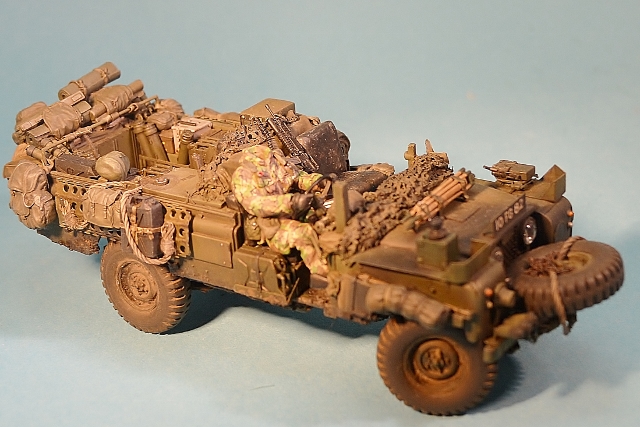
Hope you like the work so far.
The next step is to get the vehicle completed!
More soon...
Once all the paint had dried & the decal was applied to the smoke grenade I gave him a couple of heavy coats of Vallejo matt varnish.
Once this had dried I used the satin varnish from Vallejo to cover the smoke grenade, gloves, boots & the 'plastic' body of the torch.
The lens of the torch was painted by first laying down a base of Floquil Old Silver, overlaid with Tamiya Clear Red & then some Vallejo gloss varnish on top.
The following sequence of shots shows the driver fitted into the vehicle...


Hope you like the work so far.
The next step is to get the vehicle completed!
More soon...
erichvon

Joined: January 17, 2006
KitMaker: 1,694 posts
Armorama: 1,584 posts

Posted: Sunday, April 19, 2015 - 03:39 PM UTC
Joe you've nailed it there with the colours. Cracking job of doing the DPM. Wish I could get it looking like that. You've done the right thing with the colours. SAS smocks, Arctic windproofs (smocks and trousers) and trop trousers are all a lighter shade to the much hated 85 pattern which to put it bluntly was s**t and never seemed to lose it's colour so remained dark. It absorbed water, never dried out and was single stitched so anything heavier than a Mars bar in your pocket caused it to fall off depositting the contents all over the floor, generally when it was dark. You've done a superb job, even on the NI gloves as you've got the knuckle pads the right shape and size. Top work mate!
joegrafton

Joined: October 04, 2009
KitMaker: 1,209 posts
Armorama: 1,143 posts

Posted: Monday, April 20, 2015 - 01:30 PM UTC
Karl, thanks for your kind words!
I'm still not totally convinced about the final paint job on the DPM but, like I said, I tried & tried to get it right but I was throwing my teddies at the wall in the end! I think it would have driven me to the point of madness if I had to start again...& again...& again...
You get my meaning!
Joe.
joegrafton

Joined: October 04, 2009
KitMaker: 1,209 posts
Armorama: 1,143 posts

Posted: Monday, April 20, 2015 - 02:32 PM UTC
Finally, the last step to get this vehicle finished!
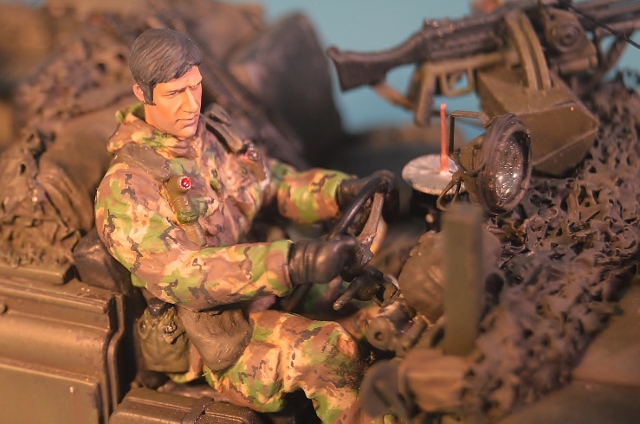
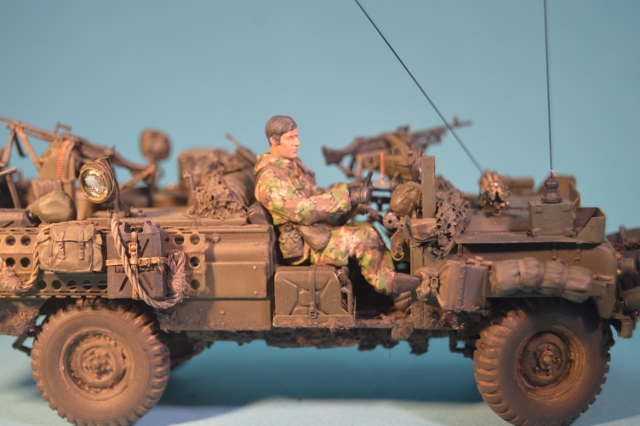
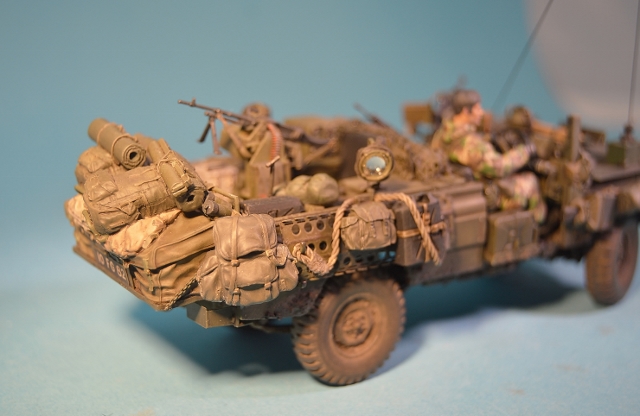
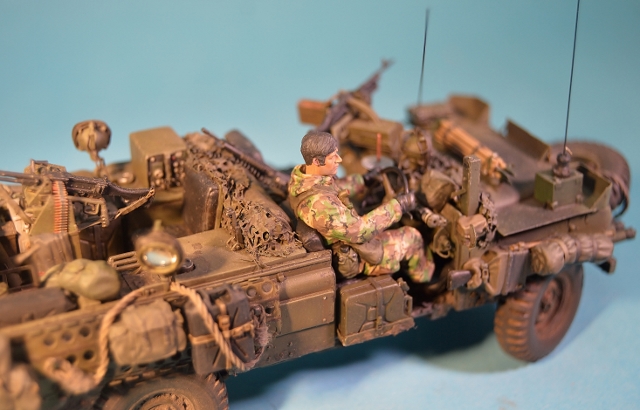
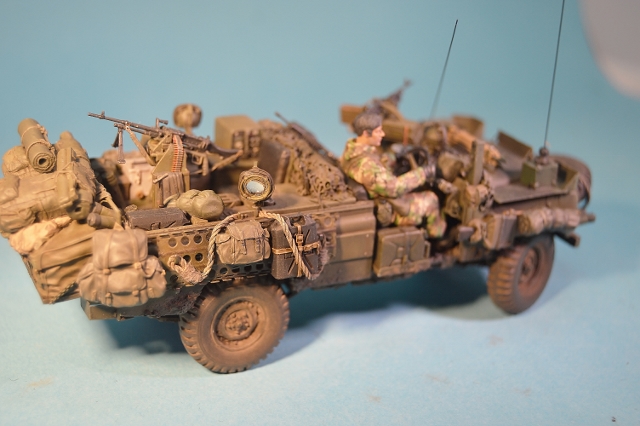
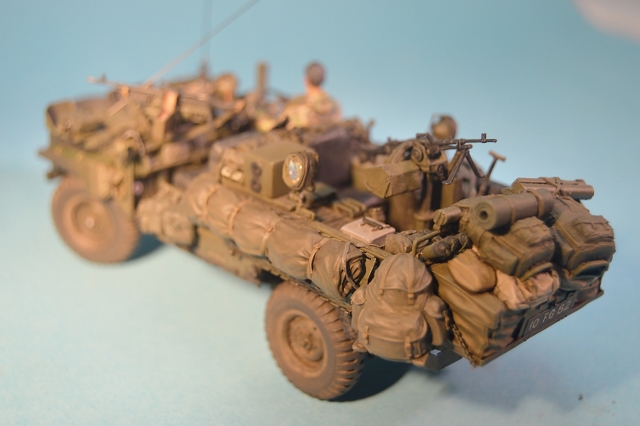
I added the drivers head (which, incidentally, is not glued in place yet as the vehicle will be slanted sideways & slightly upwards in its final resting place on the base & I don't want the driver staring off unrealistically into space), then the rest of the vehicles equipment including spotlights, sun compass, phone mic for the VCR-351, GPMG's front & rear & lastly, the two aerials.
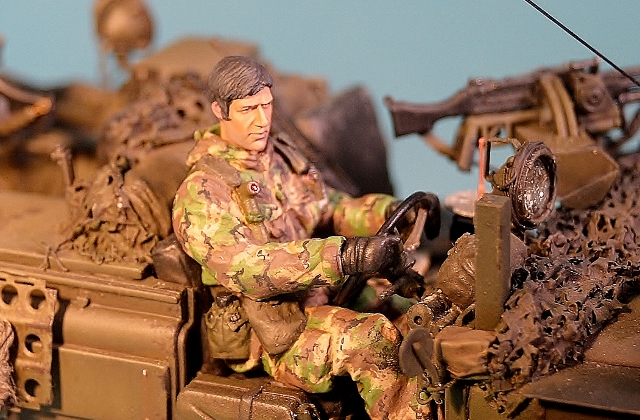
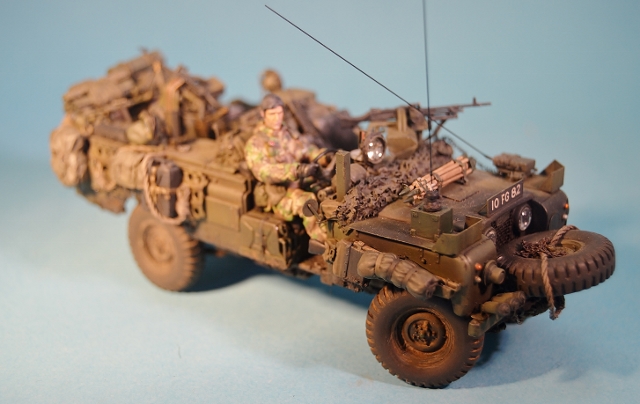
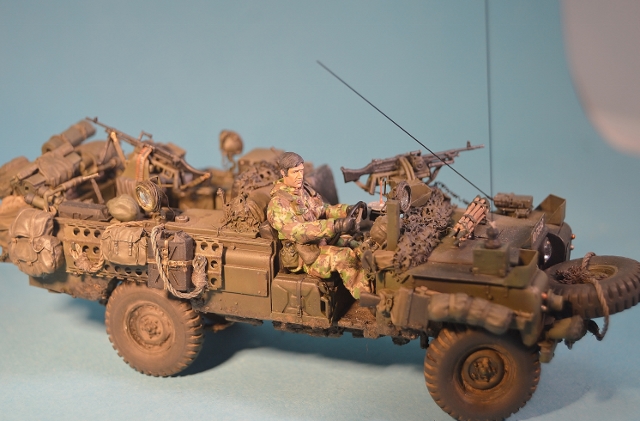
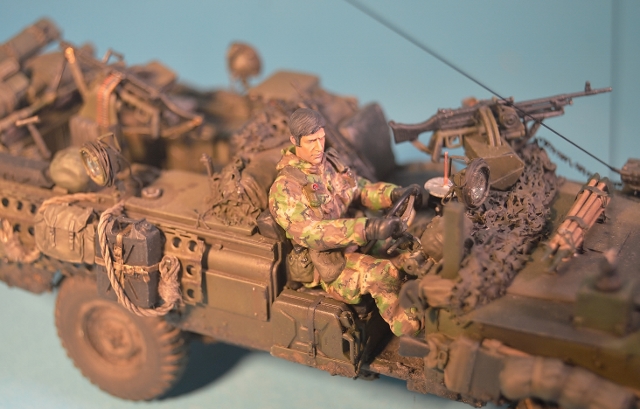
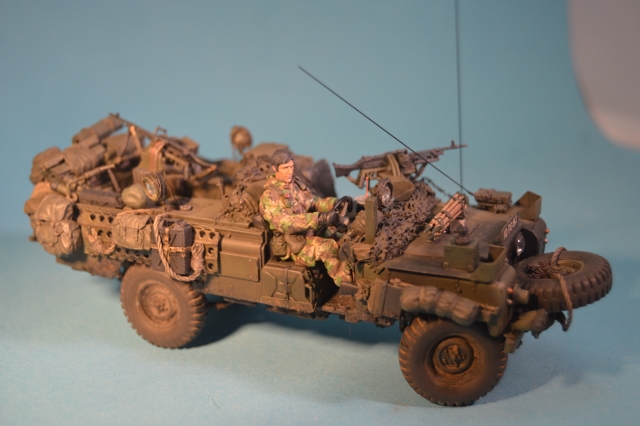
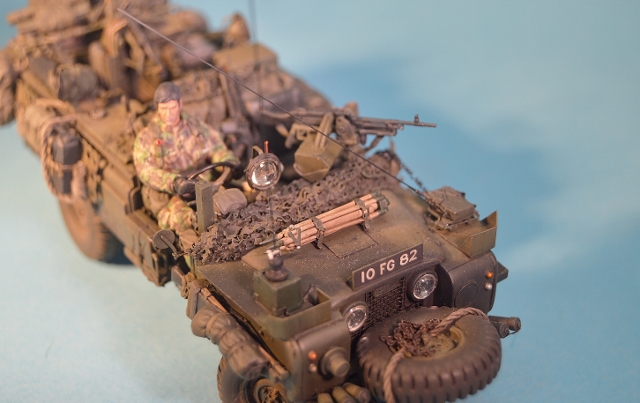
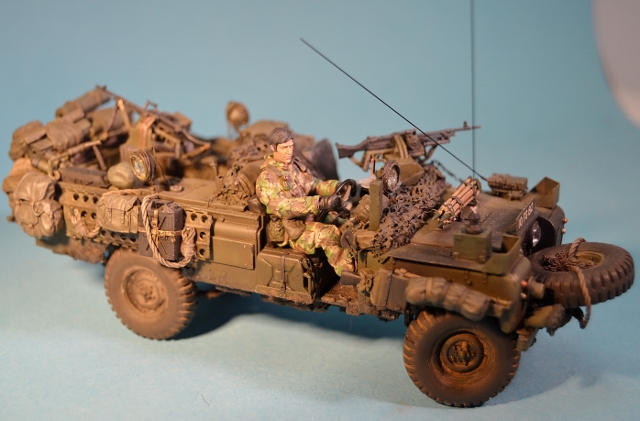
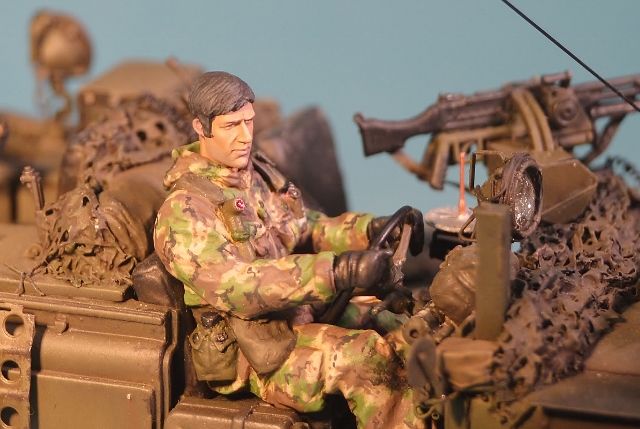
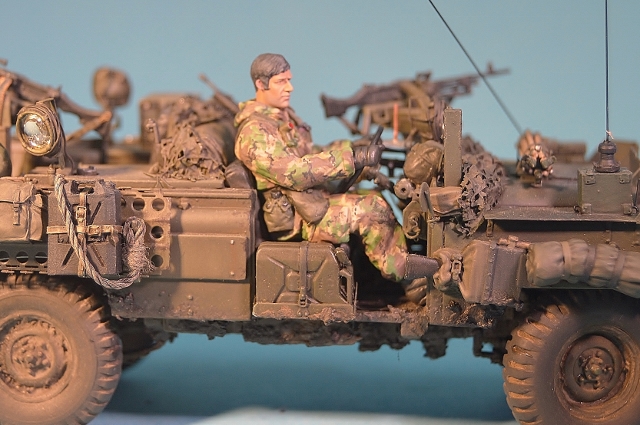
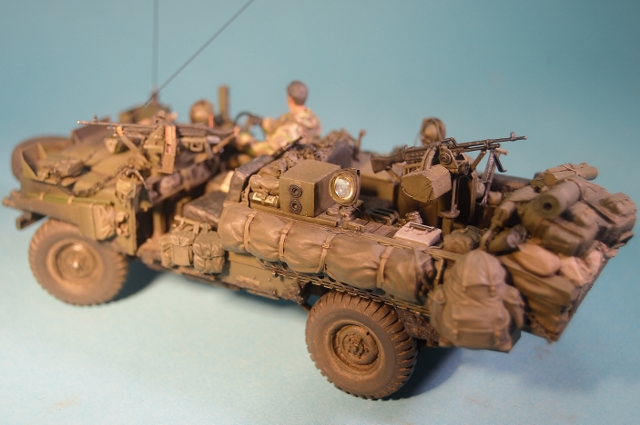
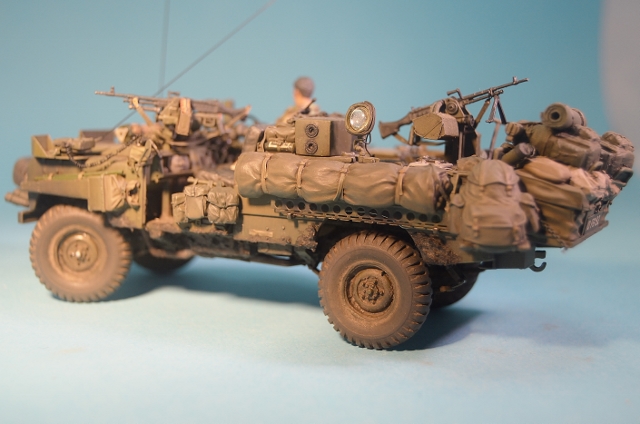
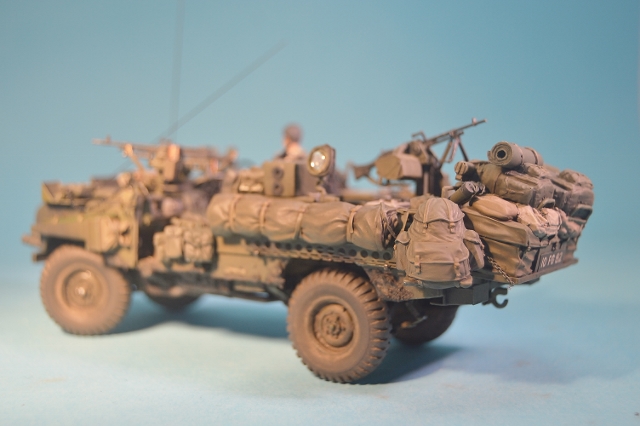
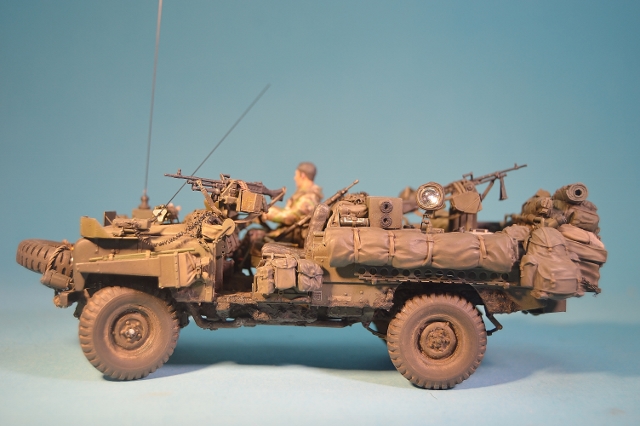
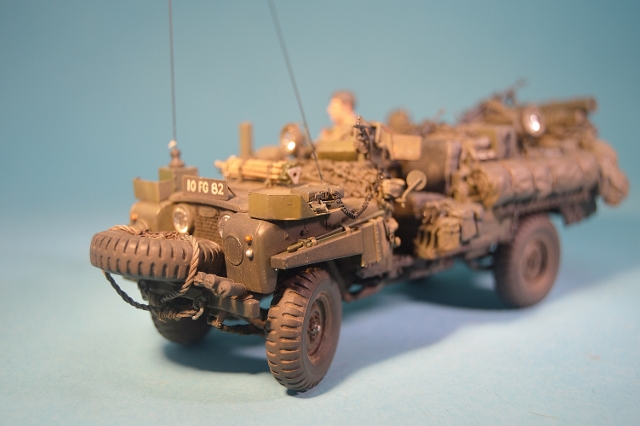
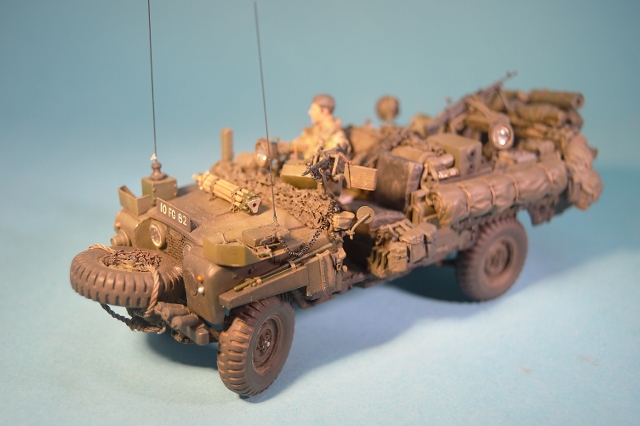
More to follow...

I added the drivers head (which, incidentally, is not glued in place yet as the vehicle will be slanted sideways & slightly upwards in its final resting place on the base & I don't want the driver staring off unrealistically into space), then the rest of the vehicles equipment including spotlights, sun compass, phone mic for the VCR-351, GPMG's front & rear & lastly, the two aerials.


More to follow...

joegrafton

Joined: October 04, 2009
KitMaker: 1,209 posts
Armorama: 1,143 posts

Posted: Monday, April 20, 2015 - 02:44 PM UTC
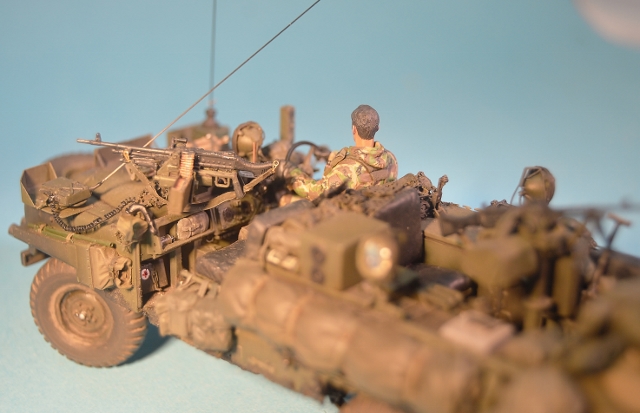
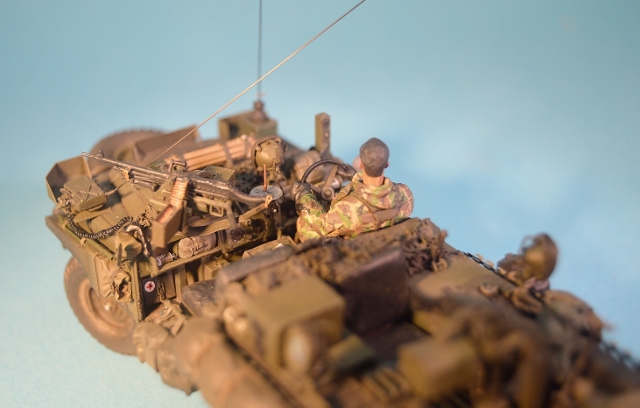
A few more photos:
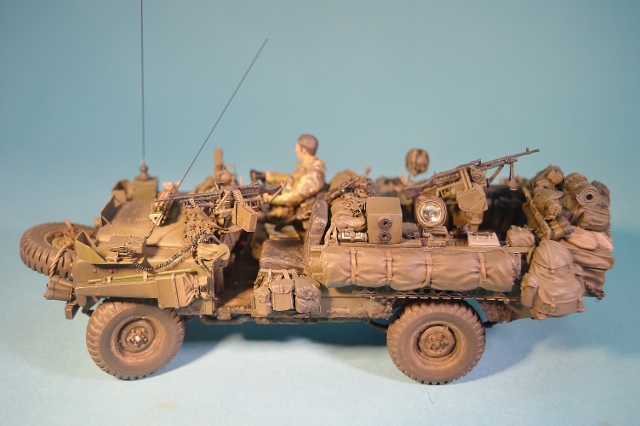
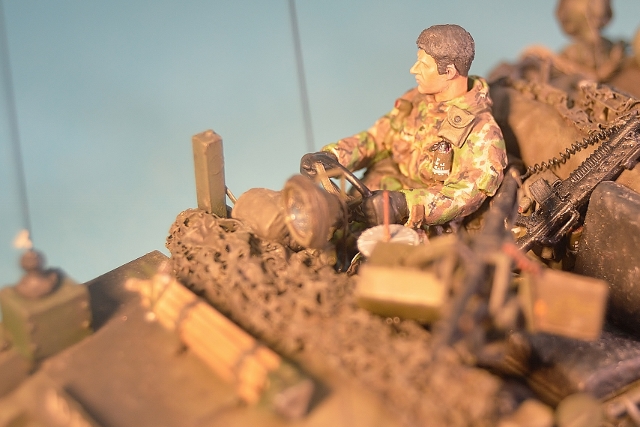
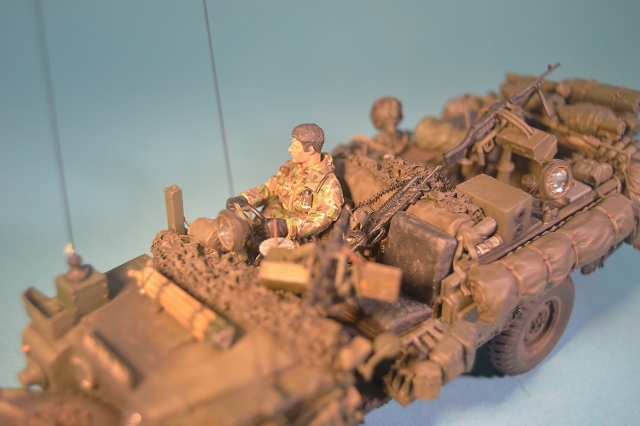
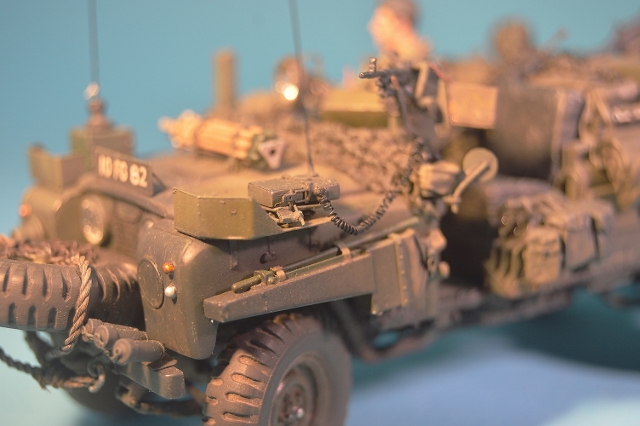
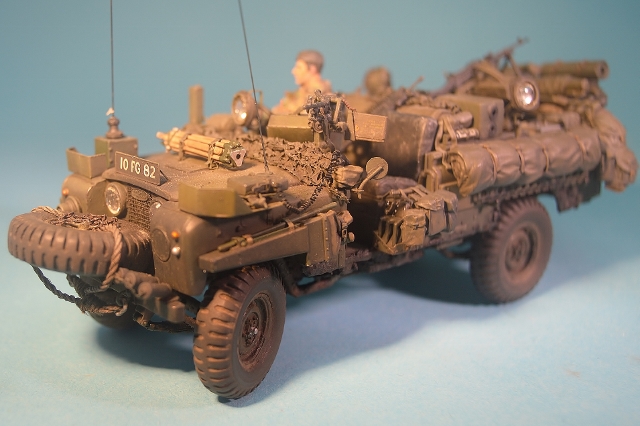
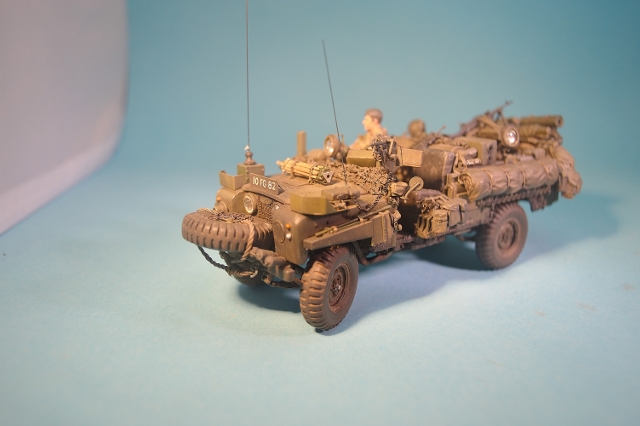
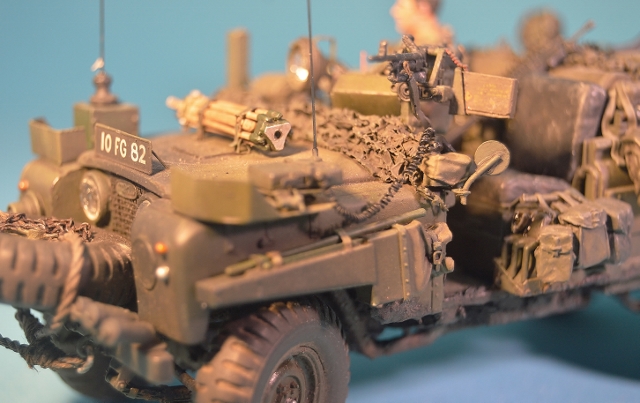
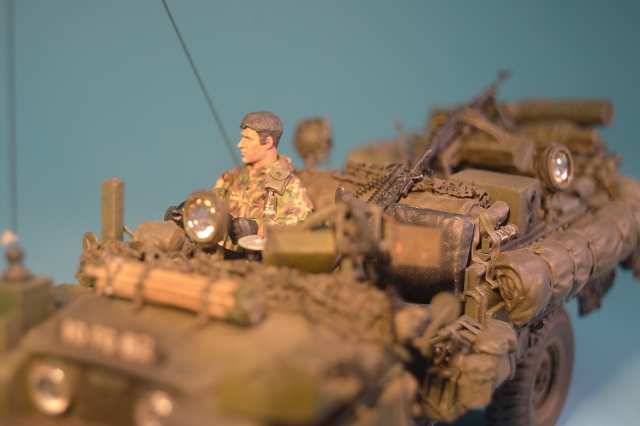
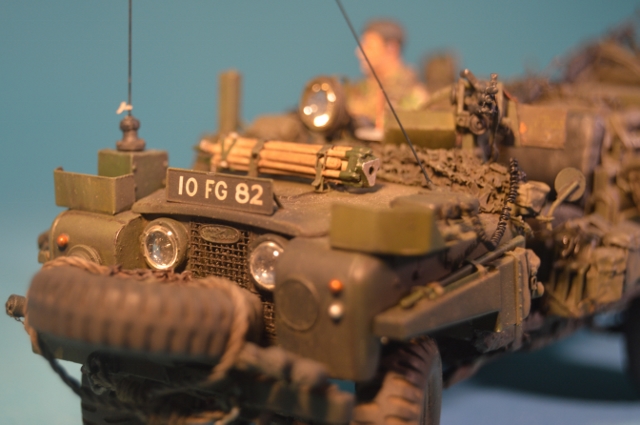
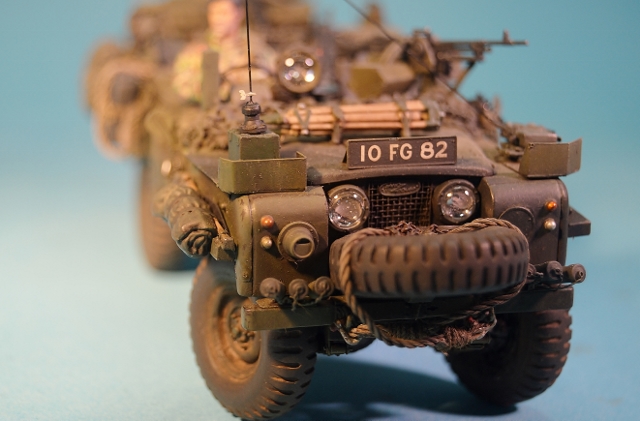
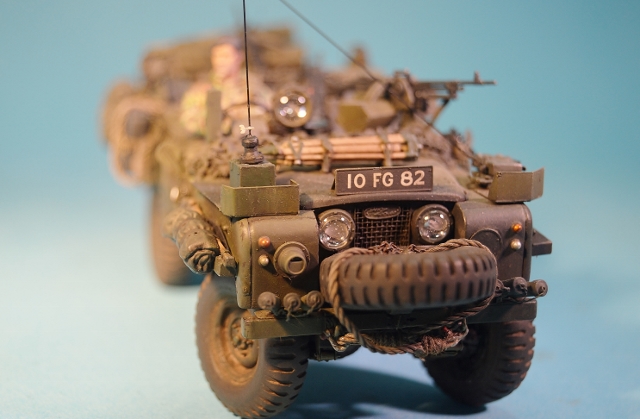
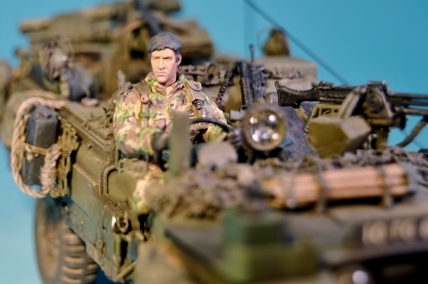
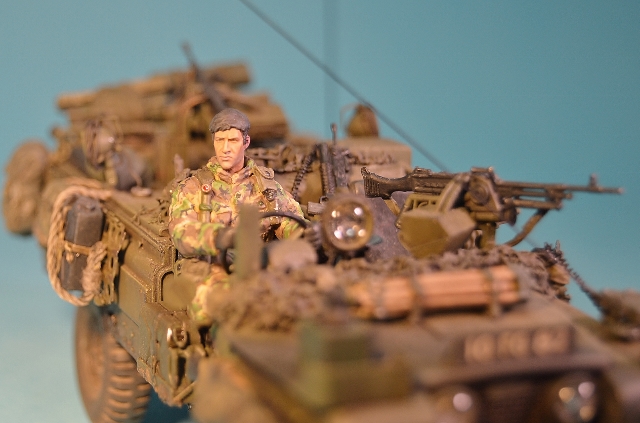
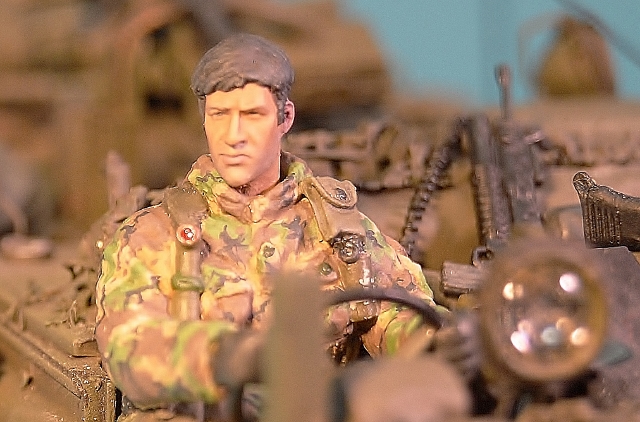
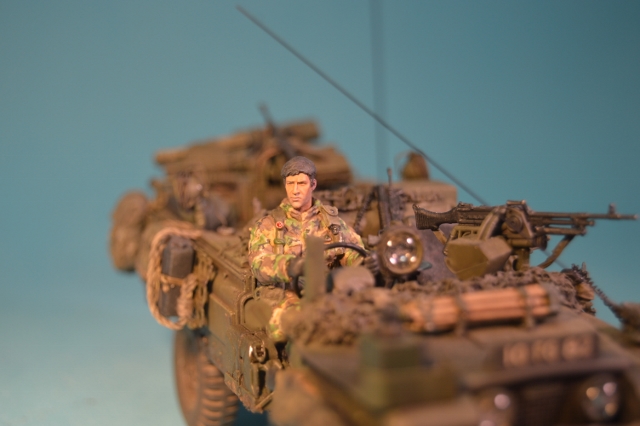
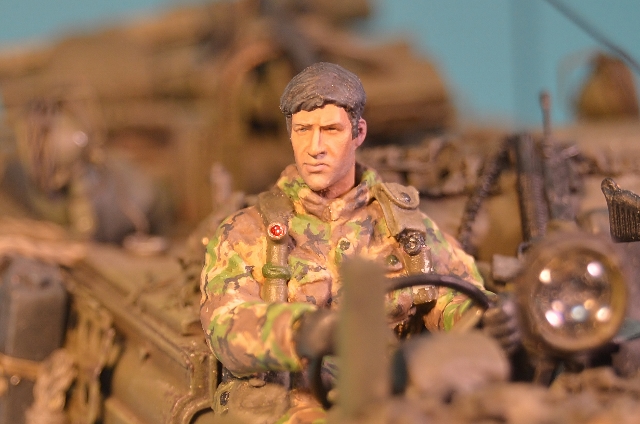
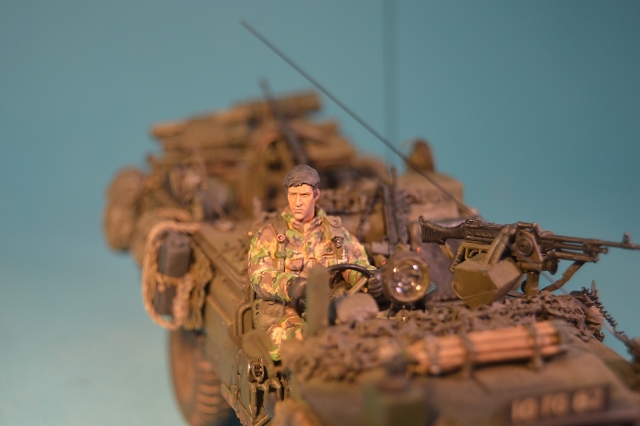
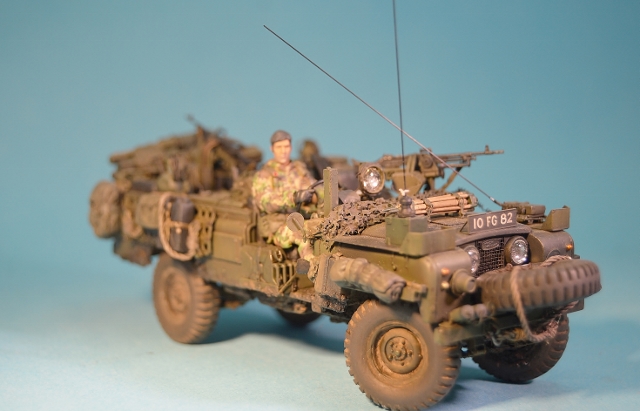
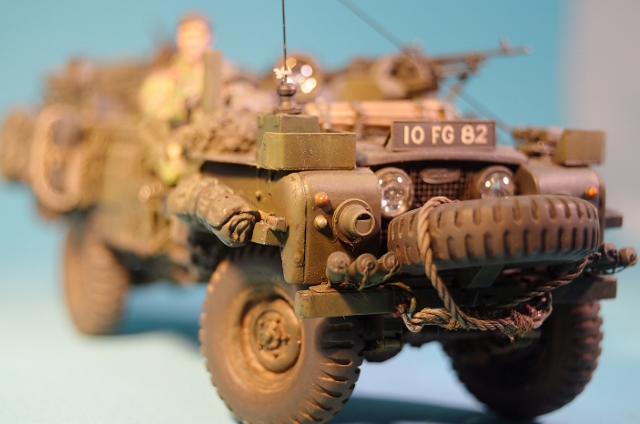
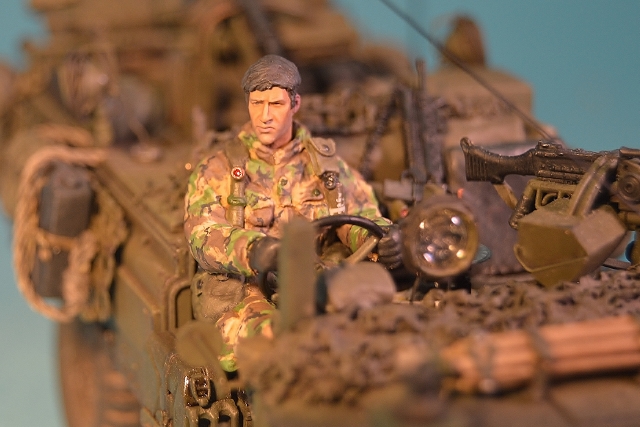
Firstly, I apologise for some of the image quality.
I hope you like the completed vehicle.
Any comments/criticisms would be most welcome.
Next step is the base!
Joe.


Firstly, I apologise for some of the image quality.
I hope you like the completed vehicle.
Any comments/criticisms would be most welcome.
Next step is the base!
Joe.
Keef1648

Joined: January 23, 2008
KitMaker: 1,240 posts
Armorama: 1,192 posts

Posted: Monday, April 20, 2015 - 04:26 PM UTC
Excellent job Joe, my hat is off to you Sir.
Keith.
Keith.

joegrafton

Joined: October 04, 2009
KitMaker: 1,209 posts
Armorama: 1,143 posts

Posted: Friday, June 12, 2015 - 05:56 PM UTC
Thank you for your kind comment, Keith.
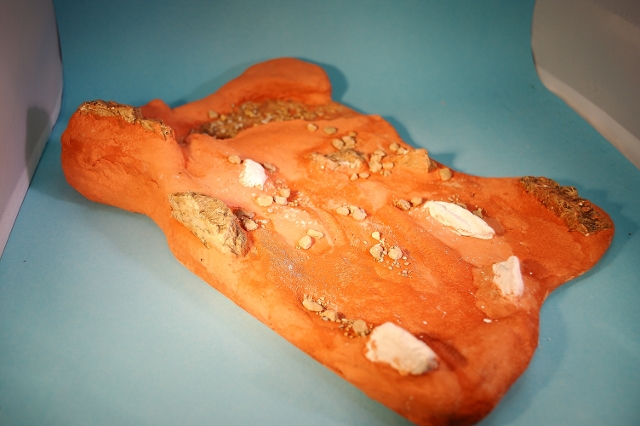
Work so far on the base:
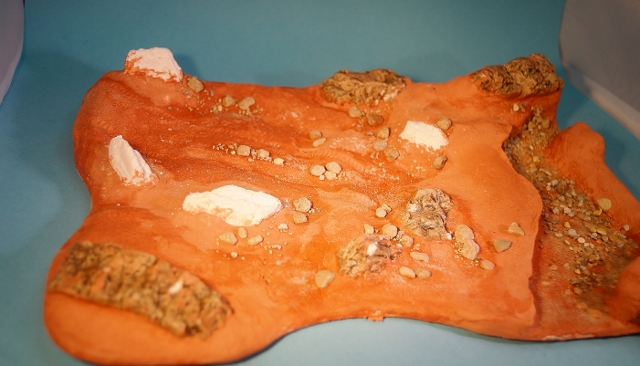
Above is the view from the front.
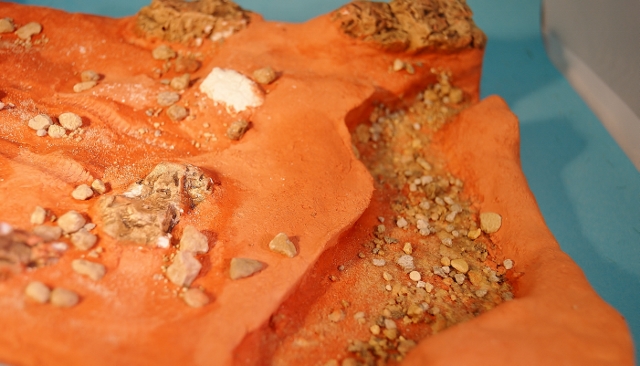
The base is built up with cork tiles of several thicknesses overlaid with DAS modelling clay.
The large 'rocks' are made from moulds & the smaller pieces are talus of varying sizes.
To the right of the scene is a stream bed.
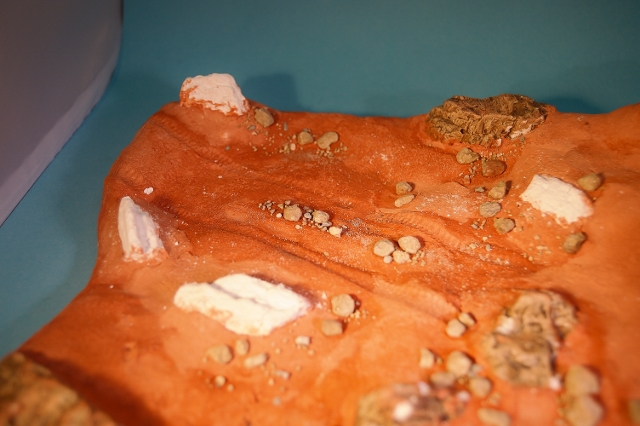
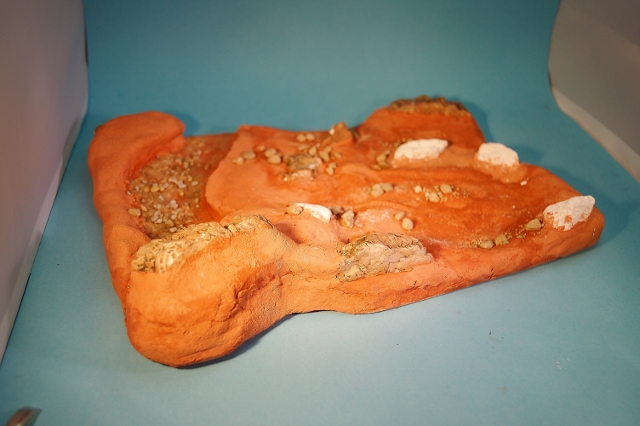
Above picture is a view from the rear.
Work so far on the base:

Above is the view from the front.
The base is built up with cork tiles of several thicknesses overlaid with DAS modelling clay.
The large 'rocks' are made from moulds & the smaller pieces are talus of varying sizes.
To the right of the scene is a stream bed.


Above picture is a view from the rear.
Dannyd

Joined: March 27, 2007
KitMaker: 803 posts
Armorama: 793 posts

Posted: Monday, October 12, 2015 - 03:14 PM UTC
So Joe, its been a while mate, any updates on this super build?
Regards
Dan
Regards
Dan
callmehobbes

Joined: April 17, 2005
KitMaker: 751 posts
Armorama: 740 posts

Posted: Monday, October 12, 2015 - 10:06 PM UTC
One of my favourite builds, let's hope there's some more to come.
mvaiano

Joined: January 24, 2012
KitMaker: 1,054 posts
Armorama: 1,050 posts

Posted: Tuesday, October 13, 2015 - 12:50 AM UTC
Fantastic work Joe!
Cheers!
Marco
Cheers!
Marco
 |


