_GOTOBOTTOM
Constructive Feedback
For in-progress or completed build photos. Give and get contructive feedback!
Dragon KingTiger with Zimm
fireontheway
Visit this Community
Pennsylvania, United States
Joined: May 17, 2006
KitMaker: 370 posts
Armorama: 368 posts
Posted: Wednesday, January 01, 2014 - 09:00 AM UTC
After posting my "Frustrated" forum I decided one way to complete this build is to start a build log. It motivates me to finish and keep you guys updated with my progress. So here we go. I have built the lower hull with roadwheels/tracks/paint and some weathering. This is where I am at, with the upper hull and turret both in work and just placed on the lower hull.

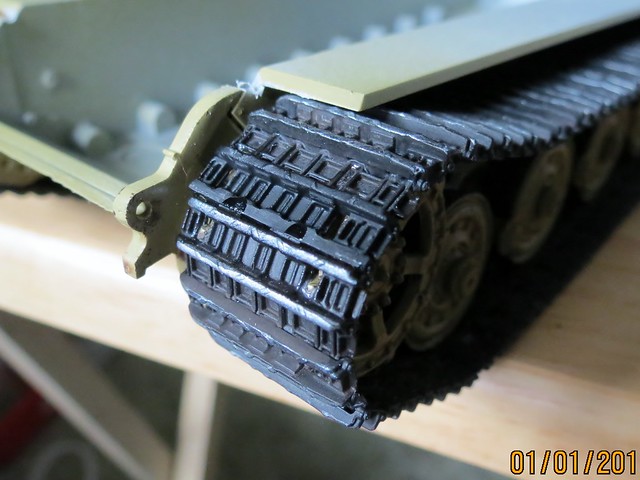
I am not comfortable building the lower hull with tracks assembling then painting, just not my cup of tea. So I semi built then painted then assembled. Started weathering and the thats when I had my first issues with the magictracks coming apart upon installation.


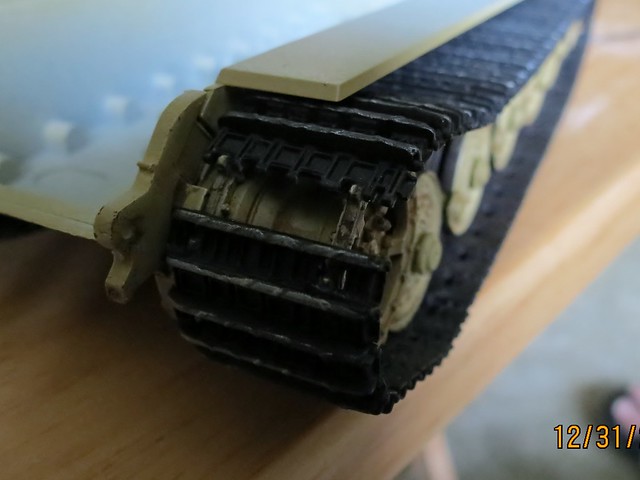
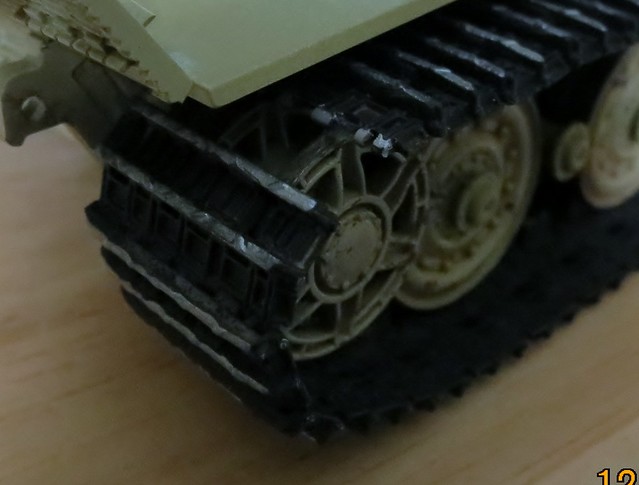
So I had to custom cut/sand pieces of track to fit.


Once this was done I started fitting the upper hull to the lower hull and found I had fit issues. Somewhere something was not allowing the hull sections to meet perfectly.

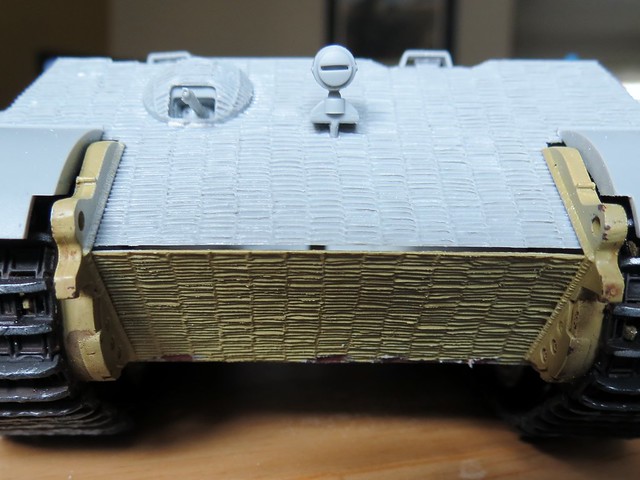
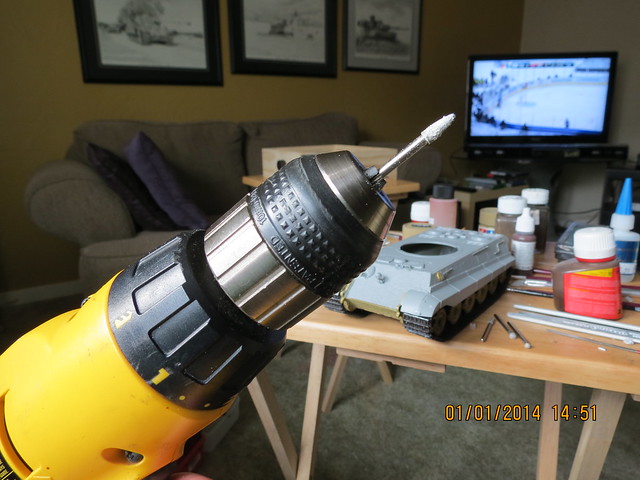
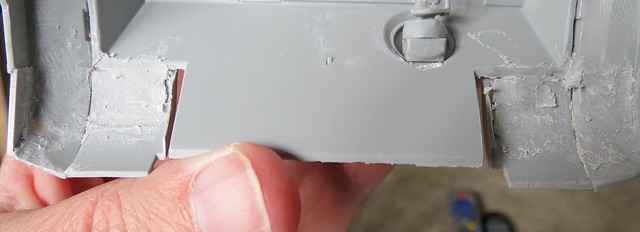
So I traced it to the front fenders and tracks. Sorry for the poor images here but there are tabs that are attached to the upper hull that the front fenders get attached to. A lot of material is present here and all of the fenders are very thick also. So I started sanding with my Dremel and when things got tough my DeWalt.


This is where I am at now.

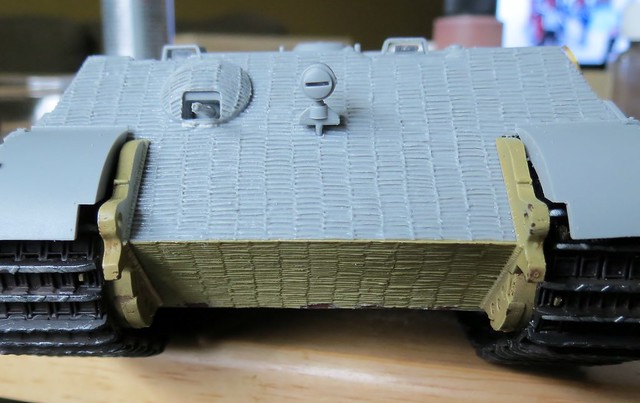
I will still have to fill in at the top of the 2 painted pieces that the tow hooks are a part of. At the other end I did not pay attention to detail and glued the engine deck slightly lower on 1 side than the other. This I will sand.

But all in all I am off and running. I will bravely paint the upper hull attached and just have to mask off the lower hull and tracks. Happy New Year everyone, this is my resolution, to complete my builds.
AFVFan
Visit this Community
North Carolina, United States
Joined: May 17, 2012
KitMaker: 1,980 posts
Armorama: 1,571 posts
Posted: Wednesday, January 01, 2014 - 09:09 AM UTC
Timothy, you're pictures aren't showing up. You may want to fix that.
fireontheway
Visit this Community
Pennsylvania, United States
Joined: May 17, 2006
KitMaker: 370 posts
Armorama: 368 posts
Posted: Wednesday, January 01, 2014 - 09:17 AM UTC
Sorry brain fart, fixed.
fireontheway
Visit this Community
Pennsylvania, United States
Joined: May 17, 2006
KitMaker: 370 posts
Armorama: 368 posts
Posted: Monday, January 06, 2014 - 11:04 AM UTC
OK, just a quick update. these are the figures I am going to add. I have been wanting to do this for quite awhile so here goes. Figures are not my specialty but I will do my best.

Tiger_213
Visit this Community
California, United States
Joined: August 10, 2012
KitMaker: 1,510 posts
Armorama: 1,443 posts
Posted: Monday, January 06, 2014 - 11:51 AM UTC
Keep going Timothy. Your running into the same problems that everyone has. The front hull plate and glacies don't always want to align, and magic tracks are only magic in how frustrating they can be at times. A nice choice in figures, they should look good sitting on the rear deck of your Tiger once it's finished.
fireontheway
Visit this Community
Pennsylvania, United States
Joined: May 17, 2006
KitMaker: 370 posts
Armorama: 368 posts
Posted: Monday, January 06, 2014 - 12:34 PM UTC
Thanks Chris I will need a lot of encouragement to stay on top of this one. But if I stay true to my commitment this should turn out ok, not Euromilitaire worthy but ok for my talents and abilities
tankglasgow
Visit this Community
Scotland, United Kingdom
Joined: October 04, 2010
KitMaker: 275 posts
Armorama: 260 posts
Posted: Monday, January 06, 2014 - 12:38 PM UTC
Yeah keep going with it, I had a similar experience with a cyberhobby/dragon firefly, a real SOB, and started a post out of sheer frustration with it. Peoples reply's kind of spurred me on to finnish it (didn't want to admit defeat in public!) Anyway it turned out well in the end so battle on, you should get encouragement here.
panzerbob01
Visit this Community
Louisiana, United States
Joined: March 06, 2010
KitMaker: 3,128 posts
Armorama: 2,959 posts
Posted: Monday, January 06, 2014 - 01:47 PM UTC
Tim K.;

Hi! Sounds like you had a time of it with those Magic Tracks...

From what I can see in your pics - perhaps you set off down a bad path? Maybe you pre-painted the loose links and then tried to assemble these onto the panzer using styrene cement? Looks like a painted join-surface, to me.

IF this is what happened... Sorry to say, but NO "MAGIC" there! I can feel your frustration! Did that myself...

As a rule-of-thumb, pre-painting styrene track links before you assemble them into runs is a "no-no" - generally, the paint prevents any typical styrene cement from dissolving the plastic and creating bonds - much the same as trying to cement a pre-painted tool onto a painted styrene fender...

IF, however, you assemble the naked links into track runs on your bench, lightly cement the link joints using your fav styrene cement, let that cement settle and dry off a bit, and then mount that pliable-but-stiffening run around the wheels... you can set sag into it and let that run fully dry in place and have a nicely-formed hard track-run, which can then be popped off and painted separately and then re-mounted onto the panzer. And the MAGIC of "MagicTracks" will emerge! You will get pretty-easy-to-do super-nice-looking tracks!

IF you do want to pre-paint styrene links before assembly... use CA to link them into runs on the panzer. By me, a route fraught with some risk that things may get stuck together in the wrong way, but at least you can successfully join painted surfaces.

Hope you give Magics another try following a different approach than you may have done. I think you'll find them rewarding if done "right"

Otherwise, looks like you are whipping this bad boy into shape. It WILL look cool when all done!

Cheers!

Bob
fireontheway
Visit this Community
Pennsylvania, United States
Joined: May 17, 2006
KitMaker: 370 posts
Armorama: 368 posts
Posted: Monday, January 06, 2014 - 01:55 PM UTC
Paul, Bob thank you for the encouragement I appreciate it. Bob I did assemble the tracks b4 painting. Building a section at a time and forming them over the wheels. Everything during that period fit ok. I then painted everything and only then went to assemble them with the wheels. Fitting the staggered wheels in unison with the track which is the only way I have found is where I ran into trouble. Each side broke one at the sprocket wheel and the other at the idler. It would seem as if things shrunk. So I had to take a link and a half and paint them and then insert them. thats why u see the glue. Thankfully all of this is hidden under the fenders.
fireontheway
Visit this Community
Pennsylvania, United States
Joined: May 17, 2006
KitMaker: 370 posts
Armorama: 368 posts
Posted: Friday, January 10, 2014 - 01:19 PM UTC
Today the first 4 figures are built minus helmets. The primer and the pictures also help me see the seams I still need to sand before painting begins tomorrow. Plus I need to get the back deck of the King done so I can start positioning these guys.


fireontheway
Visit this Community
Pennsylvania, United States
Joined: May 17, 2006
KitMaker: 370 posts
Armorama: 368 posts
Posted: Saturday, January 11, 2014 - 10:44 AM UTC
Today was working on the engine deck. Not bad, all the PE screens were easy to attach, the plastic lifting hooks were another story. Had one shoot off into who knows where from my tweezers.


Next was the figures. Applied 2 coats of Tamiya dark yellow as a base color for the camo. All 4 figures of this batch will receive the same camo smocks. These are not the best figures. Web gear details disappear on their backs, and I still have a cut in this guys chest I have to fill.
CMOT
Staff MemberEditor-in-Chief
ARMORAMA
Visit this Community
England - South West, United Kingdom
Joined: May 14, 2006
KitMaker: 10,954 posts
Armorama: 8,571 posts
Posted: Saturday, January 11, 2014 - 12:31 PM UTC
This is coming along nicely Tim. On the subject of the tracks what did you seal them with prior to (I am guessing) a spirit based weathering agent?

I see you have some seam lines to tackle on a few of those figures as well, bit they look quite good when completed and have nice poses.
fireontheway
Visit this Community
Pennsylvania, United States
Joined: May 17, 2006
KitMaker: 370 posts
Armorama: 368 posts
Posted: Saturday, January 11, 2014 - 12:52 PM UTC
Darren, I just dull coated them before applying rustall in several coats. Well right now I am searching for articles on how to paint the camo pattern on the smocks in 1/35 scale. I just applied a pattern but there should be a more realistic approach than my attempt. But I will show and tell as I move ahead this weekend.
fireontheway
Visit this Community
Pennsylvania, United States
Joined: May 17, 2006
KitMaker: 370 posts
Armorama: 368 posts
Posted: Sunday, January 12, 2014 - 09:21 AM UTC
Today I concentrated on just 1 figure. Remember i said figures are not my strength as if I had a strength in modelling. I am my worst critic, that I know of. I know the intent is to fool or trick the eye. They are 1/35th scale figures. But under my lens and magnifiers when I build/paint they are not good. I know a good coat of dullcoat will remove what looks like pollen on the smock, but the camo pattern, oh boy. I still have to finish the face and weather the mess kit and canteen cup, and paint the cigarette.


If my King turns out well and these guys look like doo doo, the whole thing will end up as doo doo
Thudius
Visit this Community
Uusimaa, Finland
Joined: October 22, 2012
KitMaker: 1,194 posts
Armorama: 1,077 posts
Posted: Sunday, January 12, 2014 - 09:53 AM UTC
Tim, no sense beating yourself up if things don't work out how you thought they would or should. We can be our own worst critics. Mistakes will be made when building kits. The trick is to learn from them and not to repeat them. Figures are a whole new world of fun and frustration with a bunch of different things to learn. Take your time, ask when you need to, and above all, have fun.

Kimmo
robw_uk
Visit this Community
England - North East, United Kingdom
Joined: June 22, 2010
KitMaker: 1,224 posts
Armorama: 1,207 posts
Posted: Sunday, January 12, 2014 - 10:01 AM UTC

Quoted Text

Tim, no sense beating yourself up if things don't work out how you thought they would or should. We can be our own worst critics. Mistakes will be made when building kits. The trick is to learn from them and not to repeat them. Figures are a whole new world of fun and frustration with a bunch of different things to learn. Take your time, ask when you need to, and above all, have fun.

Kimmo


i am in the same boat for figures. going to add the 1 to my stug iv to see if i get a half decent finish... will watch and learn from you first ;-)
fireontheway
Visit this Community
Pennsylvania, United States
Joined: May 17, 2006
KitMaker: 370 posts
Armorama: 368 posts
Posted: Sunday, January 12, 2014 - 10:11 AM UTC
Thanks Kimmo, I agree when the fun is gone its time to wrap it up. I just try to be a perfectionist. It wouldnt be so bad if all figures were 200mm
Boy Robert you are adding weight to my shoulders, I hope I can help you if its possible.
Tiger_213
Visit this Community
California, United States
Joined: August 10, 2012
KitMaker: 1,510 posts
Armorama: 1,443 posts
Posted: Sunday, January 12, 2014 - 10:46 AM UTC
The figure looks great Timothy, I think most modellers would be happy if they made figures that well; most can't.

Keep going with it.
fireontheway
Visit this Community
Pennsylvania, United States
Joined: May 17, 2006
KitMaker: 370 posts
Armorama: 368 posts
Posted: Sunday, January 12, 2014 - 10:55 AM UTC
Thanks Chris you have just given my ego a boost
thebear
Visit this Community
Quebec, Canada
Joined: November 15, 2002
KitMaker: 3,960 posts
Armorama: 3,579 posts
Posted: Sunday, January 12, 2014 - 12:05 PM UTC
Hi Tim ..Man you sure didn't give yourself an easy job choosing the paratroopers .. Just trying to get the rain marks will drive you nuts... I have a couple of pictures that might help ..


this is a winter coat but it's the same pattern...


You are a very brave man ...

Rick
Tiger_213
Visit this Community
California, United States
Joined: August 10, 2012
KitMaker: 1,510 posts
Armorama: 1,443 posts
Posted: Sunday, January 12, 2014 - 12:43 PM UTC
You couldn't possibly do the rainmarks in 1/35th. Same way you can't do Marine herring bone. Maybe if someone does decals you could get that detail in? Even then I think the marks would have to be much to vibrant to be noticable.
thebear
Visit this Community
Quebec, Canada
Joined: November 15, 2002
KitMaker: 3,960 posts
Armorama: 3,579 posts
Posted: Sunday, January 12, 2014 - 01:10 PM UTC
they do make decals..

http://www.sinsengumi.jp/sieikan/Goods.aspx?id=MCD021

Rick
fireontheway
Visit this Community
Pennsylvania, United States
Joined: May 17, 2006
KitMaker: 370 posts
Armorama: 368 posts
Posted: Sunday, January 12, 2014 - 01:54 PM UTC
Yes in my research on this the rainmarks wont be seen in 1/35th scale so I am not even attempting them. I appreciate you posting the pics Rick. I downloaded some images myself. Again its all about tricking the eye. So from the distance most people will view them I should be ok. I just have to get the pattern to look convincing. I had a great color photo book of German camo uniforms (actual uniforms in full 8 & 1/2 x 11) but I think I donated it to a library (idiot). Could use it now. So the next pattern may be a right angle style. I have 7 more to work on.
Tiger_213
Visit this Community
California, United States
Joined: August 10, 2012
KitMaker: 1,510 posts
Armorama: 1,443 posts
Posted: Sunday, January 12, 2014 - 02:32 PM UTC
David Miller's book Fighting Men of WWII: Axis Forces is a great reference book for uniforms and weapons. While there was no way in hell I would pay the 40$ MSRP for it I picked it up at Barnes and Noble for 12$. Very handy book indeed, it's bit wanting in some areas but throughout the German section there are plenty of detailed uniforms on mannequins and some clear black and white photos of the Wehrhmacht and SS throughout the war. I think there is even atleast one example of each SS pattern camoufluage
fireontheway
Visit this Community
Pennsylvania, United States
Joined: May 17, 2006
KitMaker: 370 posts
Armorama: 368 posts
Posted: Tuesday, January 14, 2014 - 01:16 PM UTC
OK let me start by saying.....I am completely embarrassed by the way this turned out. My digital camera makes him look like a clown who smeared blush over his face. Take my word for it looking through my soon to be 49 year old eyes even with glasses he looks normal at the normal distance one would look at him. Thats why I placed him on the tank and tried to shoot a pic from a lil further away. I understand now why newscasters hate broadcasting in HDTV. If he looked this bad to the naked eye at say 2-3 feet I wouldnt even think about attaching him to the engine deck. Hopefully I will improve on the other 7. Perhaps I should use oil paints for the face instead of the Andrea acrylics.


 _GOTOTOP